Raspberry Pis are getting more popular, and it’s no wonder. You can do so much with so little when you use a Raspberry Pi. These tiny computers that run on Linux are portable and affordable, often making them the perfect solution for your projects.
It’s a good idea to get a case for your Pi to shield it from its environment. You never know what can happen—you could spill a drink on your Pi or accidentally slide a paperclip into an open circuit causing damage to your sweet little wonder computer. While you can certainly purchase a case, anyone with a 3D printer can choose from a wide variety of case designs to print at home.
We’ll look at a sampling of the coolest case designs for Raspberry Pi 4, Raspberry Pi 3, Raspberry Pico, as well as some unusual custom case designs for specific circumstances and goals. All these 3D printed Raspberry Pi case designs are freely available on Thingiverse .
3D Printed Cases for the Raspberry Pi 4
The cases listed below work great for the Raspberry Pi 4 and its variants.
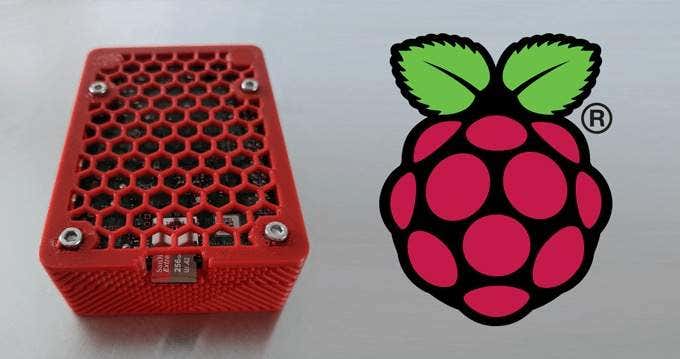
1.Raspberry Pi 4 Case
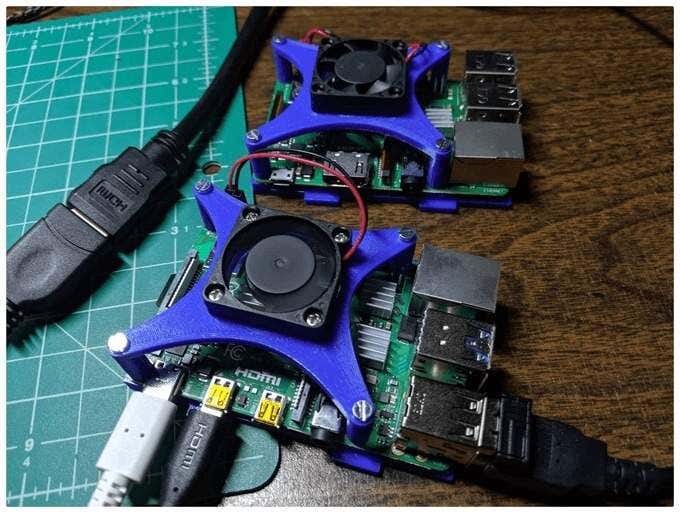
John Sinclair has designed a case for the Pi 4 that accommodates a 40mm fan. Sinclair says that the fan is designed to fit into the case’s lid without the need for glue or screws. Notably, it is printed with no top or bottom layers, which makes the infill visible and gives this case its distinctive hexagonal look.
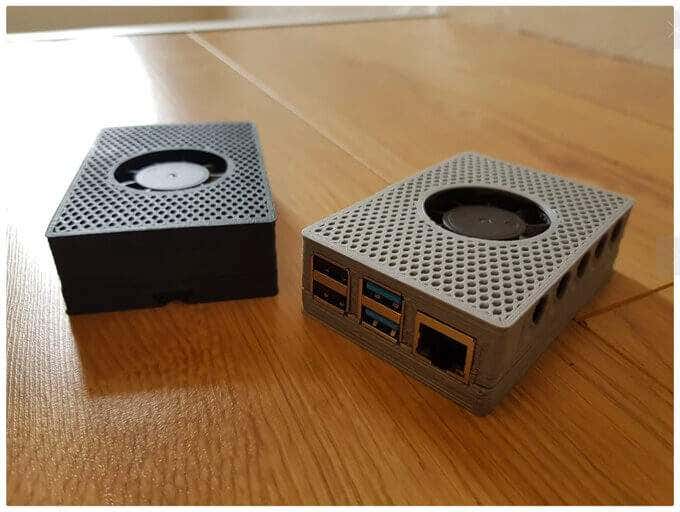
2.Raspberry Pi 4 Case, Active Cooled with Wall Mount
British engineer Tim Skillman came up with this well-ventilated case design that slides together without the need for glue or screws. The case itself comes in two parts, and the design also includes a single-piece wall mount.
The lid is customizable; the ports are labeled, and it’s easy to remove the Micro SD card, something that can be difficult to do with other case designs.
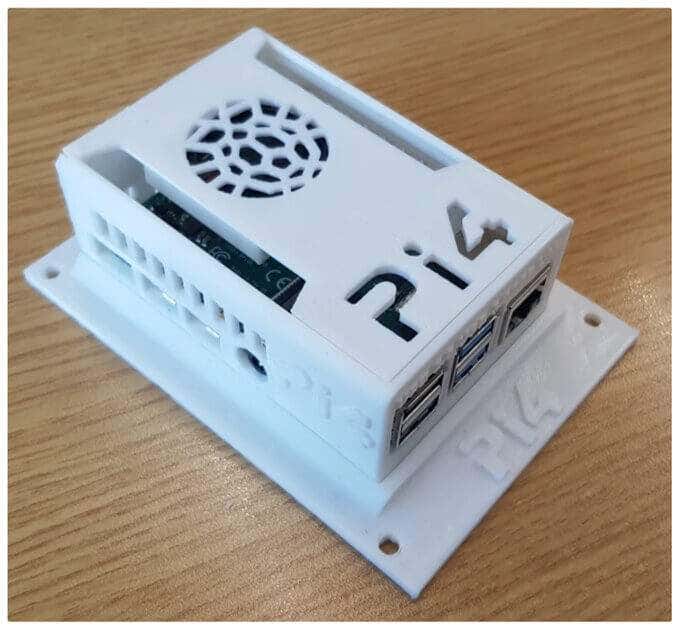
3.Raspberry Pi 4B Wind Tunnel Case

If you’ve added a hat to your Pi that covers the entire board, you’re going to want to get some airflow going so your Pi doesn’t overheat. This case is designed to cool the air between the board and hats that cover the entire board. Michael Kellsy’s design directs air through a duct from a fan mounted beneath the board.
3D Printed Cases for the Raspberry Pi 3
There’s no shortage of designs for 3D printed cases for the Raspberry Pi 3. Here are two that are designed to impress.
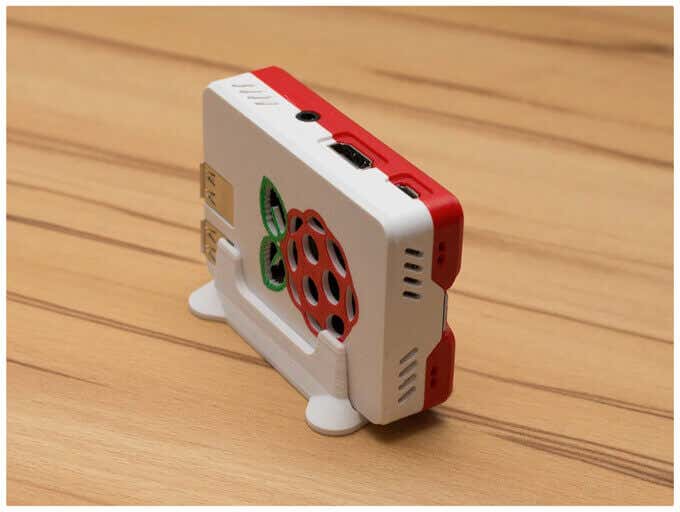
4.Raspberry Pi 3 (B/B+), Pi 2 B, and Pi 1 B+ Case with VESA Mounts and More
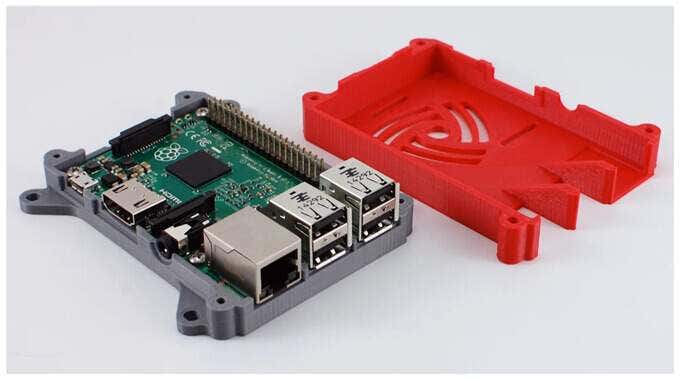
If you search for 3D printed Raspberry Pi cases on Thingiverse, this case is likely to appear at the top of the search results. Offered by user 0110-M-P on Thingiverse, this case design has been downloaded over 169,000 times and has over 288 remixes, which means that other designers have riffed on this original design.
It’s compatible with the Raspberry Pi 3 Model B+ and Model B as well as the Raspberry Pi 2 Models B and B+. It’s got an access slot for a Pi camera, built-in VESA mounting tabs, and a screw-together design that mounts the case to the Raspberry Pi. It’s licensed through a Creative Commons – Attribution – Share Alike license.
5.Malolo’s Screw-less/Snap Fit Customizable Raspberry Pi 3 model B+ Case & Stands
Maker Malolo has given us an easy-to-print case that doesn’t require any screws or glue. The snap-fit design is slim and compact, and it comes with three different kinds of stands: vertical, horizontal, and flat.
Even if you don’t have a multi-material printer, you can print a case with multiple colors by following his multi-color printing instructions. Be sure to click through the photos to get an idea of some different color combinations you could use.
3D Printed Cases for the Raspberry Pi Pico
The Raspberry Pi Pico is a tiny, fast microcontroller board that costs just four dollars. Amazing. It’s relatively new, so there aren’t many 3D case designs for it yet, but one of the case designs below should suit your needs.
6.Raspberry Pi Pico Case
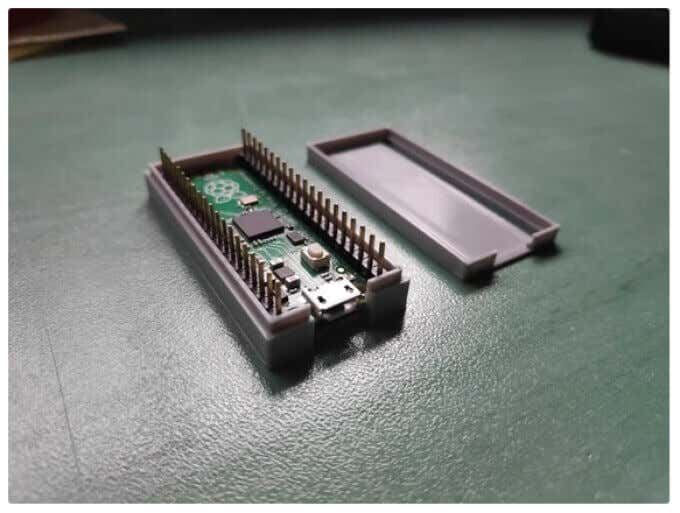
This customizable case design from David Becerro includes several setups. It’s printed in two parts, and both have versions with holes which you’ll need if you use a pin strip. Note that the holes for the required screws are not threaded, so get out your screwdriver.
7.Raspberry Pi Pico Lego Case
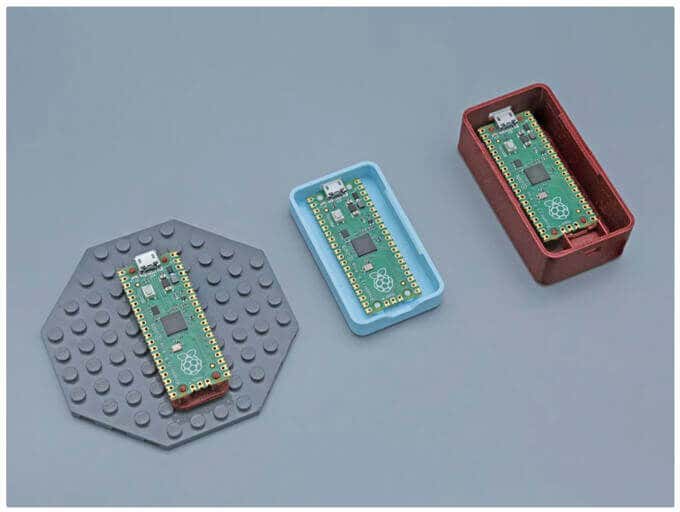
Adafruit Industries brings us a cute little Lego case for your Pi Pico. This design is compatible with LEGO. It has built-in standoffs, so your Pico will snap-fit right onto the base plate. The enclosure has space for two switches for buttons.
Specialty 3D Printed Raspberry Pi Cases
Part of the lure of 3D printing is that it’s fast and cheap to test out crazy ideas. Check out these unusual case designs for several different use cases.
8.Raspberry Pi Open “Case”
Are you the kind of person who likes to let it all hang out? If so, this is the case for you. The open design of this case by Tim Murphy allows you to position an external fan so it’s blowing directly on the heatsink. It’s a mashup of several other designs, taking the best from each and putting them all together in this innovative case design.
Murphy, who goes by knowledgecravings , calls himself a novice designer, but you wouldn’t know it.
Cat owners beware, however! The designer of this case warns, “One serious downside of an open case design is that a curious cat might decide that it’s fun to stop the fan with a claw and then bite it.”
9.Folding Raspberry Pi Case
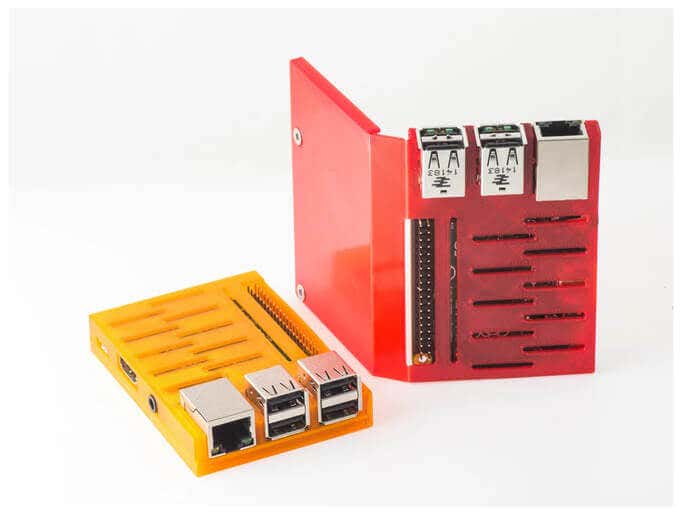
Designer Walter Hsiao brings us a folding Raspberry Pi case that prints flat and then wraps around your Pi. It’s available for The Pi 2 models B and B+ and the Pi 3 models B and B+. You’ll need two flathead screws to hold it all together.
10.RackPi Rack Shield
From Daniel Reinke, known as SliderBOR , we get the RackPi Raspberry Pi Rack Shield with OLED and Power Switch. This design features an OLED info screen with a button for rebooting and shutting down the Pi as well as an LED status light.
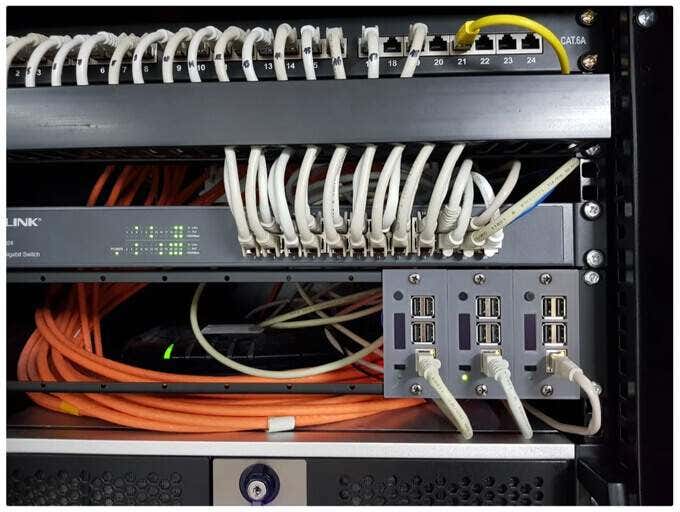
On the Raspberry Pi 4B and 3B+, the switch will turn the Pi completely off, but you’ll need some extra supplies to print this design. SliderBOR’s instructions take you through all the materials and steps to print and assemble the whole project.
- The Best Free AI Courses to Boost Your Skills
- 6 Best Procreate Alternatives for Windows PC
- 5 Best Podcast Apps for Windows
- Best 10 Free PDF Editors for Windows
- 5 Best Audiobook Players for Windows
Maggie Marystone is a freelance technology writer, human rights worker, and storyteller based in Chicago. Read Maggie’s Full Bio
Back in 2012, German software developer, maker, and excellent tour guide, Gina Häußge, got her first 3D printer . She subsequently wrote and released a free, open source 3D printer host controller application called OctoPrint which allows users to remotely control and monitor prints from a web browser.
“That’s nice,” you might say, “but what makes OctoPrint any different from all the other 3D printer host apps out there?” The thing that sets OctoPrint apart is its extremely versatile, pluggable framework.

The framework Häußge designed has attracted a community of developers who, in turn, continually extend OctoPrint’s features and functionality through plugins. There are currently 277 plugins in OctoPrint’s repository. Häußge says, “All in all 194 plugin authors have spent time and effort to bring you these plugins.”
Below, we’ll take a look at some of the best tools and toys for OctoPrint—plugins that will help you create better prints as well as a few that are just for fun. All these plugins can be installed for free via the OctoPrint interface.
Tools: Best Octoprint Plugins for Better Prints
Predictably, most plugins for OctoPrint are tools to help you make better prints . Installing and using the plugins below will help you improve your 3D printing game.
1.Bed Level Visualizer
To get good prints on your 3D printer, the first thing you need to do is make sure your printer’s bed is level. It’s a difficult, time-consuming process that uses up a lot of filament and can be very frustrating.
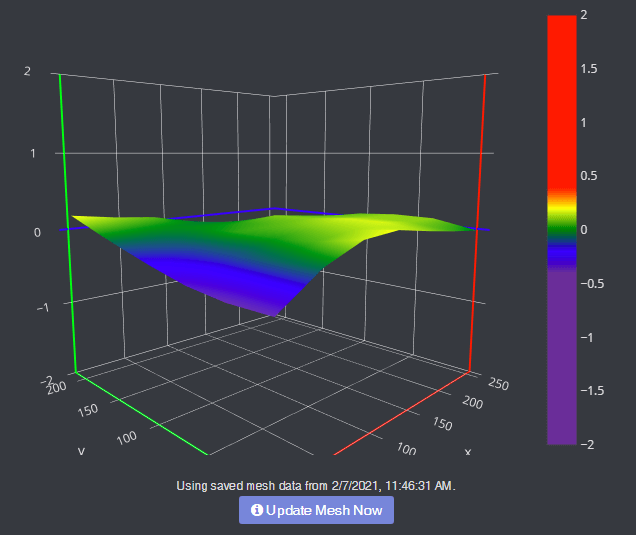
Bed Level Visualizer takes the guesswork out of that process by showing you a topographical map of your bed so you know which areas are high and which are low. If you want your bed to be perfectly level (hint: you do), this is the first OctoPrint plugin you should install. It requires that you have an auto-bed-leveling tool like BLTouch .
2.Enclosure
Putting your 3D printer inside an enclosure helps you control the printer’s environment, which leads to better quality prints. If you have an enclosure, install this plugin, and you’ll be able to control lights, switches, power, or any other sensor you can plug into your Raspberry Pi .
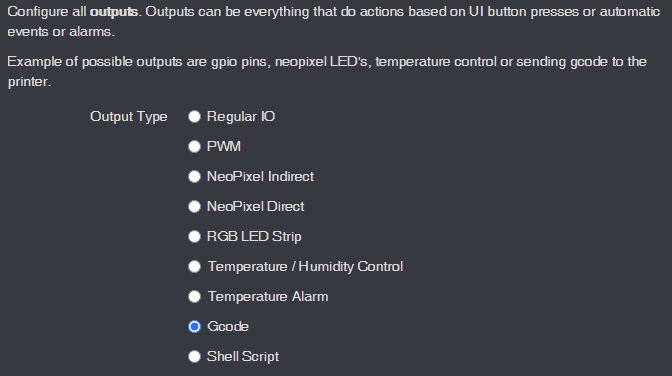
You can view temp sensors, filament run-out sensors, turn your LED lights on and off, or even change the color of your LED lights. This plugin is super-flexible and can control almost any aspect of your enclosure environment that you can imagine.
3. The Spaghetti Detective
When a print goes wrong, the result can look like a plateful of spaghetti. Moreover, if you’ve left your printer unattended, you won’t even know your print has failed until you check.
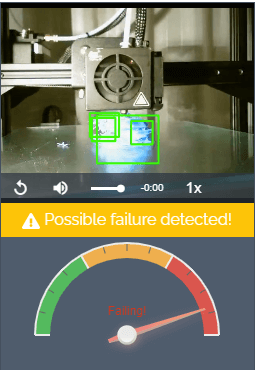
Enter The Spaghetti Detective, an OctoPrint plugin that puts AI deep learning to use by analyzing the images from your webcam for any indication that your print is failing. In other words, The Spaghetti Detective will detect failed prints and send you a message so you can react accordingly.
4.Pretty GCode
The Pretty GCode plugin is an excellent 3D model viewer. Click on your GCode file and watch it render before your eyes. Rotate, zoom in on, and detect problems with your GCode files before you print. Pretty GCode even renders arc commands.
5.Firmware Updater
All software should be updated regularly. Updating your printer’s firmware can be a pain, requiring you to download the update to an SD card and then installing it locally on your printer.
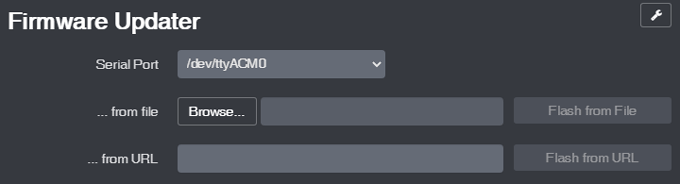
The Firmware Updater plugin allows you to flash your printer’s firmware from within OctoPrint. Just drop in the update file or URL, click a button, and soon your printer will be running the latest firmware.
6.Arc Welder*
Faulty power supplies, bad USB cables, slow serial connections, and slicer problems can all conspire to overwhelm your printer with GCode. If too many commands are sent or if your connection is slowed down, that can cause your printer to stall, and you’ll probably see evidence of every stall on your printed part. Entire forums are dedicated to solving this problem, and a lot of the advice involves recompiling firmware or other difficult operations that may or may not solve the problem.
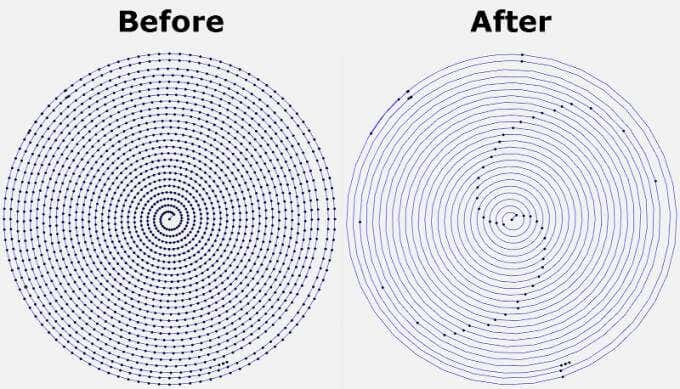
The Arc Welder plugin is perhaps the simplest fix. It reduces the number of GCodes sent to your printer— sometimes dramatically—by compressing some GCodes into arc commands. In many cases, installing Arc Welder will completely eliminate stuttering and stalling and improve your print times and quality. Not all firmware supports arc commands, but if yours does, this should be on your must-install list.
Toys: Best Octoprint Plugins for Fun
The plugins above will help you improve the quality of your 3D prints. The plugins listed below will help improve how you interact with OctoPrint and increase how much fun you have.
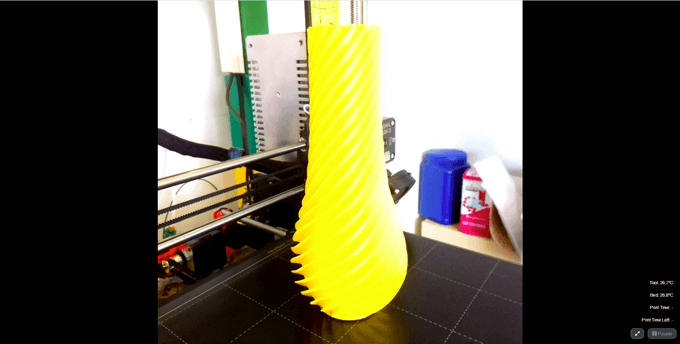
7.Octolapse*
Have you seen the videos ? A beautiful 3D print arises from the printer bed like magic. It’s not magic, though. It’s Octolapse. This OctoPrint plugin creates stabilized timelapse videos of your 3D prints. It does this by moving your printer’s extruder out of the way and your printer bed into optimal position before it takes each snapshot so you end up with a really smooth timelapse.
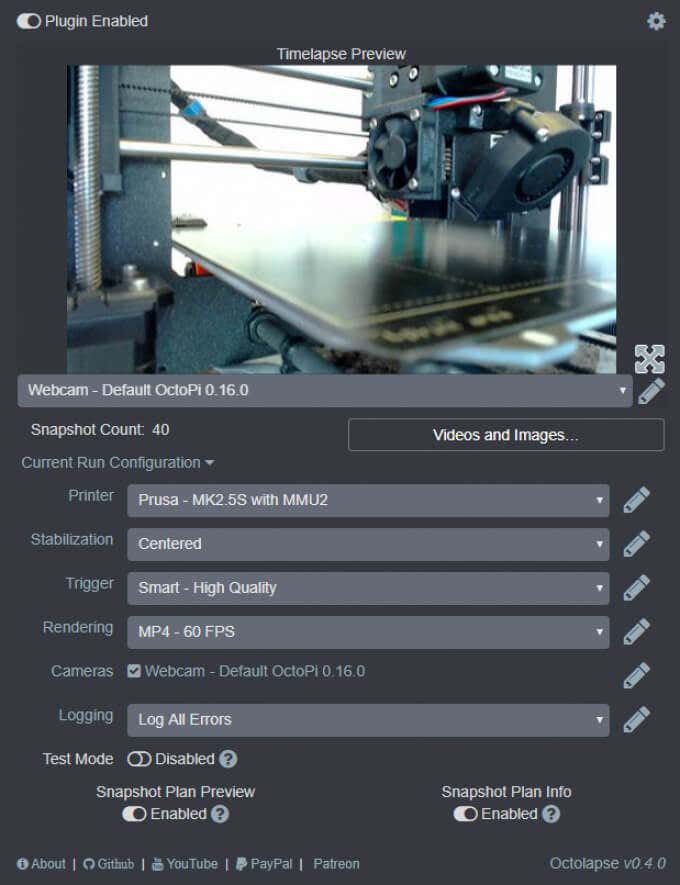
Put another way, you won’t see your printhead moving around in the timelapse, just your print growing from the printer bed. You can set specific triggers for snapshots such as at each layer change, at preset time or height increments, or when particular GCodes are sent to your printer.
8.Themeify
Given the option, many people will choose a dark theme for the apps and web pages they use most. The Themeify plugin allows you to apply themes to OctoPrint. Choose dark mode or from a variety of other pre-set themes. If you know CSS, you can customize virtually any element of the OctoPrint interface.

9.Fullscreen Webcam
Are you tired of watching your webcam in OctoPrint’s tiny control window? Maximize it with the Fullscreen Webcam plugin. It does exactly what you think it will do.
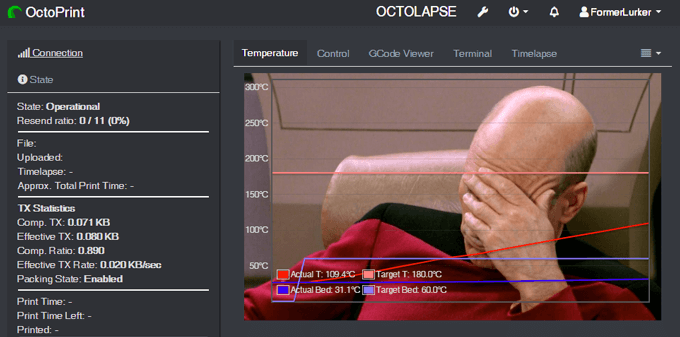
10.CustomBackground
Lastly, who doesn’t want a picture of Captain Picard on the background of their temperature output tab? Drop in any pic, and it’ll show up in the background. Fun!
*Full disclosure: The Arc Welder and OctoLapse plugins were created in the attic by my husband, FormerLurker .
- The Best Free AI Courses to Boost Your Skills
- 6 Best Procreate Alternatives for Windows PC
- 5 Best Podcast Apps for Windows
- Best 10 Free PDF Editors for Windows
- 5 Best Audiobook Players for Windows
Maggie Marystone is a freelance technology writer, human rights worker, and storyteller based in Chicago. Read Maggie’s Full Bio
