If you’re looking to create and print labels of any kind, look no further than Microsoft Word and Excel. You can store your label data in Excel and then fetch that data in Word to save or print your labels.
In this guide, you’ll learn how to create a label spreadsheet in Excel that’s compatible with Word, configure your labels, and save or print them.
1. Enter the Data for Your Labels in an Excel Spreadsheet
The first step is to create an Excel spreadsheet with your label data. You’ll assign an appropriate header to each data field so you can retrieve the headers in Word.
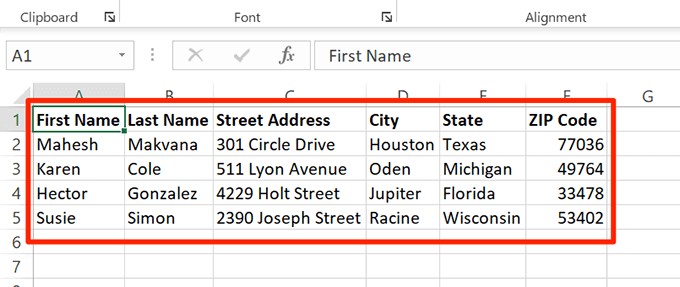
For the following example, we’ll create a spreadsheet with the following fields:
- First Name
- Last Name
- Street Address
- City
- State
- ZIP Code
To start creating your Excel spreadsheet:
- Launch Microsoft Excel on your Windows or Mac computer and create a new spreadsheet.
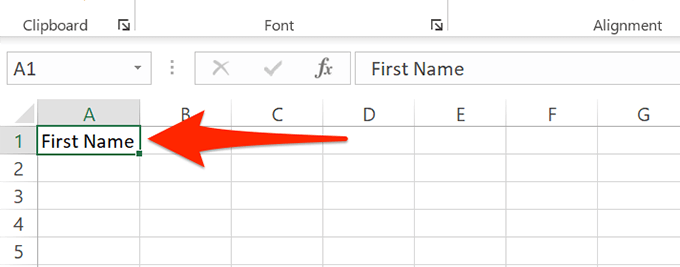
- On Excel’s spreadsheet screen, select the first cell in the first row and type First Name .
- Select the first cell in the B column and type Last Name . Similarly, add Street Address , City , State , and ZIP Code to the C , D , E , and F columns’ first rows, respectively.
- Now add the data beneath each header you just created. Your spreadsheet should look something like this:
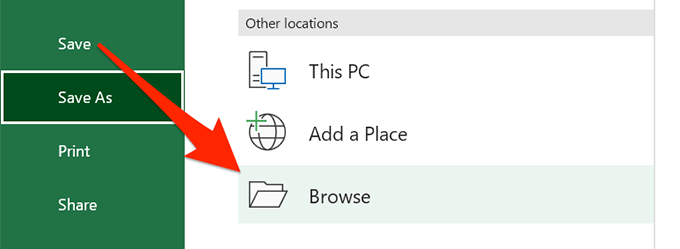
- When you’ve finished adding data, save your spreadsheet by selecting File at the top.
- Select Save in the left sidebar.
- Select Browse in the pane on the right.
- Choose a folder to save your spreadsheet in, enter a name for your spreadsheet in the File name field, and select Save at the bottom of the window.
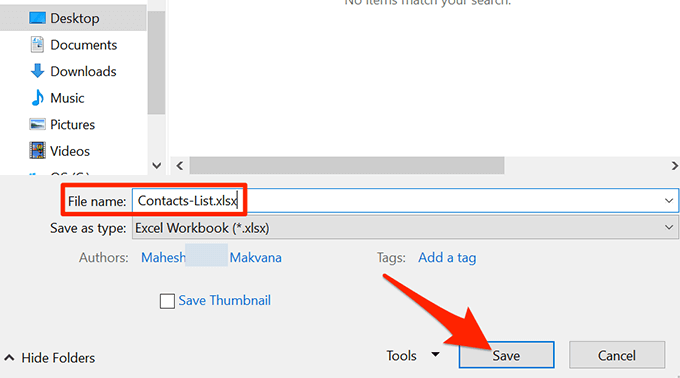
- Close the Excel window.
Your Excel spreadsheet is now ready.
2. Configure Labels in Word
The second step is to configure the dimensions of your labels in Word. There are several predefined label layouts that you can choose from. You can even create your own label with custom dimensions, if you want.
- Launch Microsoft Word on your Windows or Mac computer and start a new blank document.
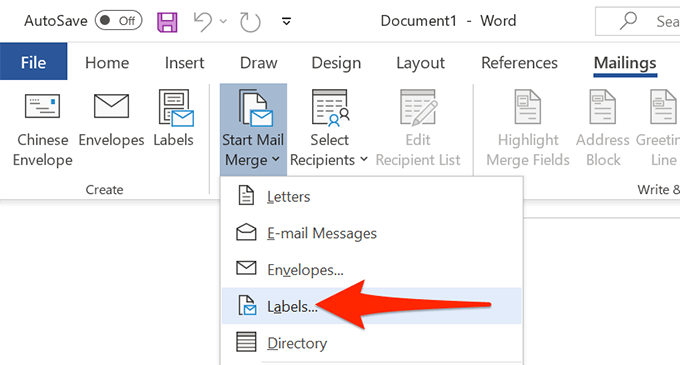
- On the document editing screen, select the Mailings tab from the top toolbar.
- In the Mailings tab, select Start Mail Merge and then choose Labels from the menu.
- In the window that opens, select a label vendor from the Label vendors dropdown menu. Then, select a label type from the Product number list, Finally, select OK .
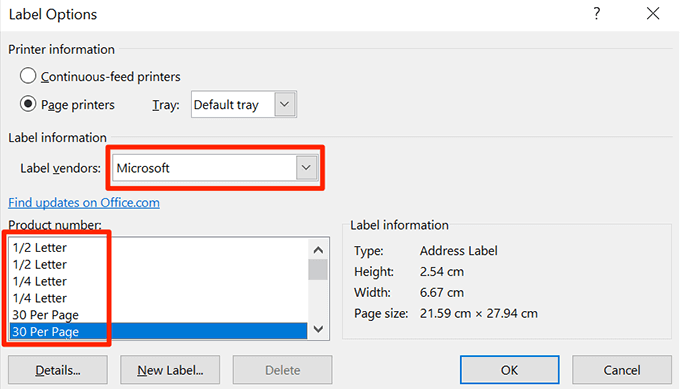
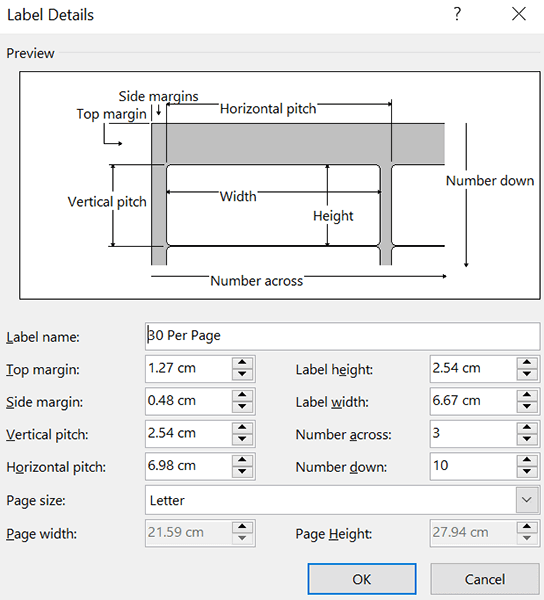
- If you’d like to create a custom label, select the New Label button and specify your label dimensions on the following window.
- Your label layout is now configured, and keep this document open in Word.
3. Bring the Excel Data Into the Word Document
Now that your labels are configured, import the data you saved in your Excel spreadsheet into your Word document. You don’t need to open Excel to do this.
To start:
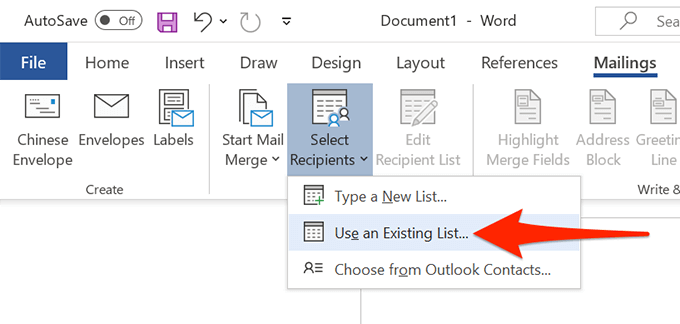
- While your Word document is still open, select the Mailings tab at the top.
- In the Mailings tab, select Select Recipients and choose Use an Existing List . You’re telling Word you want to use a predefined list for your labels.
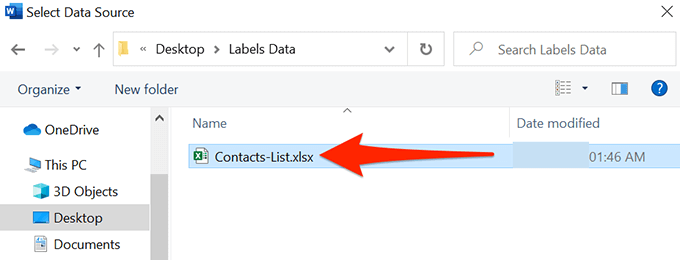
- In the File Explorer window that opens, navigate to the folder containing the Excel spreadsheet you created above. Double-click the spreadsheet to import it into your Word document.
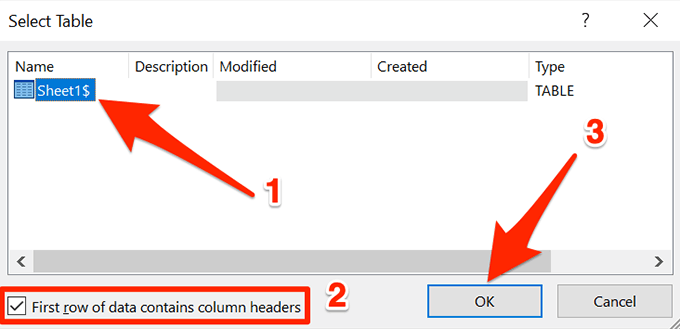
- Word will open a Select Table window. Here, select the sheet that contains the label data.
- Tick mark the First row of data contains column headers option and select OK .
4. Add Labels from Excel to a Word Document
You will now specify the fields you’d like to use in your labels.
To do that:
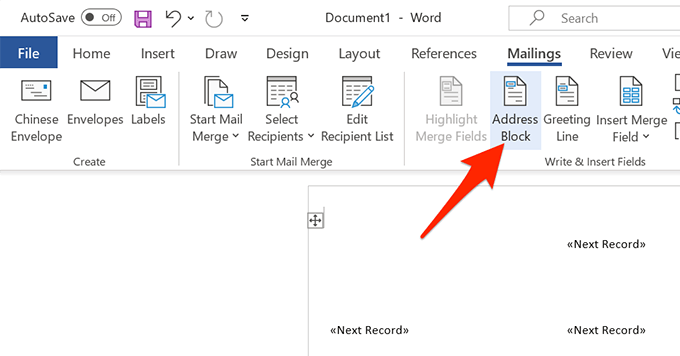
- Ensure you’re still on the labels document in Word.
- Select the Mailings tab at the top, and then from the Write & Insert Fields section, select the Address Block option.
- On the Insert Address Block window that opens, select the Match Fields button.
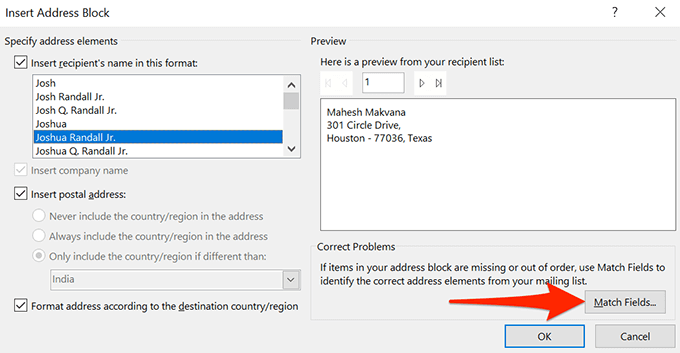
- Word opens a Match Fields window. Here, make sure each field in the Required for Address Block matches with the appropriate field in your spreadsheet. For example, Address 1 should be set to use Street Address from your spreadsheet, and so on.
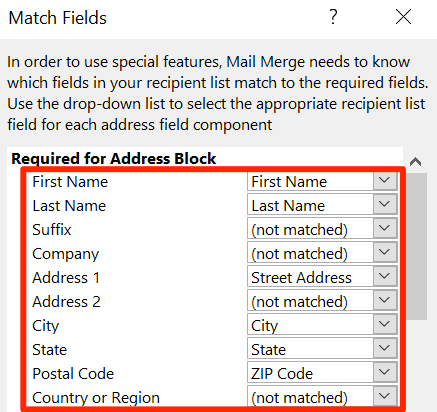
- Select OK to close the window.
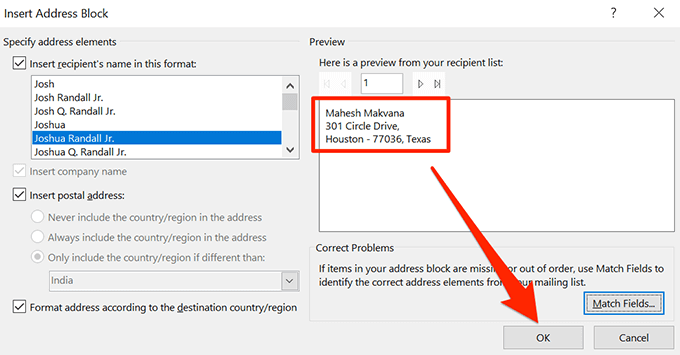
- Back on the Insert Address Block window, you can see a preview of your label. Ensure this preview represents the actual labels you want to create. Then, select OK at the bottom of the window.
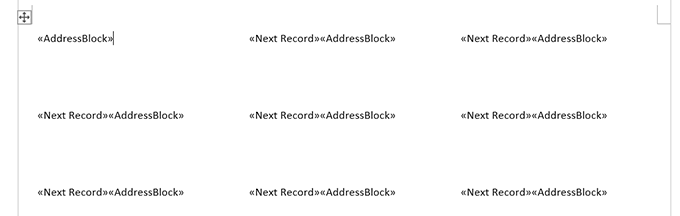
- In your Word document, you’ll notice the first label now says «AddressBlock» .
- Select the Mailings tab at the top and then select Update Labels .
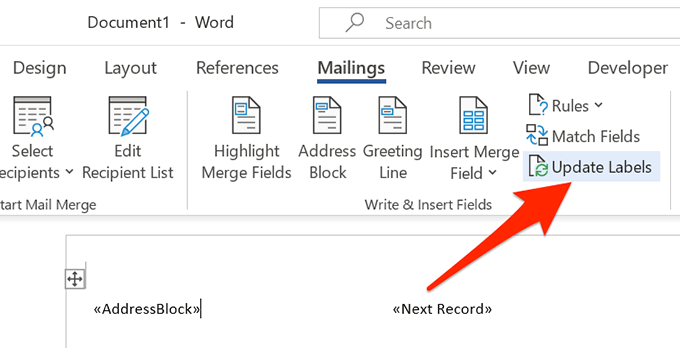
- All labels in your document should now say «AddressBlock» .
5. Create Labels From Excel in a Word Document
Word now has all the data it needs to generate your labels. You will now finish the process and Word will display the actual data for each label:
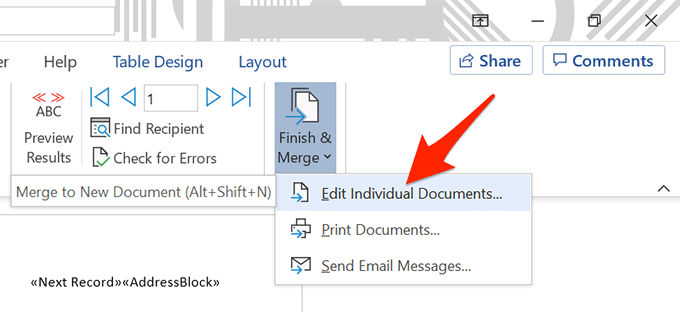
- In the Mailings tab of Word, select the Finish & Merge option and choose Edit Individual Documents from the menu.
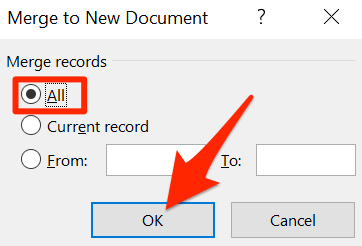
- In the window that opens, choose All and select OK .
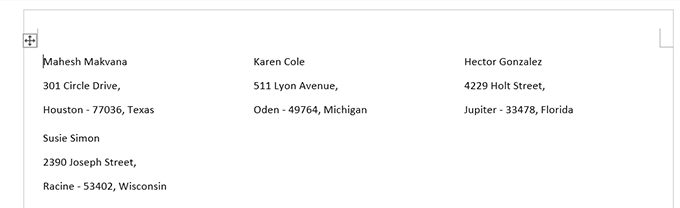
- Your Word document should now display all your labels with their individual data.
You can now save this labels document, generate a PDF out of it, or physically print the document (labels).
6.Save Word Labels Created from Excel as PDF
You don’t have to use a third-party tool to save your Word’s label document as PDF:
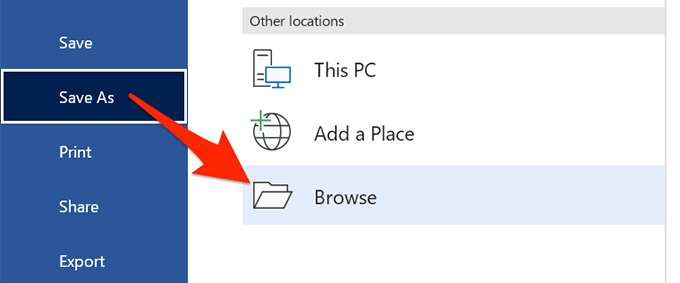
- Select the File tab at the top of the Word window.
- From the sidebar on the left, select Save As .
- Choose Browse on the right pane.
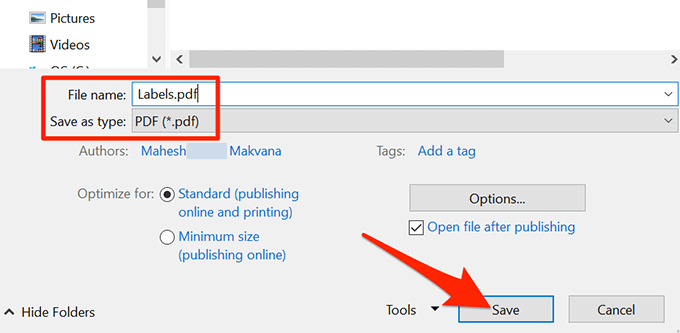
- Select a folder to save your PDF in, enter a name for your PDF in the File name field, choose PDF from the Save as type dropdown menu, and select Save .
7.Print Word Labels Created From Excel
You can print your labels directly from Word. Make sure your printer is connected to your computer when you perform printing:
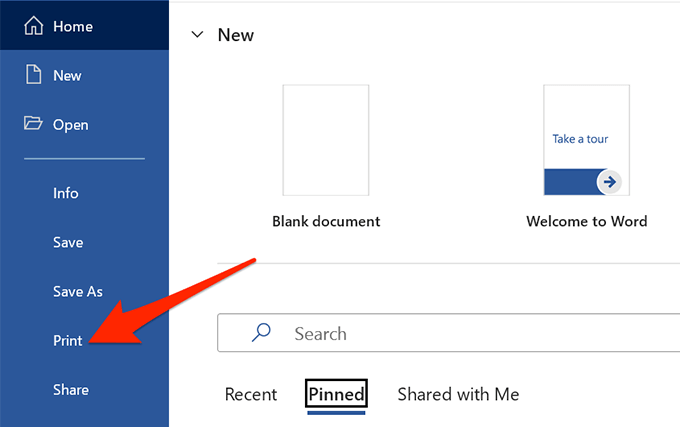
- Select the File tab at the top of the Word window.
- Select Print in the left sidebar.
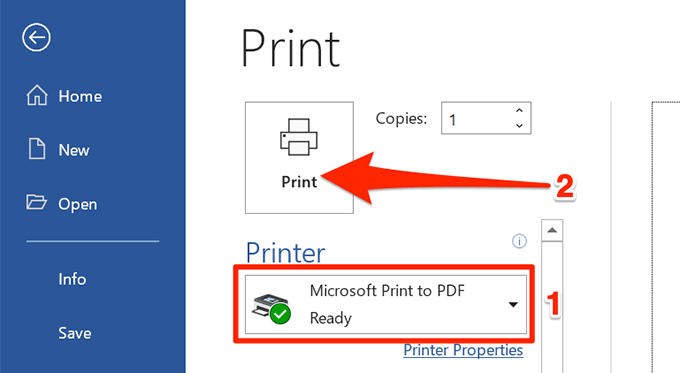
- Choose a printer from the Printer menu on the right pane, and then select Print at the top.
And you’re all set.
- How to Mail Merge from Excel to Microsoft Word
- How to Make an Organizational Chart in Word, Excel, and PowerPoint
- How to Convert a Word Document to an Excel Spreadsheet
- How to Open Word and Excel in Safe Mode
- How to Create a Flowchart in Word and Excel
Mahesh has been obsessed with technology since he got his first gadget a decade or so ago. Over the last few years, he’s written a number of tech articles on various online publications including but not limited to MakeTechEasier and Android AppStorm. Read Mahesh’s Full Bio
Printers experience several forms of malfunctions, some of which are easy to fix. Fixing printer issues can be a headache—especially on Windows devices—because there’s a wide range of things that could be wrong.
The problem could stem from your PC, the printer, or the connection between both devices. This tutorial highlights ten likely troubleshooting measures for printers that won’t print.
1. Check Paper Tray and Printer Connection
Many printer models won’t print if there’s a loose USB connection or if they’re out of ink or paper. Verify your printer’s ink levels, clean the printhead, fill the paper tray, and avoid using substandard paper. Low-quality paper can cause “Ghost Paper Jams” and other issues that stop your printer from printing documents.
For printers using a wired connection, ensure both cable ends are plugged firmly into your printer and computer. Go through the printer’s manual for instructions on connecting the device to your Windows or Mac computer.
Wireless printers won’t print documents if connected to the wrong Wi-Fi network. Make sure your printer and computer are on the same wireless network. Likewise, check your router settings, disable VPN connections, and make the printer’s IP address static. Refer to our tutorial on troubleshooting Wi-Fi (wireless) printers for more fixes.
2. Run the Printer Troubleshooter
Windows has a suite of troubleshooting tools that diagnoses and resolves hardware and software problems. We recommend running the Printer Troubleshooter before trying other more complex measures.
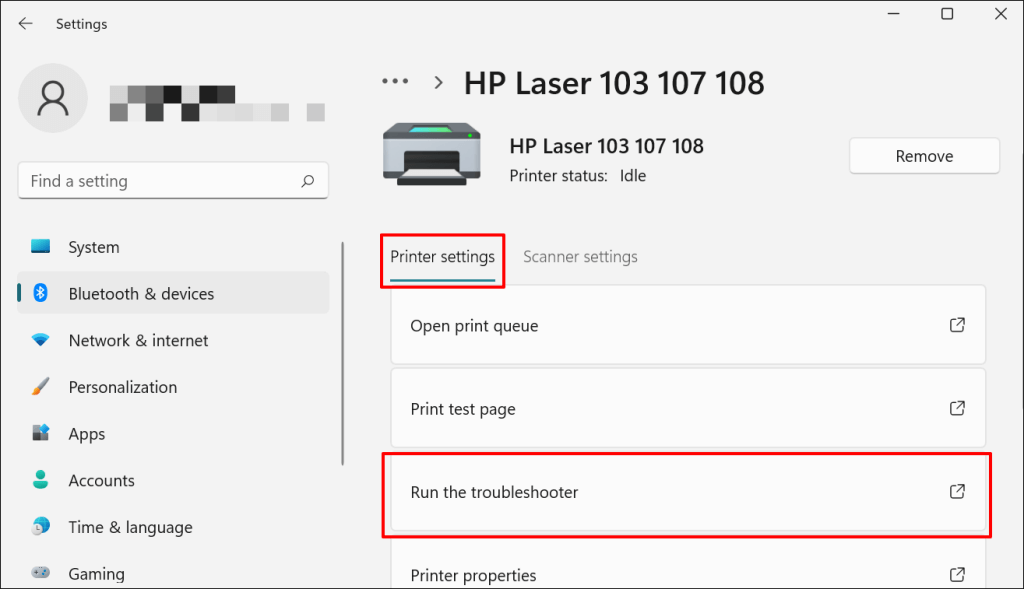
- Go to Settings > Bluetooth & devices > and select Printers & scanners .
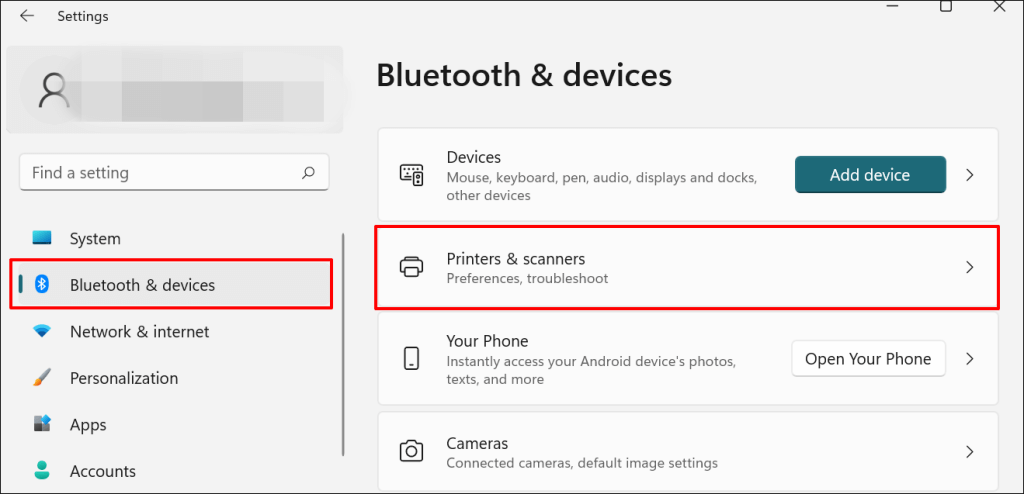
In Windows 10, go to Settings > Devices > Printers & scanners .
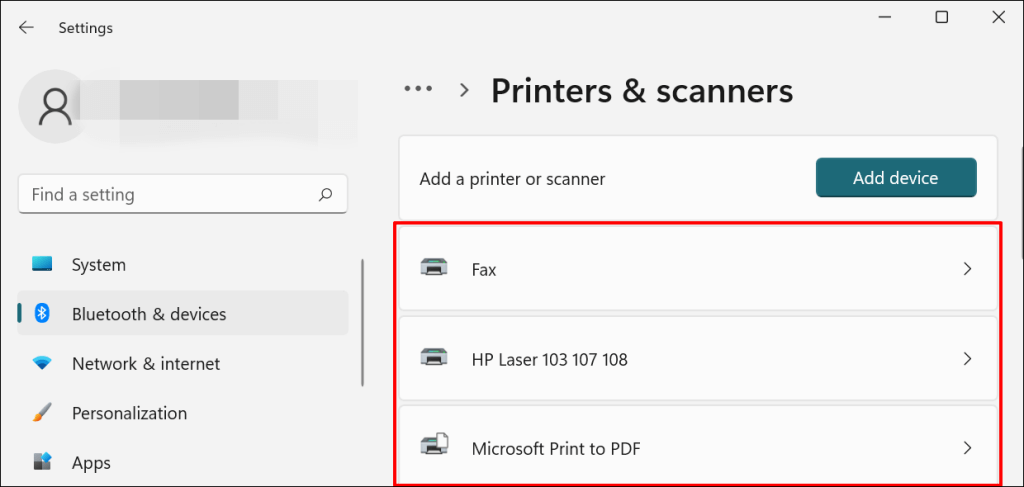
- Select the problem printer from the list of connected devices.
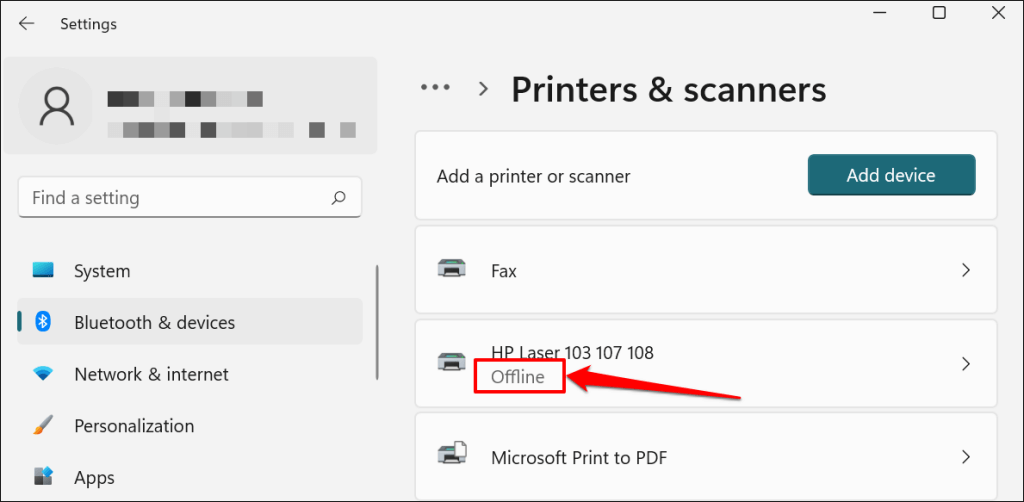
Note: If your printer status reads “Offline,” refer to our troubleshooting tutorial on getting an offline printer back online . Proceed to the next step if your printer is online.
- Select Run the troubleshooter in the “Printer settings” tab.
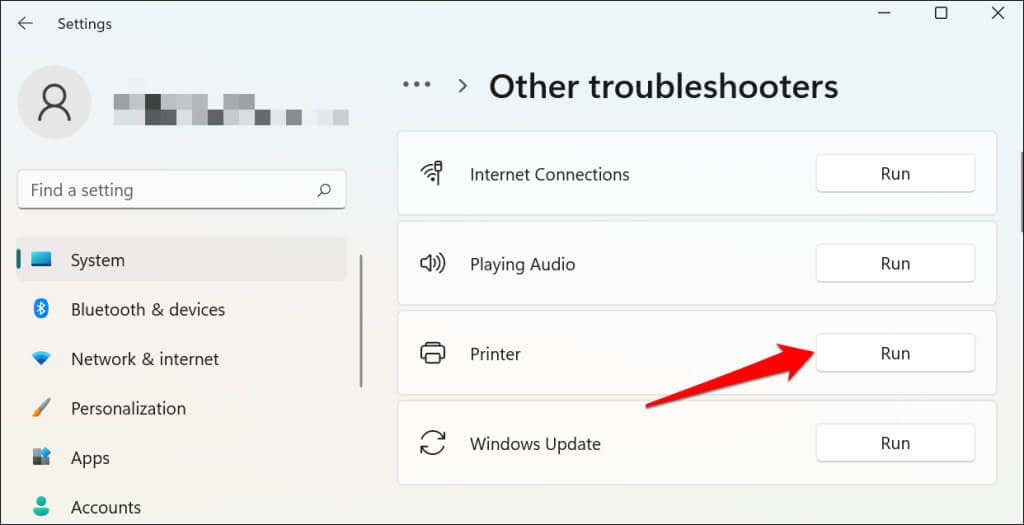
There’s another way to access the printer troubleshooter in Windows 11. Go to Settings > System > Troubleshoot > Other troubleshooters and select Run next to “Printer.”
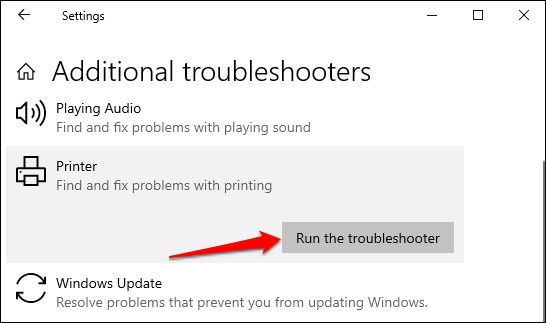
In Windows 10, go to Settings > Update & Security > Troubleshoot and select Additional troubleshooters > Printer > and select Run the troubleshooter .
Wait for the troubleshooter to run the necessary check on the printer, its drivers, and other associated processes.
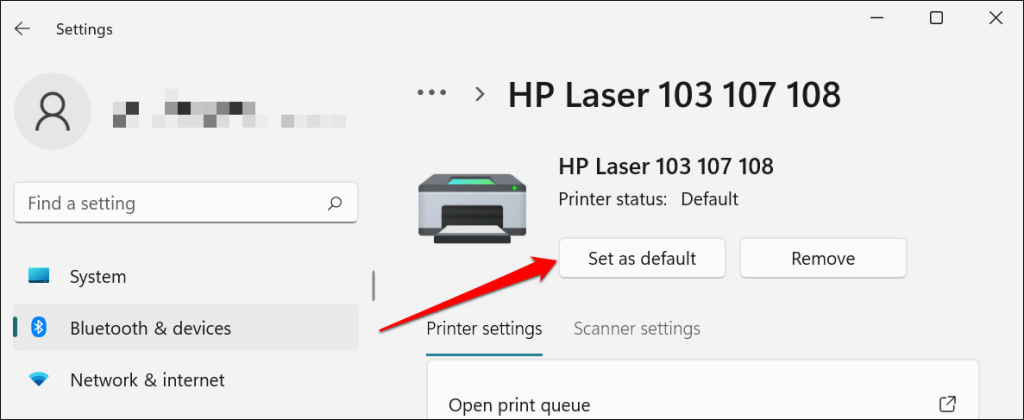
3. Set the Printer As Default
Windows has a feature that dynamically changes your PC’s default printing device based on your location and other factors. The feature is near-perfect but not failproof. If your PC doesn’t print documents, it might be that an inactive printer is the default printing device.
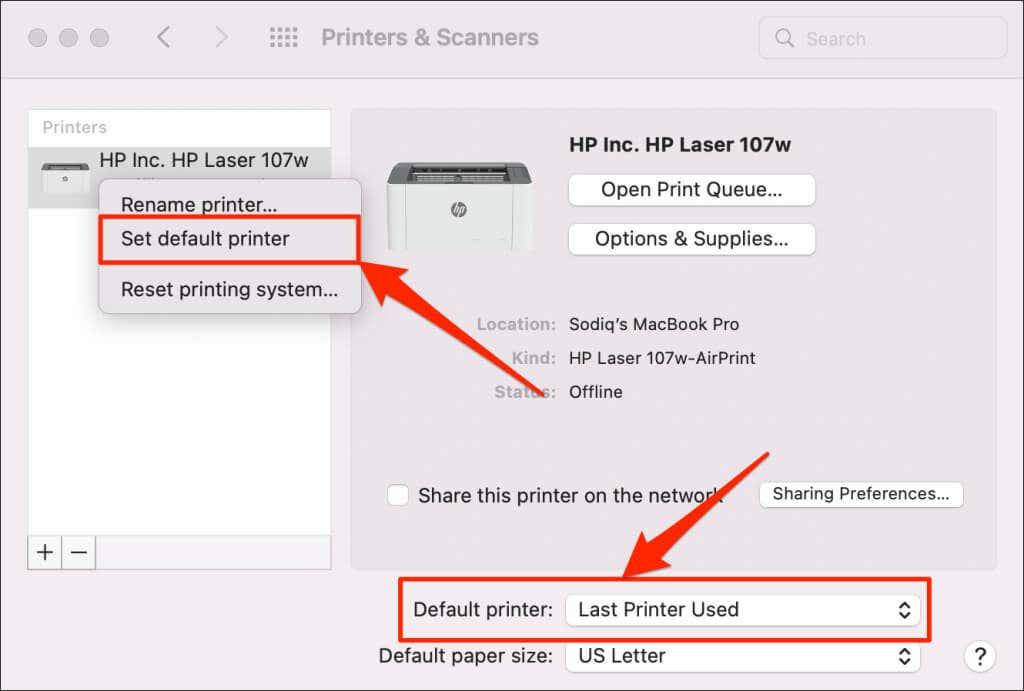
macOS also sets the last printer connected as your Mac’s default printer. Check your computer settings and ensure the active printer is the default device.
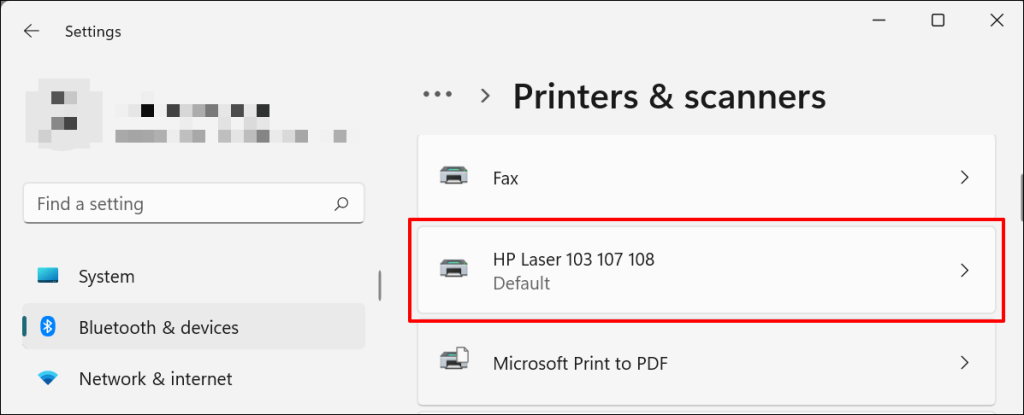
In Windows, go to Settings > Bluetooth & devices > Printers & scanners , select the printer, and select the Set as default button.
On Mac computers, go to System Preferences > Printers & Scanners on Mac computers , right-click the printer, and select Set default printer . Alternatively, open the Default printer drop-down menu and select the printer as the default.
4. Clear Your Computer’s Print Queue
When you send a document for printing, your computer first sends the “print job” to the print queue. The print job is immediately removed from the print queue when the printer prints the document. It’s usually a seamless process, but there are times when completed print jobs remain in the queue.
If that happens, subsequent print jobs will also get stuck in the queue and prevent your printer from printing files. Clearing your computer’s print queue might resolve the problem.
Clear Print Queue in Windows
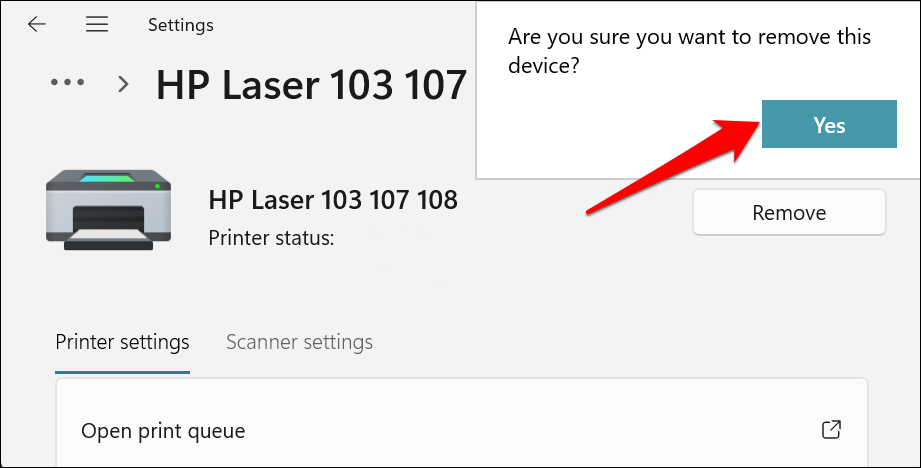
- Go to Settings > Bluetooth & scanners > Printers & scanners and select your printer.
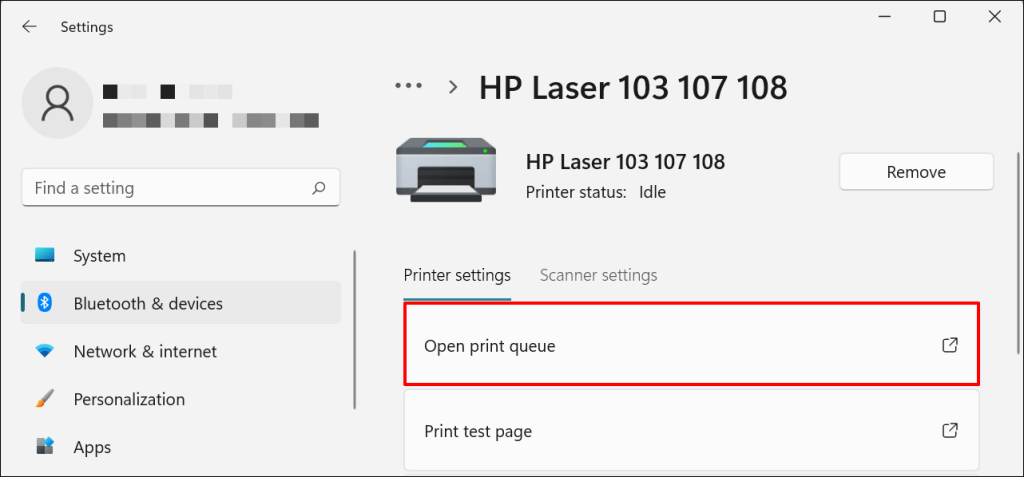
- Select Open print queue .
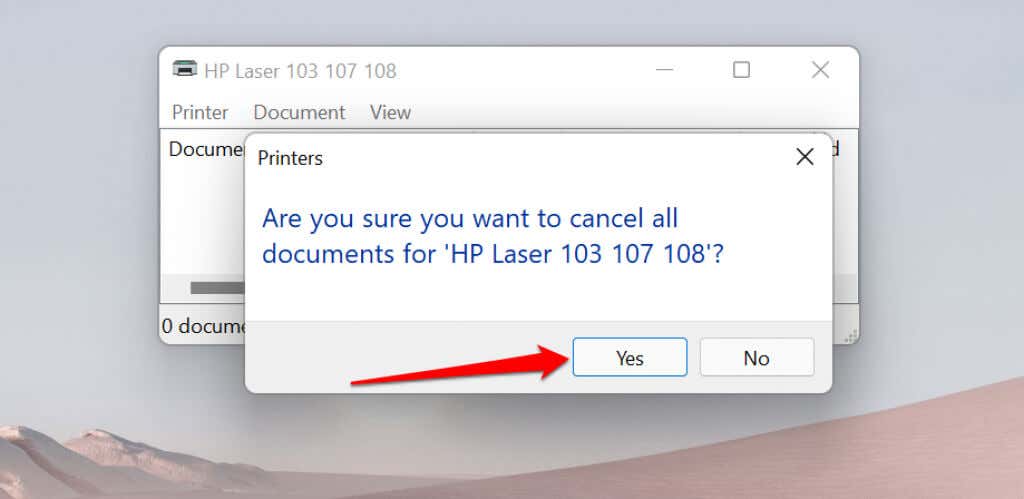
- Select Printer on the menu bar and select Cancel All Documents .
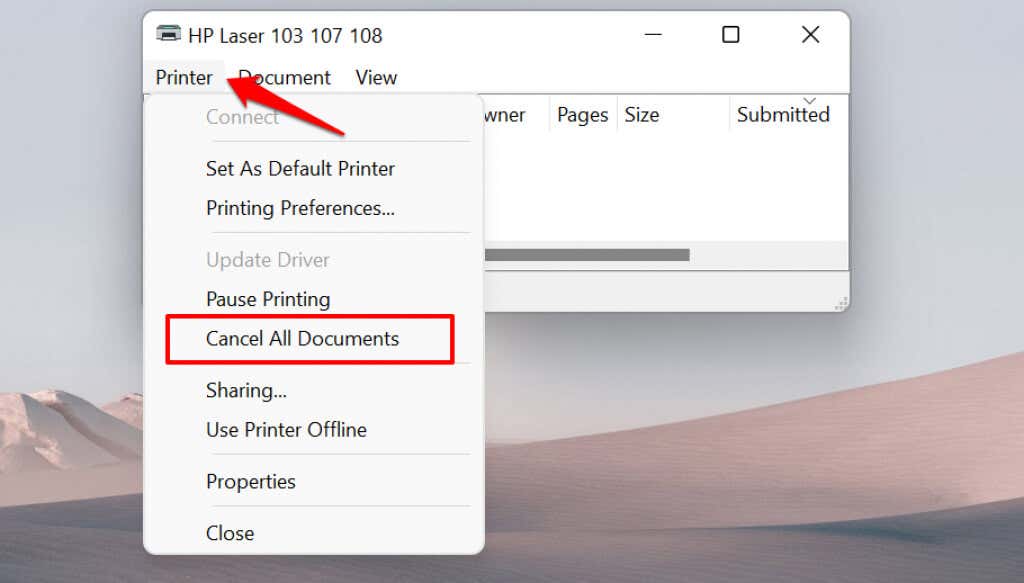
- Select Yes on the confirmation prompt.
[14-why-windows-pc-wont-print-documents]
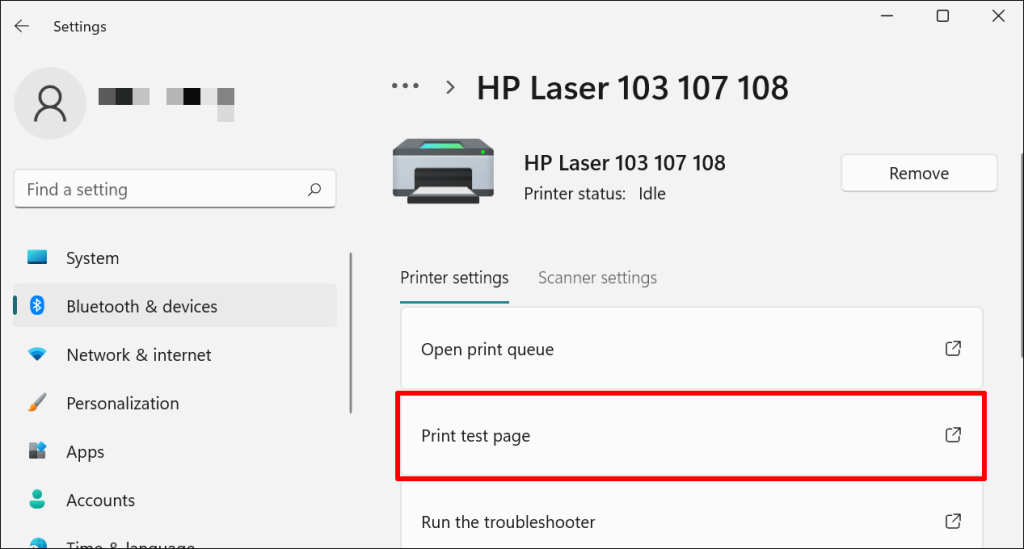
Try printing any document or a test page and check if clearing the queue fixed the problem. Open the printer menu and select Print test page .
If completed documents remain in the print queue, refer to our troubleshooting tutorial on deleting stuck print jobs in Windows .
Clear Print Queue in macOS
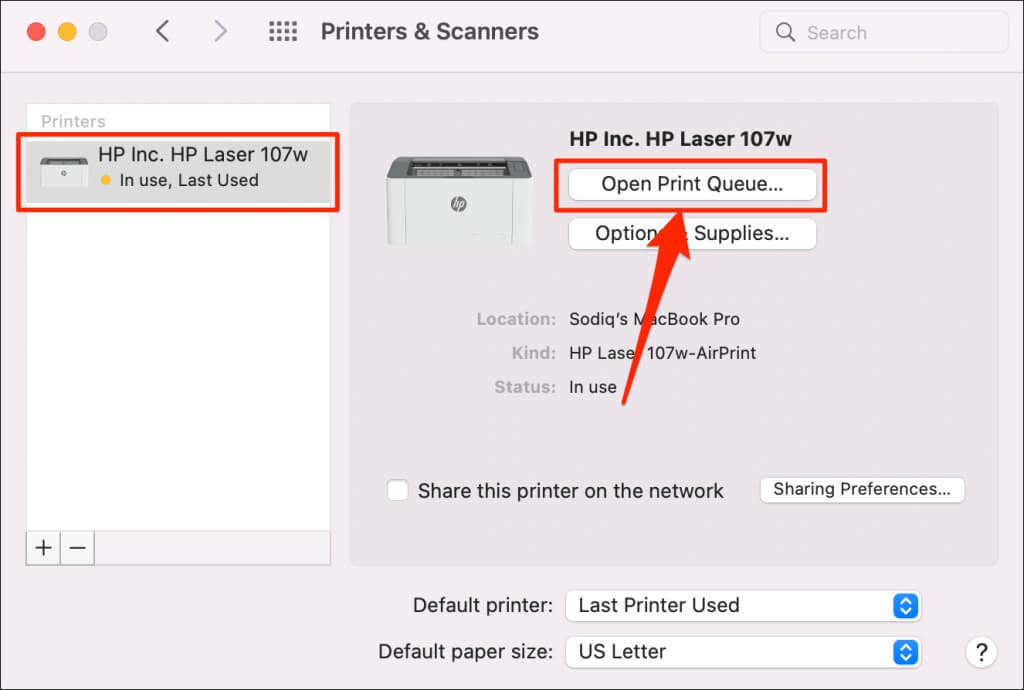
- Go to System Preferences > Printers & scanners , select the printer on the sidebar, and select Open Print Queue .
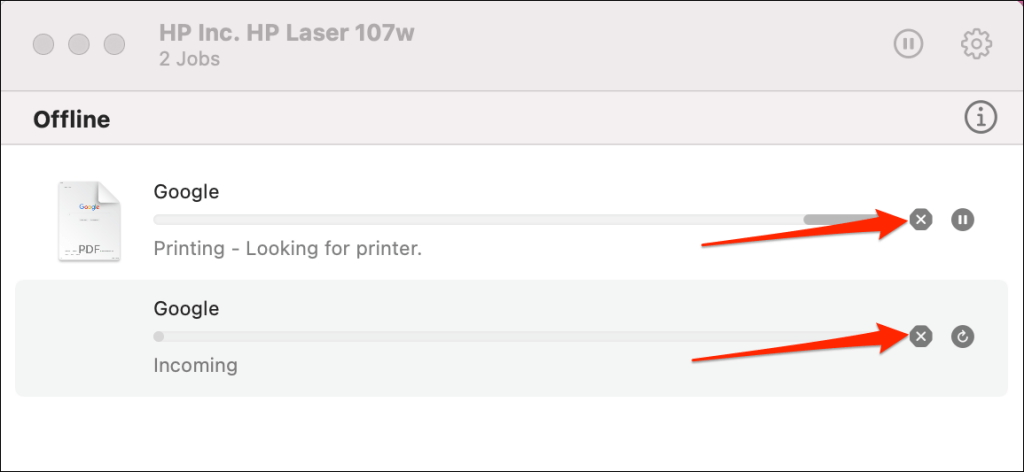
- Select the x icon next to the pending print jobs to remove them from the queue.
5. Update Printer Driver
Your printer might not receive print jobs from your PC if its driver is corrupt or outdated. Although Windows automatically installs driver updates, some factors (e.g., a metered internet connection) may prevent that from happening. Here’s how to manually install a driver from your computer or the internet.
Check the printer’s manufacturer website and download the latest driver updates for your printer model. Plug the printer into your computer and follow the steps below.
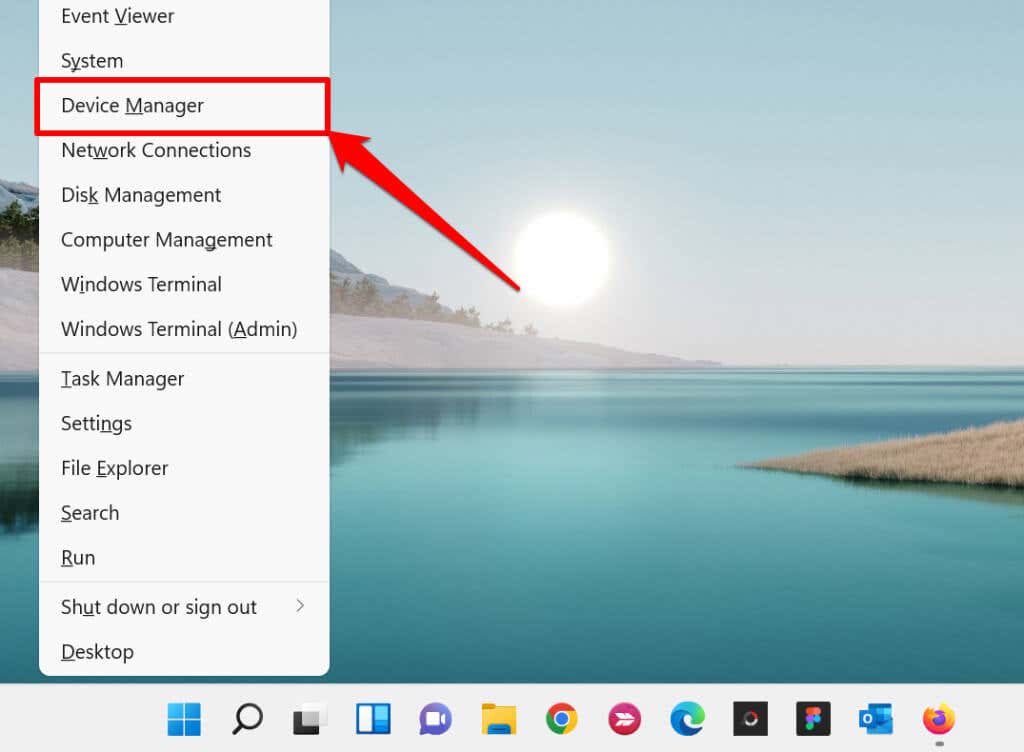
- Right-click the Start Menu or press the Windows key + X to open the Quick Access Menu. Select Device Manager to proceed.
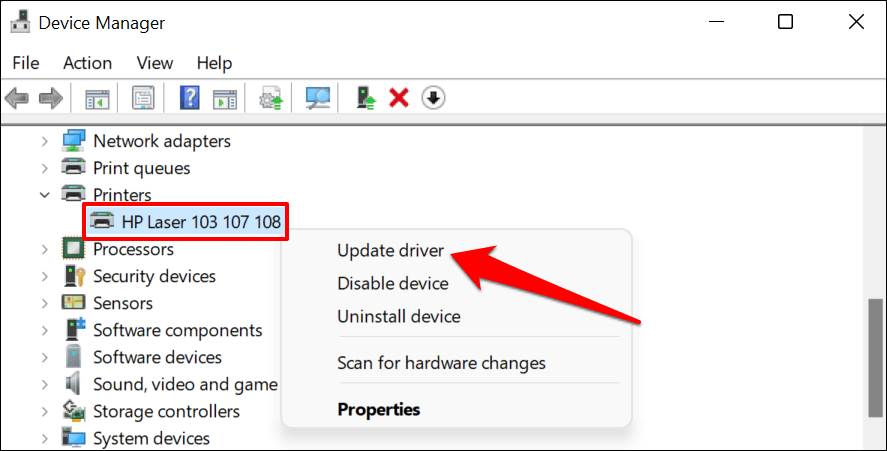
- Expand the “Printers” category, right-click the printer’s driver, and select Update driver .
- Select Search automatically for drivers and wait for Windows to search for the best driver available for the printer. The process requires an internet connection, so ensure your PC is connected to a Wi-Fi or Ethernet network.
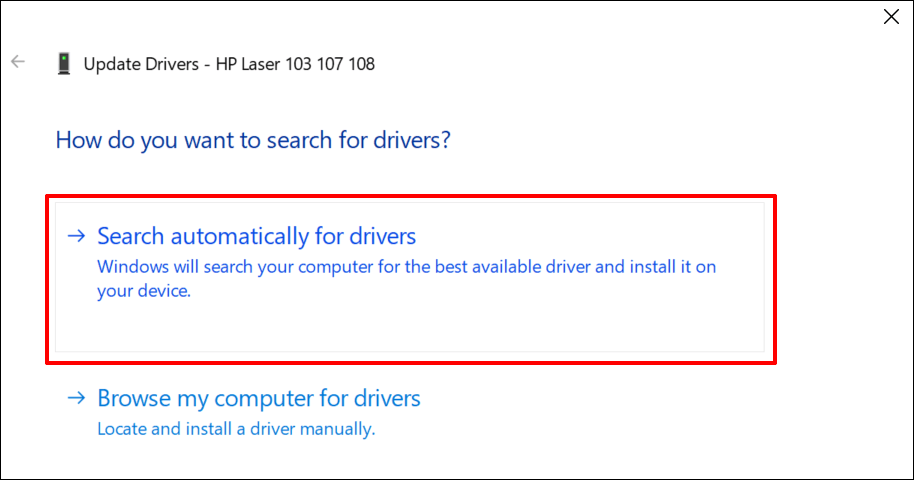
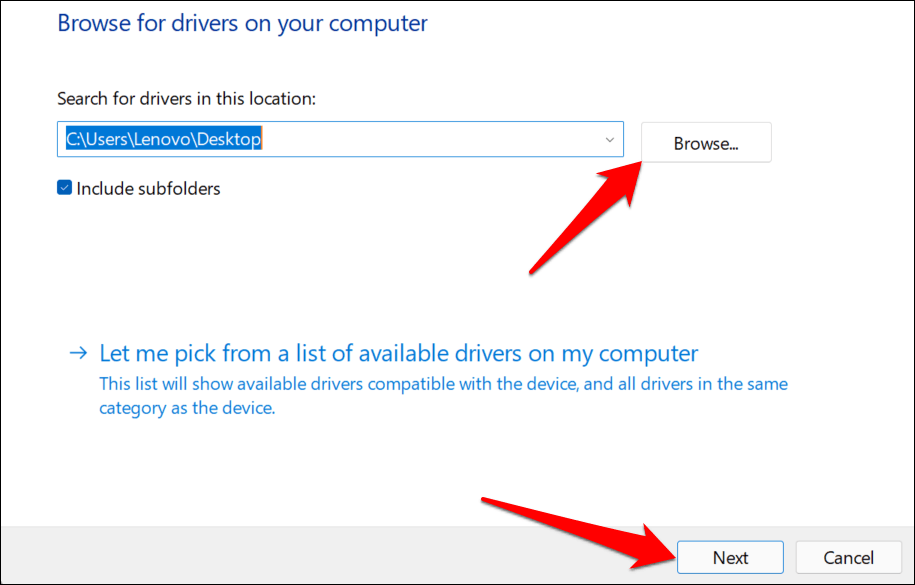
Alternatively, select Browser my computer for drivers to manually install a driver you downloaded from the printer manufacturer’s website. Afterward, choose Browse , navigate to the driver’s location on your PC, and select Next to install the update.
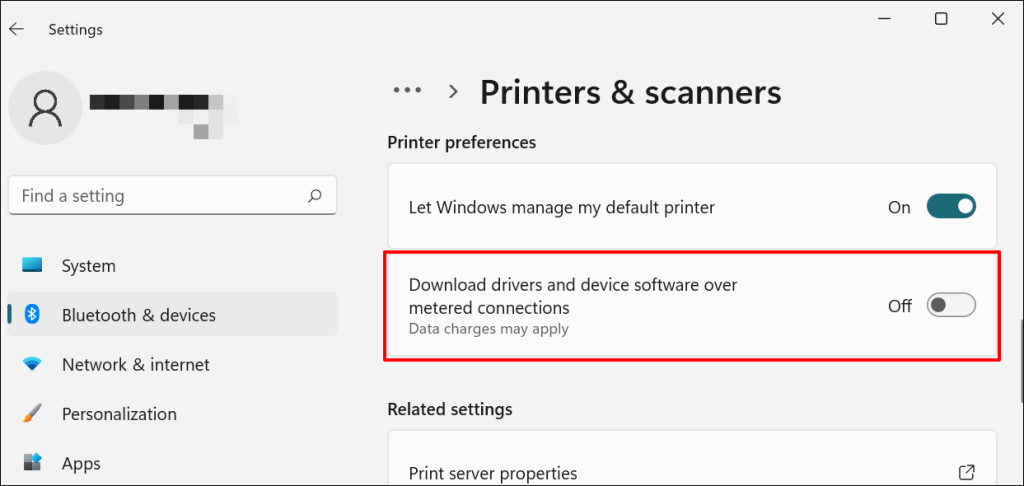
We recommend configuring Windows to automatically download drivers for your printer, especially if you’re using a metered connection.
Go to Settings > Bluetooth & devices > Printers & scanners and toggle on Download drivers and device software over metered connections .
If the Device Manager says the printer’s driver is up-to-date, check the manufacturer’s website for confirmation. You’ll find driver update history in the “Download,” “Software,” or “Drivers” section of the printer manufacturer’s website. Contact the manufacturer if you don’t know how to find, install, or update your printer’s driver update.
6. Reboot Your Devices

Power-cycling your printer and computer can help both devices re-establish a connection. Unplug your printer’s power cord and shut down your computer. Remember to close any open apps or documents so you don’t lose unsaved changes.
Restart both devices, connect your printer to your PC, and check if you can now print documents.
7. Reinstall Printer Driver
Reinstalling a faulty or corrupt driver can resolve issues causing your printer to malfunction. The operation entails deleting or uninstalling the printer driver , restarting your computer, and installing it from scratch. Note that this operation may affect any customizations made on the printer’s settings and preferences on your computer.
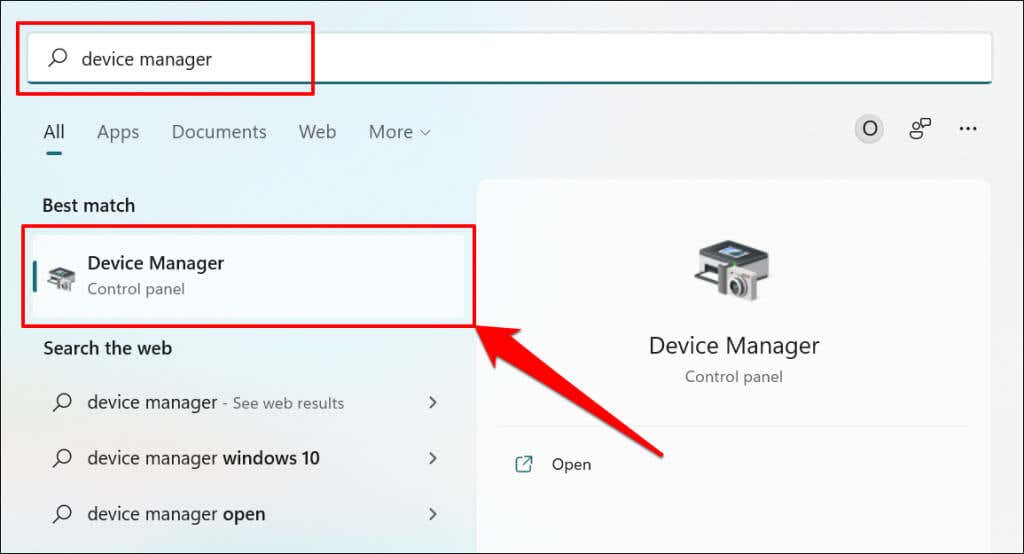
- Type device manager into Windows Search and select Device Manager .
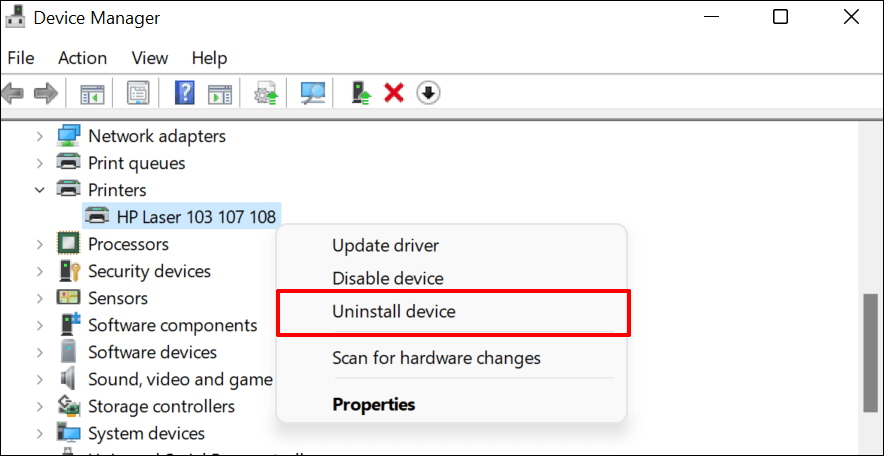
- Expand the “Printer” section, right-click the printer’s driver, select Uninstall device , and select Uninstall on the pop-up.
You should also remove the printer from your PC’s memory.
- Go to Settings > Bluetooth & devices > Printers and scanners , select the printer, and select the Remove button.
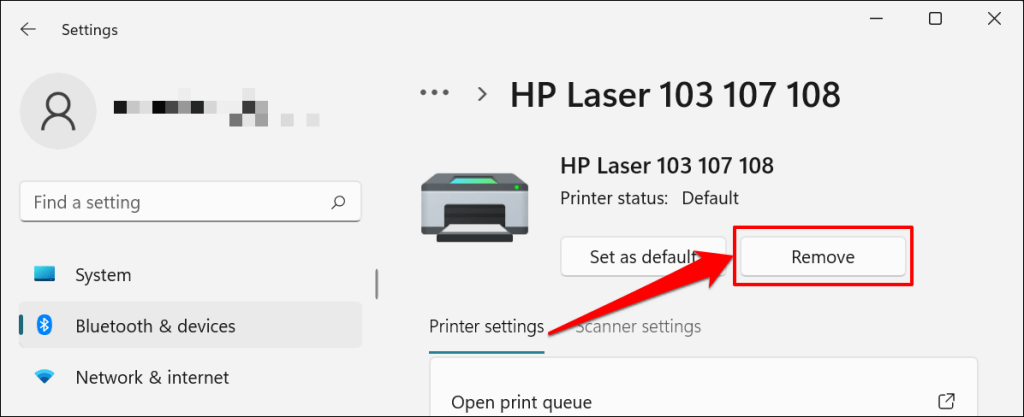
- Select Yes on the confirmation prompt.
Restart Windows and reconnect the printer to your computer. Windows should automatically install the printer’s driver when it connects to your PC.
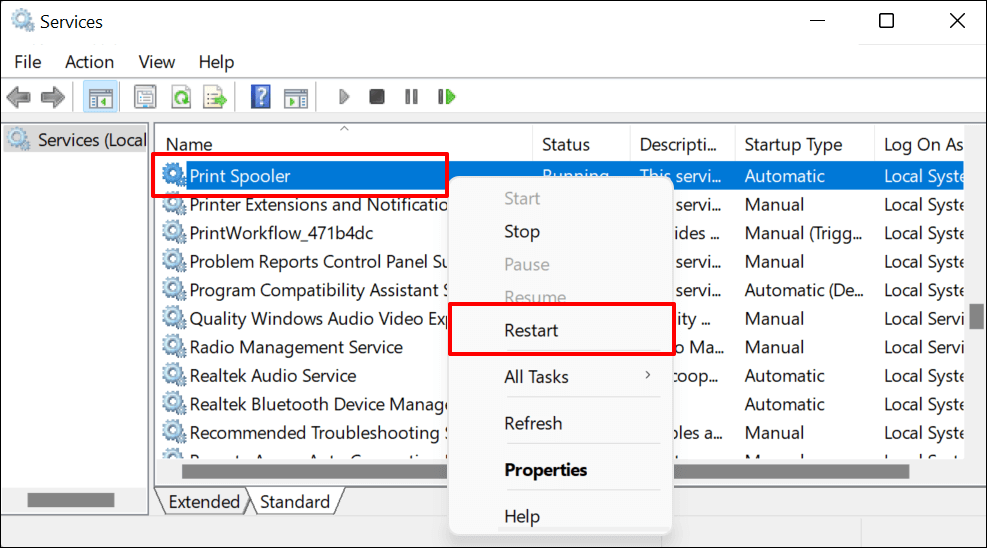
8. Restart the Printer Spooler
Printer Spooler is the system service that manages printers and print jobs on Windows devices. Temporary system glitches can affect the Printer Spooler’s performance and trigger printing-related problems. Restarting the print spooler service can restore the service to normalcy.
- Open the Windows Run box (press Windows key + R ), type services.msc in the dialog box, and press Enter .
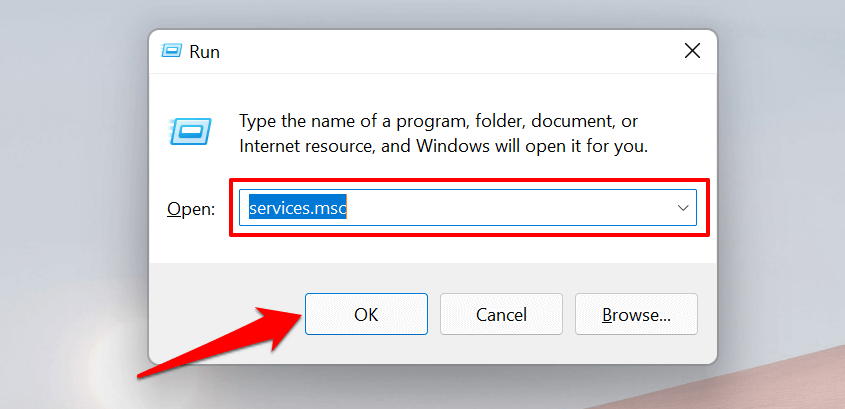
- Right-click Printer Spooler and select Restart .
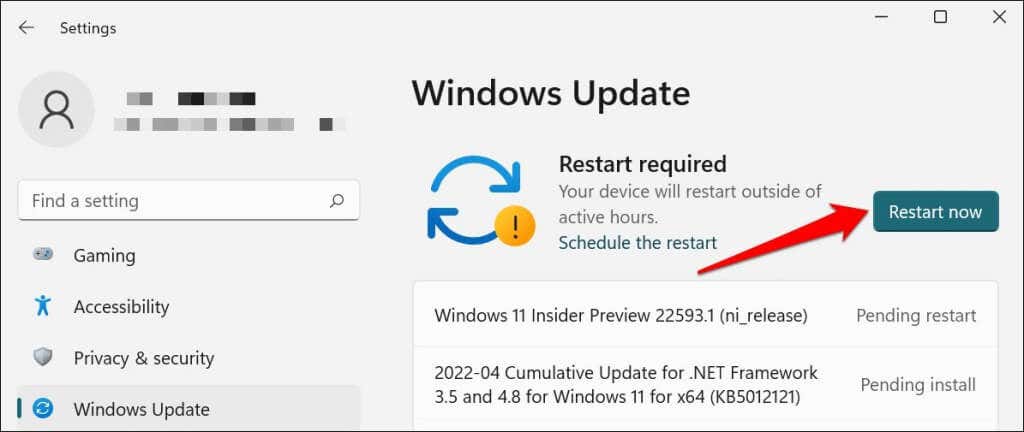
9. Update Your Computer
Asides from fixing software bugs, Windows Updates also updates outdated or buggy drivers. Head to the Windows Updates menu and install the latest Windows build or security patches available for your computer.
In Windows 11, go to Settings > Windows Update and wait for Windows to check for updates. You may need to restart your computer if Windows has already downloaded the update. Select Restart now to update and reboot your computer.
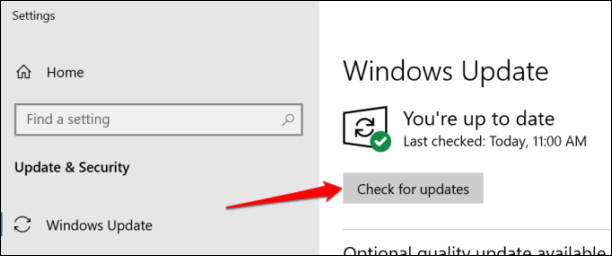
In Windows 10, head to Settings > Updates & Security > Windows Update and select Check for updates . Make sure your computer has an internet connection.
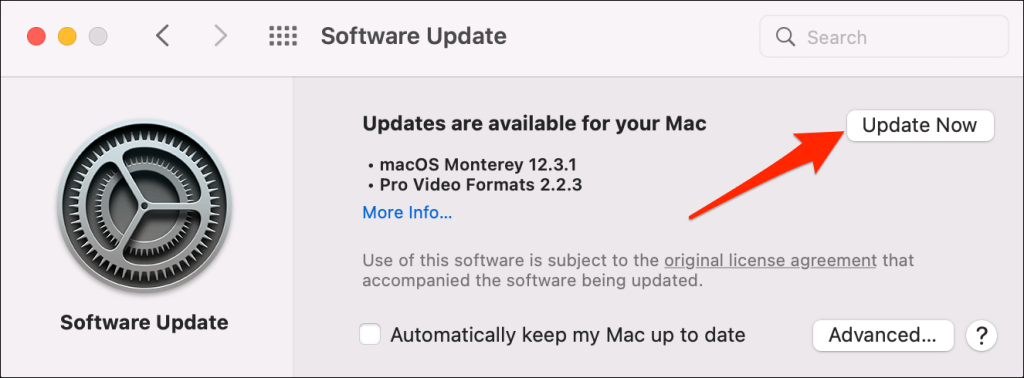
In macOS, go to System Preferences > Software Updates and select Update Now (or Upgrade Now ).
[32-update-mac-computer]
10. Run the Printer’s Utility Software
HP has a Print and Scan Doctor utility (HP Smart for Mac) that diagnoses problems with HP printers. The tool can detect empty ink cartridges, outdated driver software, blocked nozzles, print feed errors, and other printer problems.
Samsung Printer Experience is the utility that manages Samsung printers. The app has loads of troubleshooting guides for printing problems on Samsung printers. The Canon Inkjet Print Utility is also available for Canon inkjet printers.
Download and install your printer’s utility software on your computer and run the tool according to the manufacturer’s instructions.
Pay Attention to Physical Indicators
Printers have status lights or LCD screens that display error codes. These lights point out the root cause of some printing issues. Check the printer’s instruction manual to learn what the indicator lights and error codes mean and their respective solutions. Contact the printer manufacturer if your printer still won’t print after running these troubleshooting measures.
- How to Fix the “Error – Printing” Status Error in Windows
- HP Printer Not Printing Black? 10 Fixes to Try
- How to Fix Missing or Failed Printhead Error on HP Printers
- How to Add a Printer to Your Chromebook
- How to Fix the Printer Error “0x0000011b” on Windows
Sodiq has written thousands of tutorials, guides, and explainers over the past 4 years to help people solve problems with Android, iOS, Mac, and Windows devices. He also enjoys reviewing consumer tech products (smartphones, smart home devices, accessories, etc.) and binge-watching comedy series in his spare time. Read Sodiq’s Full Bio
