Unless an app natively supports additional authentication via Face ID or Touch ID , the iPhone and iPad offer no built-in means to stop anyone else from opening and viewing its contents. So if you tend to leave your iOS or iPadOS device unlocked or regularly share it with others, that can be a serious cause for concern.
Thankfully, you can use various workarounds—mostly based on Screen Time—to lock any app on your iPhone or iPad. Read on to learn all possible ways that can help you with that.
Lock App Using Face ID & Touch ID
Several third-party apps—such as Google Drive and WhatsApp—let you add an extra layer of security via Face ID or Touch ID. So before you dig into the workarounds below, it’s worth checking an app’s internal settings pane for such an option. As an example, here’s what you must do to lock Google Drive.
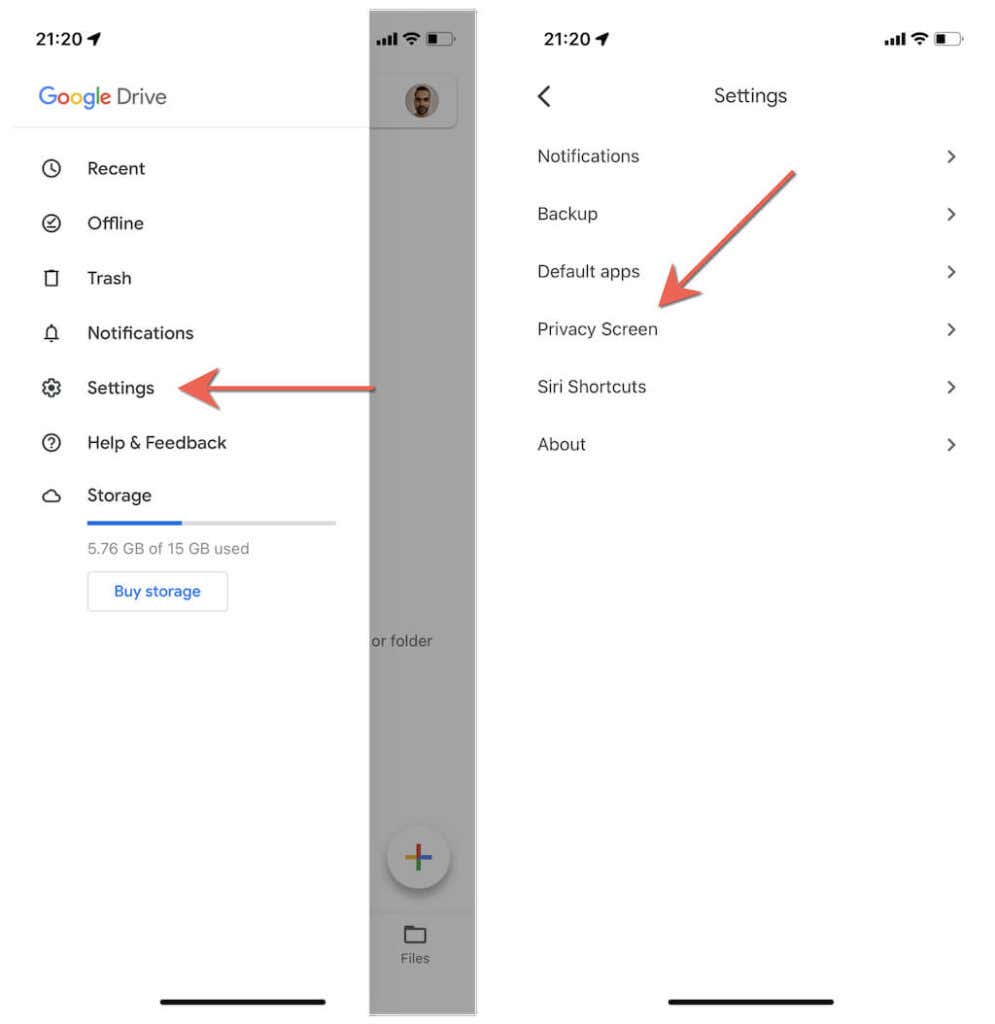
- Open Google Drive and tap the icon with three stacked lines at the top left of the screen. Then, select Settings > Privacy Screen .
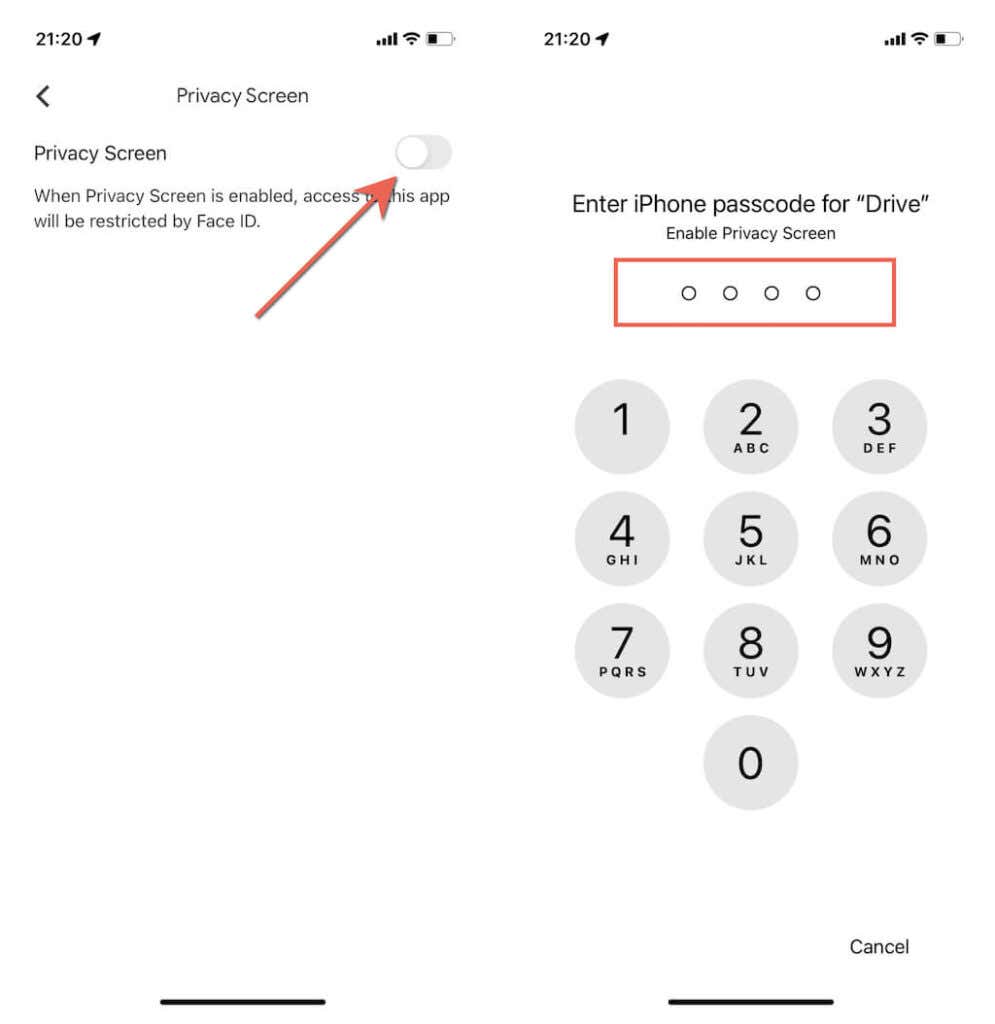
- Turn on the switch next to P rivacy Screen and enter your device passcode to activate the feature.
- Tap Require Authentication and decide if you want Google Drive to lock itself immediately, after 10 seconds, 1 minute, or 10 minutes when you switch to other apps.
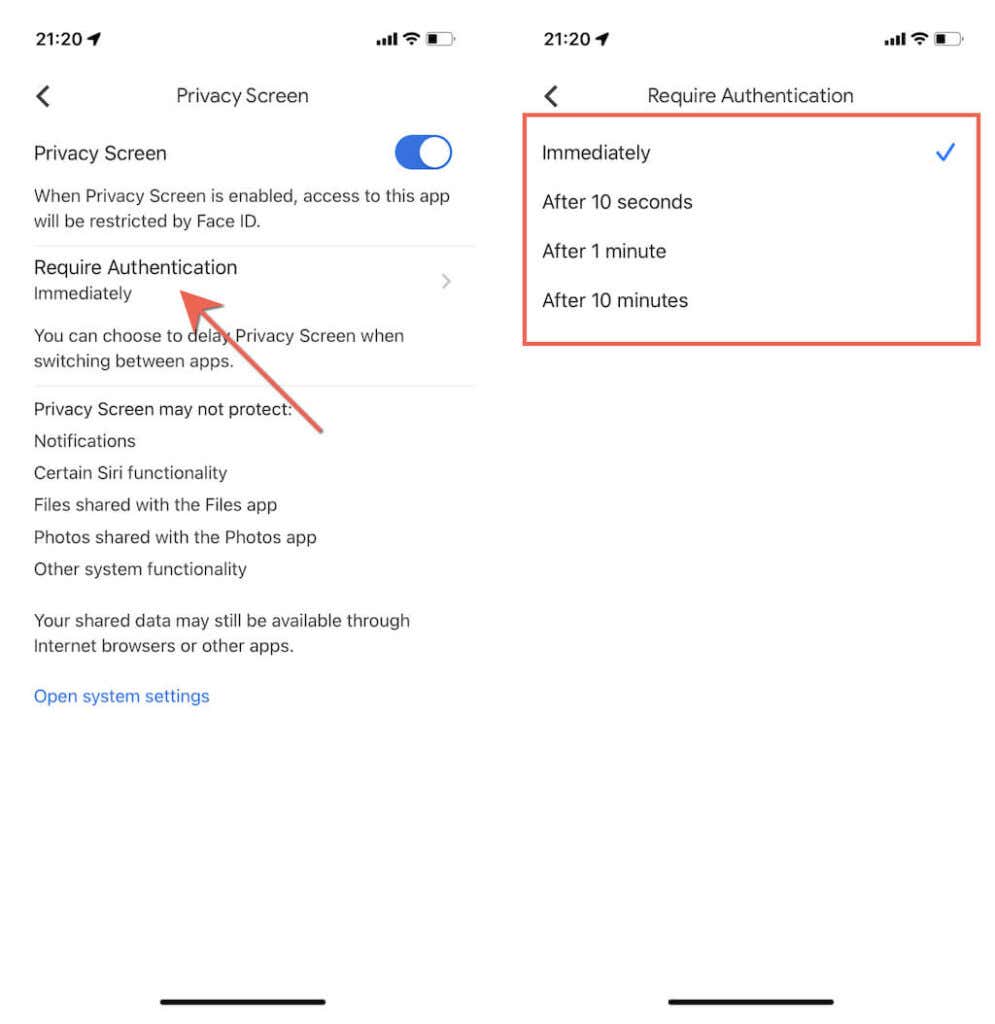
Google Drive will now require you to use Face ID or Touch ID to unlock it depending on your authentication preferences. To manage apps that use device biometrics, open the Settings app and go to Face ID & Passcode > Other Apps .
Impose App Limits Using Screen Time
Screen Time not only allows you to monitor your activity on the iPhone and iPad but also provides access to a host of useful restrictions. If you’ve set up Screen Time, you can use a feature called App Limits to impose daily time limits for any stock or third-party app.
The following workaround involves setting the lowest time limit possible, and then quickly running it down to lock an app for the rest of the day.
Related : Haven’t had the time to turn on Screen Time yet? Learn how to set up Screen Time on iPhone and iPad . It’s also essential to create a Screen Time passcode (not the same as the device passcode) before you begin.
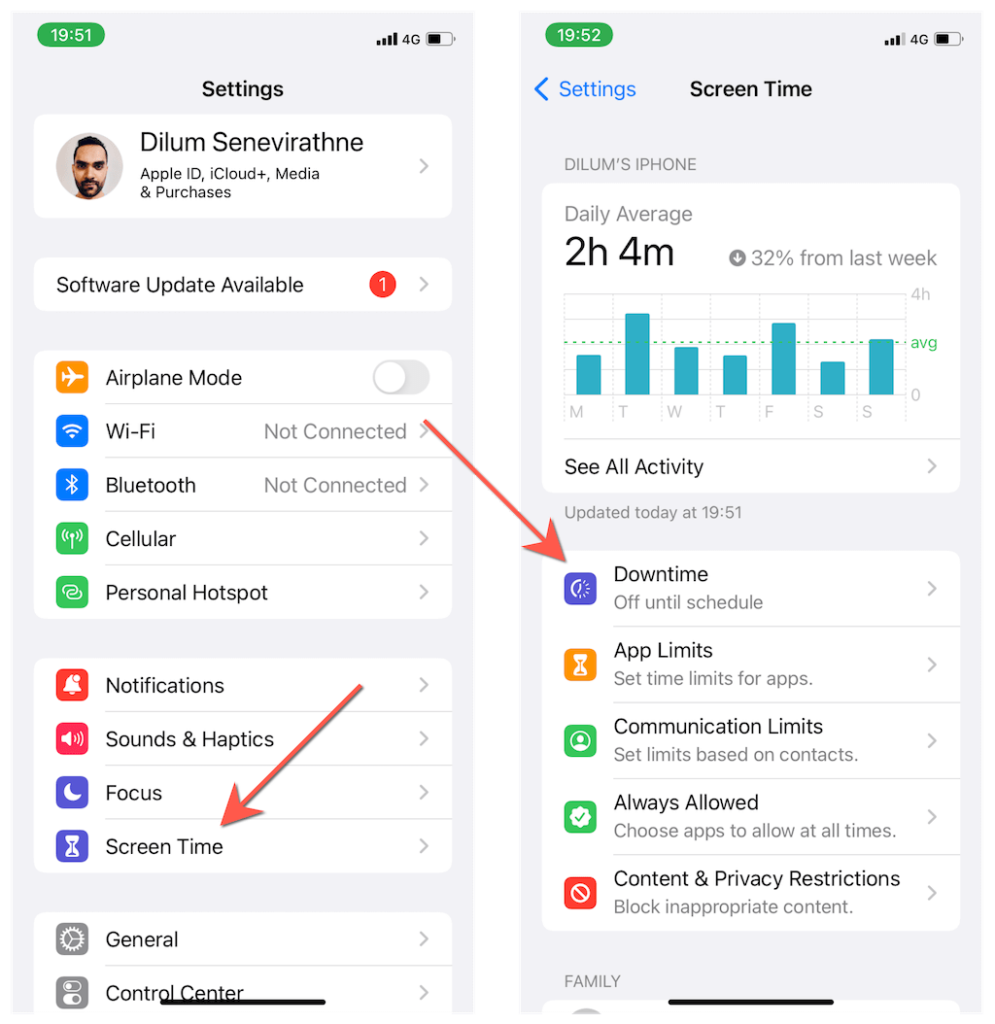
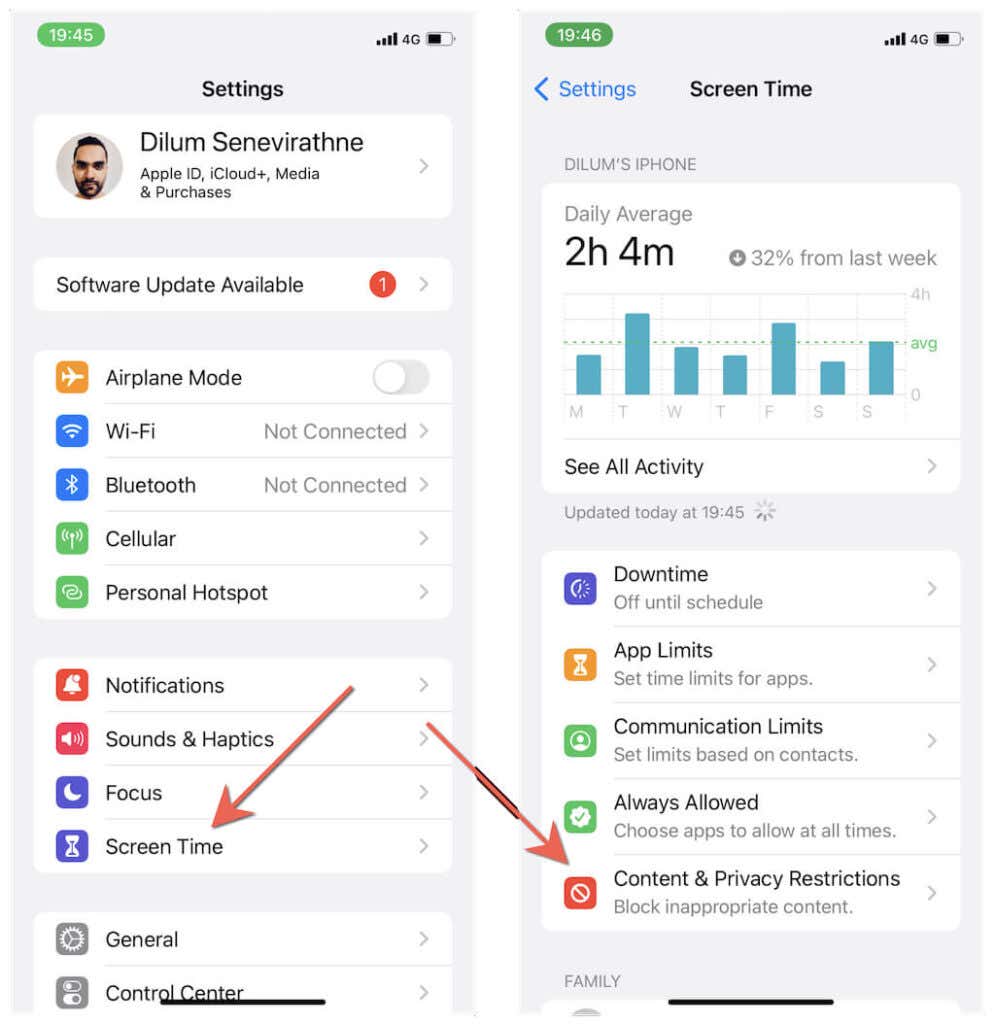
- Open the Settings app on your iPhone or iPad and tap Screen Time . Then, tap App Limits and enter your Screen Time passcode.

- Tap Add Limit , expand the relevant category (social media, creativity, entertainment, etc.), and select the app you want to lock. On the next screen, pick the lowest time limit— 1 minute —and tap Add .
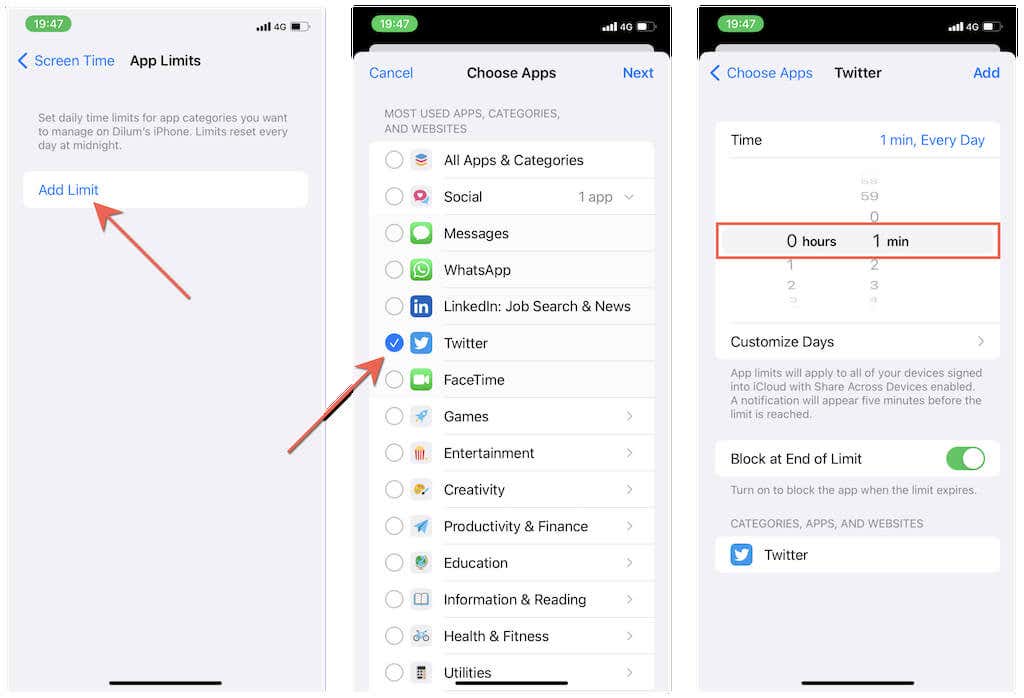
- Open the app and use it for one minute. Screen Time will automatically lock it down once you reach the limit, but you can unlock it for an additional minute by tapping Ask For More Time > One More Minute .
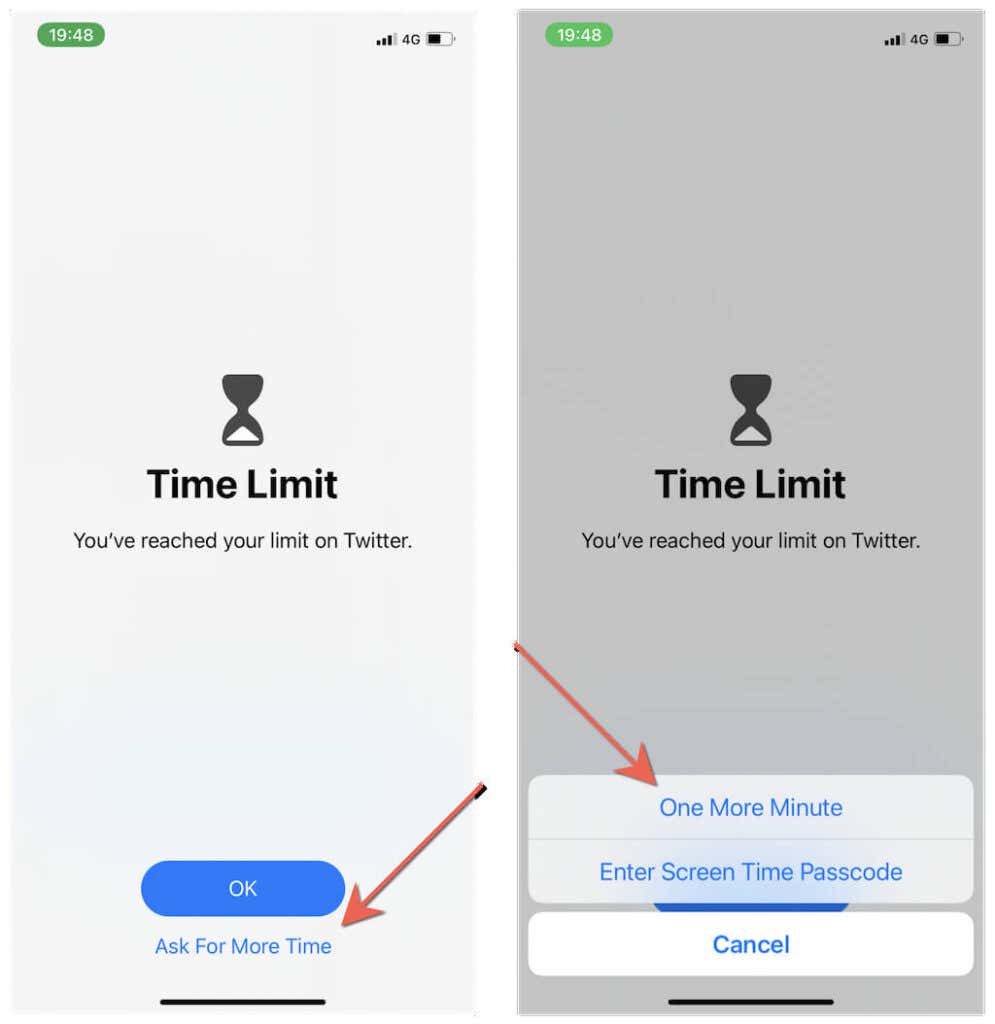
Once that minute is also up, the app will remain completely inaccessible unless you enter your Screen Time passcode. You can manage any app subject to App Limits or lock additional apps by visiting Settings > Screen Time > App Limits again.
Note : If the app remains unlocked after the imposed time limit, go to Settings > Screen Time > Always Allowed and make sure that it’s not listed under Allowed Apps .
Set Up DownTime Using Screen Time
App Limits aside, you can use another Screen Time feature called Downtime to lock apps. It restricts all apps on iPhone and iPad during a specified time of the day except for any on an exclusions list.
- Go to Settings > Screen Time > Downtime and enter your Screen Time passcode.
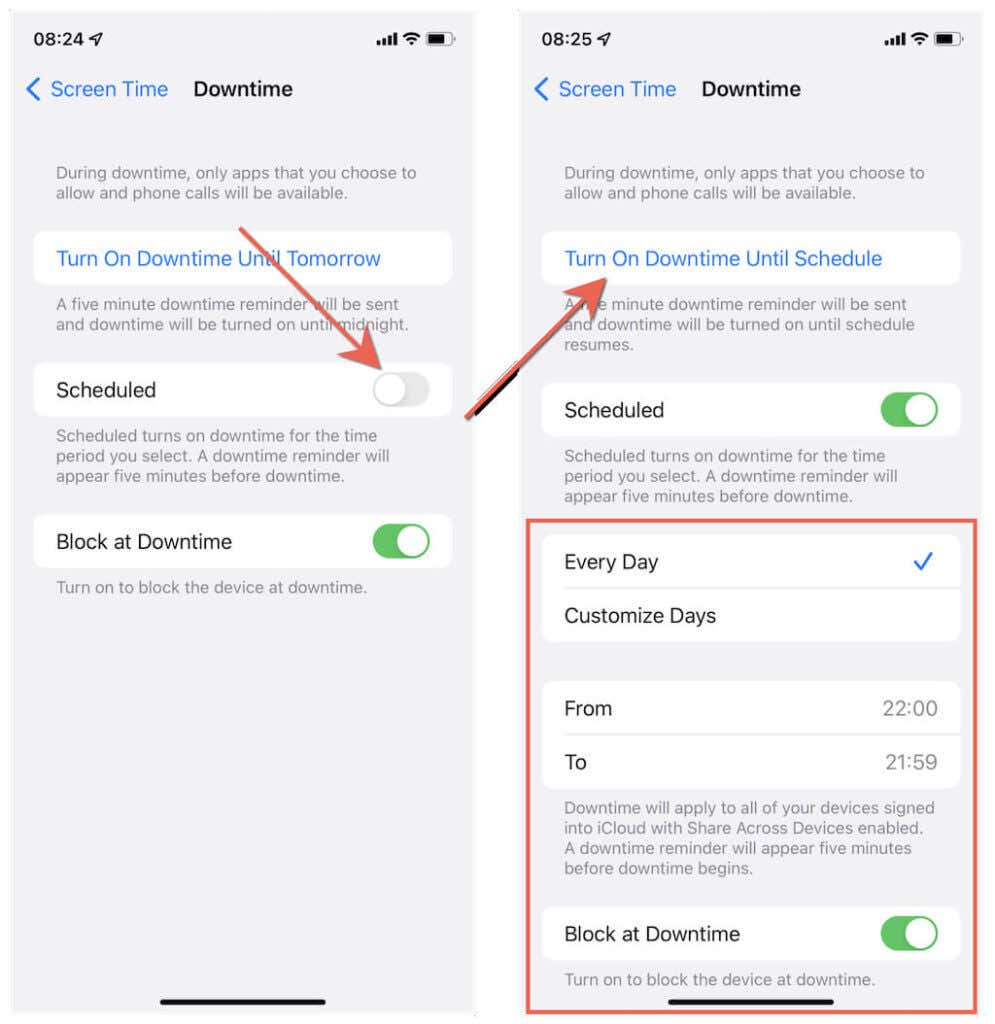
- Turn on the switch next to Scheduled . Then, set up a Downtime schedule. For example, if you want Downtime to be active all day each day of the week, tap Every Day and set From and To to 22:00 and 21.59 , respectively. Then, tap Turn On Downtime Until Schedule to activate Downtime immediately.
- Head back to the previous screen and tap Always Allowed . Then, add the apps you want to access without restrictions to the Allowed Apps section.
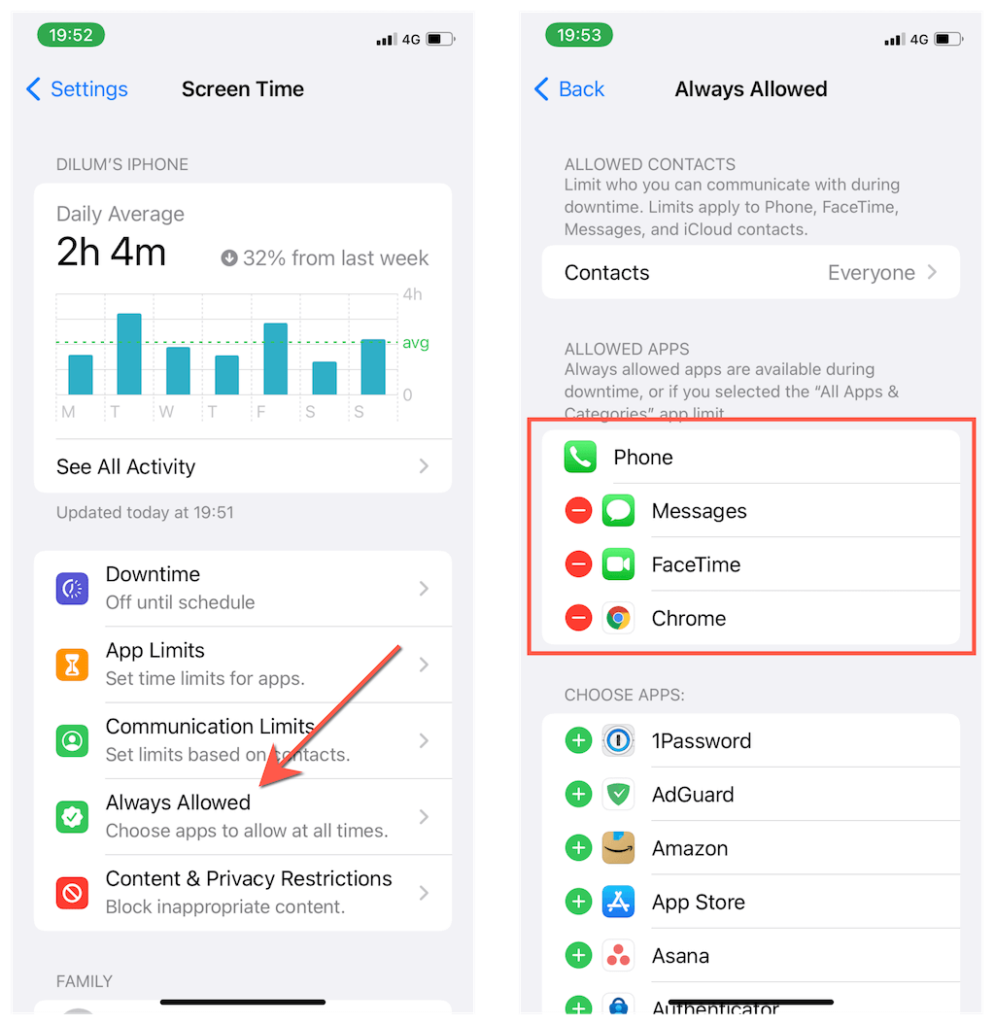
Screen Time will now lock all apps on your iOS device except for any that you’ve added to the Allowed Apps list. However, it’s still possible to access locked apps for a minute by tapping Ask for More Time > One More Minute , so consider doing that yourself for any app you don’t want anyone else to open.
Disable Apps in Screen Time
Screen Time also lets you disable specific apps built into your iPhone or iPad—e.g., FaceTime, Safari, Camera, etc. It’s quick and easy, so long as the app you want to lock is included within the list.
- Open the Settings app and go to Screen Time > Content & Privacy Restrictions > Allowed Apps .

- Turn off the switch next to any first-party app you want to disable.
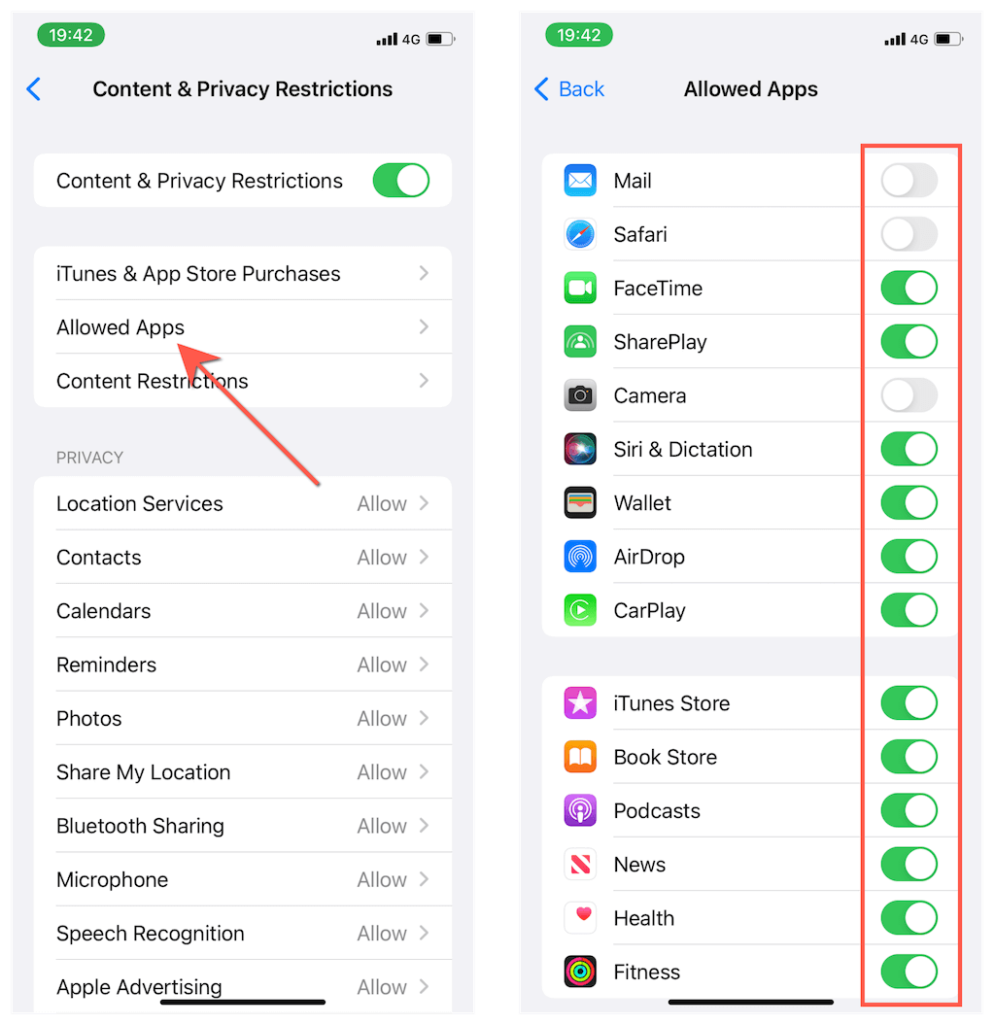
Disabled apps will not appear on the Home Screen or the App Library unless you manually activate them again via the above screen after inputting your Screen Time passcode.
Lock Apps By Age Rating
Additionally, Screen Time supports restricting all apps above specific age ratings. It’s a useful parental control when handing your iPhone or iPad to a child.
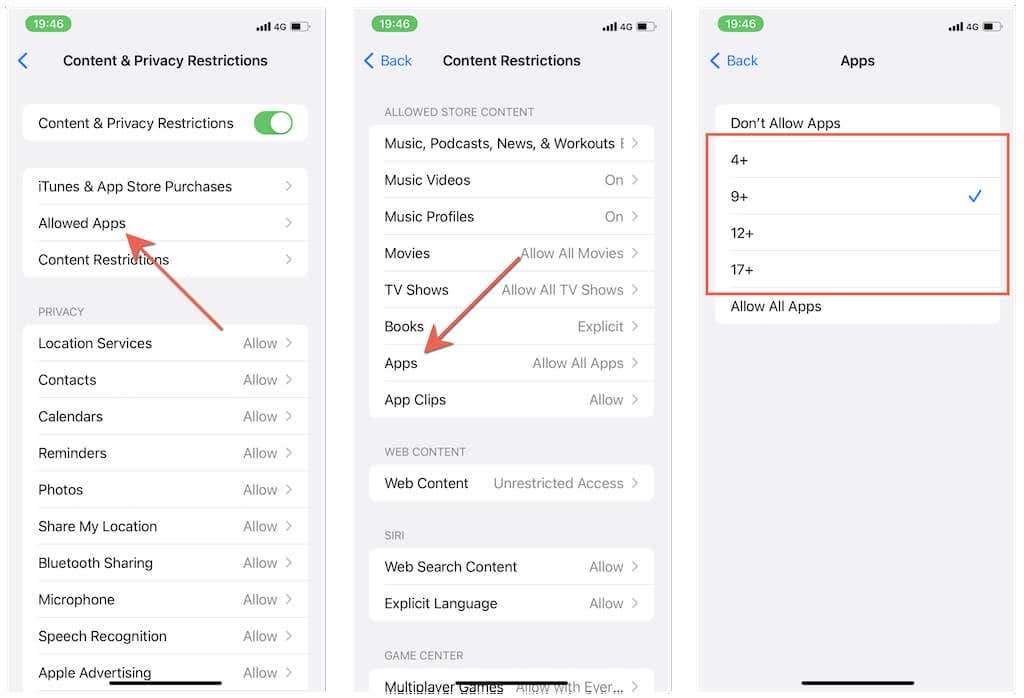
- Open the Settings app and go to Screen Time > Content & Privacy Restrictions .
- Tap Content Restrictions > Apps and pick an age rating— 4+ , 9+ , 12+ , etc.
If you want to unlock all apps again, revisit the above screen and tap Show All Apps .
Lock Apps Using an Automation
The Shortcuts app on iPhone and iPad lets you create various useful automations that trigger when interacting with apps. The following workaround involves setting up a timer-based automation for an app that forcibly locks down the device when you open it.
The method requires working through several steps involving both the Shortcuts and the Clock apps. However, the end-result is superior to the App Limits and Downtime-based workarounds since you don’t have to deal with minimum time limits.
- Open the Shortcuts app and switch to the Automation tab. Then, tap Create Personal Automation > App .
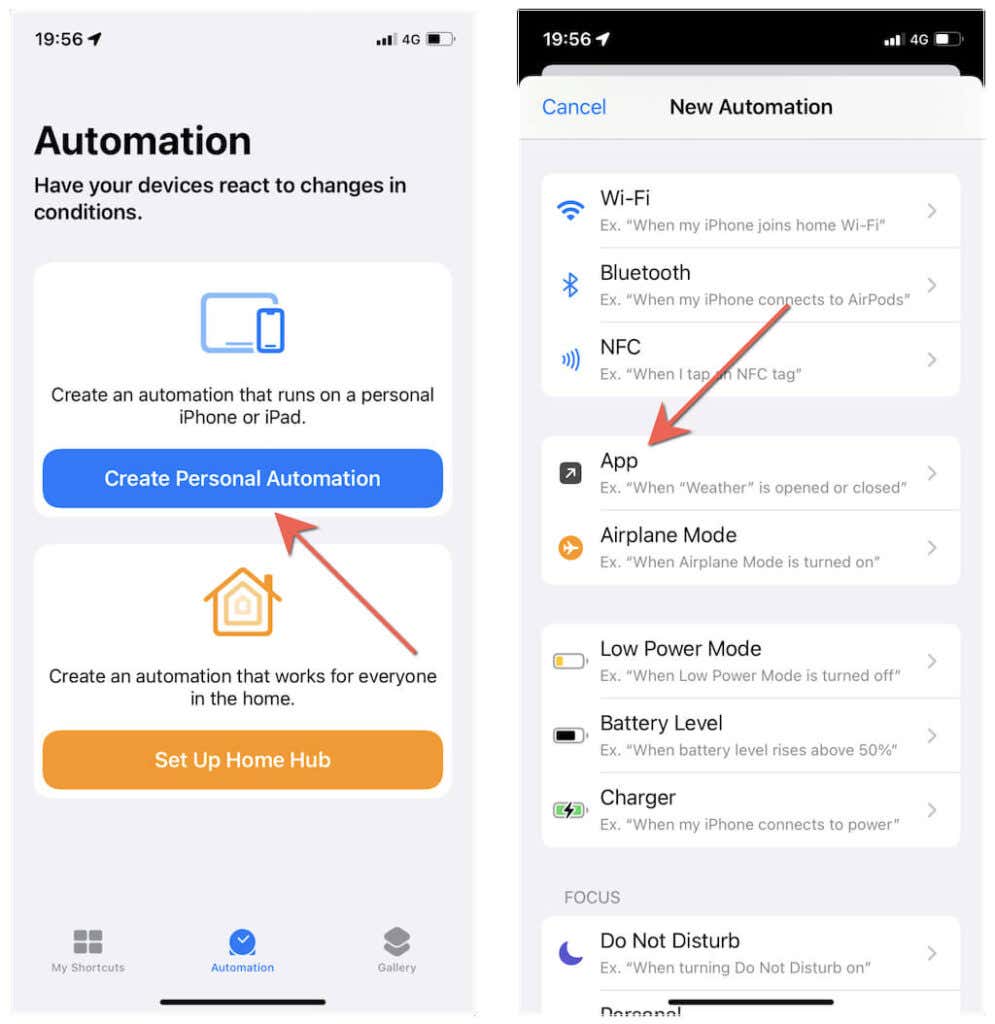
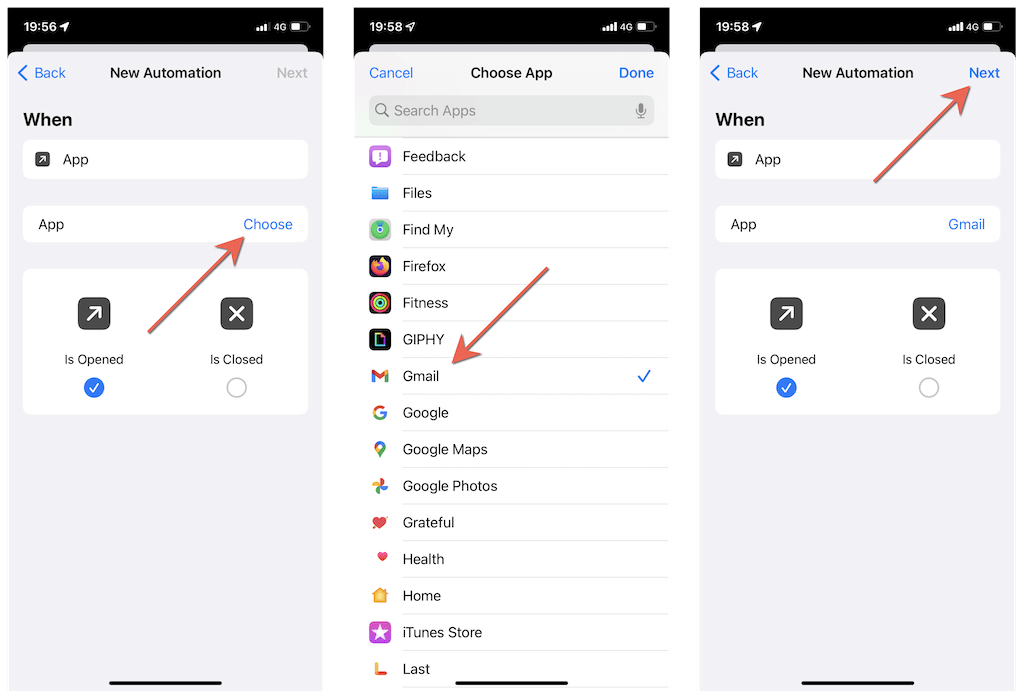
- Tap Choose , select the app you want to lock, and select Done > Next .
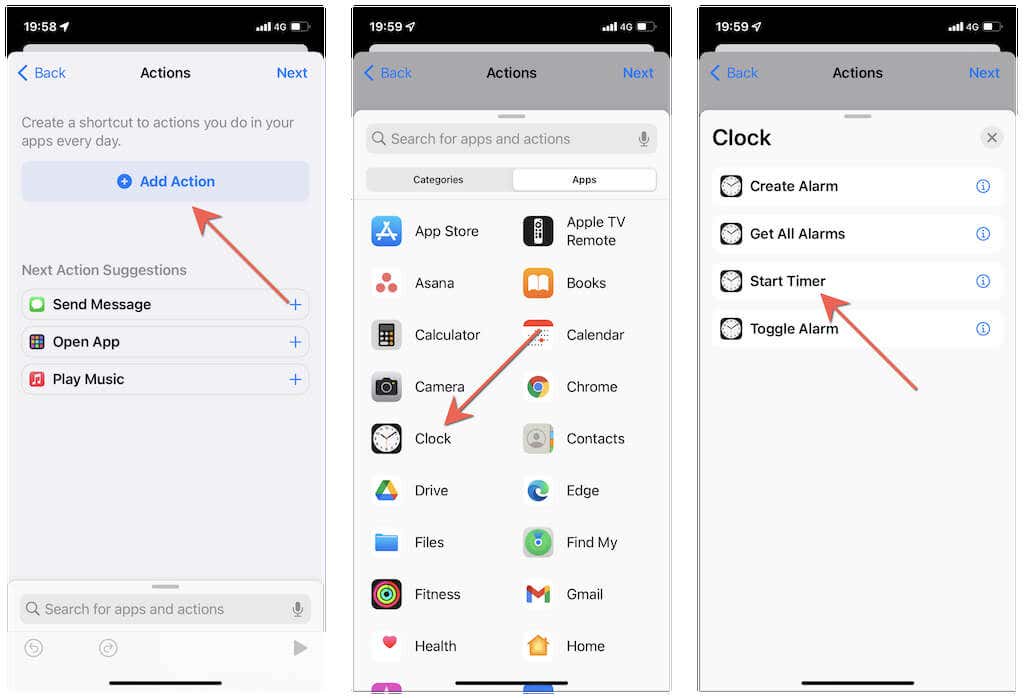
- Tap Add Action . Then, switch to the Apps tab and select Clock > Start Timer .
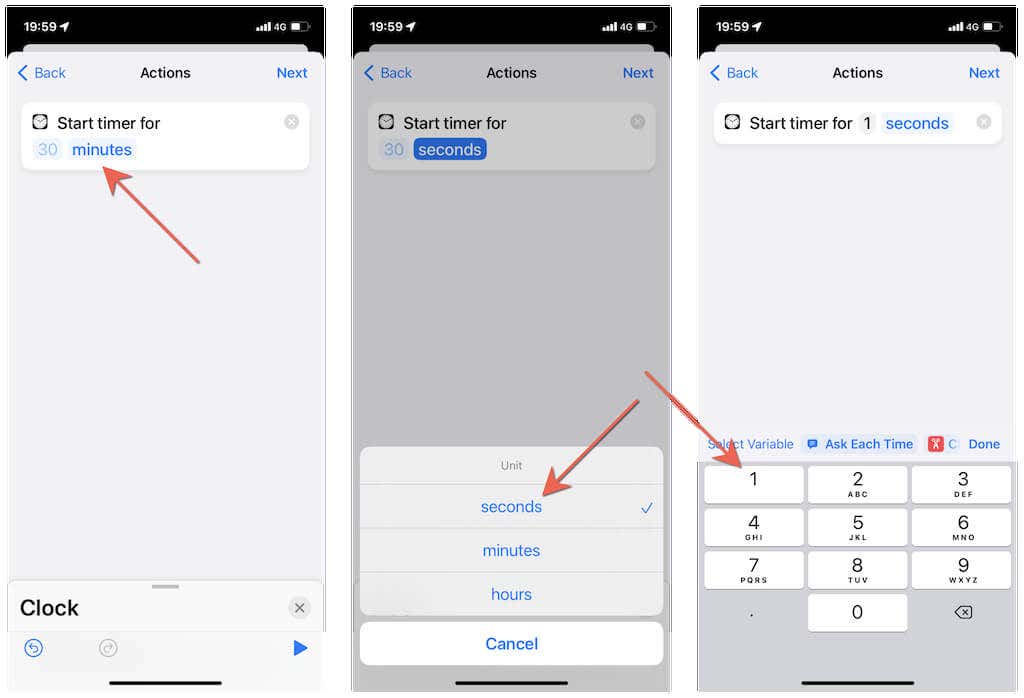
- Change the default 30 seconds value under Start timer to 1 second and select Next to continue.
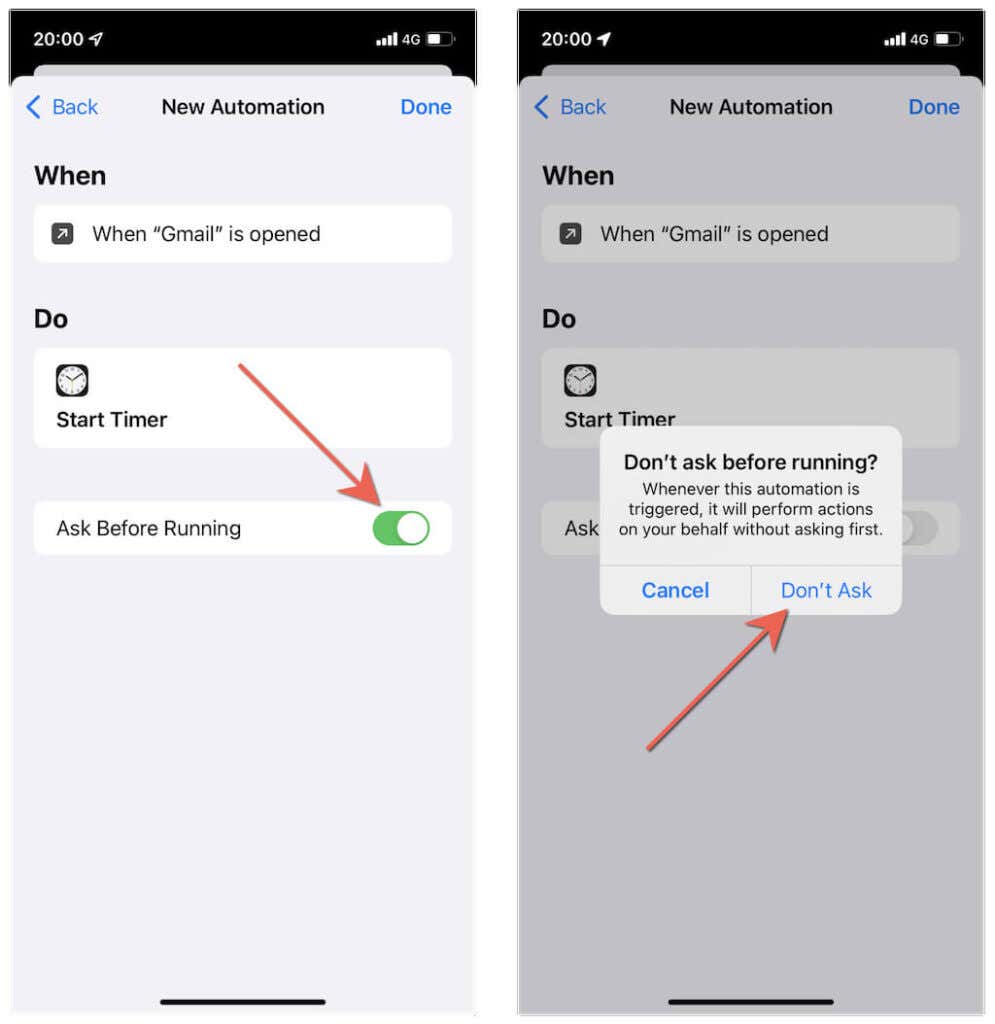
- Turn off the switch next to Ask Before Running and tap Don’t Ask . Then, tap Done to finish creating the automation.
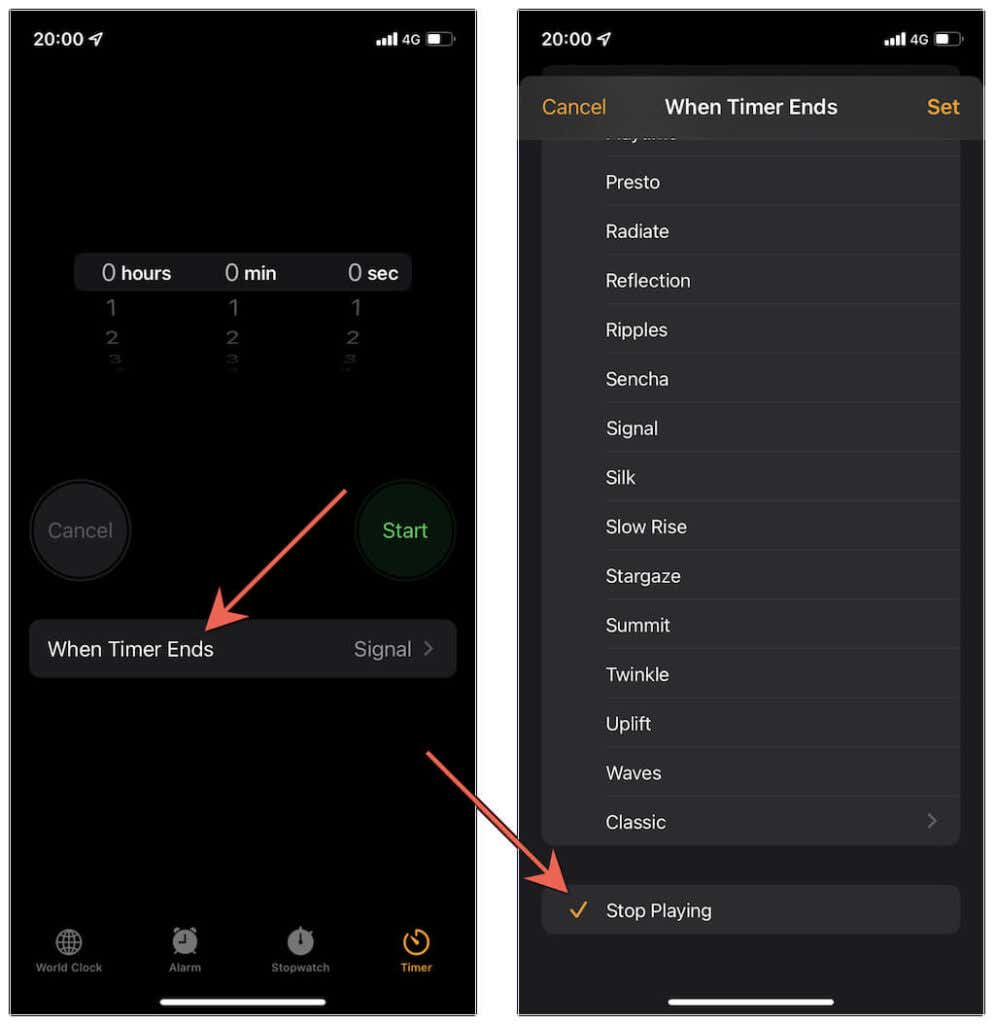
- Open the Clock app on your iPhone or iPad, switch to the Timer tab, tap Timer Ends , and select Stop Playing .
- Try to open the app you just locked, and the automation will trigger and kick you out to the Lock Screen. If you want to use the app, just unlock the device using Face ID or Touch ID.
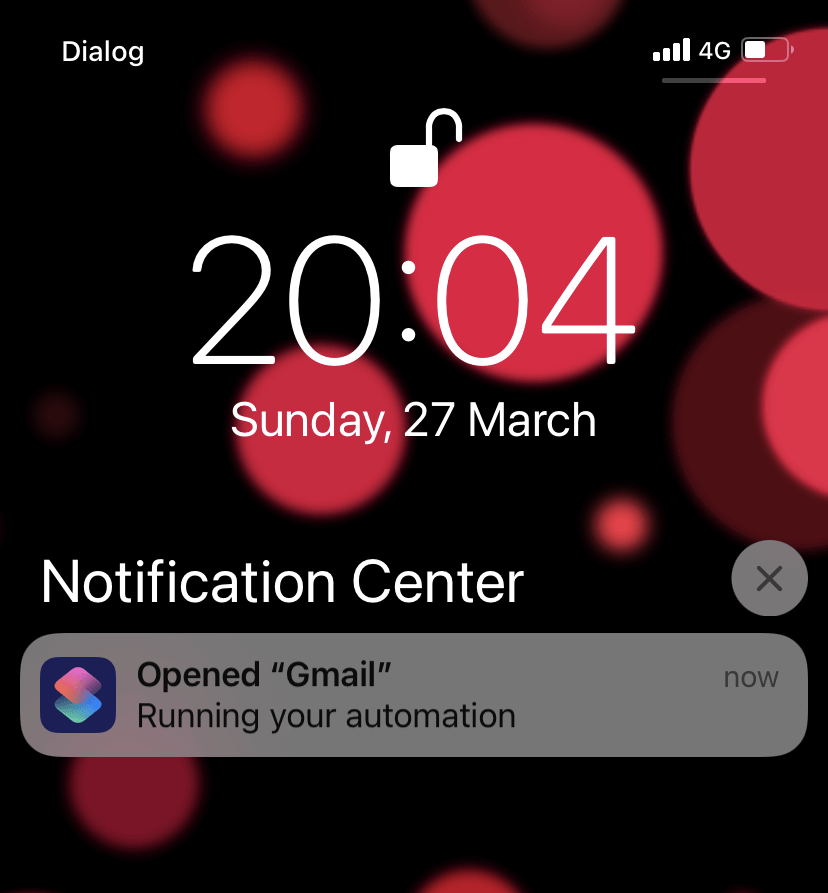
Tip : Do you want to disable the “Running your automation” alert on the Notification Center? Visit Settings > Screen Time > See All Activity > Notifications > Shortcuts and deactivate the switch next to Allow Notifications .
Use Guided Access to Lock Apps
Guided Access is an accessibility feature that you can use to restrict someone else to a single app. You must enable it before you can use it.
- Open the Settings app. Then, scroll down and tap Accessibility .
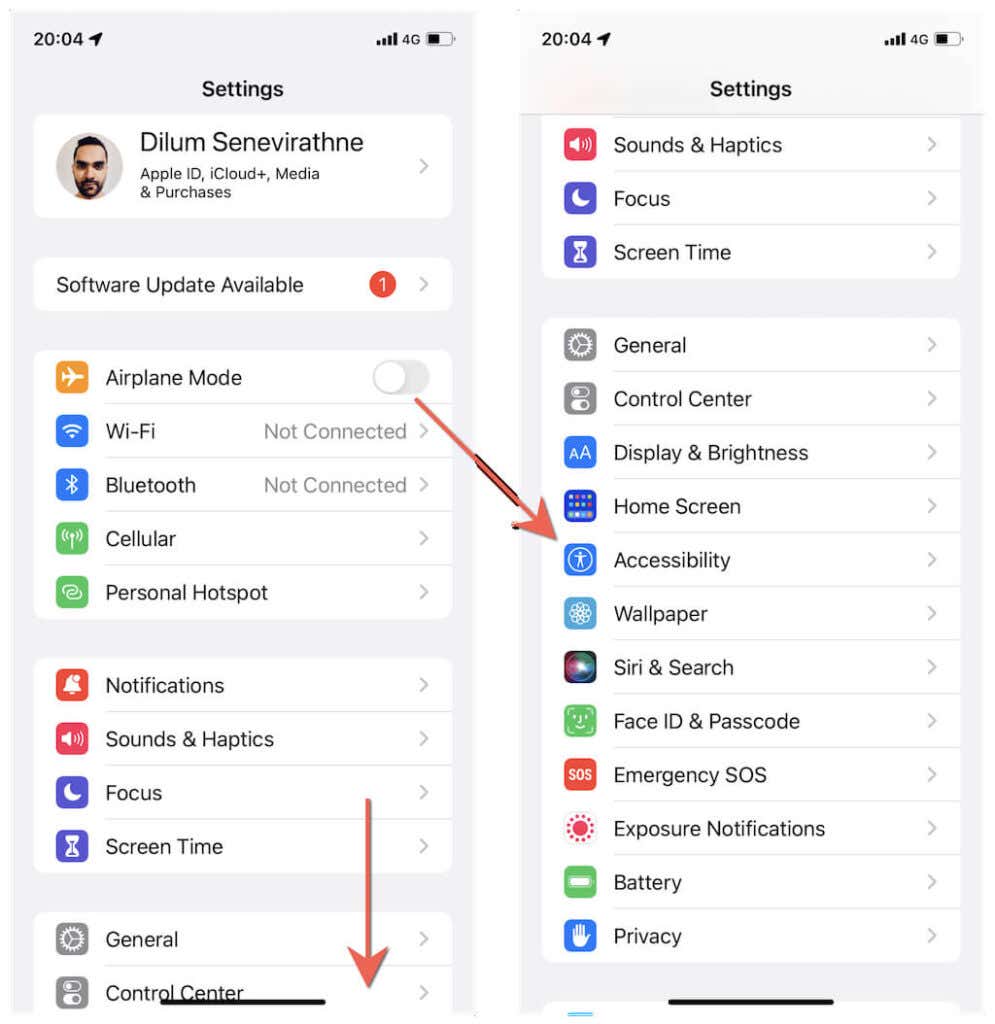
- Scroll down the Accessibility screen and tap Guided Access . Then, turn on the switch next to Guided Access .
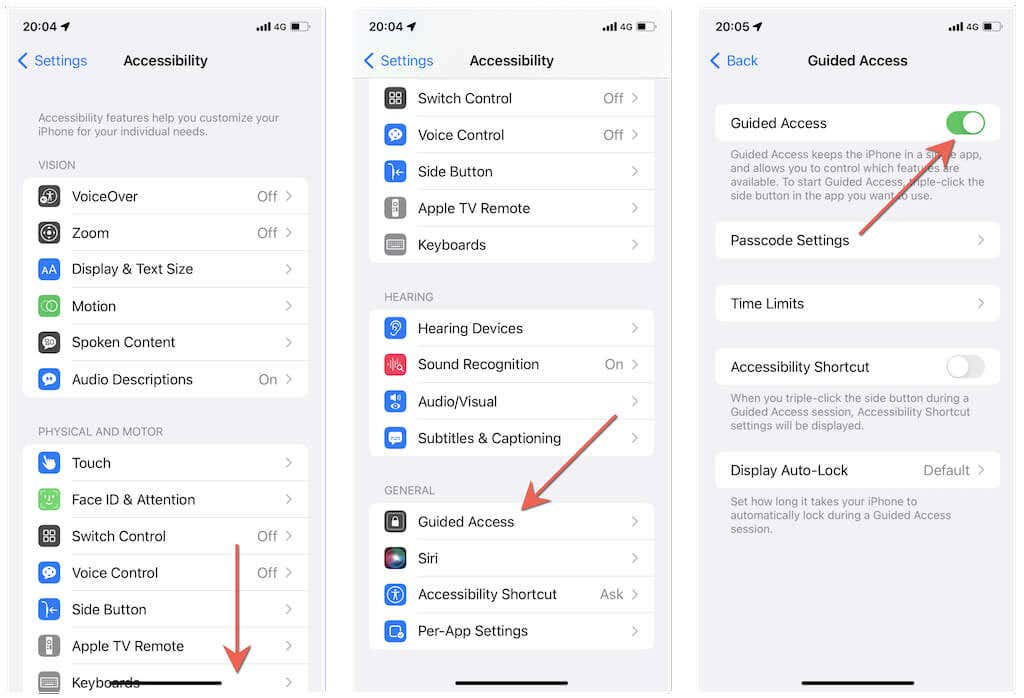
You can now triple-click the Side button (or Home button on Touch ID devices) to initiate a Guided Access session. To end it, just double-click the Side / Home button. Your iPhone or iPad will automatically use Touch ID or Face ID to authenticate the action.
Total Lockdown
As you just saw, you’ve got multiple ways to lock iPhone and iPad apps. Admittedly, none of the workarounds above are perfect. Still, they should prove helpful until Apple adds the ability to lock whatever app you want directly to the system software.
Having said that, it’s a good idea to stay away from any app-locking methods that involve jailbreaking your iPhone or iPad. Not only does a jailbroken device void your warranty, but you also open up the operating system to numerous security issues .
- How to Delete Multiple Apps (At Once) On Your iPhone/iPad
- How to Restore the Missing Phone Icon on iPhone/iPad
- How to Dismiss the “Update Apple ID Settings” Notification on iPhone and Mac
- How to Change Your Game Center Nickname (iPhone, iPad, and Mac)
- Guided Access Not Working on iPhone/iPad? Try These 9 Fixes Now
Passcodes suck. They take a long time to type in, it’s easy to forget them and most people probably pick something really easy to guess, which hurts their security. This is why biometric unlock methods are so popular.
All but the most inexpensive smartphones now have fingerprint scanners built-in. One little touch and your phone unlocks, which is pretty convenient. But more devices are also now using facial recognition instead since screens are getting so large. Apple is no different and offers devices that use both of these technologies to secure them. Technologies that are officially known as Face ID and Touch ID.

But how do Face ID and fingerprint scans work?
What Are Face ID & Touch ID?
The obvious answer to this question is that Face ID is a face unlock system and Touch ID is a fingerprint unlock system. Job done. End of article. Right? Well, it’s a little more complicated than that because although lots of different companies use faces and fingerprints to unlock their devices, they don’t all work in the same way.
These two biometric systems are Apple’s proprietary solutions to the biometric problem. This matters because companies like Apple feel that their approach and technology are more secure than their competition. It matters because hackers and other security specialists have managed to fool systems like these in the past.
As you’d expect, there’s a race between the creators of biometric security sensors and those who want to defeat them. You must know how the sensors on your Apple device work and what their limitations are.
How Does Face ID & Touch ID Work?
Touch ID is Apple’s most mature biometric system and you’ll find it on certain models of iPhones, iPads, and MacBook Pros. Its sensors use the sapphire crystal as the button material. This is very hard and incredibly resistant to scratches, which is why high-end smartphone cameras also use sapphire lens covers.
When you place your finger on the button, a very high-resolution image is taken of your fingertip. A proprietary software algorithm then examines the image, transforming your fingerprint into pure math. This is then compared to the stored mathematical transformation of the fingerprint that was registered when Touch ID was set up. If they match, then the device unlocks.

Face ID works in a pretty smart way as well. Many devices use a normal camera for facial recognition. It compares the photo it has on record with the one you are presenting to unlock the device. The software that does the facial matching is quite sophisticated, but many of these cameras can’t tell the difference between a photo or a mask, so they can be fooled into unlocking.
Face ID, on the other hand, makes use of a specialized TrueDepth camera to create a very detailed depth map of your face. One with over 30 000 points. It combines this with an infrared image of your face to create a facial profile. The neural net machine learning hardware components of modern Apple mobile device processors make this level of sophistication possible.
So how secure are these technologies and are they good enough for you to trust?
General Biometric Security Flaws
First of all, some security vulnerabilities apply to biometric systems in general. The biggest problem with using an aspect of your biology to unlock something is that you can’t change it. If someone managed to make a perfect copy of your fingerprint or face, they could unlock anything. If someone figures out a password or passcode, just change it.

This sort of thing has happened in the past and the way that biometric sensors have got around it is by becoming more detailed and looking at multiple aspects of your biology. For example, finer details of your fingerprints or the presence of body heat. Those who want to defeat these systems have to get better at replicating your biology, which is impractical for the average hacker at a certain point.
The biggest weakness of biometric systems is a pretty simple one. Someone can simply take your finger or face and force you to unlock your device. That’s different from a password or code which you can “forget” or otherwise withhold. We’ll deal with this scenario at the end of the article.
How Secure Are Face ID & Touch ID?
This is a bit of a loaded question since that depends on what your definition of ‘secure’ is. Usually, the security of systems like these is expressed as the odds of someone randomly beating them. That’s the “brute force” method of cracking a digital lock. For Touch ID there’s only a 1 in 500,000 chance of someone’s fingerprint being similar enough to yours that Touch ID will be fooled.
Of course, that’s very different compared to someone making an impression of your fingerprint or creating fake ones from a scan. Then again, how likely that is to happen depends on who you are and if someone would be motivated to take this extreme path. If you’re a VIP who draws this sort of attention, you shouldn’t be using biometrics, since they aren’t secure enough at that risk level in our opinion.

Face ID is more secure from a brute force perspective according to Apple’s numbers. With a one-in-a-million chance of a random person looking enough like you. Identical twins are perhaps the exception here. So what about photographs or masks that replicate your face? Face ID has countermeasures for this. As mentioned above, photos won’t work since the camera can sense depth. It uses neural net technology to also mitigate against the use of masks.
There are no numbers to tell us how effective this is, but once again for the average user, no one is going to spend thousands or even millions of dollars creating technology to defeat Face ID. If you’re the president of a country, don’t use biometric locks.
Activating The iOS Biometric Killswitch
Now only one issue remains. What if someone is in a position to force you into unlocking your phone? They just have to point it at your face or put your finger on it, after all. If you think you may be entering this situation, you can simply click the on/off button five times and biometrics will be disabled in favor of a passcode.
On the iPhone 8 and up you need to squeeze the side button and either of the volume buttons. These methods could be different when you read this, so be sure you look up the biometric killswitch method for your specific iOS device.
In short: Face ID and Touch ID are plenty secure for most people, but not for people who need military-grade security. If you are however very paranoid, use a six-digit passcode instead.
- How to Fix Face ID With a Mask Not Working on iPhone?
- How to Use Face ID on iPhone With a Mask On (No Apple Watch Required)
- Is iPhone Face ID Safe To Use?
- Fix Apple Watch Charging Problems (All Models)
- How to Use Your iPhone as a USB Drive on Mac and PC
