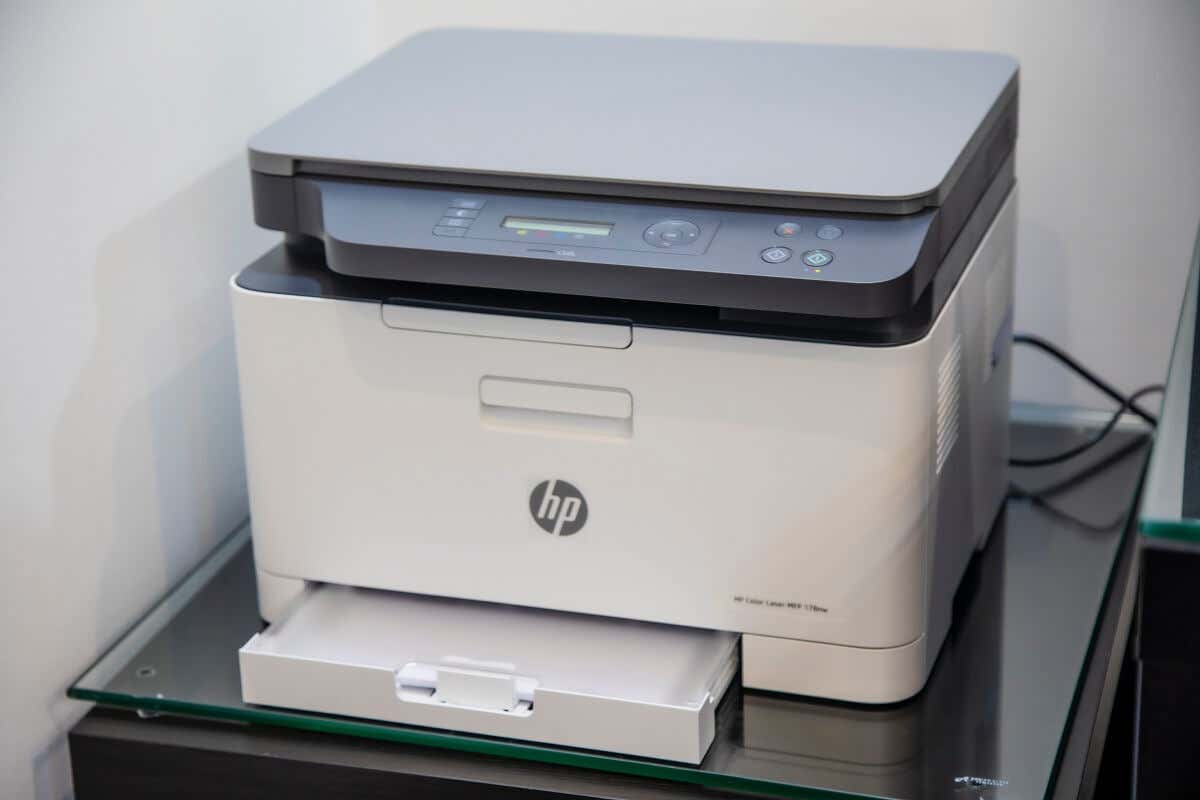
In the cult-classic film Office Space, there’s an iconic scene where a group of office workers take their lamentable printer/copier into a field and proceed to destroy it with a vengeance while an explicit rap song plays in the background.
For many people that scene is a form of wish fulfilment. If only we could take the printers that make our own lives a misery out to a field for a quick execution. Unfortunately, that’s not really an option in real life, so your best choice is to find and fix printer problems as they crop up.
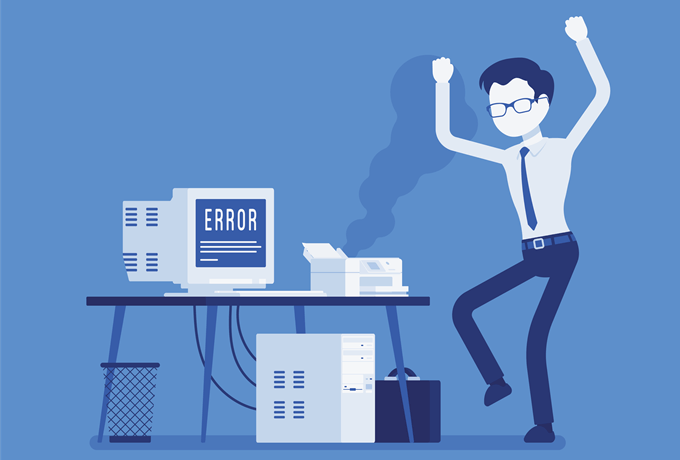
Although printer problems can feel like infuriating mysteries, once you know where to look and how to narrow down the causes of your issues most of that pent-up rage should disappear. Unfortunately, we can’t help you with any other deep-seated issues that remain. Let’s start off with the quick and easy troubleshooting checks.
Turn It Off and On Again
Yes, it’s a bit of a joke, but so many random problems go away when you just restart things. In this case that means restarting both the computer and printer. Resetting your gear is always a good first step.
If it’s a wireless printer, make sure to restart your wireless router just to make sure the network is running properly.
But, The Printer Doesn’t Power
On!
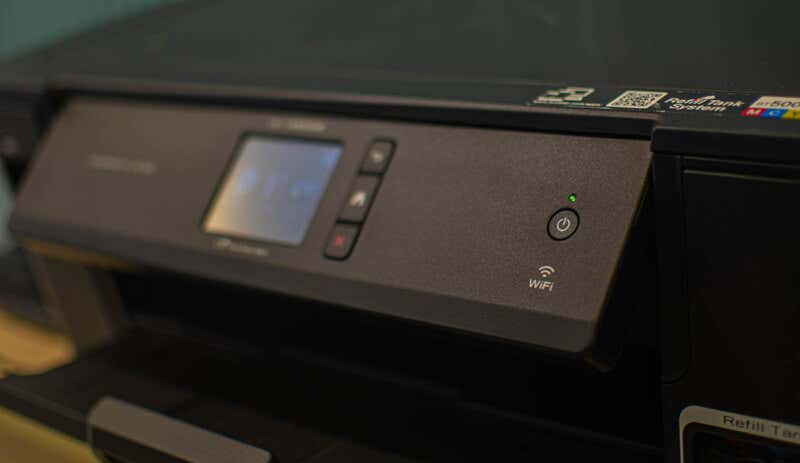
If your printer has been working properly and then suddenly won’t play ball any more, the first thing you should check is whether it’s powered-on. Yes, it seems like a simple issue, but even the most tech-savvy among us can overlook something as simple as a dead outlet/power strip, loose cable or busted printer power supply.
So check whether the outlet works properly either by plugging the printer into a known working outlet/power strip or by plugging a known working device into the suspicious outlet.
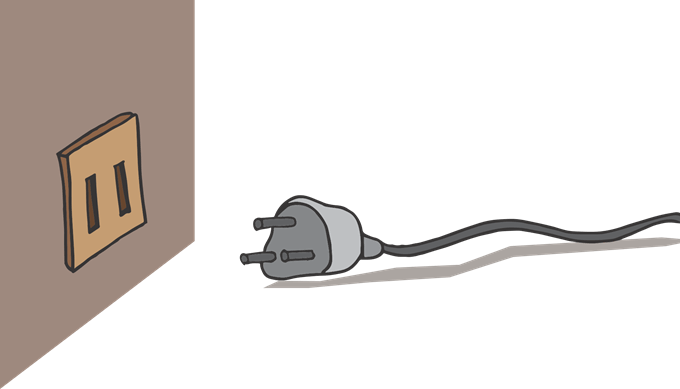
If the outlet is fine, the next step is to check the cable itself. It may have pulled out of the printer or the cable could be damaged. If you don’t have another cable to swap out as a test, you can also use a multimeter to make sure that power is making it all the way through the cable.
Some printers have two power switches. One operates the power supply. This is usually hidden at the back of the machine, near the power connector. The other is the one you’d use to switch the printer on during normal operation. The front power switch isn’t a power switch, but a standby toggle. In any event, if the power supply switch is off, nothing else will work either.
The Data Connection
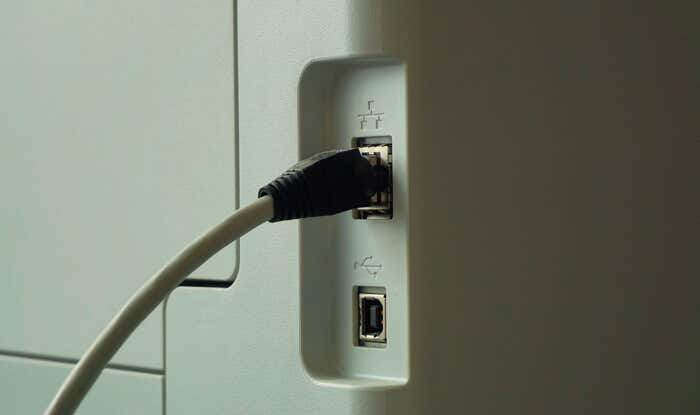
Your printer needs more than just power in order to produce printed pages. It also needs data from the host system so that it knows where the ink should go. In the old days, this data flowed over a parallel port connection. However, that connection standard is now obsolete and just about every printer on the market will use the ubiquitous USB standard.
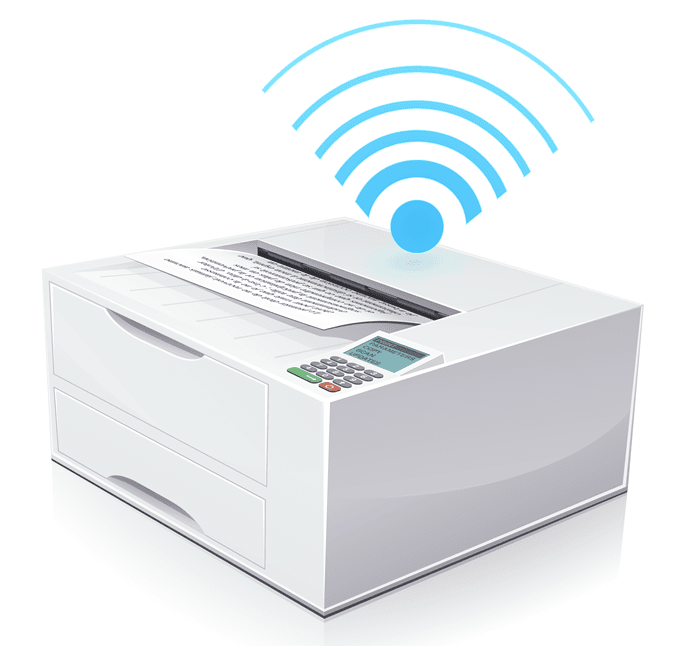
It’s also becoming more and more common for printers to have Wi-Fi modules, which turns them into home network printers. Printers can also come with an Ethernet connection, but this is more common with enterprise level equipment.
Whatever connection type your printer uses, checking that all of the connections work properly is one of the most basic printer troubleshooting steps .
With wired connections, make sure the plugs on either end are connected properly. If that doesn’t fix the problem, test the cable on another device, or swap the cables with known working ones from another device.
For Wi-Fi-connected printers, things are a little trickier. Refer to the manual on how to connect the printer to Wi-Fi and try to connect manually. You can also go into your router’s dashboard to check the list of connected devices . You can quickly determine if the printer has successfully connected to the network or not.
It’s also a good idea to temporarily try a wired connection if the Wi-Fi doesn’t seem to work. If that fixes the issue, then you know the problem is somewhere in the Wi-Fi chain.
Error Messages Can Help
(Sometimes)
If your printer does come on but has another issue, then you are embarking on a different troubleshooting journey.

Believe it or not, printers have become a lot smarter over time. They can often tell you exactly what’s wrong or at least help move you in the correct direction. If the printer has a warning light or a screen, you can refer to the user manual for that model to interpret what the self-diagnosed error is.
Papers Please
One of the most common reasons that a printer refuses to budge is because it lacks paper. On small home inkjet printers, it’s easy to see if there’s any paper left in the feeder tray.
However, you may still get a paper error despite paper being visible in the tray. In this case the issue usually solved by removing the paper, neatly aligning it and then putting it back into the tray properly so that the feeder mechanism can grab the next sheet properly.
Laser printers tend to store their paper sheets in a tray, which slides completely into the machine. So if the printer says it has no paper then it usually means simply refilling the tray.
There is one wrinkle to this though. Some printers have multiple sources of paper. For example, one tray for A4 sheets and another for A3. You may have the wrong paper source selected if you check the tray and find paper there.
For example, when printing on envelopes or notecards, you normally have to use a much smaller tray that pulls out separately. It can sometimes be hard to find this tray, so check your printer manual in this case.
Getting Out of a (Paper) Jam
A paper jam happens when paper literally jams the roller mechanisms that move paper through the system. This could happen for several reasons. For example, the printer may pull in more than one page at a time. A sheet of paper could be pulled in at an angle or have a fold or tear in it.
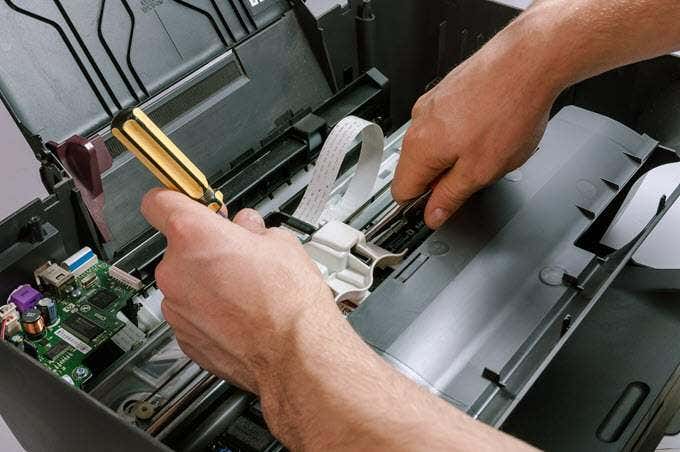
In order to resolve a paper jam, you’ll have to open up your printer. All printers have an access panel from where you can get to the rollers and the rest of the feeding mechanism. Open that panel and then carefully extract the paper.
Using good quality paper will help prevent paper jams. The printer’s manual should list the recommended paper types.
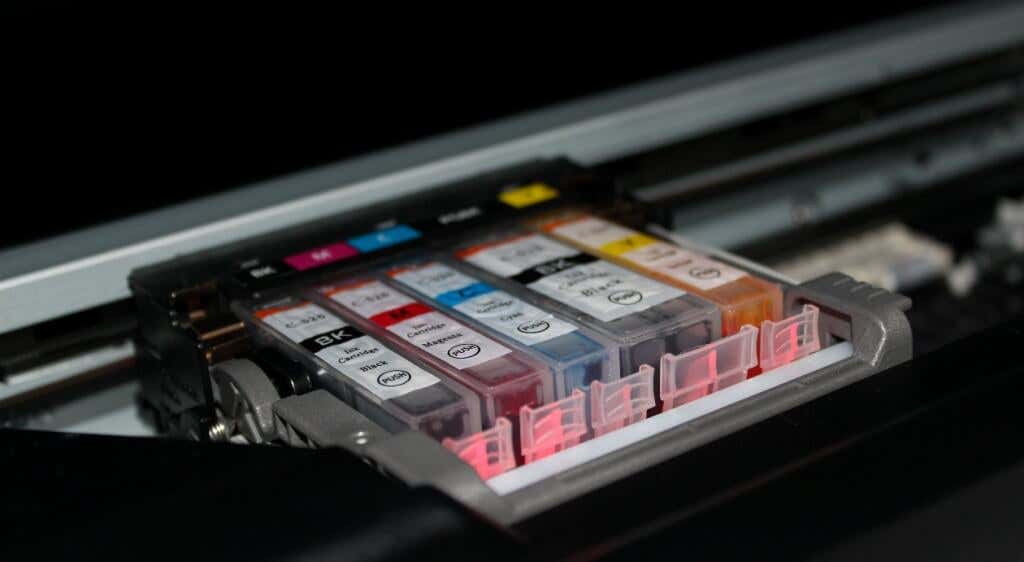
Ink and Toner
If your prints are coming out faded or otherwise not as they should, you could be running low on ink or toner. Depending on the type of printer you are using, not all printers can measure this directly, especially in the case of inkjets.
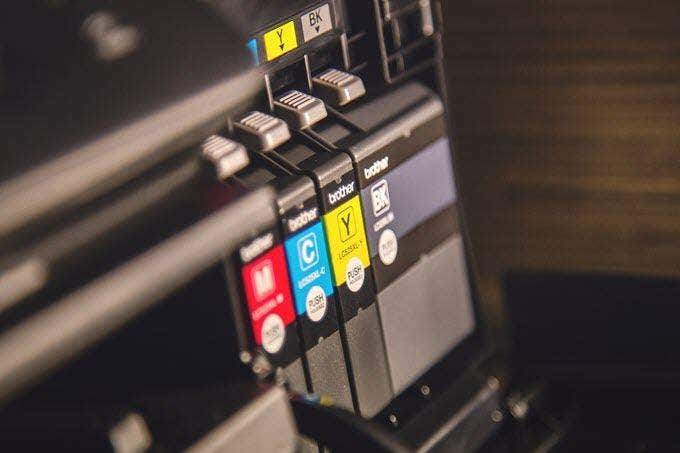
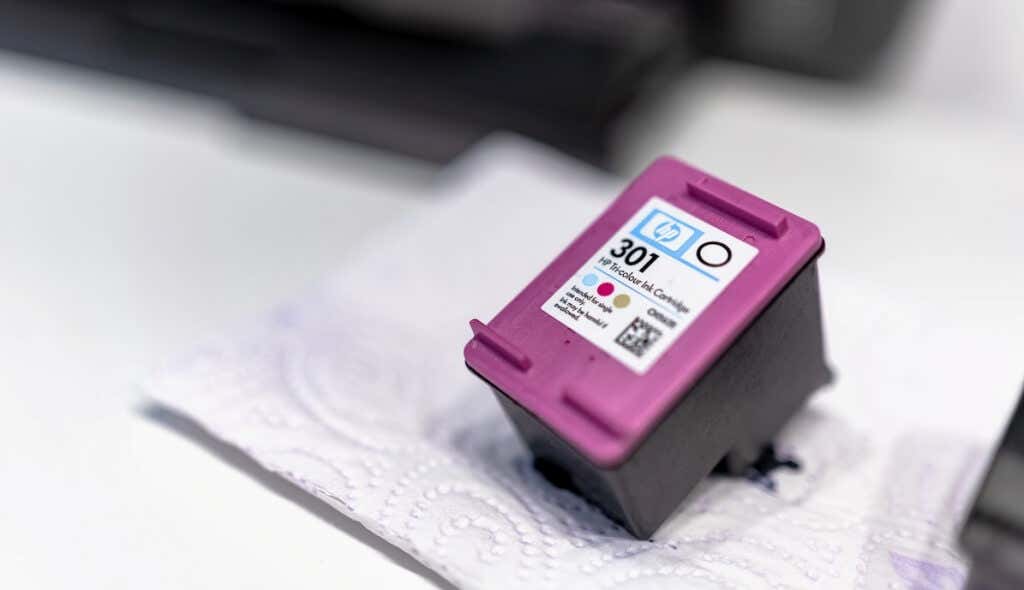
They rely on you telling them when a new tank of ink is installed and then guesstimate how much is left based on how much has been used. Sometimes that calibration gets reset, so the printer reports there is ink when there is none. If your prints look a little colorless, consider replacing the ink cartridges.
Windows Woes
A common source of printer problems isn’t the printer at all, but the computer and its operating system. We’ve come a long way from the janky printer software and drivers haunting the early days of personal computing.
In Windows 10, the first stop is check out your printer settings under “Printers and Scanners”. Just open the Start Menu, type “Printers” and click on “Printers and Scanners”.
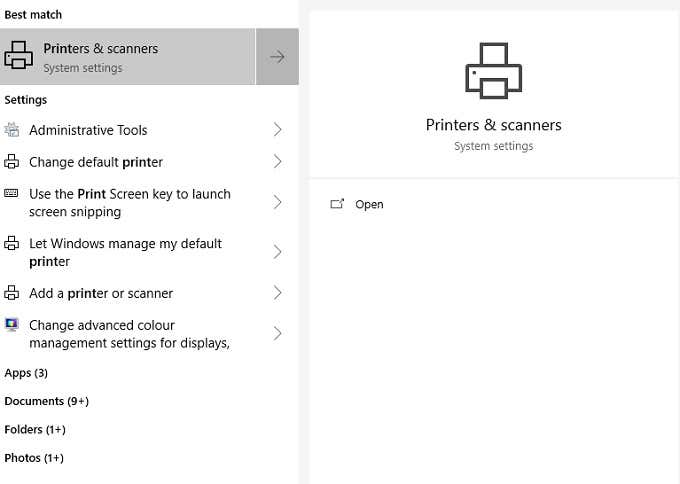
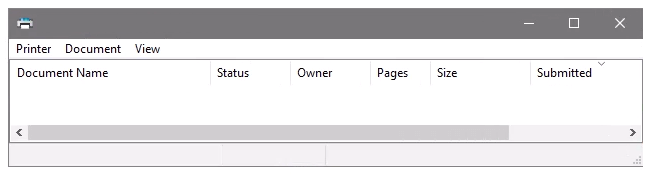
Here you see connected printers listed. If your printer is listed, it means Windows sees it OK. Click on the printer listing.
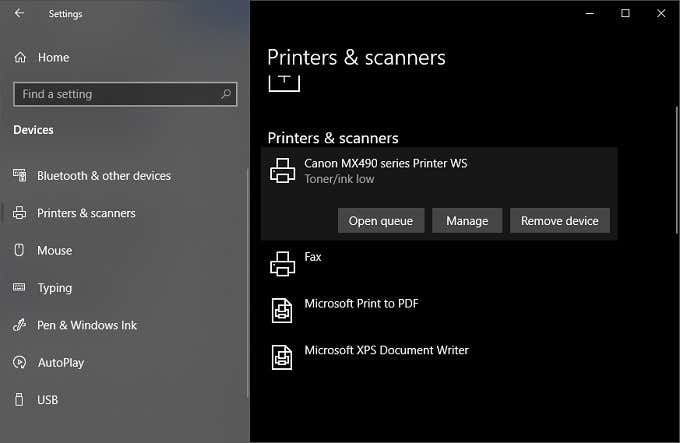
Three option will drop down. Click on “Open Queue”
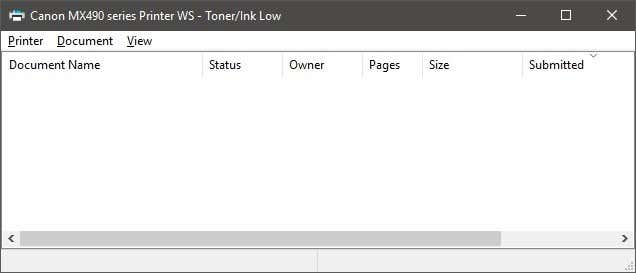
Here you can see any print jobs that have stalled or otherwise messed with your prints. You can cancel them here directly and clean up the pipes.
You can also read our other posts on how to clear the print queue manually if you can’t do it using the GUI interface shown above.
Software, Hard Times
When your printer is giving you grief, but seems to be physically OK, the first step is to update your drivers and software. Search for your printer model’s support website and find the latest software and drivers for it. We recommend that you uninstall the current drivers and software, just in case something got corrupted.
If the problem persists after cleanly reinstalling both drivers and software , you need to look elsewhere.
One quick way to resolve printer issues is to delete the printer and then try to reinstall it. You can read our previous guide on how to install a wireless or network printer in Windows 10.

If your printer worked perfectly not too long ago, you can use System Restore to roll things back to that date. If that fixes the problem, then you know it was a new software package (such as an antivirus) or other change like a Windows update that borked things.
Most printer manufacturers also have their own printer troubleshooting software. I’ve written about HP Print and Scan Docto r to resolve common printer issues.
Use A Different Computer
If you want to rule out the computer as the problem, the easiest way is to hook the printer up to another computer. If the problem goes away, then the culprit is clear.
If your computer is the problem and none of the remedies above work, then you may want to consider resetting or reinstalling the operating system. It’s a measure of last resort, but after eliminating the most common issues, it might be the fastest way to get back on track.
- How to Fix the “Error – Printing” Status Error in Windows
- HP Printer Not Printing Black? 10 Fixes to Try
- How to Fix Missing or Failed Printhead Error on HP Printers
- How to Add a Printer to Your Chromebook
- How to Fix the Printer Error “0x0000011b” on Windows
Founder of Help Desk Geek and managing editor. He began blogging in 2007 and quit his job in 2010 to blog full-time. He has over 15 years of industry experience in IT and holds several technical certifications. Read Aseem’s Full Bio
Few things are more frustrating than when you want to print a document, and your wireless printer is in an error state, or gives you the silent treatment. Perhaps you’ve tried to connect your WiFi printer to the network in your home, but the problems persist, leaving your printer stubbornly off the grid.
Ideally, a wireless connection should allow you to transfer documents easily from your device to the printer, but it’s not always that simple in reality.

Knowing how to troubleshoot wireless printer issues can relieve some of that frustration. We’re going to cover some fixes that’ll help you work through most of them below.
Troubleshoot Wireless Printer Problems
- Check the basics.
- Set your printer as the default printer.
- Restart all your devices.
- Run the Printing Troubleshooter.
- Check Router settings.
- Update router firmware.
- Disable VPN connections.
- Make printer IP address static.
- Check Firewall Settings.
- Change your SSID.
- Uninstall and reinstall printer driver and software.
- Uninstall and reinstall the printer.
- Clear and reset print spooler.
- Reset your printer.
Check The Basics
It’s possible to overlook some basics so here’s what to check for before moving to advanced steps:
- Make sure the printer is on or that it has power.
- Connect your printer to your computer or other device
- Check the printer’s toner and paper, plus the printer queue. Sometimes a print job with an error may hold up the line, the travel time for files from your device to the printer may take more time, or a larger document may take longer to download and process.
- Check for any warning lights or error messages on the printer.
- Make sure it’s connected to WiFi.
- Use a USB cable to connect and see if it works again.
- Move your printer to where it gets the best WiFi signal without interference. Ideally, it shouldn’t be too far from the router.
- Confirm that your device is also on the right network especially where there’s a WiFi range extender as this creates separate networks, making it harder to connect.
- If you recently updated your browser, security software, operating system or firewalls, it could cause issues connecting to your printer. In this case, reconnect your device to the network, reconfigure security settings to include printers, and/or install updated drivers.
You can also perform a System Restore to go back to the default version or settings and try connecting to your printer again.
Set Your Printer As The Default Printer
It’s possible that you’re trying to connect to a WiFi printer that has set itself as the default. Sometimes a printer may install software that has a “virtual” printer so that when you hit the Print command, the virtual printer saves the file instead of the actual document you’re sending to the physical printer.
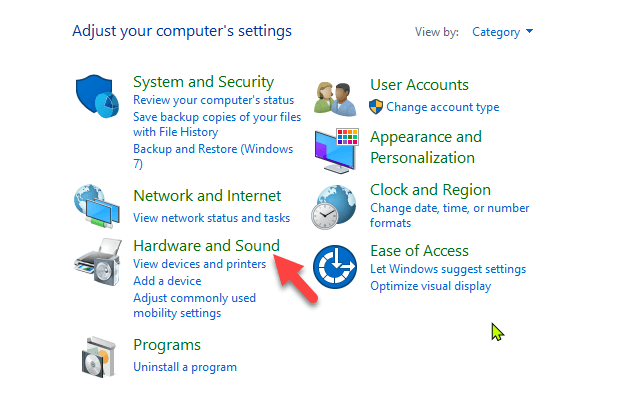
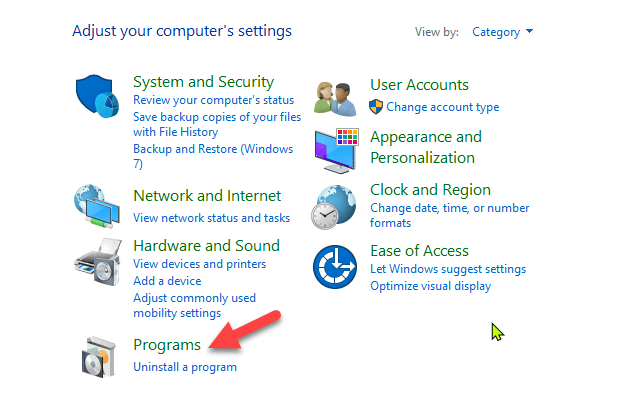
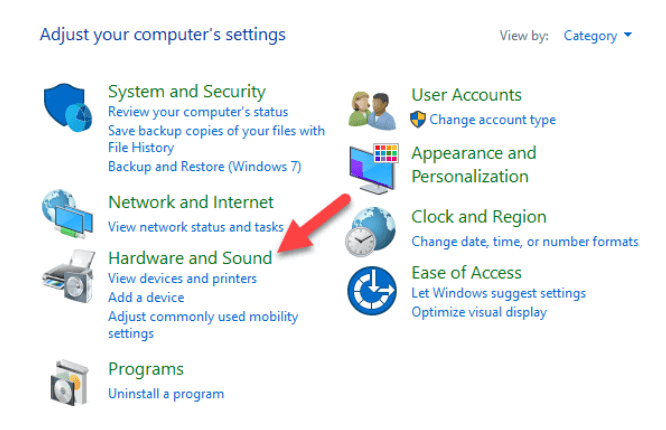
- Click Start > Control Panel > Hardware and Sound .
- Click Devices and Printers .
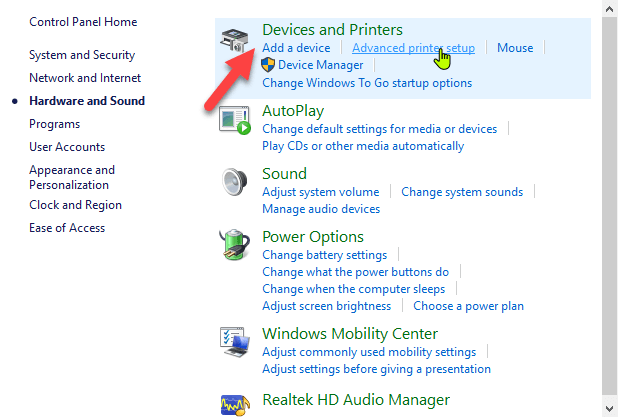
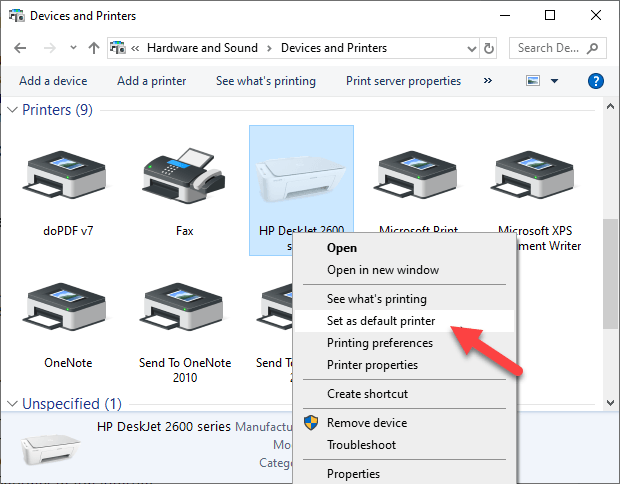
- Right-click your printer and select Set as default printer . Click Yes (or OK) to confirm the action.
Restart All Your Devices
A restart helps fix any software glitches that could cause your wireless printer and connected devices not to work properly together. The wireless printer, router, computer/other device, wireless access point and modem all rely on your home or office network in order to connect to the internet.
However it’s configured, if one device acts up, it may affect all the others. A restart can get the network humming again, after which you can try the printer to see if it works.
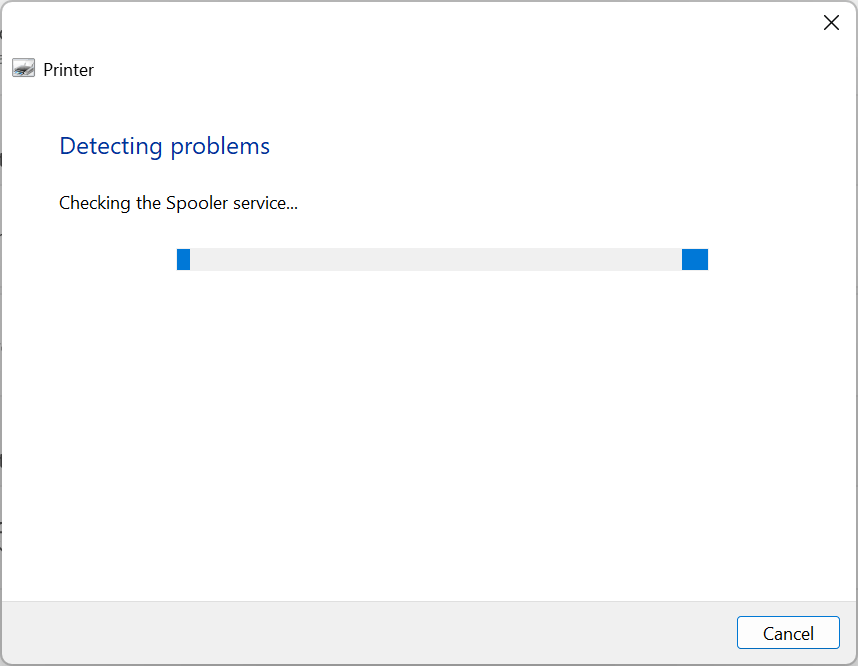
Run The Printing Troubleshooter
To do this, open Control Panel > Hardware and Sound > Devices and Printers .
Right click the printer icon and click Troubleshoot . The printing troubleshooter to identify and fix problems connecting to your printer.
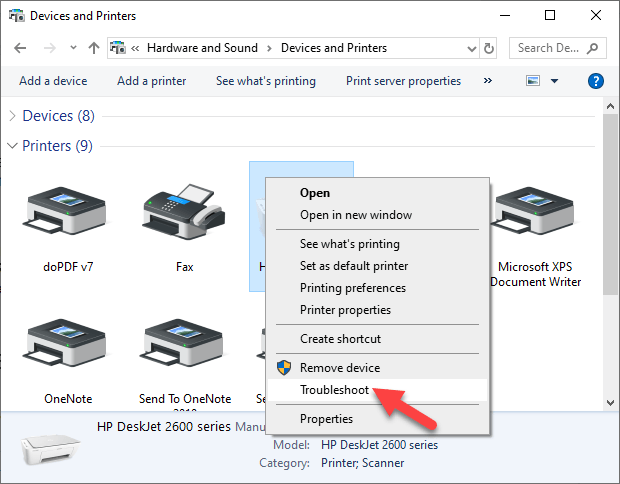
- Alternatively, go to the search box on the taskbar and type Printing problem in , and then select Run Troubleshooter to download the printing troubleshooter . Click Open and follow the on-screen instructions.
Check Router Settings
If you replaced your router recently, you may have to reconfigure the computer and printer to reconnect with your network.
The new router may have a different ISP address that needs reconfiguration, and adjustment of router settings, some of which may be unsuitable for your wireless printer.
- To check router settings, open your browser and type its IP address and press Enter. If you’re not sure of the IP address, read our post how to find the IP address of a router. You can try using admin as the username, and password as the password, which are the commonly used default passwords for routers.
- Find the Wireless or Security section and adjust the settings to default for the printer to connect.
A few things you can check in the router settings include:
- MAC address filtering – disable it as it really doesn’t make your network secure.
- Check if your router is in the 2.4GHz frequency band, which most wireless printers easily connect to compared to connecting to the 5GHz only mode.
- Use a WiFi channel that’s least used by other local networks. For printers that aren’t connecting, channels 1, 6, and 11 usually work best, instead of the default “Auto” channel selection setting.
- Disable wireless isolation mode setting and try connecting to the printer again.
- Enable DCHP to allow your printer to acquire an IP address and communicate over the network, and attempt reconnection.
- Check that your router, device or printer has a guest connection, as this isolates them from other devices on a network, and prevents your wireless printer from connecting.
Update Router Firmware
If changing the router settings didn’t help, update its firmware to address bugs or vulnerabilities and connectivity issues.
For example, moving to Windows 10 from a different version could create an interruption to your connection, which a firmware update could solve.
Check your router’s manual or consult the device manufacturer for further instructions as the steps may vary with different routers. Some may also require special instructions to connect to wireless devices, especially those provided by ISPs.
Disable VPN Connections
If you’re using a virtual private network to connect securely to a remote network, it could restrict you from printing through your WiFi printer. This happens for security reasons, but you can disable the VPN connection and try to connect to the home network and resume printing functions.
Make The Printer IP Address Static
IP addresses can fluctuate in a particular range, whether or not your device remains in the same spot. This can be confusing especially where several devices are attempting to connect wirelessly over a given duration.
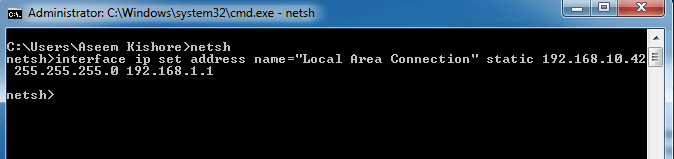
In this case, check your router’s manual for instructions on how to set a static IP address for your printer so that it won’t change with time.
Check Firewall Settings
Your device’s firewall is designed to block any attacks from malware , but it could also block network settings for printing. It could be overprotective of your device depending on how it’s configured, and won’t let it see your printer over the local network.
Firewall settings vary though, in which case you should check the user guide or vendor’s website for support resources.
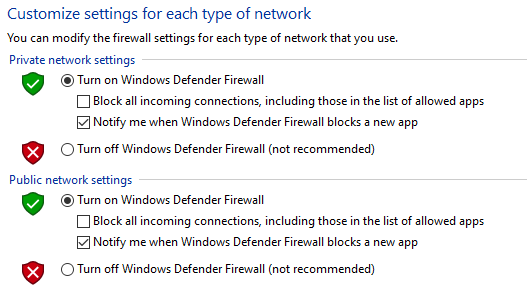
Make sure you keep your software up-to-date, set firewall settings to medium or “Trusted Zone” where your device is connected to a network, and enable it to show all alert messages.
Check that you don’t have multiple firewalls enabled at once as this causes several wireless printer connection issues or you may find your wireless printer not printing.
Change Your SSID
Changing the name of your WiFi network (SSID) may solve connectivity issues. If there are multiple routers with a similar SSID like Home , you can change one of them to make it recognizable by your printer and resolve connectivity errors due to drops in connection or incorrect wireless connection.
Doing this means you have to reconnect a computer system or compatible devices to the right network that the printer is connected to.
Uninstall & Reinstall Printer Driver & Software
This involves reinstalling or reconfiguring your printer’s special network drivers.
- Open Control Panel > Programs .
- Click Programs and Features > Uninstall a program .
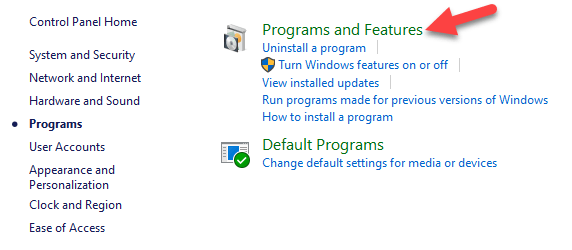
- Click your printer’s name and then click Yes to confirm the action. Turn on the printer and go to the manufacturer’s site to get specific instructions for downloading and installing the drivers for your model. Once installed, follow the steps to set up the printer connection and try printing again.
You can also reinstall printer drivers using Windows Update, by clicking Start > Settings > Update & Security and click Check for updates . If an updated driver is available, it will download and install and your printer will use it.
Alternatively, use the disc installation software that came with your printer as this may help you install its drivers or check for driver updates.
What If The Printer Driver Doesn’t Install?
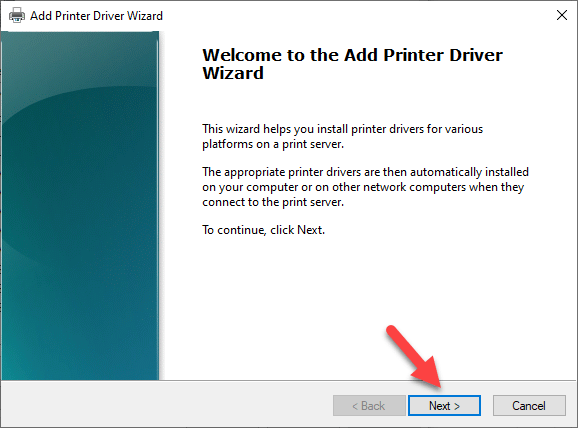
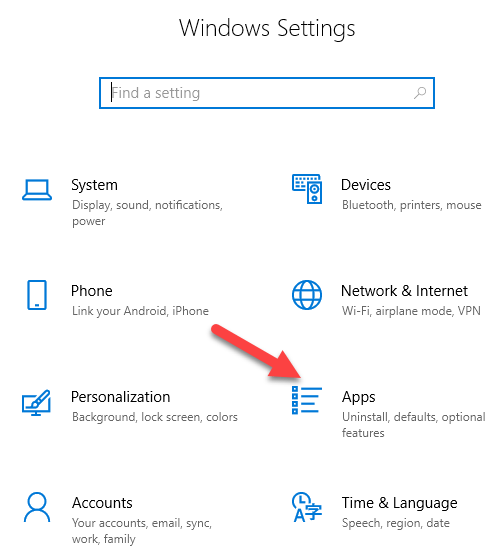
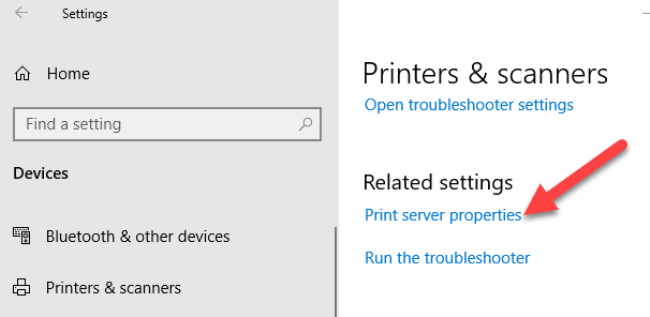
- In this case, click Start > Settings > Devices .

- Click Printers and Scanners and then click Print server properties under Related settings .
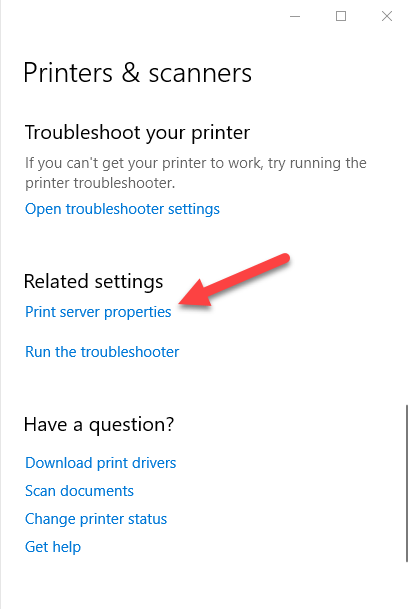
- Go to the Drivers tab and check for your printer. If it’s there, you’re good to go. If not, click Add .
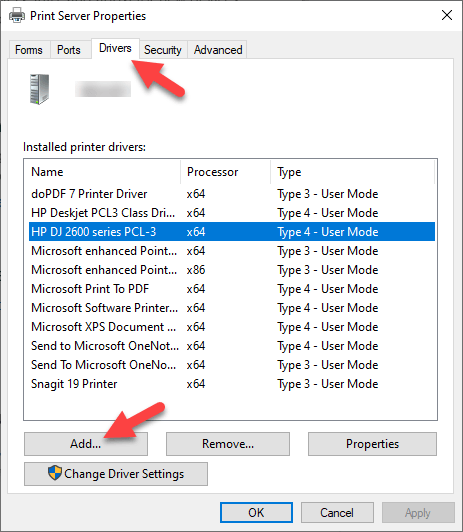
- Click N ext in the Welcome to the Add Printer Driver wizard
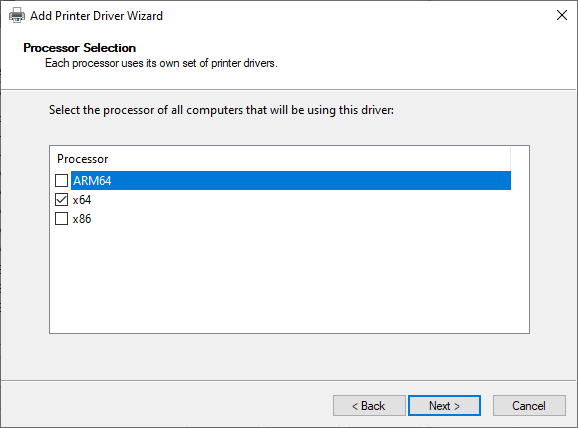
- Click on your device’s architecture in the Process Selection box, and click Next .
- Under Printer Driver Selection , click your manufacturer, select the printer driver, and then click Next > Finish . Follow the on-screen steps to add your printer’s driver.
Note: If no new drivers are available, contact the manufacturer and ask when they’ll be available. If your printer model is no longer supported, you can check with a printer in the same series for updated drivers as there’s a likelihood they’ll work for yours, with some loss of functionality though.
It’s a long shot, but there’s not much to lose if it’s not working already.
Uninstall & Reinstall The Printer
Try to remove your printer and reinstall it to see if the connection will work for it to print again.
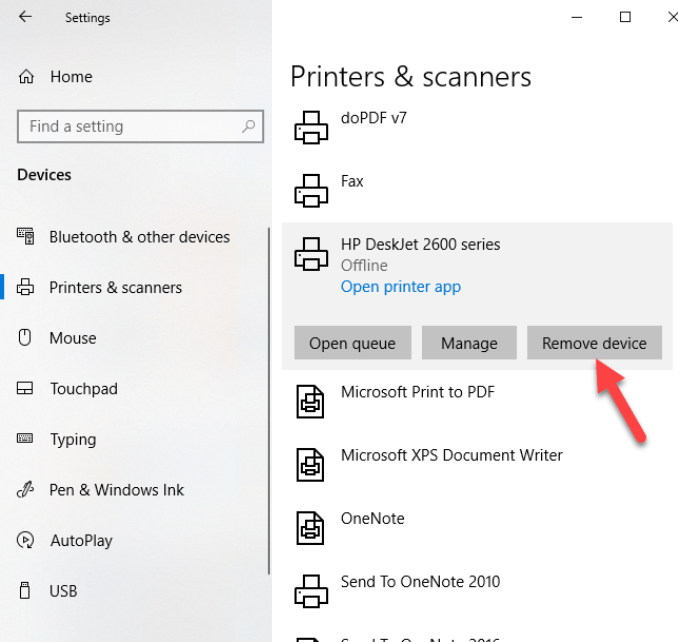
- To remove the printer, click Start > Settings > Devices . Click Printers and Scanners and find your printer, click on it and select Remove device.
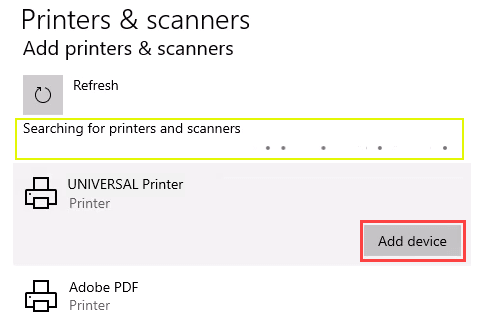
- Reinstall the printer by clicking Start > Settings > Devices > Printers and Scanners . Select Add a printer or scanner .
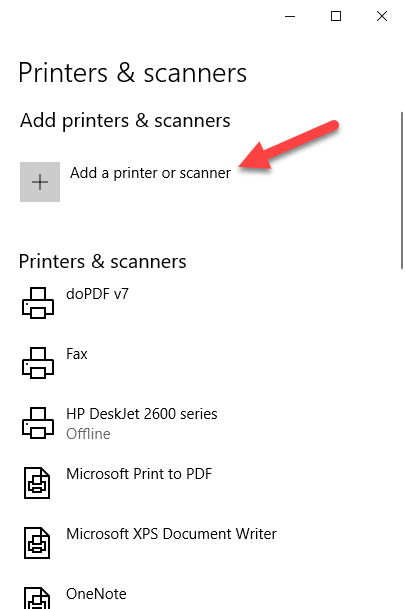
- Choose your printer from the list of available ones (including Bluetooth or printers connected to another computer and shared on your network) and click Add device .
Note: If you use an extender, wireless access points, or multiple routers with different SSIDs, ensure you’re connected to the same network so your device can find and install your printer. Print a test page to be sure it works properly.
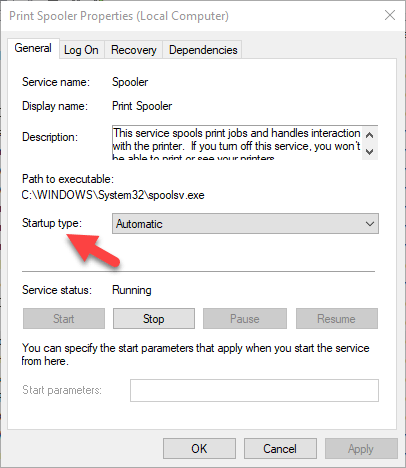
Clear & Reset Print Spooler
The print spooler manages the printing process. If you find your wireless printer not printing, the print spooler could have a problem. In this case, clear the spooler files and restart the spooler service.
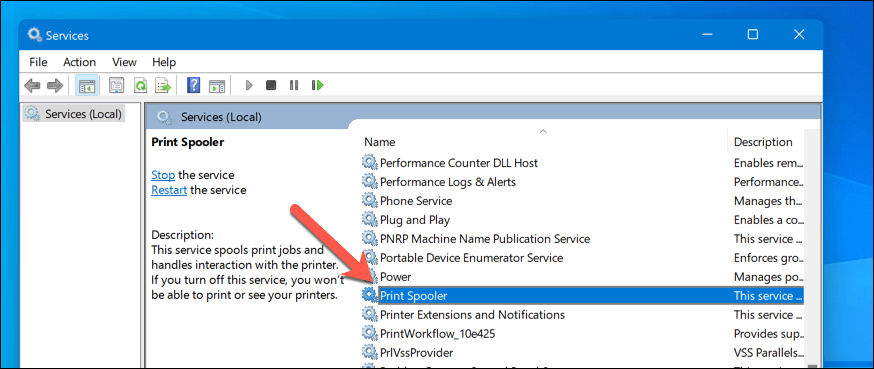
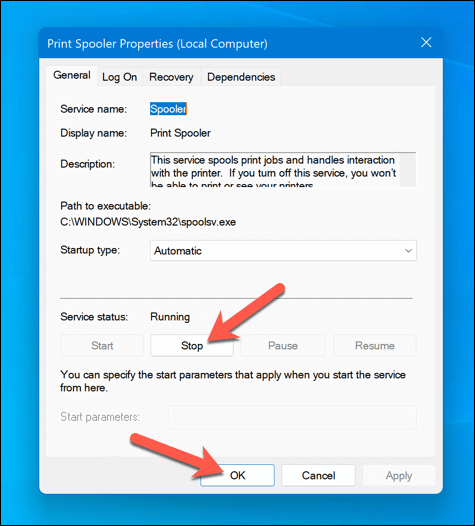
- In the search box, type services and choose Services from the search results.
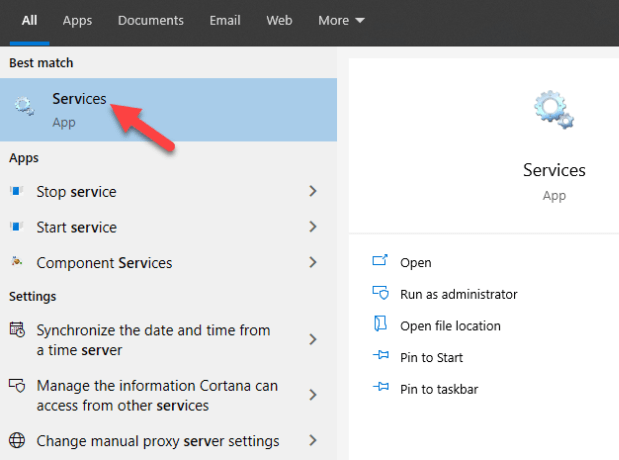
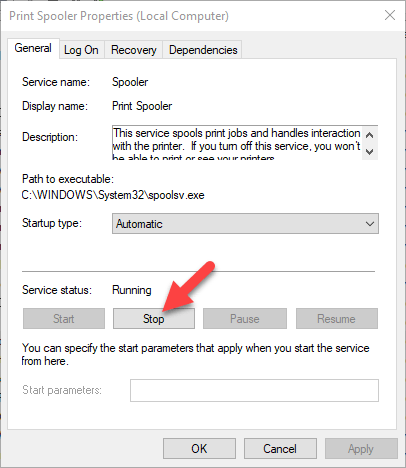
- Click Standard tab and double-click Print spooler.
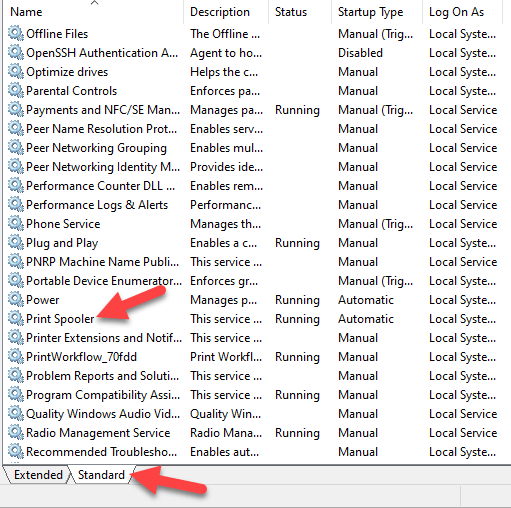
- Click Stop > OK.
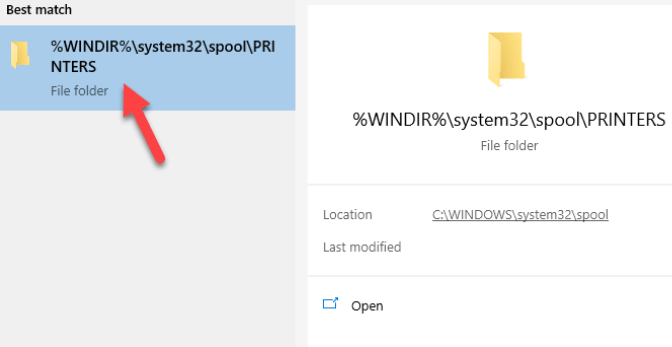
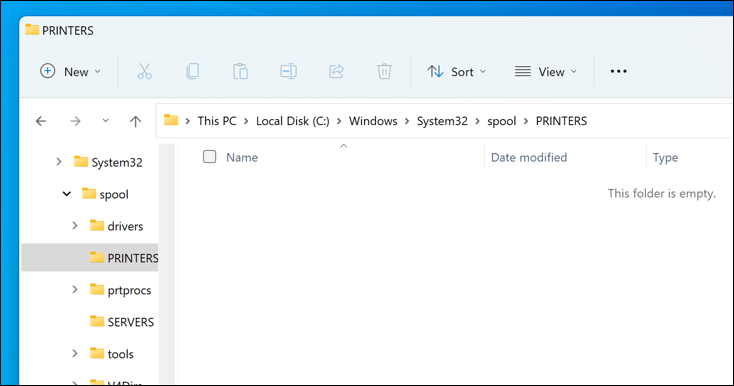
- Type %WINDIR%system32spoolprinters in the search box again, and then select %WINDIR%system32spoolPRINTERS from the search results. Delete all the files in that folder.
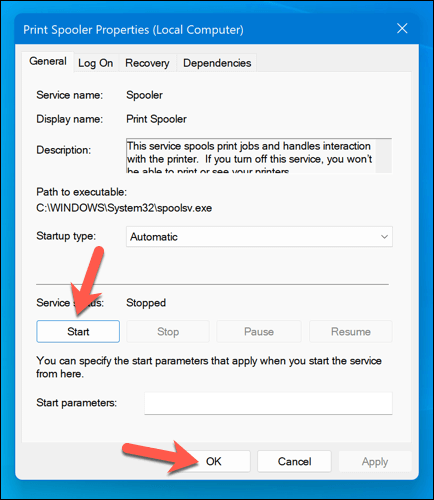
- Type services and select Services . Click Standards tab, and double-click Print Spooler from the list. Click Start and in the Startup type box, select Automatic and click OK .
Reset Your Printer
This is a last resort solution when all other fixes have failed because it clears all your printer settings, including the WiFi login credentials in order to reestablish a connection.
Check your printer manual for directions on how to perform a factory reset as the steps vary by brand and model. The information may also be available online if you don’t have an owner’s manual.
We’ve covered most probable fixes to wireless printer problems, if yours still won’t connect after going through each of these fixes, you can consult the manufacturer, return it to the store, or buy a new printer and start over.
- How to Find the IP Address of Your WiFi Printer on Windows and Mac
- How to Access and Change Your WiFi Router Settings (2025 Edition)
- How to Fix When No Wi-Fi Networks Found on Windows 11 and 10
- How to Fix the “Error – Printing” Status Error in Windows
- Wi-Fi Option Not Showing Up in Windows 11? 11 Fixes To Try
Elsie is a technology writer and editor with a special focus on Windows, Android and iOS. She writes about software, electronics and other tech subjects, her ultimate goal being to help people out with useful solutions to their daily tech issues in a simple, straightforward and unbiased style. She has a BCom degree in Marketing and currently pursuing her Masters in Communications and New Media. Read Elsie’s Full Bio
If you connect to different printers across several locations all the time, you’ll probably not use all of the printers installed on your device – probably just once or twice. However, your device ends up with many printers installed on it without you realizing it.
Thankfully, you can remove any printer you’re no longer using, except it doesn’t completely get erased from your device – the printer driver remains in your device’s inventory in case you need it again.

If you’re sure you won’t need it, you can remove or uninstall old, obsolete or uninstalled printer drivers , and leftover driver packages or registry entries from your device.
We’re going to walk you through five ways to completely uninstall printer drivers in Windows 10.
How To Remove Or Uninstall Printer Drivers In Windows 10
These are a few of the ways you can remove printer drivers in Windows 10:
- Uninstall printer software using Settings.
- Remove printer driver from Print Server Properties.
- Uninstall printer driver using Control Panel.
- Use Print Management to remove old printers.
- Delete old printers via Registry Editor.
- Uninstall printer using Command Prompt.
- Remove a printer using PowerShell.
- Delete remnants from Windows driver store.
Uninstall Printer Software Using Settings
If you don’t need a particular printer anymore, you can follow the usual steps to uninstall a printer from Settings and then uninstall its software, especially if using a third-party utility.
If the Settings app installed other tools to manage your printer automatically, you’ll have to manually remove the leftover software.
- Open Settings>Devices.
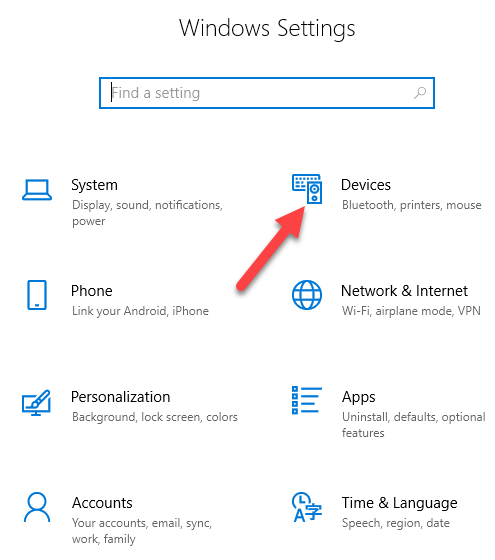
- Click Printers & Scanners .
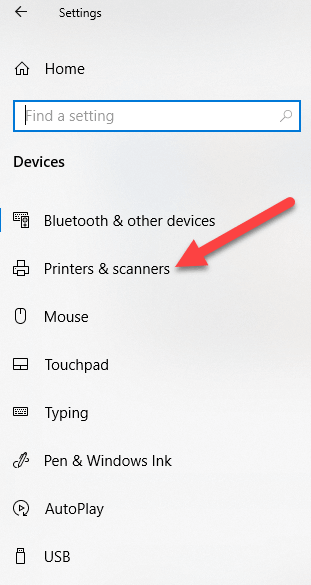
- Select your printer, click Remove device , and click Yes when asked to confirm the deletion.
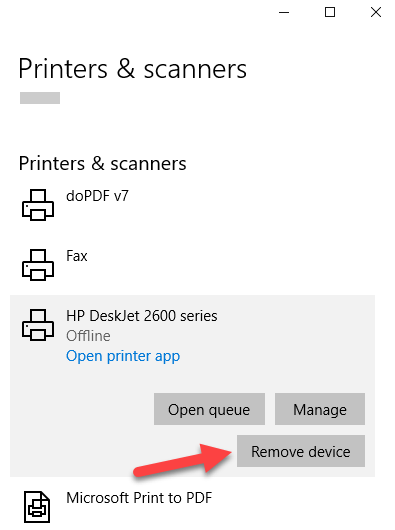
Note: The steps above only remove the printer from the list, so you’ll need to remove any leftover printer software or related applications.
- Open Settings>Apps .
- Click Apps & Features and select the printer software you’d like to remove.
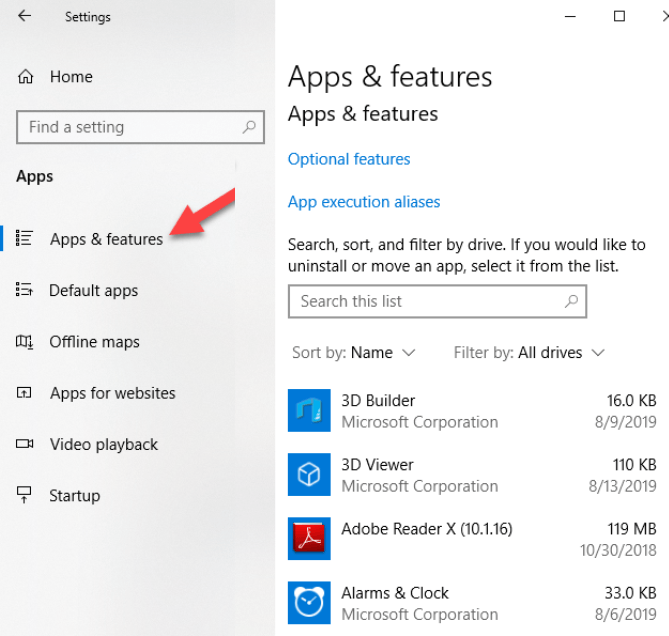
- Click Uninstall and follow the steps to completely remove any leftover printer-related applications.
Remove Printer Driver From Print Server Properties
If you’re still seeing an old printer, or one that you previously uninstalled, appearing on the Printers & Scanners page, you can remove or uninstall the printer driver and driver packages.
- Open Settings>Devices>Printers and Scanners on the left pane.
- Scroll down to Related settings and click Print Server Properties . Alternatively, you can right-click Start>Run and type printui /s /t2 to go to the Print Server properties page directly.
- Select the Drivers tab. From the list, click on the old printer entry and select Remove .
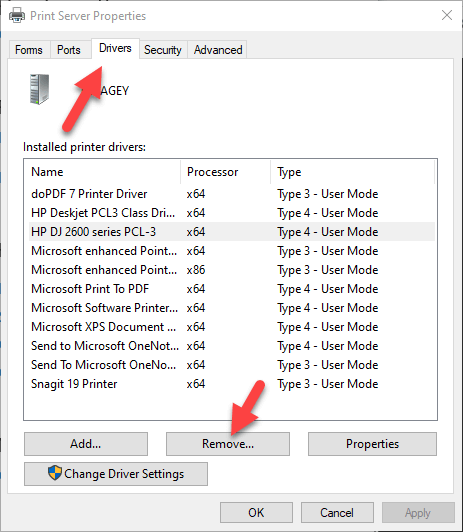
- You’ll get two options in a popup – Remove driver or Remove driver and driver package . Select the latter and click OK .
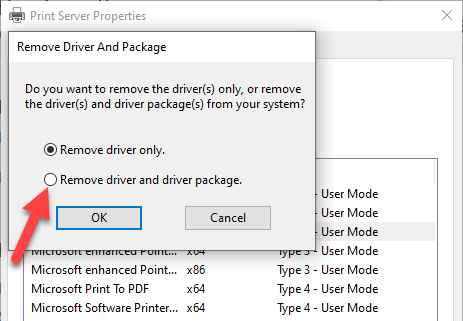
- If you get a confirmation prompt to Remove Driver Package , click Delete .
Uninstall Printer Driver Using Control Panel
You can remove and uninstall your printer and leftover printer driver or related apps from Control Panel using these steps.
- Open Control Panel>Hardware and Sound .
- Click Devices and Printers .

- Under Printers , right-click your device and click Remove device . Click Yes to confirm the action.

- Next, go to Settings>Apps>Apps & Features and select the software you want to remove.
- Click Uninstall and follow the on-screen steps to completely remove the printer software.
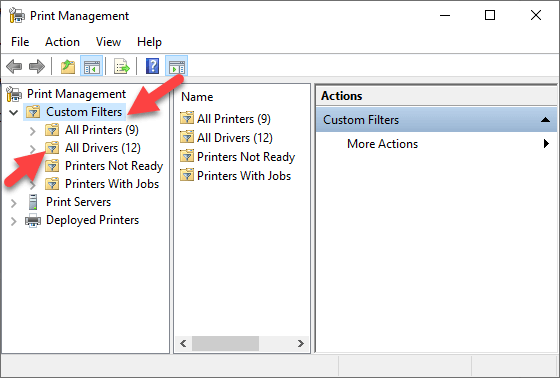
Use Print Management To Remove Old Printers
Ideally, if you used the Print Server properties method above, it should remove and uninstall the printer driver. However, you can use the Print Management console to completely remove printers you no longer use, and their drivers.
The Print Management dialog shows you the printers and current print jobs on your device. Before you delete the old printer driver though, make sure it’s not being used by any other printer.
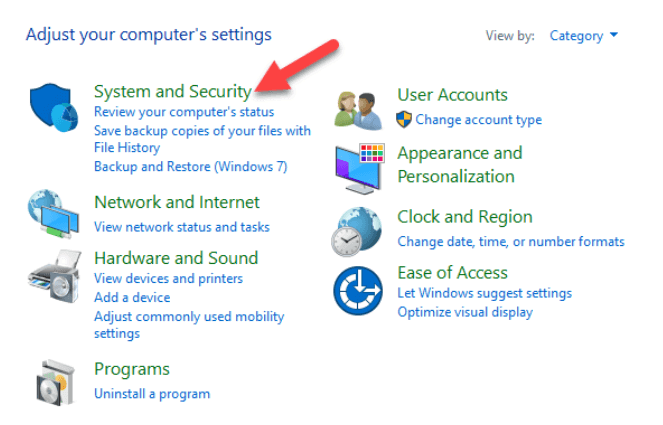
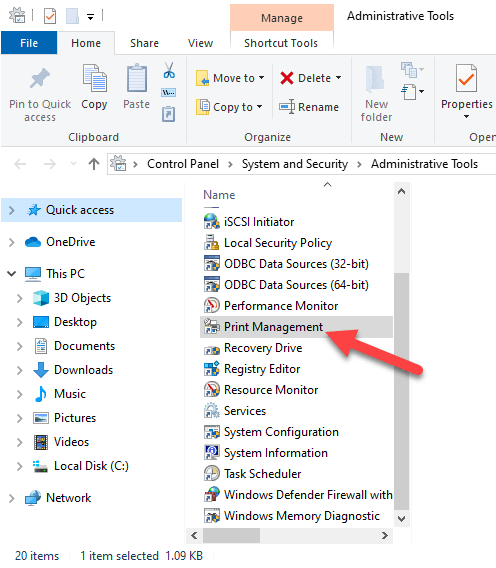
- Open Control Panel>System and Security .
- Click Administrative Tools .
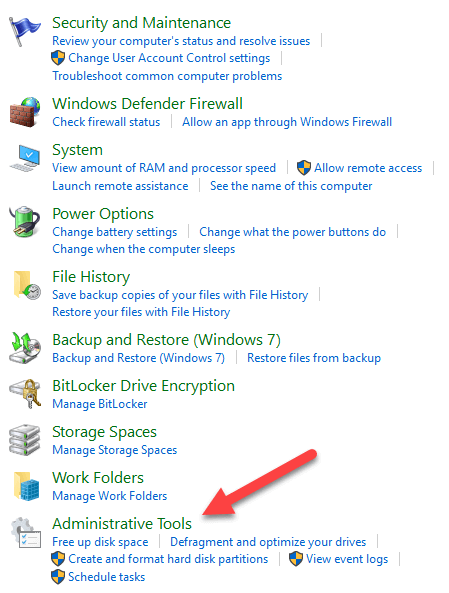
- Double-click the Print Management shortcut.
- Under Custom Filters , select All Printers .
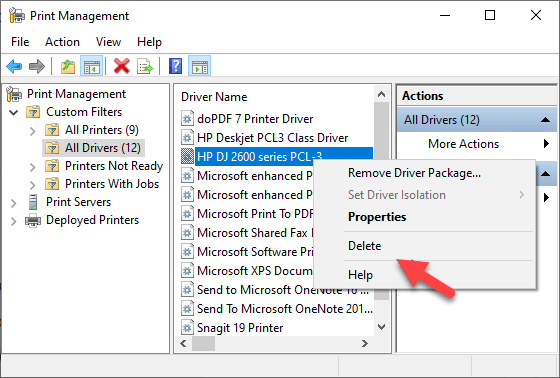
- Right-click the printer you want to remove.
- Click Delete and Yes to confirm the action.
- Open Settings>Apps>Apps & Features and click the printer software you want removed.
- Click Uninstall and follow on-screen instructions to completely remove the printer driver.
Delete Old Printers Via Registry Editor
If you open the Add a printer page and find old printers still listed there, edit the registry to remove leftover entries. To do this, start by creating a system restore point, and then follow the steps below.
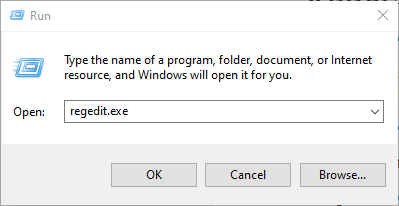
- Right-click Start>Run .
- Type regedit.exe and click OK (or press Enter on your keyboard) to open the Registry Editor.
Find the registry key:
HKEY_CURRENT_USERSOFTWAREClassesLocal SettingsPrintersRoamed
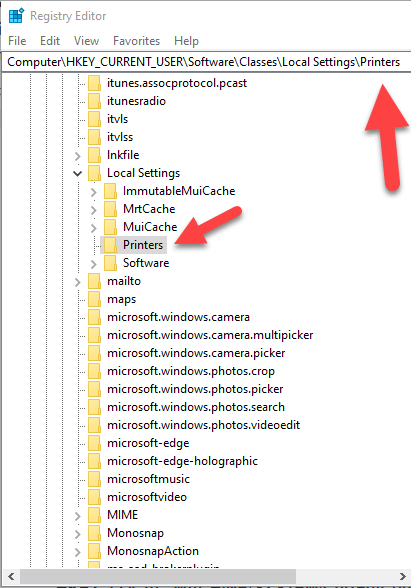
- Right-click the printer from the right pane, and select Delete .
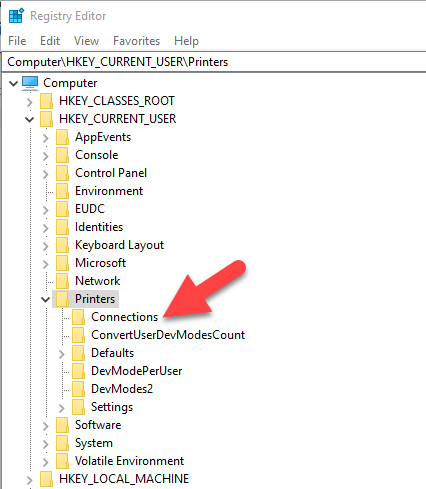
- Check printer entries and delete unwanted items by going to this key: HKEY_CURRENT_USERPrintersConnections
Next, go to this key:
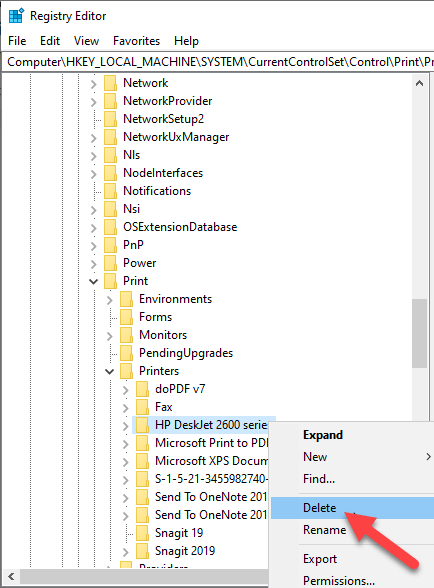
HKEY_LOCAL_MACHINESYSTEMCurrentControlSetControlPrintPrinters
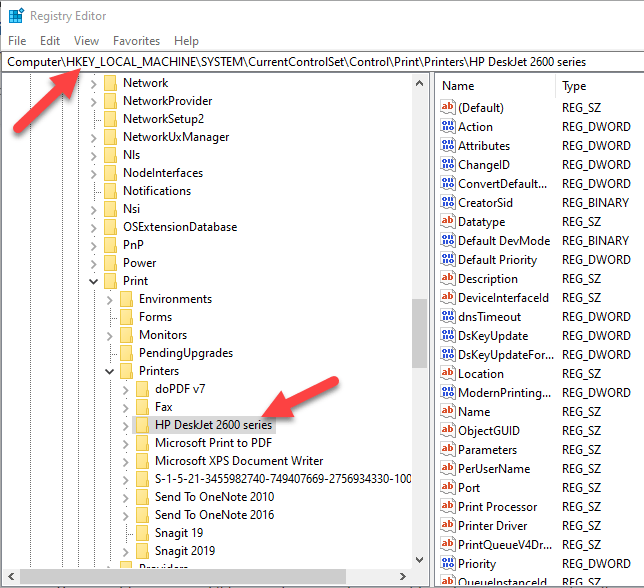
- Click to expand the key, right-click your printer and select Delete .
Some subkeys may still have references to your old printer, so you can clear the following as well:
HKEY_LOCAL_MACHINESYSTEMCurrentControlSetControlPrintEnvironmentsWindows NT x86DriversVersion-3 HKEY_LOCAL_MACHINESYSTEMCurrentControlSetControlPrintEnvironmentsWindows x64DriversVersion-3 HKEY_LOCAL_MACHINESYSTEMCurrentControlSetControlPrintEnvironmentsWindows x64DriversVersion-4
Once this is done, exit the Registry Editor.
Uninstall Printer Using Command Prompt
If you’re a fan of command lines, the Command Prompt is another tool you can use to delete a printer and remove related drivers and apps.
- Click Start and type CMD in the search bar.
- Click Command Prompt and select Run as administrator from the right pane.
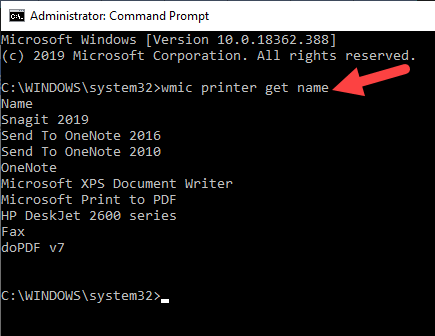
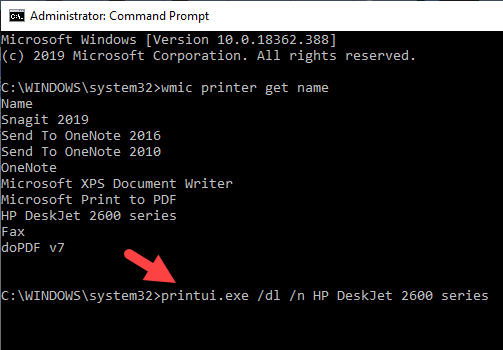
- In the Command Prompt window, type this command: wmic printer get name and press Enter to see the list of printers on your device.
- To uninstall the printer, type printui.exe /dl /n “YOUR-PRINTER-NAME” and press Enter. Remember to replace YOUR-PRINTER-NAME with your printer’s full name. For example, printui.exe /dl /n HP DJ 2600 Series CL3 .
- To uninstall the printer software, open Settings>Apps>Apps & Features and select the printer software you want to remove. Click Uninstall and follow the on-screen instructions to complete the process.
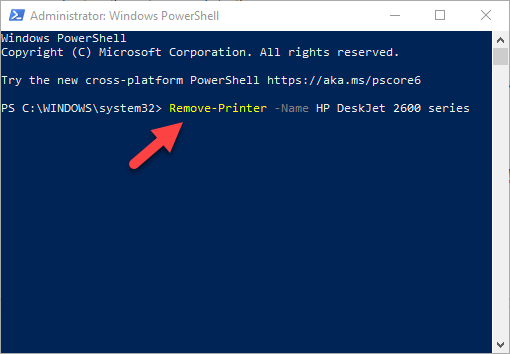
Remove a Printer Using PowerShell
If you prefer PowerShell over Command Prompt, here are the steps to take to remove the printer and related software.
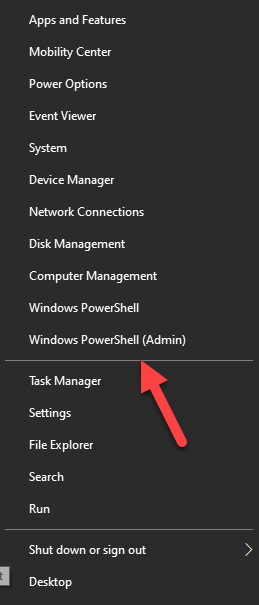
- Right-click Start > Windows PowerShell (Admin) .
- Type this command: Remove-Printer –Name “YOUR-PRINTER-NAME” .
- Open Settings > Apps > Apps & Features , and click the software you want removed.
- Click Uninstall and follow the directions to remove it completely.
Delete Remnants From The Windows Driver Store
This solution is meant to remove any remnants of drivers that may still be on your device even after deleting driver packages.
In the driver store, you’ll find inbox and third-party driver packages, which were installed and stored in the folder even before the driver itself got installed.
Each of the subfolders in the store holds a driver package and corresponding .inf file , but it’s a bit difficult to find the specific driver package you’d like to remove.
The good news is you can use a third-party tool to explore the Windows driver store and completely remove the old printer driver once for all. It’ll also save you lots of space that would otherwise have been occupied by junk files.
What Happens When Drivers Are Deleted?
A device driver is a piece of software that tells your computer’s operating system how to communicate with the device it’s connected to.
For example, to connect to your printer and execute the print command, a printer driver is needed to bridge the gap between the two devices, and deliver the print job to you.
Without the printer driver, your printer is just hardware that doesn’t work. Similarly, deleting the printer driver after deleting the printer from your computer renders it inoperative.
However, if you delete the driver, you can undo the deletion using System Restore , from the previous restore point created when you deleted the driver from your computer.
Alternatively, Windows will automatically install the driver on your operating system by searching for it from its extensive library of drivers. If it doesn’t find a suitable driver, it’ll search for a driver online through Windows Update. Otherwise, you can visit the device manufacturer’s website to find the specific driver for your printer.
- Preparing for Windows 10 End of Support: Upgrading to Windows 11
- How to Fix a “This file does not have an app associated with it” Error on Windows
- How to Fix an Update Error 0x800705b4 on Windows
- How to Resolve “A JavaScript error occured in the main process” Error on Windows
- How to Fix the Network Discovery Is Turned Off Error on Windows
Elsie is a technology writer and editor with a special focus on Windows, Android and iOS. She writes about software, electronics and other tech subjects, her ultimate goal being to help people out with useful solutions to their daily tech issues in a simple, straightforward and unbiased style. She has a BCom degree in Marketing and currently pursuing her Masters in Communications and New Media. Read Elsie’s Full Bio
Times change and so does Windows. If you’ve recently moved from a Windows Server 2012 and Windows 7 or 8 environments into Windows Server 2019 and Windows 10 , things are a little different.
The old ways to connect to a network printer are still there. They may look a little different, too. So we’ll show you how to connect to a network printer in Windows 10 or Server 2019. Our favorite way is the last method.
Use Add Printers & Scanners
The new Windows Settings world works the same as in the Control Panel , but it looks different enough to cause confusion for some. Note that if this is at work and you’re not an administrator, the printer must be on the network and the driver already installed. If it’s not installed, you’ll get a prompt to enter the administrator account name and password.
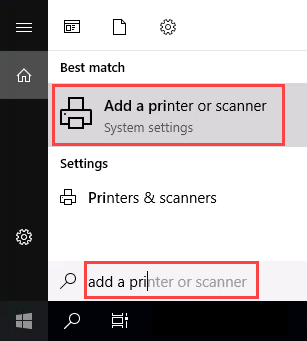
- In the Start menu, type add printers . When the result Add a printer or scanner shows, select it.
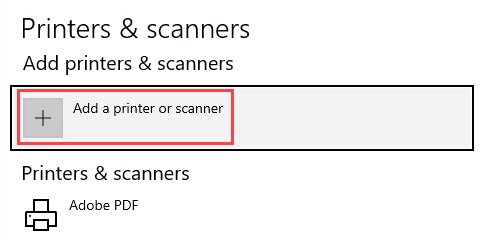
- When the Printers & scanners window opens, select Add a printer or scanner . It will start searching for available printers.
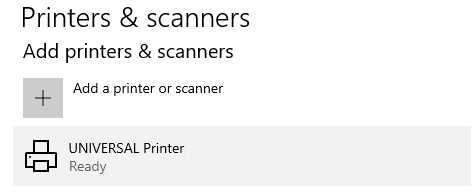
- It may look like it’s still searching, even though all the printers available are showing. Find the printer needed, select it, and then the Add device button will show. Select it.
- The printer will install. There’ll be a progress bar and when it’s done, it’ll say Ready .
Connect to a Network Printer Through a Network Share
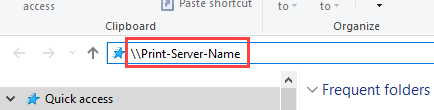
Here’s a way to install a printer that’s different from what you may be used to. It requires that the printer is shared and on the network. Unless you’re the administrator, the driver needs to be installed on your local machine or server. You need to know the path to the share as well. It will look something like Print-Server-Name , where Print-Server-name is the name of the server.
- Open File Explorer . In the location bar, enter the printer share path and then press the enter key. File Explorer will find the share.
All the shared printers will show.
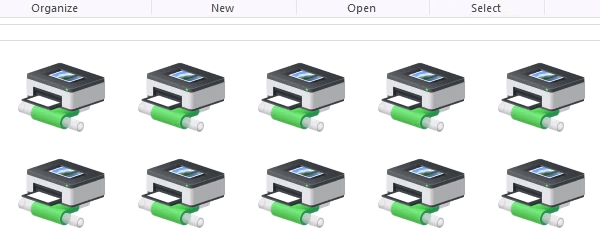
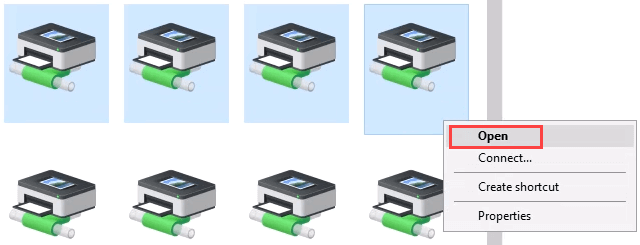
- There are two options: Install a single printer Install several printers at one time
To install a single printer, double-click on it.
When the installation finishes, you’ll see the newly installed printer’s print queue window.
- To install several printers at once, select printers by clicking and dragging a rectangle around them, or hold down the Ctrl key while selecting printers individually. Either right-click and select Open or simply press the Enter key.
Connect to Network Printer via Control Panel
The good old control panel is still there. If you’ve used it before, you know what to do. If not, it’s almost the same as adding a printer through Settings.
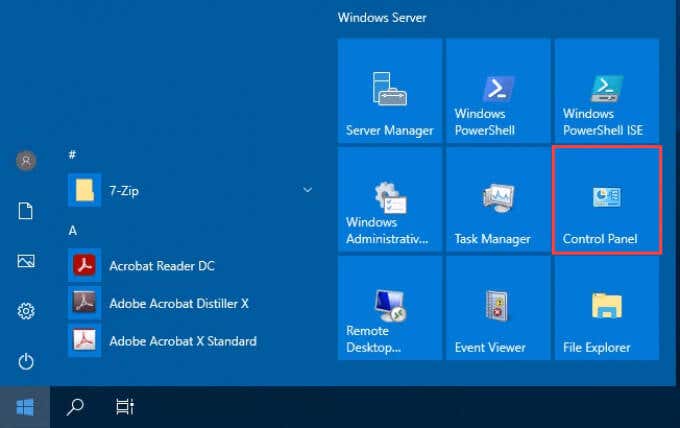
- Open the Start menu and select Control Panel . If it’s not there, start typing control and it will show.
- Select Add a device in the Hardware category.
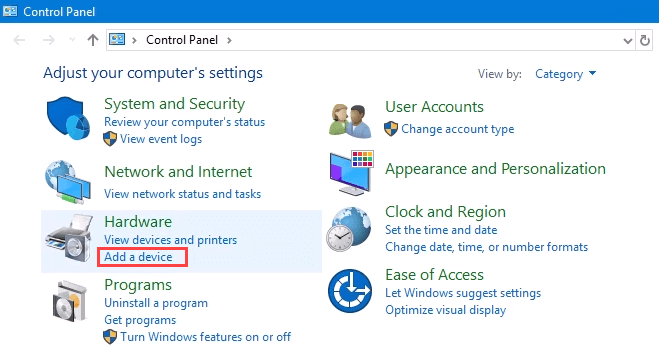
- Select Add a printer .
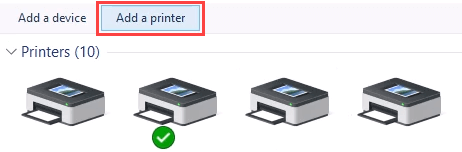
- It will show a selection of printers. Select the one needed and then select Next .
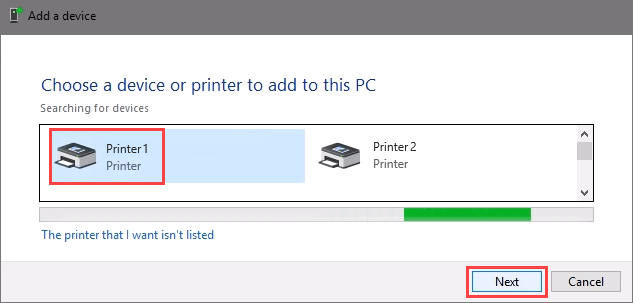
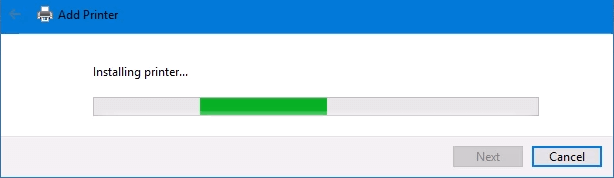
The printer will start installing. It may take a few seconds or minutes.

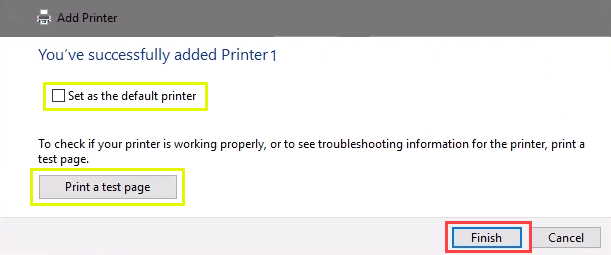
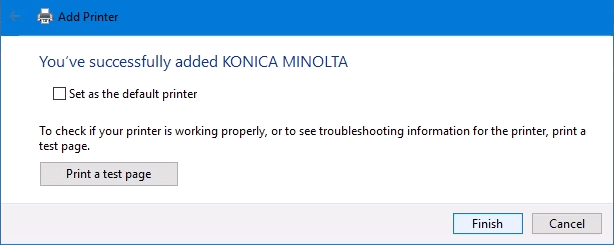
- Once the success window opens, there are options to Set as the default printer and Print a test page . Set the printer as default if needed. It’s always a good idea to print a test page. To exit, select Finish .
Connect to Network Printer via IP Address
The printer you want to install might not be easily visible, but if you have the IP address for it you can use that to connect with the printer. Administrator rights may be required. The first part is the same as adding a printer through the Control Panel until you get to the step to choose the printer. Let’s pick it up from there.
- At the Add a device window, select The printer that I want isn’t listed .
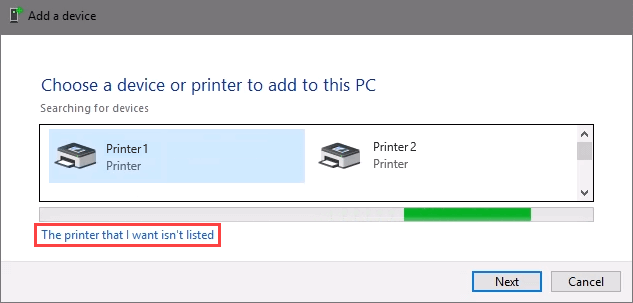
- If administrator rights are required, select Add a local or network printer as an administrator .
Otherwise, the window below will show. Select Add a printer using TCP/IP address or hostname then select Next .
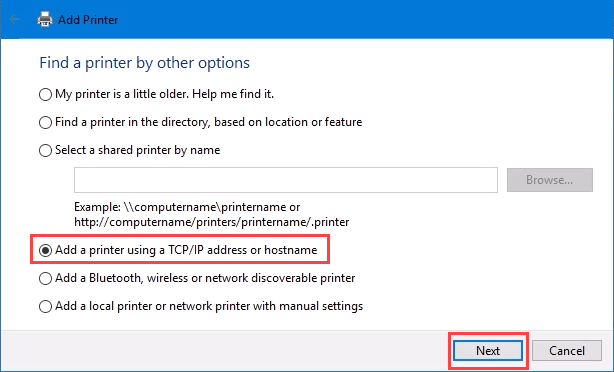
- For Device type: there are several choices. Web Services Device and Web Services Secure Print Device are used for special cases. If you don’t know what those mean, you probably don’t need them. Autodetect may make the wrong choice as well. Select TCP/IP Device .
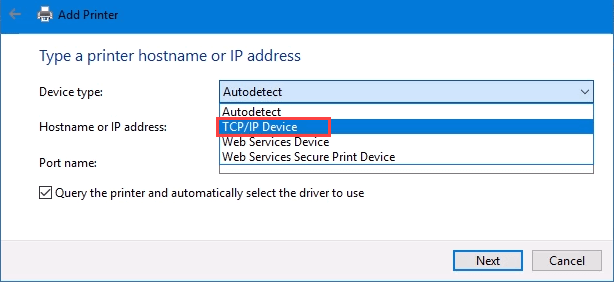
Enter the IP address in the Hostname or IP address: field. Notice how the Port name: field auto-populates with whatever is entered. The port name can be left as is or changed. In most cases, Query the printer and automatically select the driver to use remains checked.
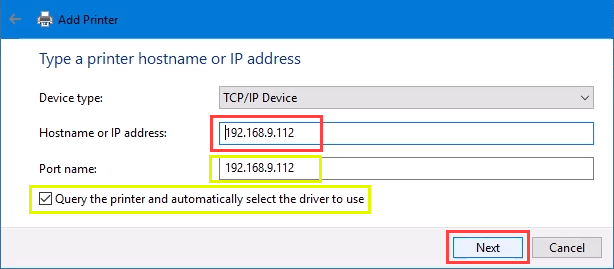
Sometimes an organization will use a universal printer driver to keep things simpler and use less storage. It also keeps the registry small and login times faster. The HP Universal Print Driver works well for HP and many other printers. Select Next .
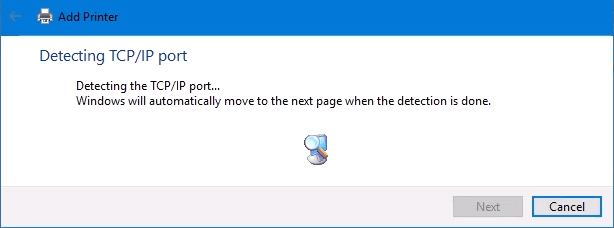
It detects the TCP/IP port to see if it exists.
Then it detects the driver model needed.
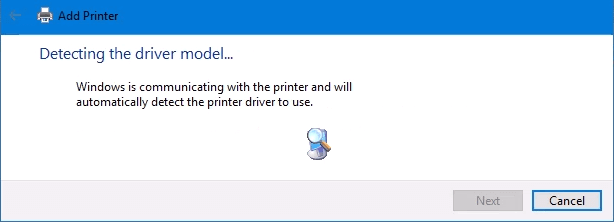
- Normally, Windows will find a driver already installed, offer the option to replace the driver, or ask to install a driver. If it’s on the network already, it probably installed the driver already. Select Use the driver that is currently installed and select Next .

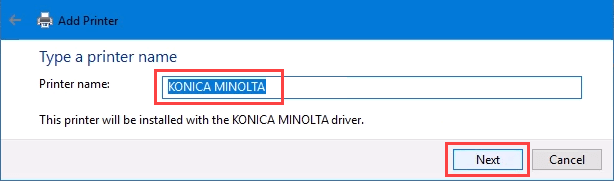
- It will auto-select a name for the printer. That can change as needed. Select Next .
The real installation begins.
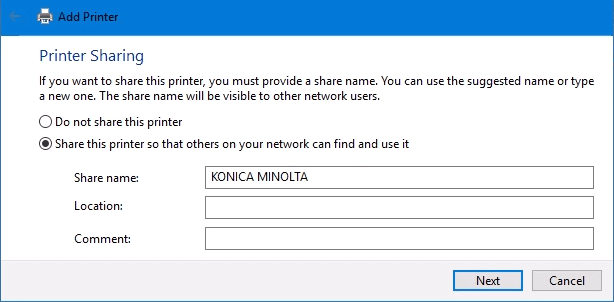
- If sharing the printer, add a location so others can see where the printer is located.
It successfully installed the printer. Set it as the default or not as needed. As always, it’s a good idea to Print a test page . Select Finish closes out the window.
Connect to a Network Printer via PowerShell
Finally, the last, and possibly best, way to connect network printers is with PowerShell . Why is this best? If you’re a System Administrator and have dozens of printers to connect, or if you need to make sure the printer is connected every time the server starts or someone logs in, a PowerShell script is best. It’s fast, done once, and easy to call many times.
You will need to know:
- Printer IP address
- Printer driver name
- What to name the printer
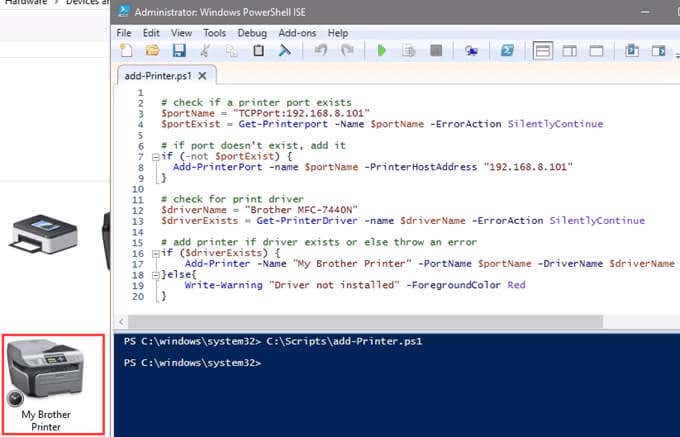
Following is a sample script. Make it into a looping script to install several printers at a time, or make it a function to call from other processes.
check if a printer port exists
$portName = “TCPPort:192.168.8.101”
$portExist = Get-Printerport -Name $portName -ErrorAction SilentlyContinue
if port doesn’t exist, add it
if (-not $portExists) { Add-PrinterPort -name $portName -PrinterHostAddress “192.168.8.101” }
check for print driver
$driverName = “Brother MFC-7440N”
$driverExists = Get-PrinterDriver -name $driverName -ErrorAction SilentlyContinue
add printer if driver exists or else throw an error
if ($driverExists) { Add-Printer -Name “My Brother Printer” -PortName $portName -DriverName $driverName } else { Write-Warning “Driver not installed” -ForegroundColor Red }
When the script is run, it takes maybe 3 seconds. Then you’ll see the printer installed.
Any Other Ways to Connect to a Network Printer?
We’ve given you several ways to connect to a network printer or several printers. One of them will be the best way for you. There is at least one other way, and that’s by the Command Prompt.
- Preparing for Windows 10 End of Support: Upgrading to Windows 11
- How to Fix a “This file does not have an app associated with it” Error on Windows
- How to Fix an Update Error 0x800705b4 on Windows
- How to Resolve “A JavaScript error occured in the main process” Error on Windows
- How to Fix the Network Discovery Is Turned Off Error on Windows
Guy has been published online and in print newspapers, nominated for writing awards, and cited in scholarly papers due to his ability to speak tech to anyone, but still prefers analog watches. Read Guy’s Full Bio
I’m a huge fan of HP printers and I think overall they are the best printers for businesses as well as consumers. However, they come bundled with the worst possible software that not only bloats and slows down your system, but doesn’t really help all that much in connecting your computer to your printer, which is the main goal of any printer.
Nowadays, a lot of printers are wireless or at least network-capable, meaning you can plug in a network cable and print without actually having to connect the printer to your computer via USB. It’s absolutely ridiculous if you buy a new printer today and it forces you to connect it to your computer for setup.
Unfortunately, setting up a network or wireless printer is far more complicated just because you now have to deal with all kinds of equipment in between the two devices. Even if you can print to your wireless printer today, you may not be able to a month from now if the IP address accidentality changes or if someone turns on a security feature on your router that prevents communication between devices on the network. There are literally hundreds of things that can go wrong.
In fact, I’ve previously written about troubleshooting WiFi printers and gave six possible solutions for fixing most WiFi printing issues. However, there are some issues that are just manufacturer-specific and at that point, it’s a good idea to simply use the diagnostic tools they have provided.
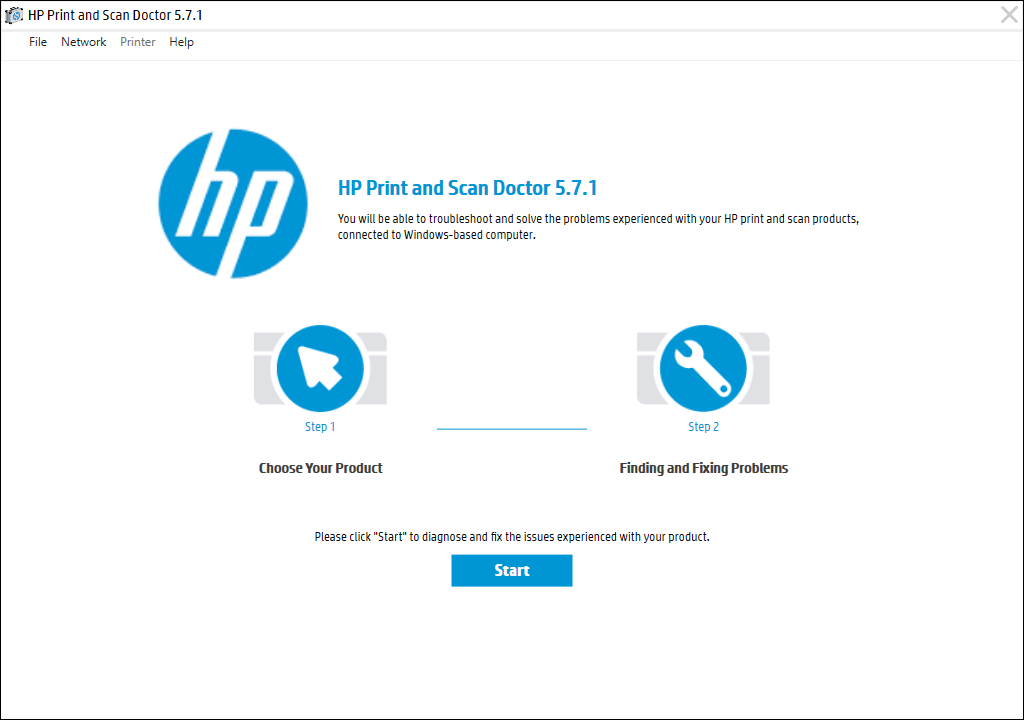
HP Print and Scan Doctor is a free software utility that helps you quickly address most printing and scanning issues with HP printers. This utility works on everything from Windows XP to Windows 10. Unfortunately, there is no Mac version of this utility yet.
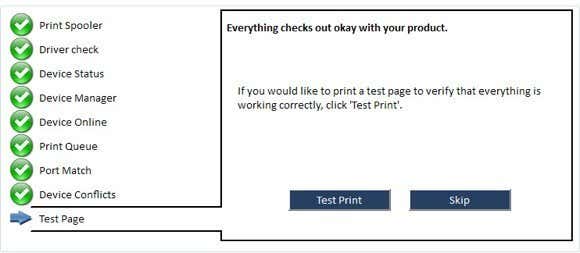
The program checks a bunch of stuff and actually replaces four separate utilities that HP used to have for diagnosing problems with printers. Here’s a quick list of items checked:
Connectivity – If connected via USB, it makes sure the printer is connected properly and if connected via the network, it makes sure your computer is actually connected to the network.
Device Status – Checks to make sure there are no printer errors like out of ink, paper jams, feed issues, etc.
Driver Check – Makes sure the driver is not corrupt or missing.
Device Manager – Checks for issues in Device Manager that could be causing issues.
Print Queue – Clears the print queue if there are stuck jobs.
Port Match/Device Conflicts – Checks the port settings for the printer and makes sure there are no device conflicts with the printer like other drivers or printer brands.
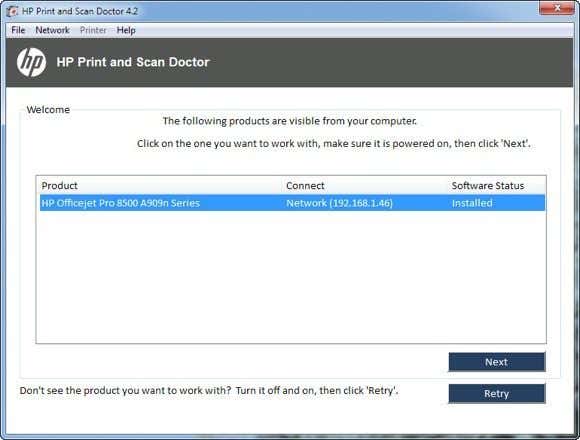
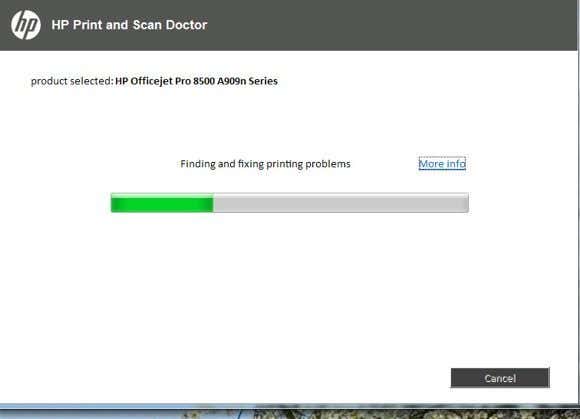
When you start the program up, it will go ahead and perform a search for any HP printer connected via USB, ethernet or wirelessly. Once it shows up, you can then click Next and continue to screen where you can diagnose problems with the printer.
Now what if you’re having issues even getting the printer to show up properly? In that case, the program won’t be able to find your printer and you’ll see this screen:
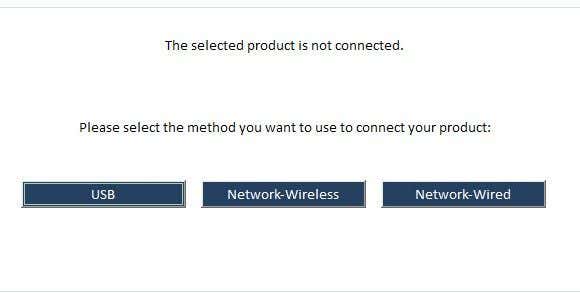
Depending on how you want to connect the printer, the program will give you tips for getting the printer connected. Unfortunately, until you get the printer online at least, the program can’t help you very much. If you have a wireless or network printer and have no idea why it’s not getting an IP address, then connect it to the computer using a USB cable first.
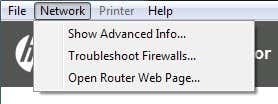
The program also has a menu option called Network where you can see advanced info about your network and you can disable the firewall ( Troubleshoot Firewalls ). That seems to be a major cause of communication errors, so they have that option built right into the program.
Now once your printer shows up in the list like in the first screenshot, go ahead and click Next . Here it’ll detect whether your printer is the default printer or not and give you the option to make it default by clicking a button.
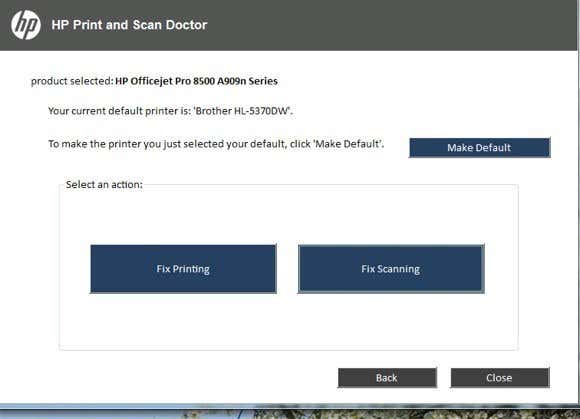
Now to diagnose and fix any problems, click on Fix Printing or Fix Scanning . If you have an HP All-in-One printer that can print and scan, then you can pick exactly which issue is causing problems.
The program will go ahead and start analyzing the printer and your system to see what issues are preventing the printer from printing or scanning. If it finds problems, it will list them out and help you resolve them. If everything is ok, you should see a bunch of green check marks and the option to print a test page.
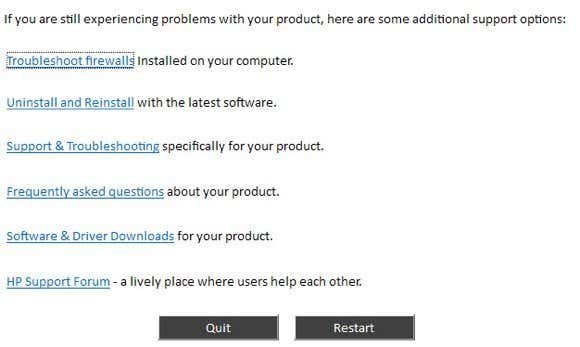
Lastly, the program has some last resort options if the printing issues have not been resolved. You can troubleshoot the firewall, uninstall and reinstall the printing software and get support information for your specific product.
Overall, it’s an excellent tool and makes me wish HP created driver packages for their printers like they created this tool: simple, sleek with no extra fluff. If you’re having issues printing with your HP printer, make sure to download and run the Print and Scan Doctor. Have any questions? Post a comment. Enjoy!
- Google One Explained: Is It Worth Subscribing To?
- What Is Stremio? A Faster Media Center for Your PC
- Stack Browser Review: How It Makes You More Efficient
- O&O ShutUp10 Review – Stop Microsoft From Spying on You
- NetSpot App Review – Professional WiFi Analyzer, Tester, and Troubleshooter
Founder of Help Desk Geek and managing editor. He began blogging in 2007 and quit his job in 2010 to blog full-time. He has over 15 years of industry experience in IT and holds several technical certifications. Read Aseem’s Full Bio
As a Windows user, a non-working printer could be a simple fix or a time-consuming disaster. If you see the “Error – Printing” status error on Windows, you won’t have much to go on to try and troubleshoot the problem, which can be frustrating and inconvenient to resolve.
Several factors might cause the “Error – Printing” status error, but, in most cases, simple troubleshooting steps like restarting your printer or checking your printer connections may do the trick. To fix the “Error – Printing” status error on Windows, follow the steps below.
Understanding the “Error – Printing” Status Error on Windows
The “Error – Printing” status is a simple, catch-all error code that appears when your Windows PC can’t successfully print . It can be caused by several factors, such as missing paper, outdated or corrupted printer drivers, incorrect printer settings, or issues with the Print Spooler service on your Windows PC.
It can appear in a few different ways, such as “Error – Printing,” “Printer in error state,” or “Print Spooler service not running.” The message may differ, but the result is the same—your printer can’t process or complete the print job.
If you see this error, try some of the troubleshooting fixes below.
Restart Printer and PC
First, restart your devices to see if this resolves the problem.
It’s a good idea to turn off your printer and disconnect its power cord. Next, shut down your PC and unplug its power cable as well. Wait for at least 30 seconds before plugging everything back in.
After the waiting period, reconnect the printer and PC’s power cords. Turn on your printer first, ensuring it’s up and running. Next, turn on your PC. Finally, try printing a test page to see if the “Error – Printing” status error has been resolved.
This restart process might seem obvious, but a clear shutdown and restart can often resolve minor (and unexpected) issues.
Check Printer Hardware and Connection
Printer still not working? It’s a good idea to look more closely at your printer hardware and its connection with your PC.
First, verify that your printer is turned on. Look for an LED or display indicating power, and ensure it’s connected to an electrical outlet. If you have a wired printer, inspect the USB cable connecting the printer to your PC. Make sure it’s properly secured at both ends.
If the USB connection isn’t recognized, try a different USB port or a new cable. Likewise, if the printer is connected over a network, ensure the ethernet cable is connected and the connection is active.
For wireless printers, double-check your Wi-Fi connection. Ensure that your printer connects to the same network as your PC. Most printers have a display or indicator light to show a successful wireless connection. If your wireless printer isn’t connecting , consult your printer’s manual for specific steps to connect to Wi-Fi.
Also, check your printer for issues such as low paper or ink. Without paper or ink, you can’t print, so replenishing the paper or ink should resolve the issue.
Clear Paper Jams
A paper jam may be causing the “Error – Printing” status message on your PC. If your printer can’t push through paper, it can’t continue the printing process.

To resolve this issue, you’ll need to clear any jams from your printer. Depending on your device, this might be difficult to do, so you may need to consult your manual first.
Start by checking the areas where paper enters and exits the printer, then remove any jammed paper. If your printer has an automatic document feeder, open the ADF cover (Automatic Document Feeder) and remove any jammed paper.
Restart Print Spooler Service and Clear Print Queue
After clearing a printer jam, it’s also a good idea to clear your print queue and restart the Print Spooler service (which your printer needs to be able to print). It’s a good idea to do this if your print queue won’t clear after an error occurs during printing.
You can also do this at any point to try and resolve printer errors like the “Error – Printing” message.
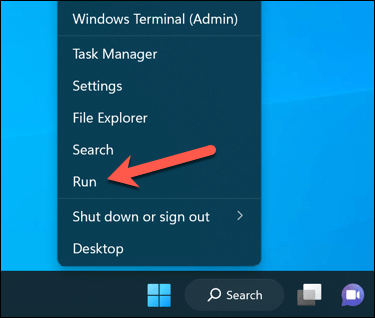
- To begin, right-click the Start menu, select Run, or press the Windows Key + R to open the Run command box.
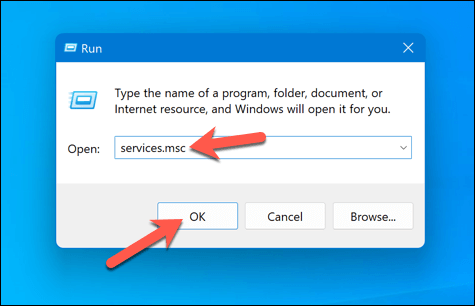
- In Run , type services.msc and press OK .
- In the Services window, look for the Printer Spooler service and double-click it.
- Press Stop and OK . This will stop the print spooler service, allowing you to clear any leftover print jobs.
- Next, open File Explorer and navigate to the C:\Windows\System32\spool\PRINTERS folder using the address bar. Delete all files in this folder to completely clear the print queue.
- Return to the Printer Spooler service in the Services window and click Start to restart the spooler.
With the paper jams cleared and the print queue emptied, your printer should now return to a ready state, and you can resume printing your documents without any errors.
Update or Reinstall Printer Drivers and Software
Outdated driver software can sometimes lead to the “Error – Printing” status error in Windows. To fix this issue, you should check for new printer software (including new printer drivers) from the manufacturer.
Follow these steps to ensure your printer driver and manufacturer software are up-to-date. It may be a good idea to uninstall existing printer software before proceeding.
- Visit the printer manufacturer’s website and search for your specific printer model in the support or downloads section.
- Find any available updates or new versions of the printer driver software. Ensure the software is compatible with your version of Windows.
- Next, download the latest driver and printer software. If new software is available, download and save the installer to your computer.
- Run the installer and follow the on-screen instructions to complete the installation.
After completing these steps, your printer should begin to start working. However, you may need to restart your PC for any changes to take effect.
Check for New Windows Updates
A new Windows update can fix bugs, and new updates can help resolve common printing issues. You can manually check for new Windows updates to try and resolve the “Error – Printing” status error on your PC.
To check for new Windows updates, follow these steps.
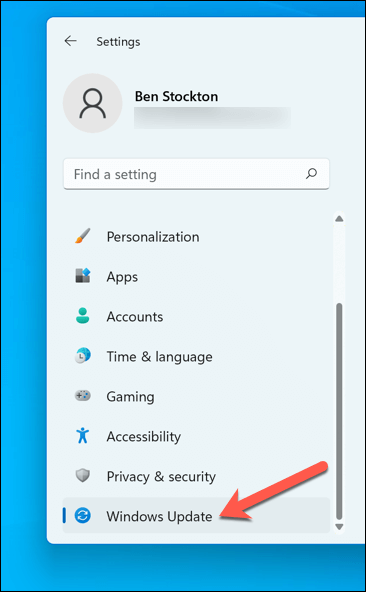
- Right-click the Start menu and select Settings .

- In the Settings window, select Windows Update from the sidebar.
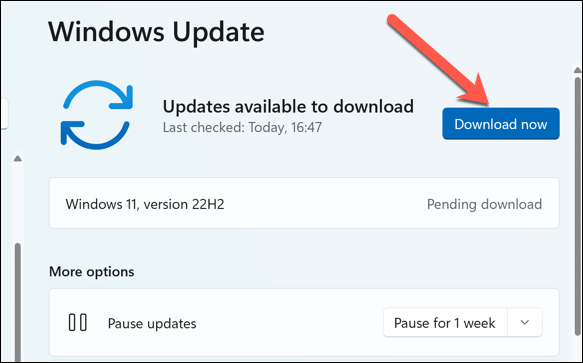
- Next, click the Check for updates button. If there are any pending updates, Windows will automatically start downloading and installing them.
- If it doesn’t, press Download Now to begin the installation.
After updating your PC, restart your computer and try printing again to see if the error is resolved.
Use the Printer Troubleshooting Tool
If you’re still struggling to resolve the “Error – Printing” status error in Windows, you can use the Printer Troubleshooter . This built-in tool helps to identify and fix common hardware and device-related issues.
Follow these steps to run the troubleshooter on your Windows PC.
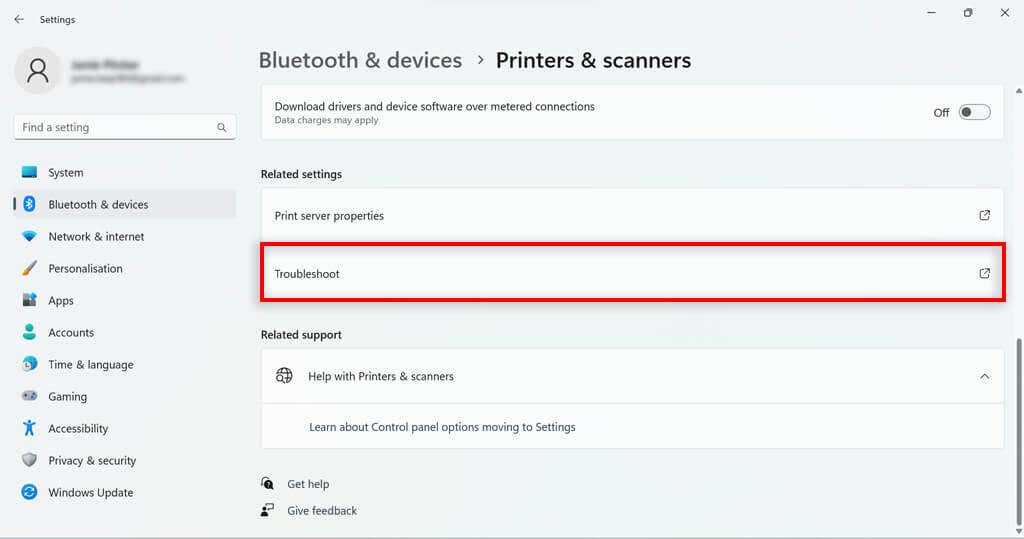
- Right-click the Start menu and select Settings .
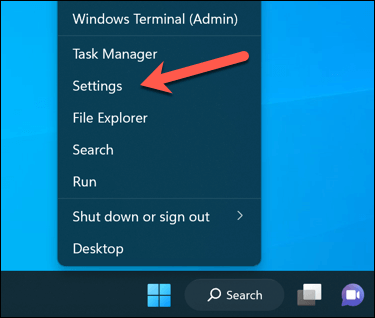
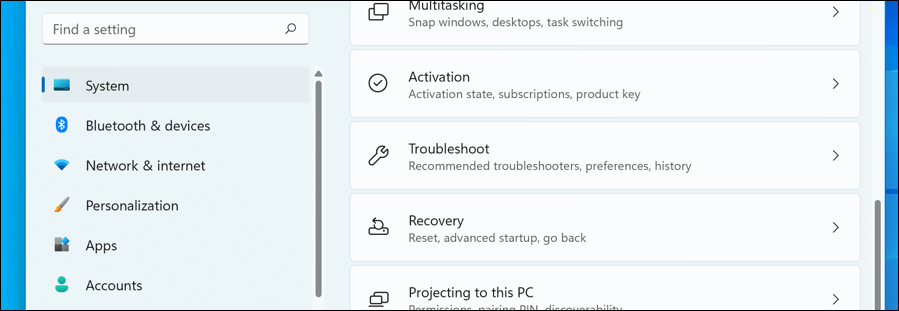
- In Settings , select System > Troubleshoot .
- Select the Other troubleshooters option.
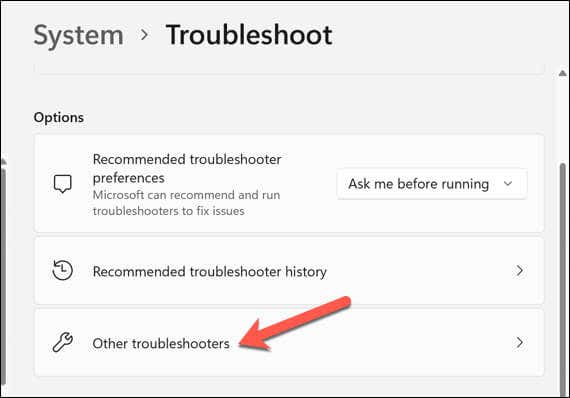
- Next, select the Printer troubleshooter to begin running the printing troubleshooting tool.
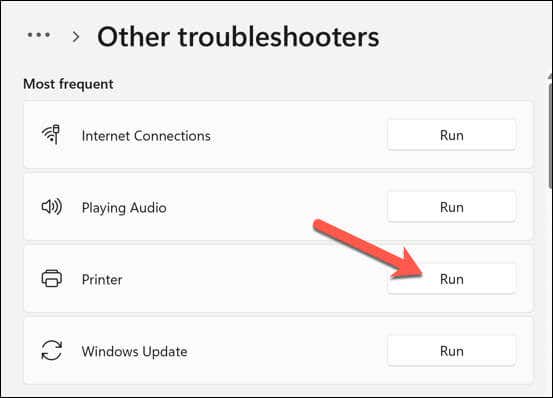
- Click Next and follow the on-screen instructions to detect and fix any problems.
After completing the troubleshooter and resolving any issues it detects, restart your computer, and then check if the “Error – Printing” issue is resolved.
Resolving Common Printer Issues on Windows 11
There isn’t a one-size-fits-all fix for resolving the “Error – Printing” status error on your Windows PC. Most of the time, however, one of the troubleshooting fixes above will resolve the problem.
However, there could be deeper problems with your printer, which means you can’t connect to your printer or print properly. For instance, if you see the error code “0x0000011b” on your PC, there could be a problem with your network that’s preventing you from printing—you’ll need to dig deeper to find and fix the problem.
- 7 Ways to Fix HP Printers ”Driver Is Unavailable” Error on Windows PC
- How to Fix Your Printer’s “Driver is unavailable” Error on Windows
- 7 Ways to Fix ”Windows Cannot Connect to the Printer”
- Print Job Won’t Delete in Windows? 8+ Ways to Fix
- Preparing for Windows 10 End of Support: Upgrading to Windows 11
Ben Stockton is a freelance technology writer based in the United Kingdom. In a past life, Ben was a college lecturer in the UK, training teens and adults. Since leaving the classroom, Ben has taken his teaching experience and applied it to writing tech how-to guides and tutorials, specialising in Linux, Windows, and Android. He has a degree in History and a postgraduate qualification in Computing. Read Ben’s Full Bio
One of the most common printing issues that HP printer users report is that their printer will not print black ink. There are a few reasons this might occur, including incorrect printhead alignment, faulty or empty black color printer cartridges, and more.
In this article, we’ll cover ten common printer errors that can cause your HP Printer to stop printing black and explain how to fix them. These methods might also help with color ink or color cartridge issues.
10 Ways to Fix Your HP Printer When It’s Not Printing Black
Below, we cover 10 different methods to troubleshoot your HP color printer. We begin with the easiest and most probable fixes, so start at the top and work your way down.
Note: Your printer problems might be associated with a specific error message. If so, check out our troubleshooting guides for “ Printer Status Unknown ” and “ Driver Is Unavailable .”
1. Make Sure You Have Ink or Toner

This may seem obvious, but if your HP Printer won’t print black, it might be low on ink or toner. Whether your printer requires ink or toner will depend on the model. HP DeskJet, HP Envy and HP Officejet, and HP InkJet Printers all use ink. HP LaserJet printers use toner.
The first thing to do is check your ink levels. Your printer cartridge doesn’t need to be completely out of ink to stop printing in that color—just very low. If there’s an exclamation mark beside the ink level indicator for black, you need to insert a new cartridge.
Keep in mind that if your printer sensors are faulty, they may show that you have ink even when you don’t. So, even if your printer says it has ink, insert a new printer cartridge to test whether it’s an empty cartridge at fault.
2. Clean the Printhead
A clogged printhead nozzle can prevent your printer from printing black ink. Fortunately, this is an easy fix. Printhead cleaning is available in the Printer Maintenance menu or HP printer’s control panel under Deep Cleaning or Clean Printhead .
Select the appropriate option on your printer and allow the cleaning process to take place. This may take a while. The printer will then usually print a test page to see if the issue has been resolved. You may need to do this a few times to restore print quality fully.
To prevent clogging in the future, avoid going for long periods of not using your printer, and do not use third-party black ink cartridges.
Note: Another common error HP users get is that they have “Missing or Failed Printheads.” See how to fix this error if it occurs .
3. Clean the Cartridges
If you have cleaned the printhead a few times and are having no luck, it may be worth cleaning the cartridges themselves. Printer cartridges can become clogged or dry out, causing that color to fail.
The easiest way to clean cartridges is to wipe the nozzle plate (where the ink comes out) with some isopropyl alcohol. If this doesn’t work, your cartridge may be dry. Pour some boiling water into a container and submerge about a quarter of the cartridge face down. Leave until the water cools. Dry the cartridge and reinsert it into the printer as normal.
4. Use the HP Smart App
The HP Smart App is available for some HP users and can be used to troubleshoot various printing issues. Most Wi-Fi-enabled HP printers manufactured after 2010 are compatible with this app.
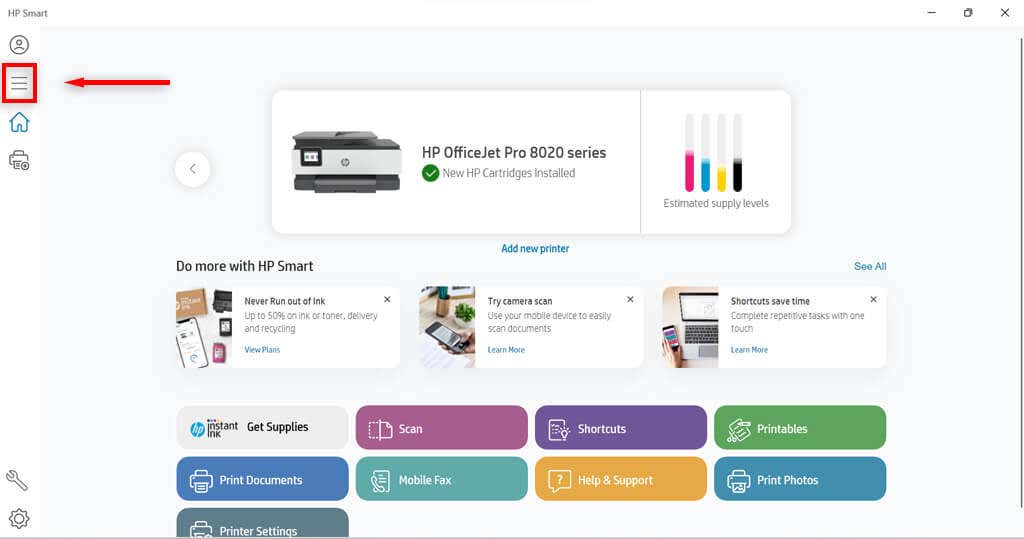
- Open the HP Smart app on your device.
- Select the three bars on the left-hand side to open the home menu.
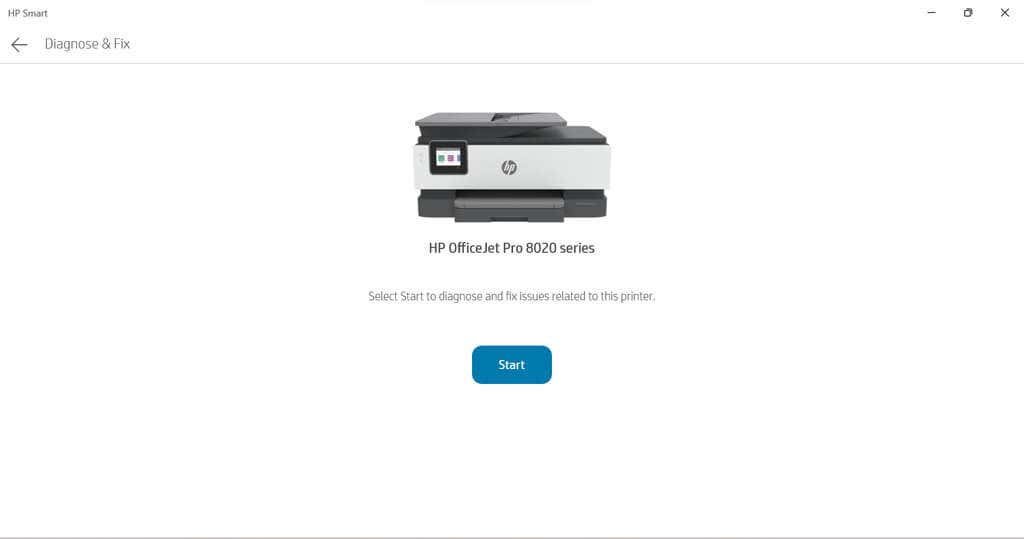
- Select Diagnose and Fix.

- Select Start . Follow the instructions from the troubleshooter.
5. Use the Windows Printer Troubleshooter
Windows users can also use the Printer Troubleshooter to see what may be causing the issues.
- Type Printers and scanners into the taskbar and select Printers & scanners .
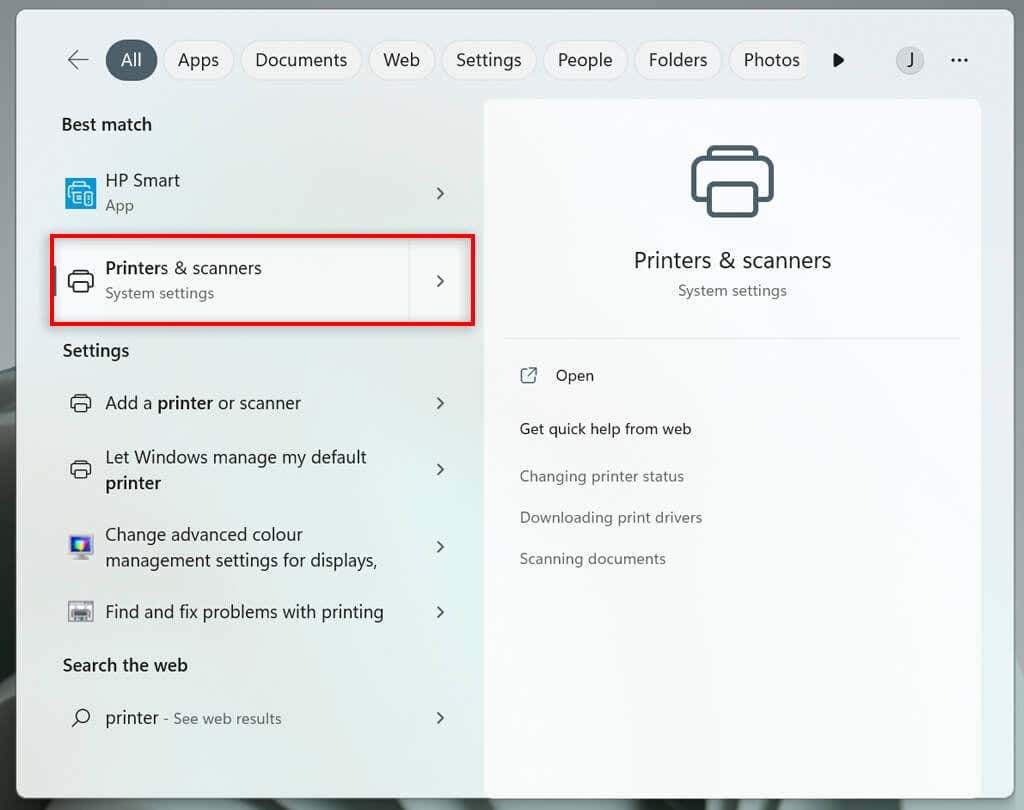
- Under related settings, select Troubleshoot .
- Choose your HP printer model . This should be listed in the troubleshooter’s window.

- Select Next .
- Follow any instructions in the diagnostic report.
If Windows identifies any problems with the software or printer driver, it will fix them or recommend actions for you to take.
6. Use the HP Print and Scan Doctor
For those with models that aren’t compatible with HP Smart, there is another piece of software that may be helpful. If you don’t have it already, you can download the HP Print and Scan Doctor software here .
- Open the HP Print and Scan Doctor software.
- Select Start to choose your HP printer, and then select Next .
- Select the Fix Printing option.
- Follow the troubleshooting instructions.
7. Use Genuine Hewlett-Packard Cartridges
Third-party ink cartridges, while usually cheaper, don’t always work so well on HP printers. Sometimes the cartridge is faulty, other times it is not compatible with the HP software.
If you’re using a third-party ink cartridge, and having printing problems, try replacing it with an official HP ink cartridge.
8. Align the Printhead
A printer might not print black ink if it has not been calibrated properly. Calibrating your HP Printer by aligning its printhead may fix these issues.
HP printers have an Align Printhead option in their Printer Maintenance menu or within the Control Panel menu that can be used to calibrate the printer.
When you select the Align Printhead option, the printer will print an alignment page and prompt you to make changes based on the outcome of the alignment printout. The actual process will depend on your model. Refer to your HP printer manual for specific printhead alignment guidelines.
9. Check the Paper Type
If you’re printing in black and white and getting blank pages (or it won’t print at all ), the issue may not be the ink but the paper. Try inserting plain paper rather than any specialty paper and see whether the issue is resolved.
If the printer prints fine on normal paper, you might need to adjust your paper settings. Make sure that the paper selected in your printer settings for the print job matches the paper type you’re trying to print on.
10. Contact HP Support
If all else fails, it’s time to contact customer service. You can access HP Support here . Select Contact Us to get in contact with an HP staff member that can hopefully talk you through your printer problems.
Print it Black
Hopefully, the above solutions have helped you fix your HP printer so that it prints in black once again. If they don’t help and HP support is unable to identify the problem, the printer itself might need repairing.
Users can return HP printers within their warranty periods to the manufacturer for repairs. So check the warranty period of your printer to see if you can return it.
- How to Fix the “Error – Printing” Status Error in Windows
- How to Fix Missing or Failed Printhead Error on HP Printers
- How to Add a Printer to Your Chromebook
- How to Fix the Printer Error “0x0000011b” on Windows
- How to Fix HP “Printer Status Unknown” Error
Jake Harfield is an Australian freelance writer whose passion is finding out how different technologies work. He has written for several online publications, focusing on explaining what he has learned to help others with their tech problems. He’s an avid hiker and birder, and in his spare time you’ll find him in the Aussie bush listening to the birdsong. Read Jake’s Full Bio
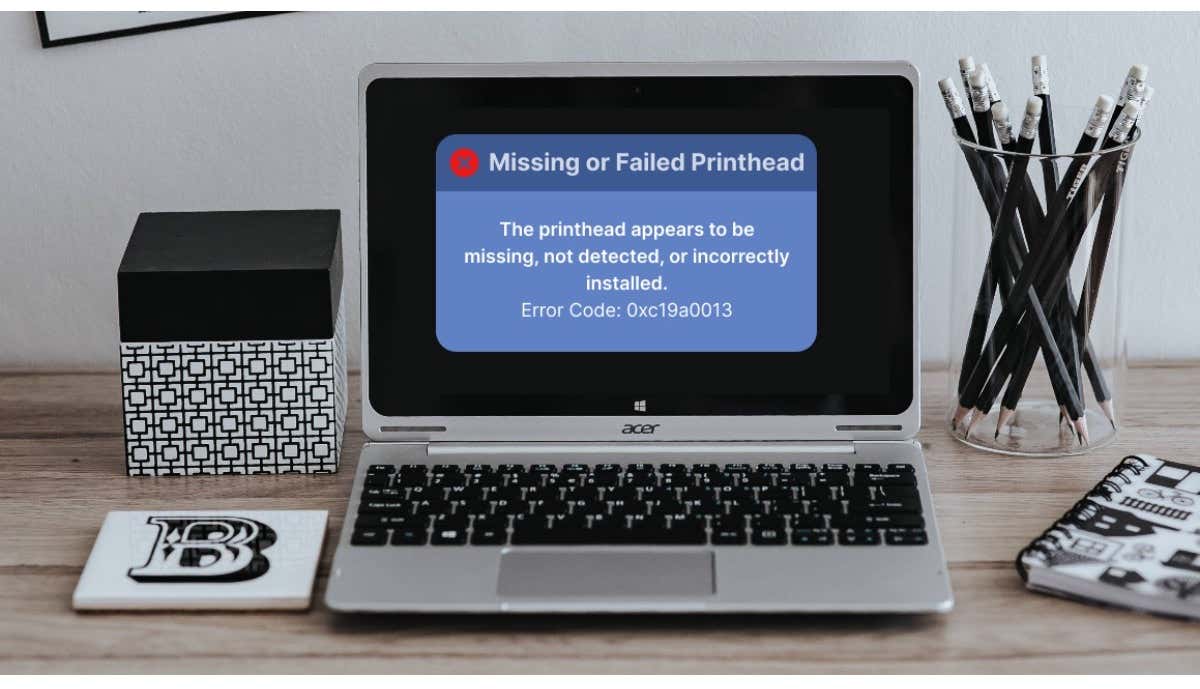
The printhead assembly is the compartment that houses your printer’s ink cartridges. Your printer displays the “Missing or Failed Printhead” error to signal a malfunctioning printhead. The issue could be due to clogged ink nozzles, dirty ink cartridges, internal paper jams, and more.
HP printers may also display this error if the printhead pulls air from ink cartridges. This tutorial covers troubleshooting fixes for the “Missing or Failed Printhead” error on HP printers .
Restart or Factory Reset Your Printer
Rebooting your printer will fix common printer problems , so will restoring its settings to factory default.
Note: Factory resetting your HP printer won’t reset its page count, language, or tray size.
- Turn off your printer and unplug its power cord from the wall outlet for at least 30 seconds.
- Reconnect your printer to its power source and turn it on. If your printer has a Resume button , press and hold it for 10-20 seconds while your printer boots.
- Release the Resume button when the yellow “Attention” light comes on. The “Attention” and “Ready” lights cycle while your preset resets to factory default.
Reseat your printer’s printhead if the missing printhead error message persists.
Reseat Your HP Printer Printhead
HP printers might malfunction if the printhead isn’t seated correctly in the carriage. Reseat your printer’s printhead and check if that stops the “Missing or Failed Printhead” error. Turn off your printer and unplug its power cable before reseating or realigning the printhead.
Open your printer’s cartridge access door, lift the latch on the carriage, and gently pull the printhead halfway out. Return the carriage latch to lock the printhead firmly.
Try the troubleshooting steps below if reseating the printhead doesn’t resolve the “Missing or Failed Printhead” error.
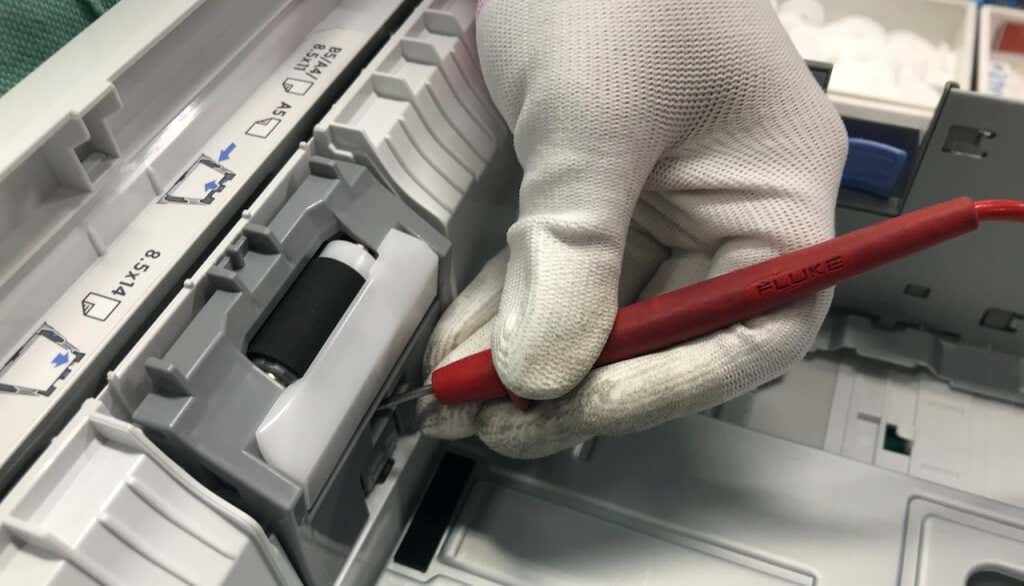
Check for Paper Jam
Paper jams inside your printer can prevent the detection of the printhead. Turn off your printer, disconnect its power cable, and check the ink or toner cartridge access area for jammed paper.
Examine the carriage path and other areas and remove torn pieces of paper inside your printer. Close the cartridge access door, and reconnect your printer’s power cable.
Clean or Replace the Ink Cartridges
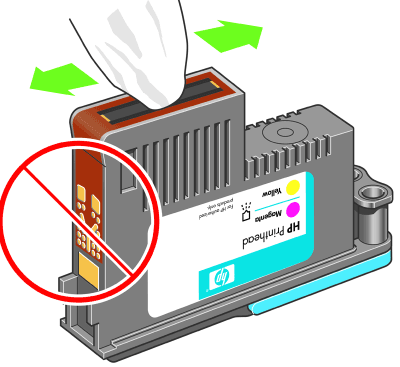
Dirt, debris, or ink residue on your printer’s ink cartridges can also trigger printing errors. Remove your ink cartridges from the printhead and wipe off accumulated dirt or debris. HP recommends cleaning ink cartridges using a clean, dry, and lint-free cloth damped in distilled water.
You should also gently wipe accumulated ink off the copper-colored electrical contacts on the printhead and carriage. Snap the ink cartridges into their color-coded slots, close the cartridge access area, and turn on your printer.
Touching the ink nozzles or cleaning past the electrical contacts can cause print quality issues and electrical failures. Likewise, leaving your ink cartridges or printhead outside the printer for an extended period (over 30 minutes) can damage the cartridges and printer.
Clean the ink cartridges and printhead quickly (but carefully) and replace them immediately. Refer to this HP Support tutorial for more information on cleaning your printer’s ink cartridges and printhead.
Some HP Inkjet printers have a “Clean Printhead” function in their control panels. Depending on your printer model, you’ll find the cleaning option in the “Tools,” “Maintenance,” or “Printer Services” section of the control panel. Refer to your printer’s manual for instructions on accessing or using its cleaning tool.
Check for connectivity issues between the printer and cartridges if the printhead problem persists. Ensure the ink cartridges are connected correctly, and their plastic tabs align with the printhead.
Additionally, inspect the cartridge’s chip and ensure it’s properly fixed and in good condition. You might have to replace the entire cartridge pack, especially if using non-HP cartridges.
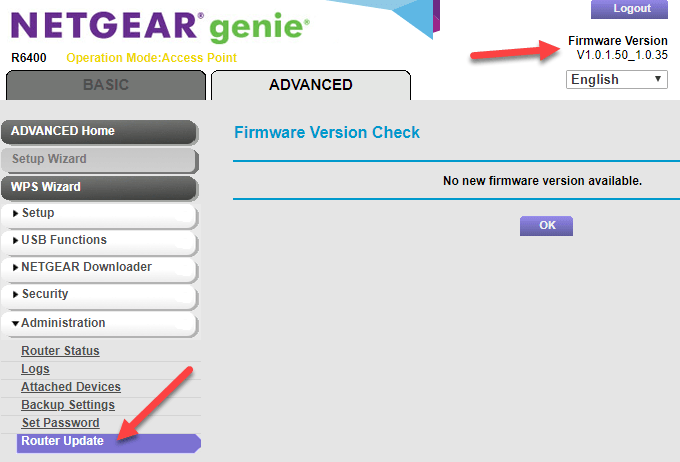
Update the Printer’s Firmware

Updating your printer’s firmware to the latest version sometimes resolves printhead errors and other printing malfunctions . You can update your printer’s firmware through HP’s website or the HP Smart app.
Update Your Printer from HP Website
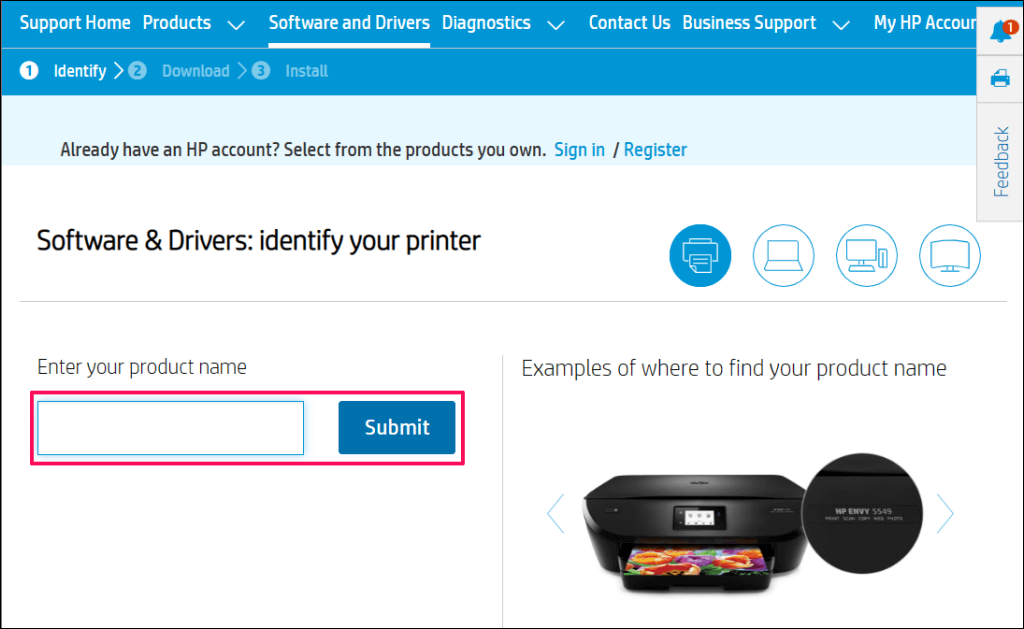
- Visit HP’s website’s Software and Driver Download page and select Printer .

- Enter your HP printer model number or name in the dialog box and select Submit .
- Expand the “Firmware” category and select Download next to the latest firmware file.
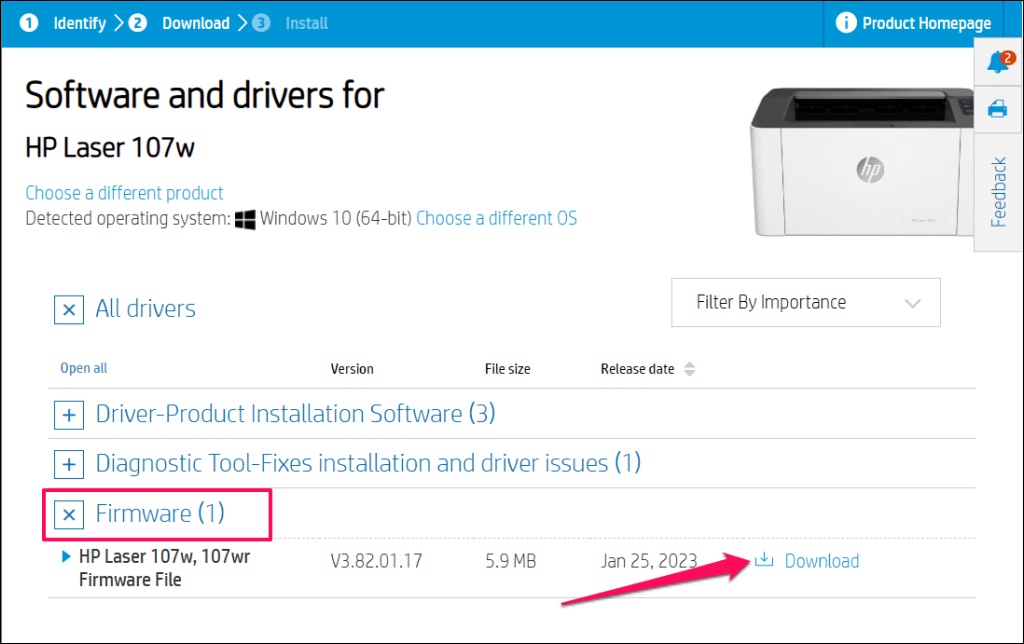
- Unzip the file and follow the instructions in the attached PDF document to install the firmware update.
Restart your computer and printer after installing the firmware update. Keep your printer powered on during the firmware update process. Power failure or turning your printer while updating its firmware can irreversibly damage the printer.
Update Your Printer via the HP Smart
The steps for updating your printer’s firmware may vary depending on the HP Smart app version and your printer model.
Select your printer on the HP Smart app home screen and select Advanced Settings or Printer Home Page ( EWS ). Next, head to Tools / Web Services > Printer Update (s) and select Check Now .
The HP Smart app will automatically download and install any available firmware update onto your printer.
You can also install firmware updates from your printer’s control panel. This HP Customer Support document highlights different ways to install firmware or driver updates on your HP printer.
Fix HP Failed Printhead Error
Contact HP Support or a local service center if the printhead missing error persists. You’ll get a new printhead or replacement printer if your printer is defective and under warranty. Use HP’s Product Warrant Check tool to verify your printer’s warranty or service status.
Otherwise, HP will service or repair your printer for a fee if you have an out-of-warranty product.
- How to Fix the “Error – Printing” Status Error in Windows
- HP Printer Not Printing Black? 10 Fixes to Try
- How to Add a Printer to Your Chromebook
- How to Fix the Printer Error “0x0000011b” on Windows
- How to Fix HP “Printer Status Unknown” Error
Sodiq has written thousands of tutorials, guides, and explainers over the past 4 years to help people solve problems with Android, iOS, Mac, and Windows devices. He also enjoys reviewing consumer tech products (smartphones, smart home devices, accessories, etc.) and binge-watching comedy series in his spare time. Read Sodiq’s Full Bio
If you own a Chromebook and have it connected to the same Wi-Fi network as your printer, adding a printer to your Chromebook is almost identical to adding one on any other computer.
Using the printer settings in your Chromebook’s settings menu, you can configure your printer so that you can print to it any time you like.
How to Add a Wi-Fi Printer to Your Chromebook
If you have a wireless printer connected to your network, adding that printer on your Chromebook is effortless. ChromeOS supports mostly all modern printer drivers.
- Select the clock in the bottom-right corner of the window and select the gear icon to open your Chromebook settings. Select Print and scan in the left menu.
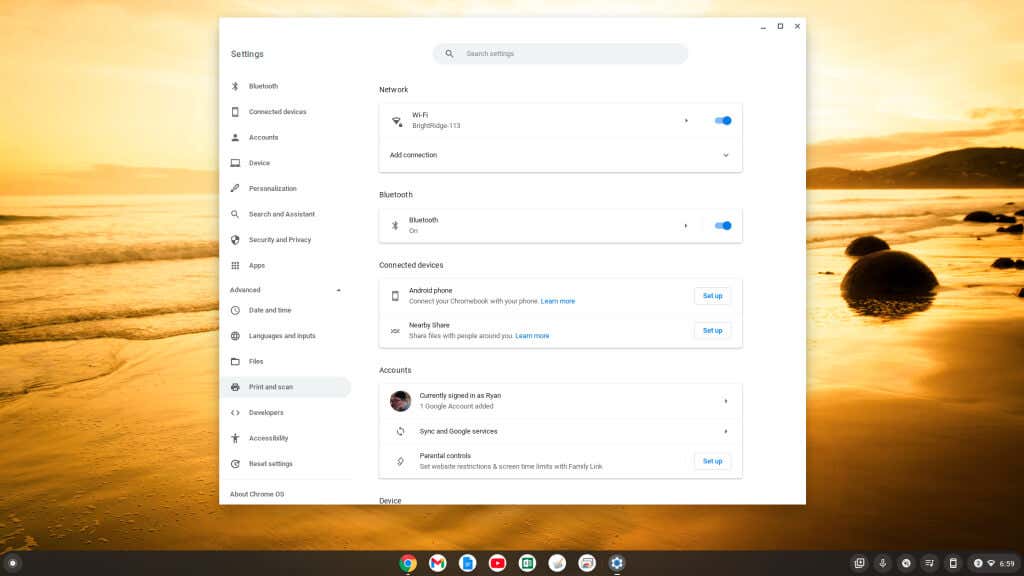
- In the right pane, select the right arrow next to Printers .
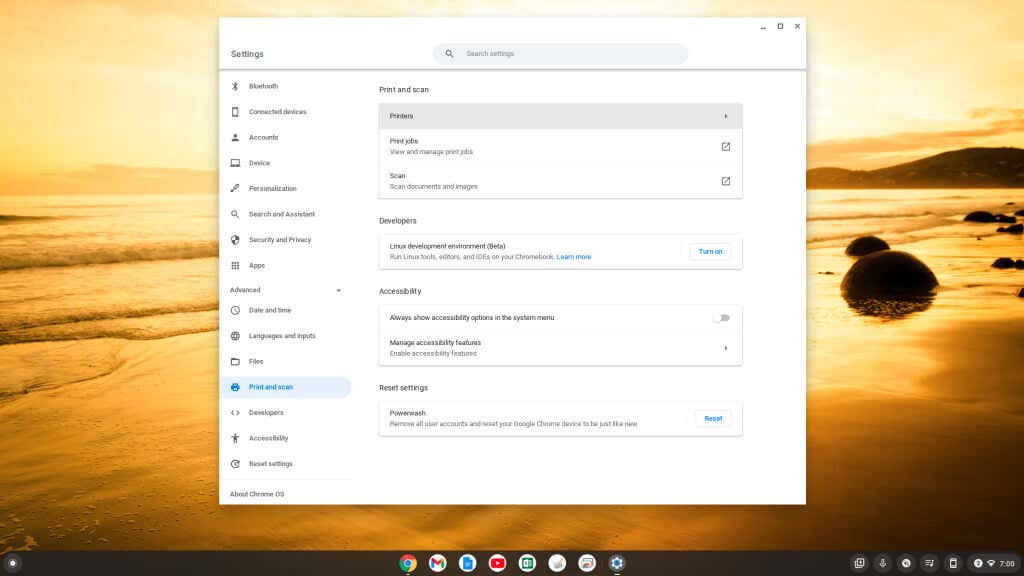
- A new window will open for you to add the new printer. All you need is the printer’s IP address (which you can get from your printer’s menu). Type a name for the printer, enter the IP address in the Address field, and then select the Add button.
Note : Ensure Internet Printing Protocol (IPP) is selected in the Protocol drop-down menu for Wi-Fi network printing to work properly.

You’ll see your printer show up in your list of compatible printers on the Printers page. It will show up under Your saved printers and under Add printers to your profile .
If you have a newer printer with Wi-Fi functionality, it may show up under the second section. You can select Save to add that printer automatically rather than using the manual process above.
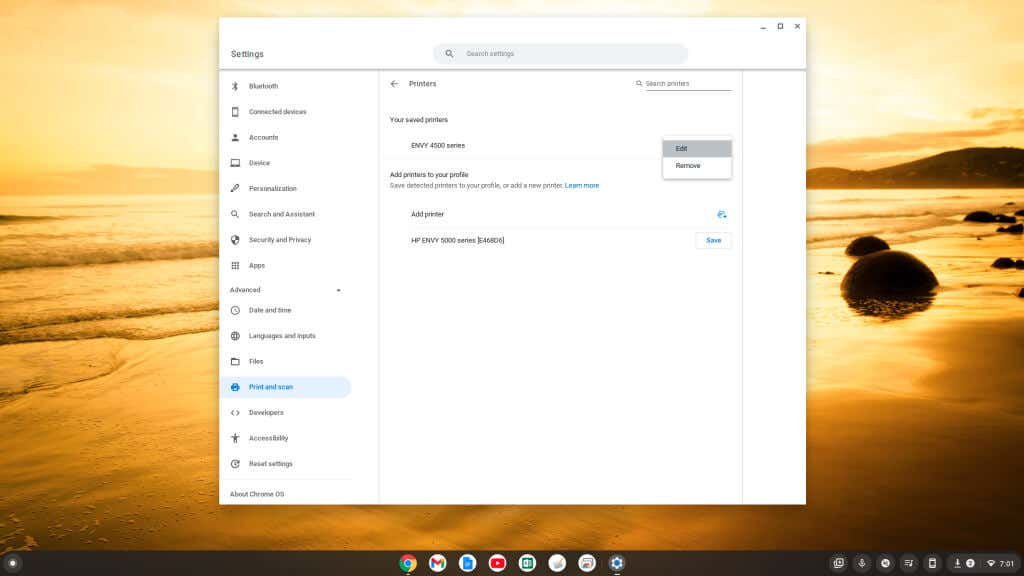
If you don’t see any new printer you purchase in the list at the bottom of the settings window, you can add it manually using the same process above by selecting the small plus icon to the right of Add printer .
How to Add a USB Printer to Your Chromebook
If you’re using an older printer that requires a USB connection, you can still connect your Chromebook to that printer.
- Plug the USB cable from your printer into your Chromebook’s USB port.
- You’ll see a pop-up window to add a new printer. Select Add Printer .
- Follow the wizard to step through adding the new printer.
If you don’t see a Wizard appear, you can go through the steps in the previous section to view available printers in the Settings menu and select the connected printer under the Add printers to your profile section.
Note : Whenever you print for the first time, if you don’t see the new printer’s name in the Destination field, select See more… and the printer should be listed in that window.
How to Print From Your Chromebook
Once you’ve added your printer, you can print to it from any Chromebook app that supports printing.
- With the document, image, or other media open that you want to print, just press Ctrl + P keyboard shortcut on the keyboard to open the Print menu. In that menu, select the Destination dropdown and choose See more .

- In the Select a destination window, select the printer you want to print to.
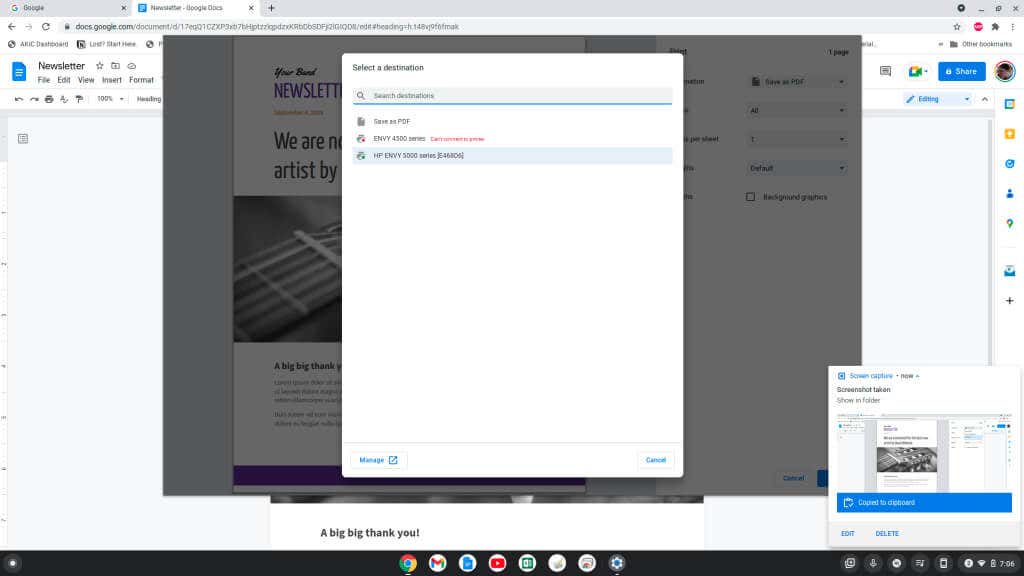
- Once you’ve selected the printer you want to print to, select the Print button to send that print job to your selected printer.

You should see the document or image printed on the printer you’ve selected on your network.
Printing From a Google Chromebook
As you can see, printing from a Chromebook is similar to printing from any other computer . Just open the Chromebook Settings menu and go through the process to add the new printer using the simple menus.
Also, if you want to print from your Chromebook outside your home, away from your Wi-Fi network, Google Cloud Print is the perfect solution.
- Top 4 Ways to Fix Chromebook White Screen Issues
- Chromebook Keeps Turning Off? 9 Fixes to Try
- How to Install and Use VirtualBox on Your Chromebook
- How to Install and Run Windows Apps on Your Chromebook
- How to Play Videos on Chromebooks (And the Best Video Players to Use)
Ryan has been writing how-to and other technology-based articles online since 2007. He has a BSc degree in Electrical Engineering and he’s worked 13 years in automation engineering, 5 years in IT, and now is an Apps Engineer. Read Ryan’s Full Bio
Microsoft Windows’ printer error “0x0000011b” occurs when you try to print something using a network-shared printer. This error usually occurs after installing a faulty Windows update. We’ll show you how to fix that as well as tweak other system settings to resolve your error.
Other reasons you may get the error include an enabled CVE-2021-1678 mitigation option, faulty printer drivers, corrupt Windows system files, and more. You’ll learn how to fix all these items in this guide.
Uninstall the Problematic Windows Update
If you’ve started receiving the “0x0000011b” printer error after installing a Windows update, that update might be faulty. In this case, you can roll back the update (uninstall it) and resolve your issue.
Later, you can check back and install an update that brings your operating system to a newer version without causing issues.
- Launch Control Panel by accessing the Start menu, searching for Control Panel , and selecting the utility in the search results.
- Select Uninstall a program on the Control Panel’s main window.
- Choose View installed updates in the left sidebar to view your update history.
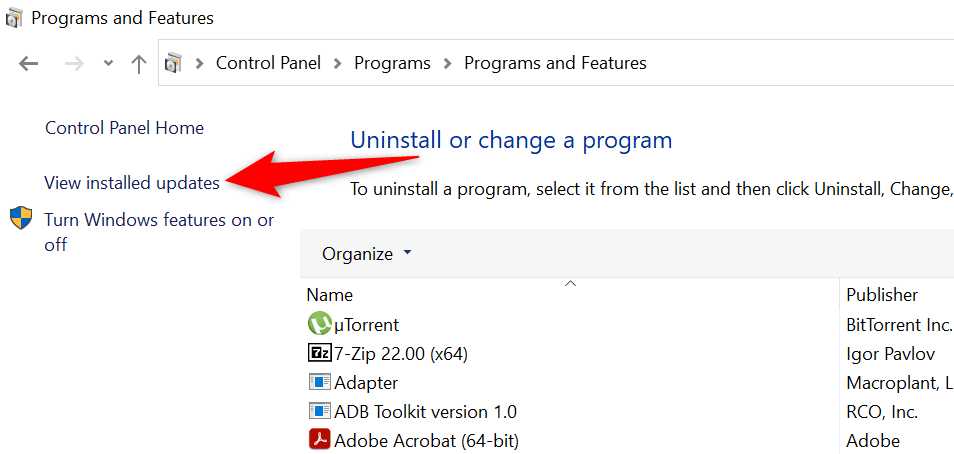
- Select the most recent update on the right and choose Uninstall at the top.
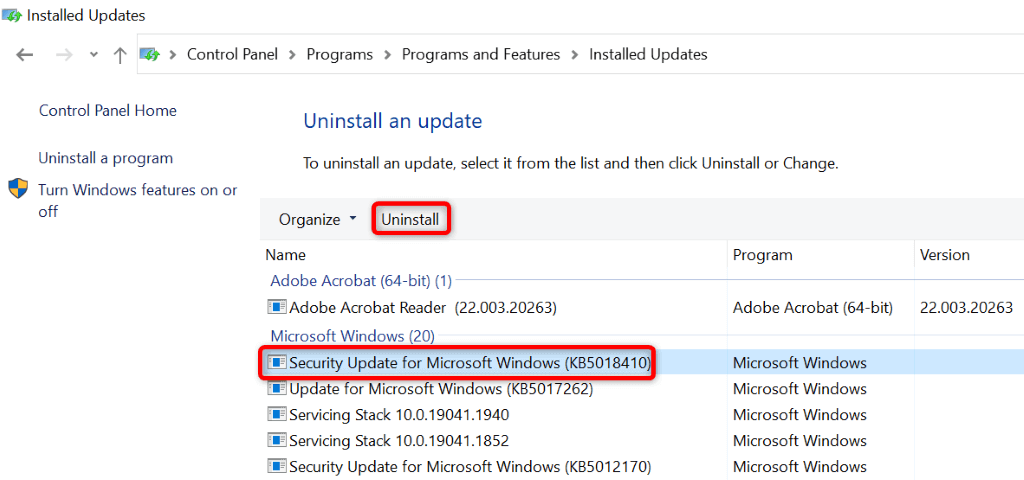
- Select Yes in the prompt.
- Restart your PC when the update is removed. You can do that by opening Start , selecting the Power icon, and choosing Restart .
When your PC turns back on, try to print a test page using your network printer and see if that works.
Fix Your Printing Error by Disablingthe CVE-2021-1678 Mitigation
Another way to resolve the printer error “0x0000011b” is by disabling a Windows option called CVE-2021-1678 mitigation. This option is known to cause your printer problem.
You’ll need to modify a registry key using Registry Editor to turn the feature off on your PC.
- Open Run by pressing Windows + R .
- Type the following in the Run dialog box and press Enter : regedit
- Select Yes in the User Account Control prompt.
- Type the following in the registry path field at the top and press Enter : ComputerHKEY_LOCAL_MACHINESYSTEMCurrentControlSetControlPrint
- Right-click anywhere blank on the right pane and choose New > DWORD (32-bit) Value .
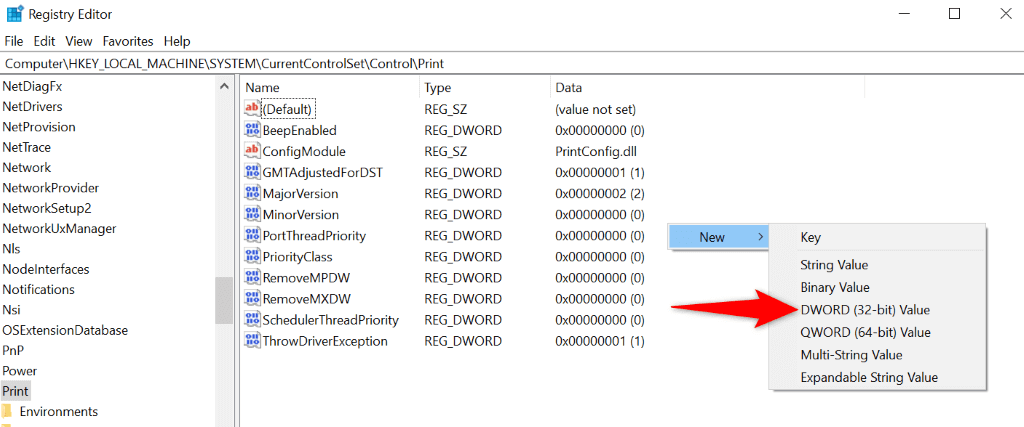
- Use the following as the name for your DWORD: RpcAuthnLevelPrivacyEnabled
- Double-click the newly-created DWORD, enter 0 in the Value data field, and select OK .
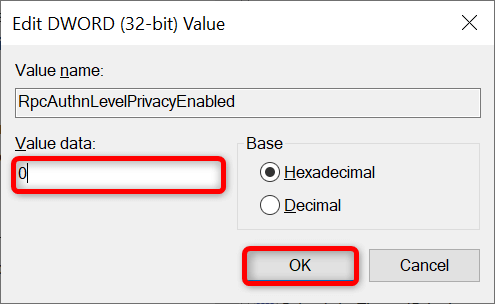
- Close Registry Editor .
- Reboot your Windows PC.
Use the Windows 10/11 Printer Troubleshooter
If your printer error persists and you can’t print your documents, use Windows’ built-in printer troubleshooter and see if that fixes your issue. This troubleshooter detects and resolves your printer issues on its own.
- Open Settings by pressing Windows + I .
- Select Update & Security in Settings.
- Choose Troubleshoot in the sidebar on the left.
- Select Additional troubleshooters on the right.
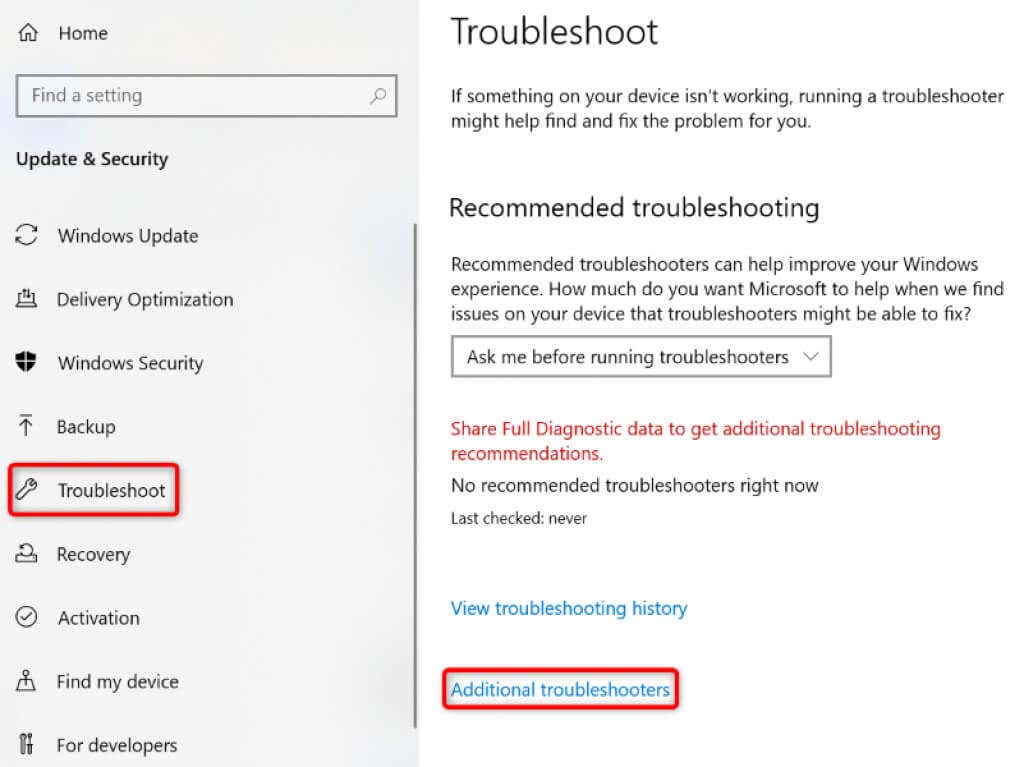
- Choose Printer and select Run the troubleshooter .

- Allow the troubleshooter to find and fix issues with your printer.
When your printer issue is resolved, try to print a document and see if that works.
Update Your Printer Drivers to Fix the Error 0x0000011b
Most printer errors are the result of corrupt or outdated drivers. You can fix this easily by updating your installed drivers to the latest version. Windows offers a utility called Device Manager to help you automatically find drivers for all your attached devices.
- Open Start , find Device Manager , and select the tool in the search results.
- Expand Print queues , right-click your printer, and choose Update driver .
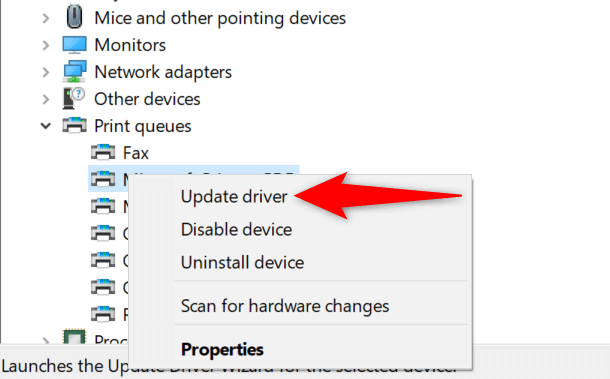
- Select Search automatically for drivers .
- Let Windows find and install the latest drivers for your printer.
- If Device Manager can’t find newer drivers, try to locate the latest drivers by selecting Search for updated drivers on Windows Update .
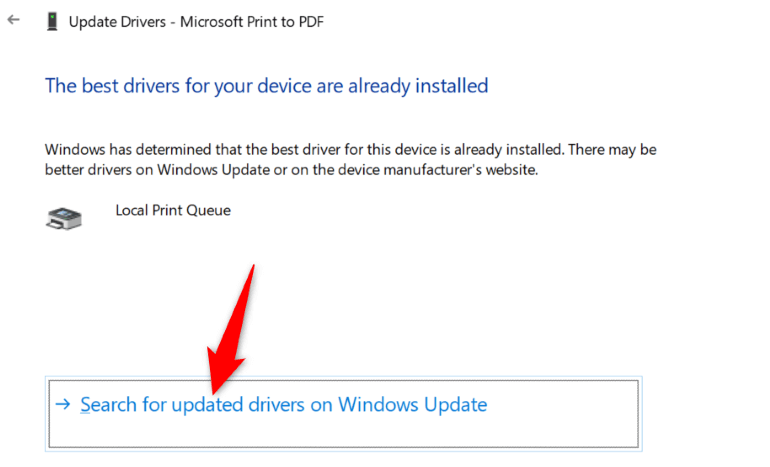
- Reboot your PC when your printer drivers are updated.
Now, try to print something using your printer, and you shouldn’t get any errors anymore.
Install Your Pending Windows Updates
Your Windows system’s bugs can cause your printer to malfunction, resulting in various error messages, including “0x0000011b.” You can fix nearly all the system issues by updating Windows to the latest version.
Updating your Windows PC is quick, easy, and free.
- Launch Settings by pressing Windows + I .
- Select Update & Security in Settings.
- Choose Windows Update in the sidebar on the left.
- Select Check for updates on the right.
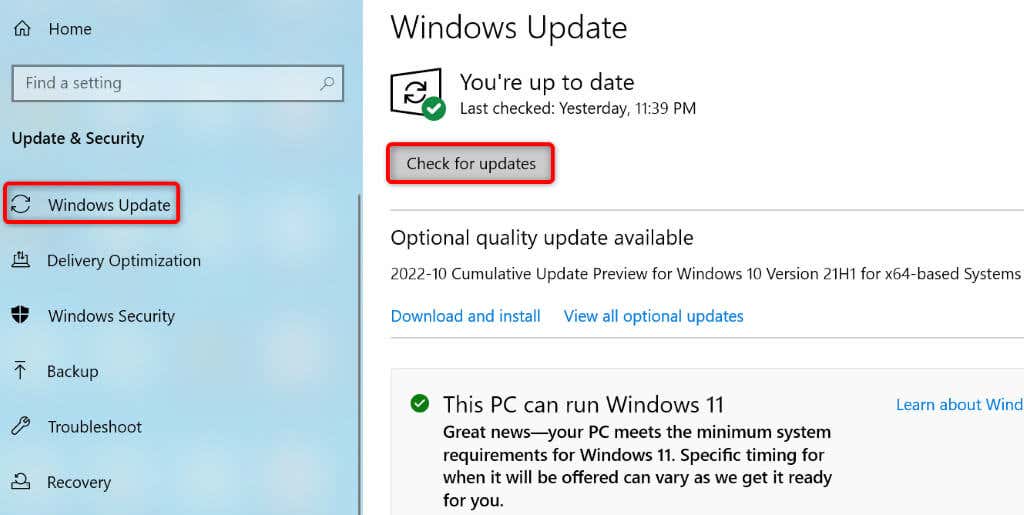
- Install the available updates.
- Restart your PC.
Fix Windows 11/10’s Corrupt Files
Windows’ corrupt files can cause your system features to go haywire. Your printer error may have resulted from such files. In this case, use your PC’s built-in System File Checker (SFC) tool to find and fix faulty files.
The SFC tool runs on its own for the most part, so you don’t have to manually locate any files and try to fix them. You can use this tool from a Command Prompt window on your PC, as follows.
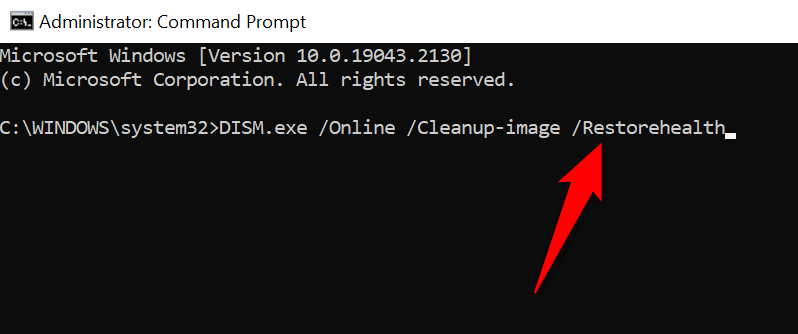
- Open Start , search for Command Prompt , and select Run as administrator .
- Select Yes in the User Account Control prompt.
- Type the following in CMD and press Enter : DISM.exe /Online /Cleanup-image /Restorehealth
- After executing the above command, run the following command: sfc /scannow
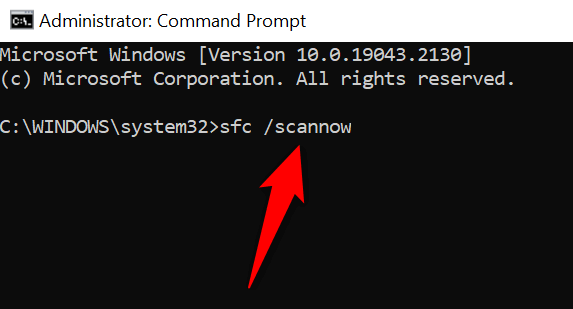
- Restart your PC when you’ve fixed the corrupt files.
Uninstall and Reinstall Your Printer to Resolve the 0x0000011b Error
If all else fails to resolve your “0x0000011b” printer error, remove and reinstall your printer on your system to fix the problem. Doing so deletes all of your printer’s files and sets up the printer from scratch. This fixes nearly all your printer-related issues.
- Open Start , search for Control Panel , and select the tool in the search results.
- Select View devices and printers in the Control Panel.
- Right-click your faulty printer on the list and choose Remove device .
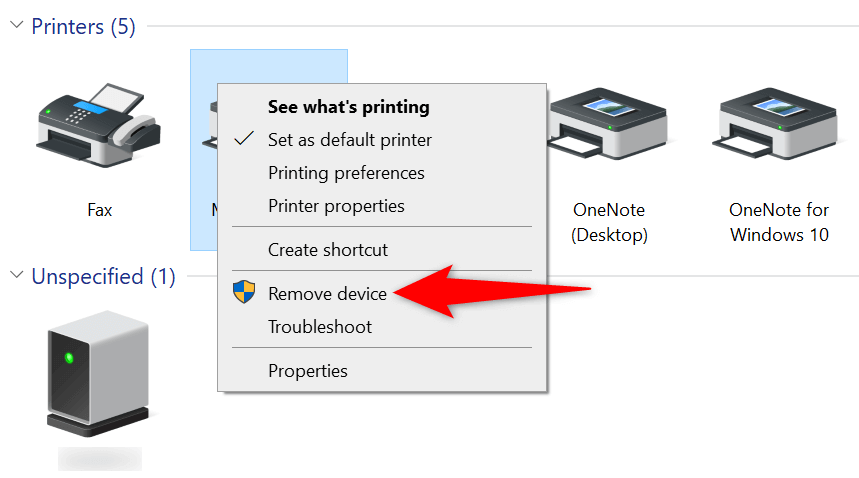
- Select Yes in the prompt to remove the printer.
- Unplug and replug your printer into your computer.
- Access Control Panel > View devices and printers and select Add a printer at the top.
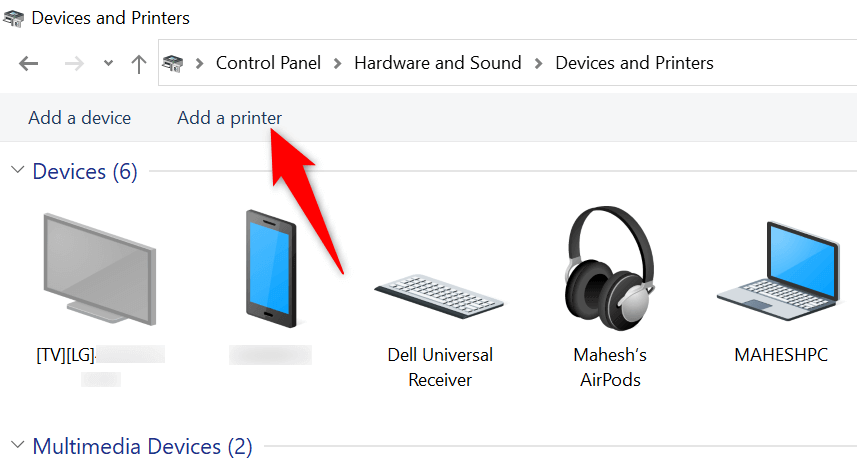
- Finish adding the printer to your PC.
Resolve Your Printer Error to Resume the Pending Print Jobs
It’s frustrating when you want to print something urgently and a printer error shows up. Luckily, you can fix most printer-related issues by tweaking a few items here and there on your Windows system. Once you’ve done that, your printer will communicate with your PC and let you print all your files.
Happy printing!
- How to Fix the “Error – Printing” Status Error in Windows
- 7 Ways to Fix HP Printers ”Driver Is Unavailable” Error on Windows PC
- How to Fix Your Printer’s “Driver is unavailable” Error on Windows
- 7 Ways to Fix ”Windows Cannot Connect to the Printer”
- Print Job Won’t Delete in Windows? 8+ Ways to Fix
Mahesh has been obsessed with technology since he got his first gadget a decade or so ago. Over the last few years, he’s written a number of tech articles on various online publications including but not limited to MakeTechEasier and Android AppStorm. Read Mahesh’s Full Bio
