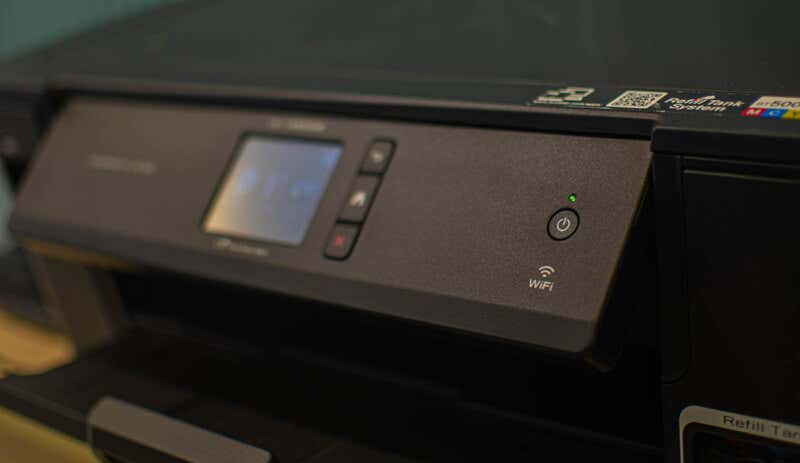
Few things are more frustrating than when you want to print a document, and your wireless printer is in an error state, or gives you the silent treatment. Perhaps you’ve tried to connect your WiFi printer to the network in your home, but the problems persist, leaving your printer stubbornly off the grid.
Ideally, a wireless connection should allow you to transfer documents easily from your device to the printer, but it’s not always that simple in reality.
Knowing how to troubleshoot wireless printer issues can relieve some of that frustration. We’re going to cover some fixes that’ll help you work through most of them below.
Troubleshoot Wireless Printer Problems
- Check the basics.
- Set your printer as the default printer.
- Restart all your devices.
- Run the Printing Troubleshooter.
- Check Router settings.
- Update router firmware.
- Disable VPN connections.
- Make printer IP address static.
- Check Firewall Settings.
- Change your SSID.
- Uninstall and reinstall printer driver and software.
- Uninstall and reinstall the printer.
- Clear and reset print spooler.
- Reset your printer.
Check The Basics
It’s possible to overlook some basics so here’s what to check for before moving to advanced steps:
- Make sure the printer is on or that it has power.
- Connect your printer to your computer or other device
- Check the printer’s toner and paper, plus the printer queue. Sometimes a print job with an error may hold up the line, the travel time for files from your device to the printer may take more time, or a larger document may take longer to download and process.
- Check for any warning lights or error messages on the printer.
- Make sure it’s connected to WiFi.
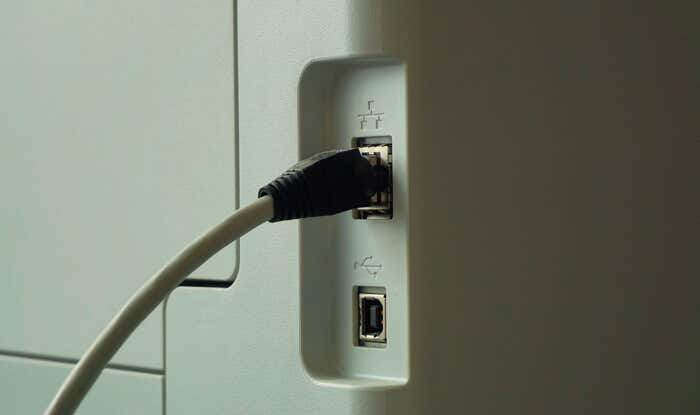
- Use a USB cable to connect and see if it works again.
- Move your printer to where it gets the best WiFi signal without interference. Ideally, it shouldn’t be too far from the router.
- Confirm that your device is also on the right network especially where there’s a WiFi range extender as this creates separate networks, making it harder to connect.
- If you recently updated your browser, security software, operating system or firewalls, it could cause issues connecting to your printer. In this case, reconnect your device to the network, reconfigure security settings to include printers, and/or install updated drivers.
You can also perform a System Restore to go back to the default version or settings and try connecting to your printer again.
Set Your Printer As The Default Printer
It’s possible that you’re trying to connect to a WiFi printer that has set itself as the default. Sometimes a printer may install software that has a “virtual” printer so that when you hit the Print command, the virtual printer saves the file instead of the actual document you’re sending to the physical printer.
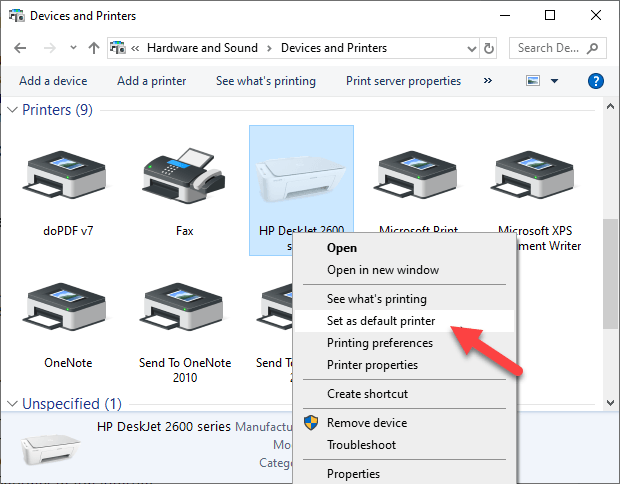
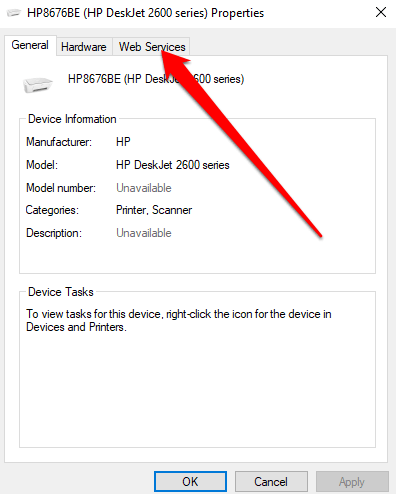
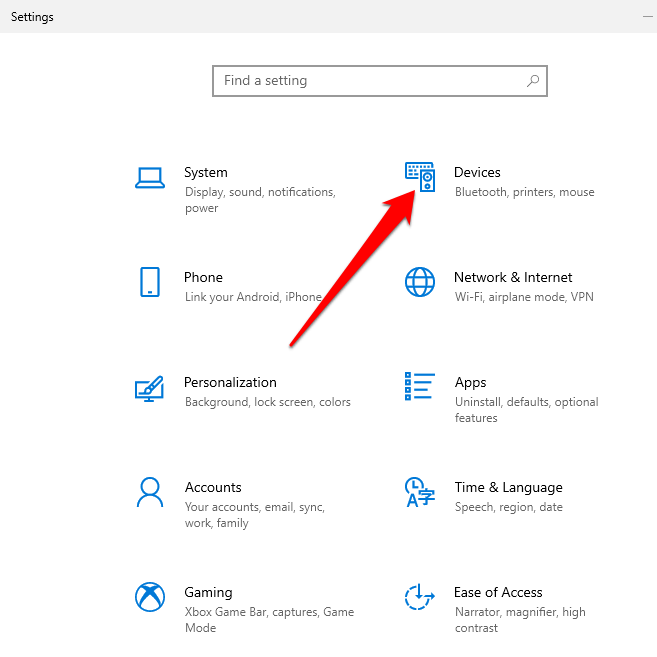
- Click Start > Control Panel > Hardware and Sound .
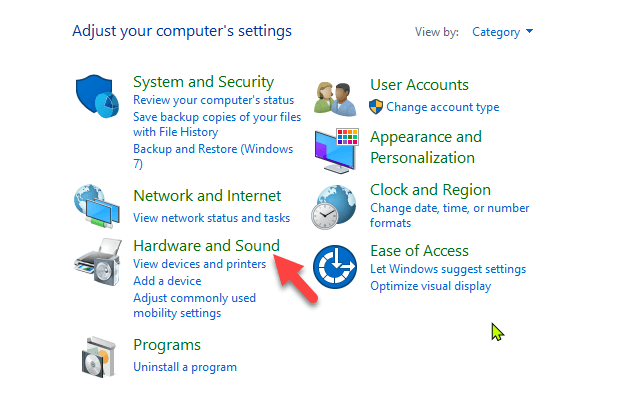
- Click Devices and Printers .
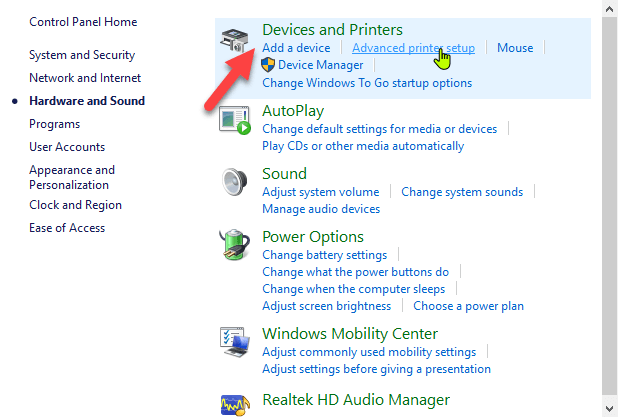
- Right-click your printer and select Set as default printer . Click Yes (or OK) to confirm the action.
Restart All Your Devices
A restart helps fix any software glitches that could cause your wireless printer and connected devices not to work properly together. The wireless printer, router, computer/other device, wireless access point and modem all rely on your home or office network in order to connect to the internet.
However it’s configured, if one device acts up, it may affect all the others. A restart can get the network humming again, after which you can try the printer to see if it works.
Run The Printing Troubleshooter
To do this, open Control Panel > Hardware and Sound > Devices and Printers .
Right click the printer icon and click Troubleshoot . The printing troubleshooter to identify and fix problems connecting to your printer.
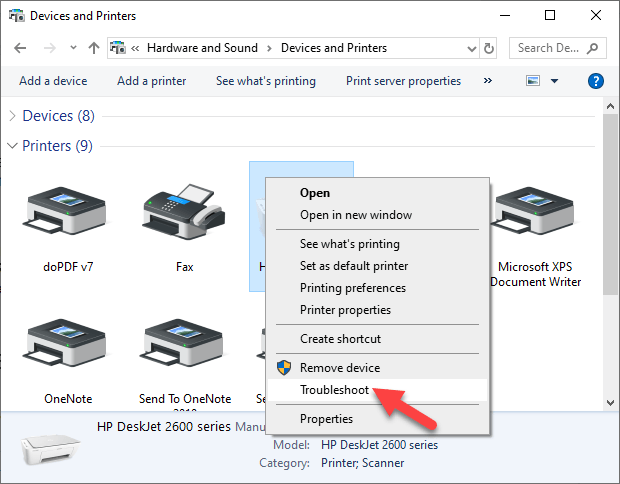
- Alternatively, go to the search box on the taskbar and type Printing problem in , and then select Run Troubleshooter to download the printing troubleshooter . Click Open and follow the on-screen instructions.
Check Router Settings
If you replaced your router recently, you may have to reconfigure the computer and printer to reconnect with your network.
The new router may have a different ISP address that needs reconfiguration, and adjustment of router settings, some of which may be unsuitable for your wireless printer.
- To check router settings, open your browser and type its IP address and press Enter. If you’re not sure of the IP address, read our post how to find the IP address of a router. You can try using admin as the username, and password as the password, which are the commonly used default passwords for routers.
- Find the Wireless or Security section and adjust the settings to default for the printer to connect.
A few things you can check in the router settings include:
- MAC address filtering – disable it as it really doesn’t make your network secure.
- Check if your router is in the 2.4GHz frequency band, which most wireless printers easily connect to compared to connecting to the 5GHz only mode.
- Use a WiFi channel that’s least used by other local networks. For printers that aren’t connecting, channels 1, 6, and 11 usually work best, instead of the default “Auto” channel selection setting.
- Disable wireless isolation mode setting and try connecting to the printer again.
- Enable DCHP to allow your printer to acquire an IP address and communicate over the network, and attempt reconnection.
- Check that your router, device or printer has a guest connection, as this isolates them from other devices on a network, and prevents your wireless printer from connecting.
Update Router Firmware
If changing the router settings didn’t help, update its firmware to address bugs or vulnerabilities and connectivity issues.
For example, moving to Windows 10 from a different version could create an interruption to your connection, which a firmware update could solve.
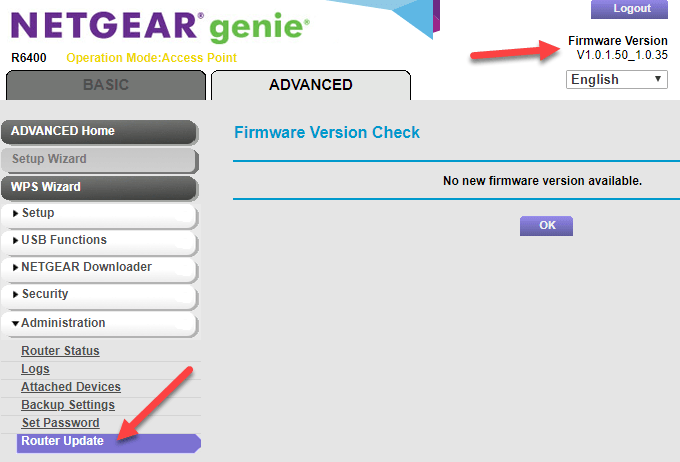
Check your router’s manual or consult the device manufacturer for further instructions as the steps may vary with different routers. Some may also require special instructions to connect to wireless devices, especially those provided by ISPs.
Disable VPN Connections
If you’re using a virtual private network to connect securely to a remote network, it could restrict you from printing through your WiFi printer. This happens for security reasons, but you can disable the VPN connection and try to connect to the home network and resume printing functions.
Make The Printer IP Address Static
IP addresses can fluctuate in a particular range, whether or not your device remains in the same spot. This can be confusing especially where several devices are attempting to connect wirelessly over a given duration.
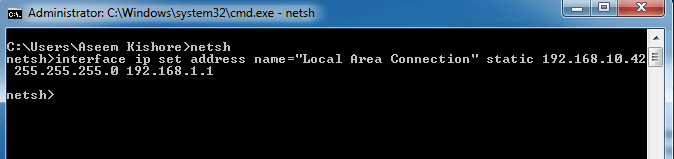
In this case, check your router’s manual for instructions on how to set a static IP address for your printer so that it won’t change with time.
Check Firewall Settings
Your device’s firewall is designed to block any attacks from malware , but it could also block network settings for printing. It could be overprotective of your device depending on how it’s configured, and won’t let it see your printer over the local network.
Firewall settings vary though, in which case you should check the user guide or vendor’s website for support resources.
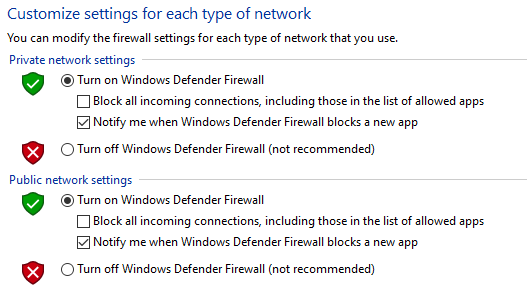
Make sure you keep your software up-to-date, set firewall settings to medium or “Trusted Zone” where your device is connected to a network, and enable it to show all alert messages.
Check that you don’t have multiple firewalls enabled at once as this causes several wireless printer connection issues or you may find your wireless printer not printing.
Change Your SSID
Changing the name of your WiFi network (SSID) may solve connectivity issues. If there are multiple routers with a similar SSID like Home , you can change one of them to make it recognizable by your printer and resolve connectivity errors due to drops in connection or incorrect wireless connection.
Doing this means you have to reconnect a computer system or compatible devices to the right network that the printer is connected to.
Uninstall & Reinstall Printer Driver & Software
This involves reinstalling or reconfiguring your printer’s special network drivers.
- Open Control Panel > Programs .
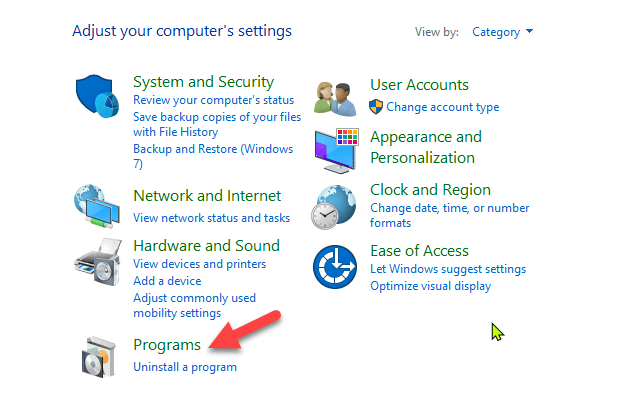
- Click Programs and Features > Uninstall a program .
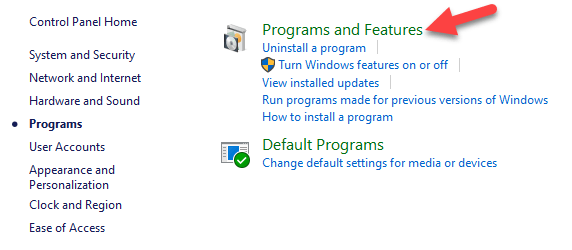
- Click your printer’s name and then click Yes to confirm the action. Turn on the printer and go to the manufacturer’s site to get specific instructions for downloading and installing the drivers for your model. Once installed, follow the steps to set up the printer connection and try printing again.
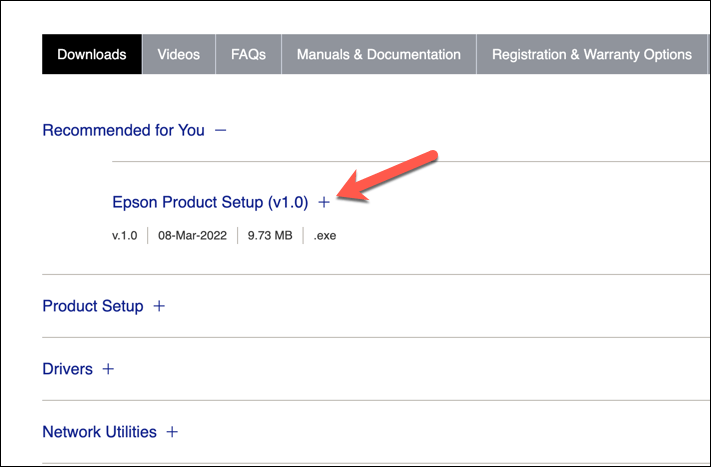
You can also reinstall printer drivers using Windows Update, by clicking Start > Settings > Update & Security and click Check for updates . If an updated driver is available, it will download and install and your printer will use it.
Alternatively, use the disc installation software that came with your printer as this may help you install its drivers or check for driver updates.
What If The Printer Driver Doesn’t Install?
- In this case, click Start > Settings > Devices .

- Click Printers and Scanners and then click Print server properties under Related settings .
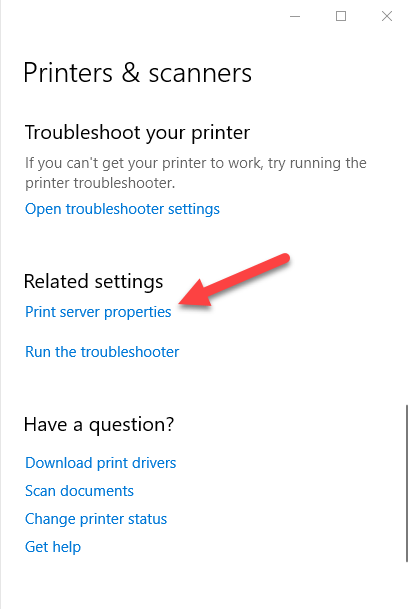
- Go to the Drivers tab and check for your printer. If it’s there, you’re good to go. If not, click Add .
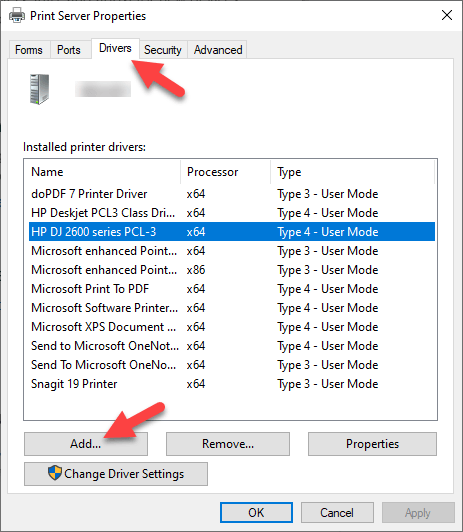
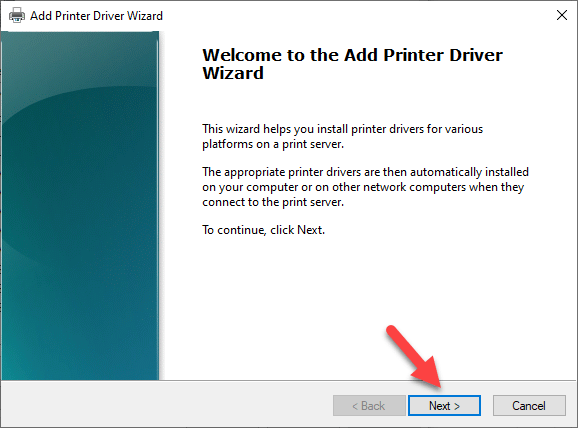
- Click N ext in the Welcome to the Add Printer Driver wizard
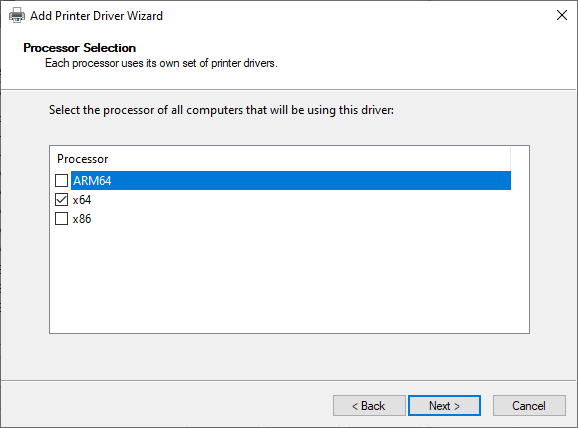
- Click on your device’s architecture in the Process Selection box, and click Next .
- Under Printer Driver Selection , click your manufacturer, select the printer driver, and then click Next > Finish . Follow the on-screen steps to add your printer’s driver.
Note: If no new drivers are available, contact the manufacturer and ask when they’ll be available. If your printer model is no longer supported, you can check with a printer in the same series for updated drivers as there’s a likelihood they’ll work for yours, with some loss of functionality though.
It’s a long shot, but there’s not much to lose if it’s not working already.
Uninstall & Reinstall The Printer
Try to remove your printer and reinstall it to see if the connection will work for it to print again.
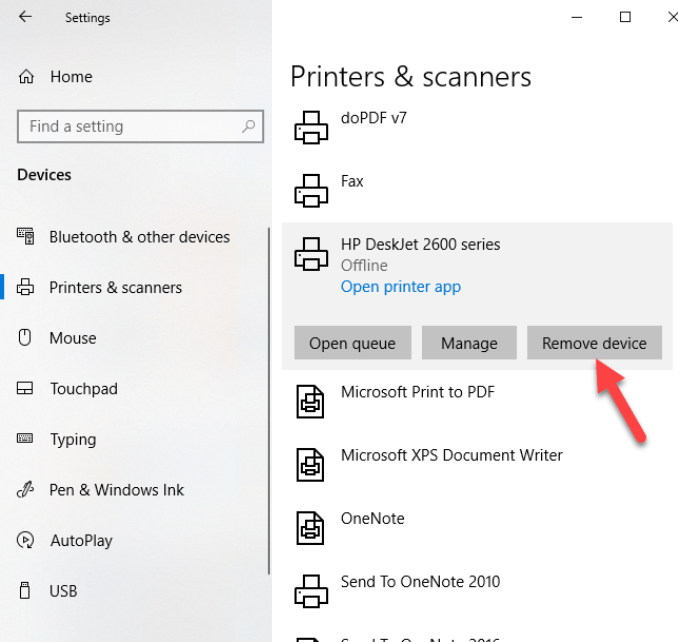
- To remove the printer, click Start > Settings > Devices . Click Printers and Scanners and find your printer, click on it and select Remove device.
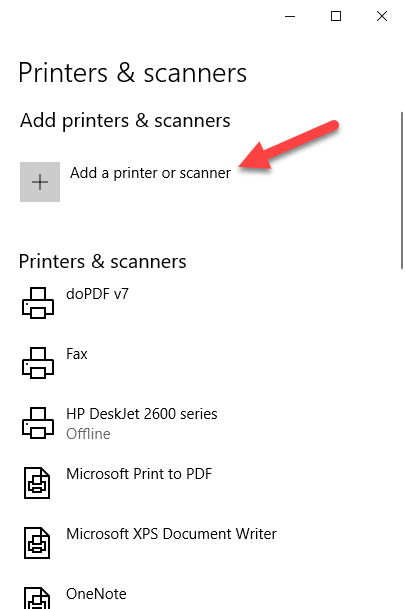
- Reinstall the printer by clicking Start > Settings > Devices > Printers and Scanners . Select Add a printer or scanner .
- Choose your printer from the list of available ones (including Bluetooth or printers connected to another computer and shared on your network) and click Add device .
Note: If you use an extender, wireless access points, or multiple routers with different SSIDs, ensure you’re connected to the same network so your device can find and install your printer. Print a test page to be sure it works properly.
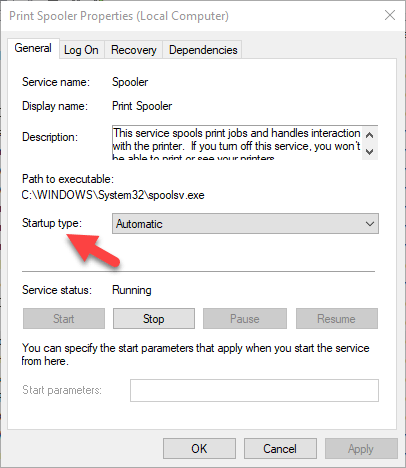
Clear & Reset Print Spooler
The print spooler manages the printing process. If you find your wireless printer not printing, the print spooler could have a problem. In this case, clear the spooler files and restart the spooler service.
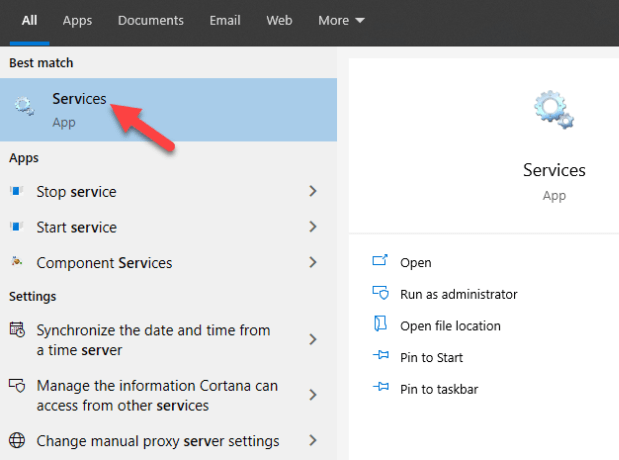
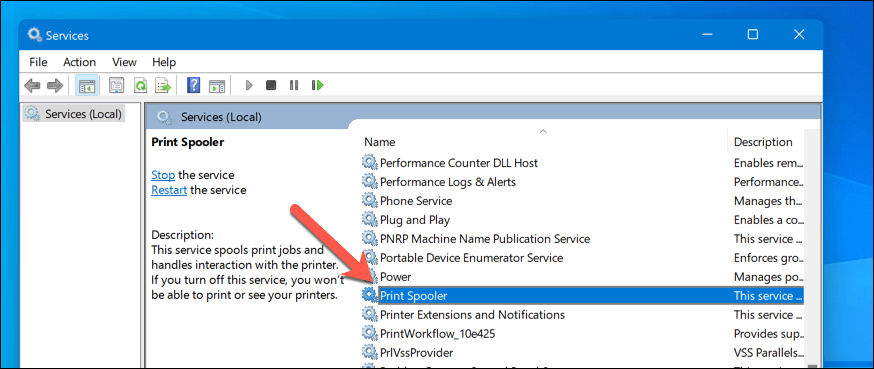
- In the search box, type services and choose Services from the search results.
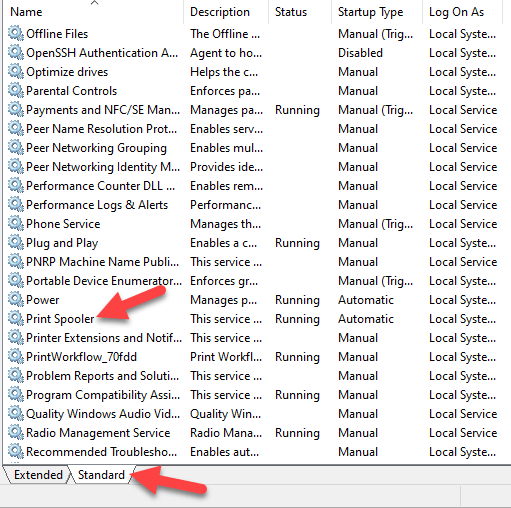
- Click Standard tab and double-click Print spooler.
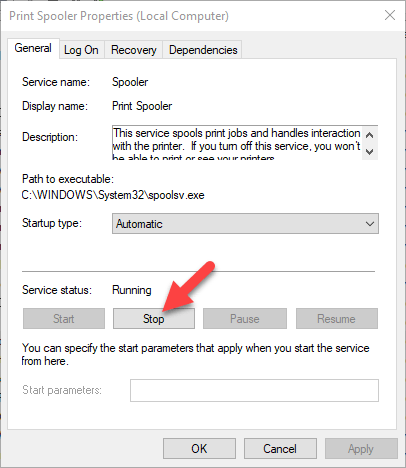
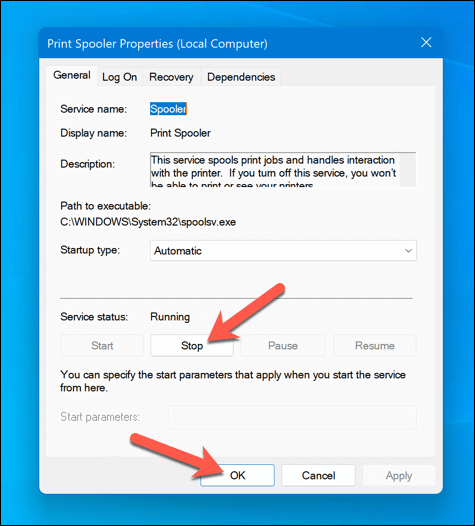
- Click Stop > OK.
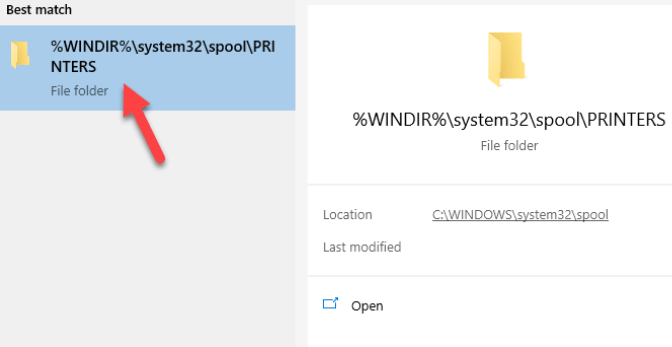
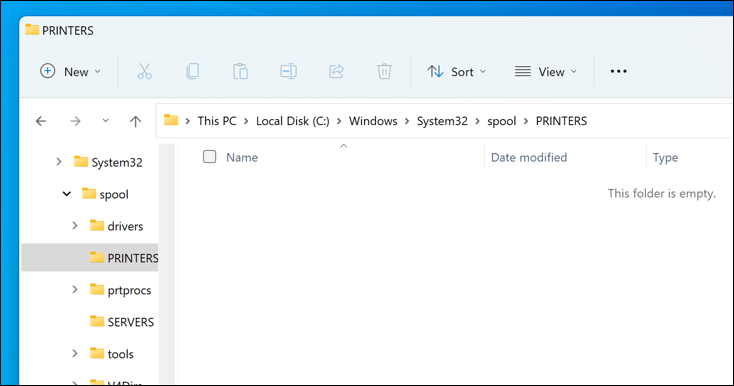
- Type %WINDIR%system32spoolprinters in the search box again, and then select %WINDIR%system32spoolPRINTERS from the search results. Delete all the files in that folder.
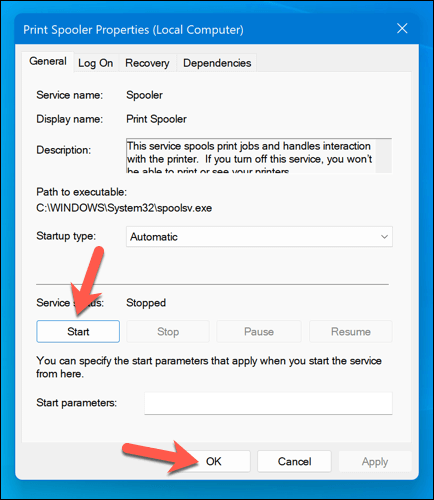
- Type services and select Services . Click Standards tab, and double-click Print Spooler from the list. Click Start and in the Startup type box, select Automatic and click OK .
Reset Your Printer
This is a last resort solution when all other fixes have failed because it clears all your printer settings, including the WiFi login credentials in order to reestablish a connection.
Check your printer manual for directions on how to perform a factory reset as the steps vary by brand and model. The information may also be available online if you don’t have an owner’s manual.
We’ve covered most probable fixes to wireless printer problems, if yours still won’t connect after going through each of these fixes, you can consult the manufacturer, return it to the store, or buy a new printer and start over.
- How to Find the IP Address of Your WiFi Printer on Windows and Mac
- How to Access and Change Your WiFi Router Settings (2025 Edition)
- How to Fix When No Wi-Fi Networks Found on Windows 11 and 10
- How to Fix the “Error – Printing” Status Error in Windows
- Wi-Fi Option Not Showing Up in Windows 11? 11 Fixes To Try
Elsie is a technology writer and editor with a special focus on Windows, Android and iOS. She writes about software, electronics and other tech subjects, her ultimate goal being to help people out with useful solutions to their daily tech issues in a simple, straightforward and unbiased style. She has a BCom degree in Marketing and currently pursuing her Masters in Communications and New Media. Read Elsie’s Full Bio
Every WiFi printer will have an IP address assigned to it that will allow the printer to connect to your home or office network successfully. If you’re having issues printing to your WiFi printer, knowing the IP address can be helpful when you start troubleshooting . It’s also useful to know the IP address if you need to install the printer on a different computer.
There are a few ways you can go about finding the IP address of your WiFi printer on your computer. If the printer has a display, you can usually get the IP address by printing a configuration page via the printer’s control panel.
If your printer doesn’t have a display, you’ll need to connect it to your Windows PC or Mac to find the IP address. Below are the steps you’ll need to take to find your printer’s IP address on Windows and macOS.
How to Find a Printer IP Address on a Windows PC
On a Windows PC, you can find your IP address via the Windows Control Panel, Command Prompt or via Windows Settings.
Find a Printer IP Address on Windows Using the Control Panel
The Control Panel is a collection of tiny programs or applets that allow you to view and configure various Windows system settings. You can use the Control Panel to find your printer’s IP address in a few quick steps.
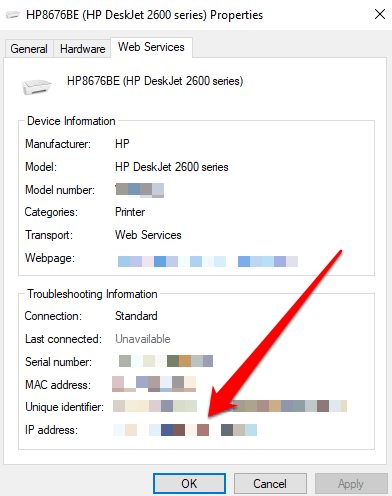
- Open Control Panel .

- Next, select Hardware and Sound > View Devices and Printers .
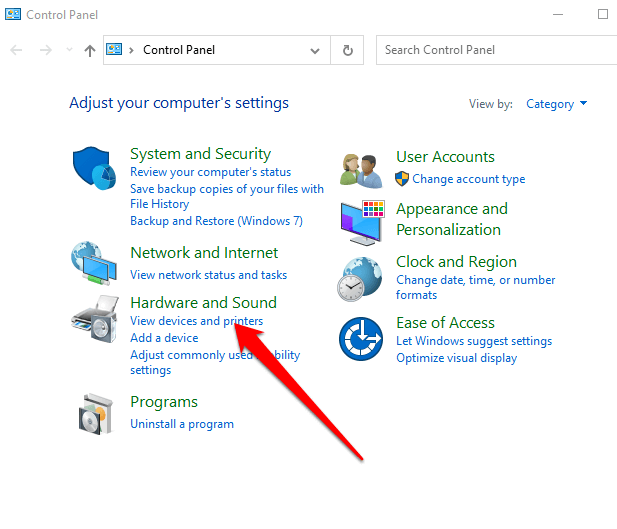
- Right-click your printer and select Properties .

- Select Web Services .
- Check for your printer’s IP address below the Troubleshooting Information panel.
Find a Printer IP Address Using Command Prompt
The Command Prompt in Windows is used to execute commands that automate tasks via scripts and batch files. The command-line interpreter app can also be used to troubleshoot or solve certain issues in Windows or perform advanced administrative functions.
If you can’t find your printer’s IP address via the Control Panel, you can use the Command Prompt instead.
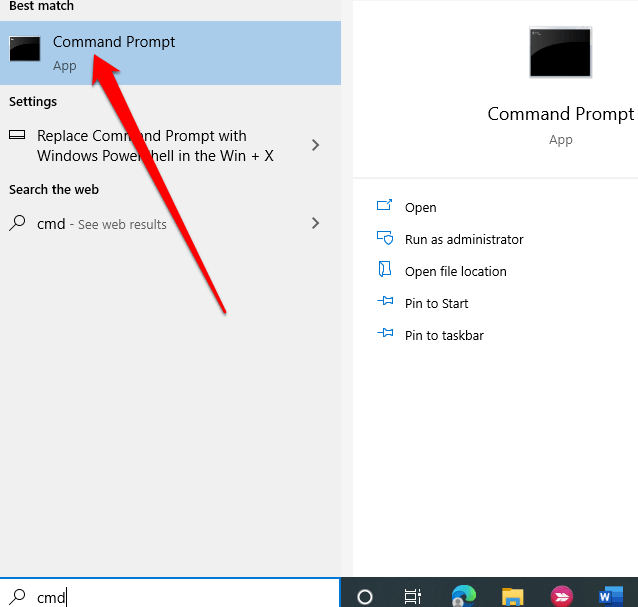
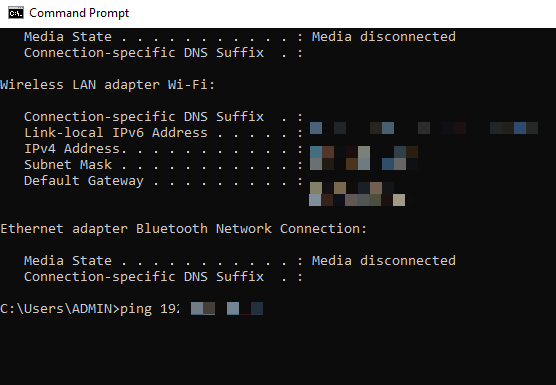
- Type CMD in the search box, press Enter and select the Command Prompt option from the search results.
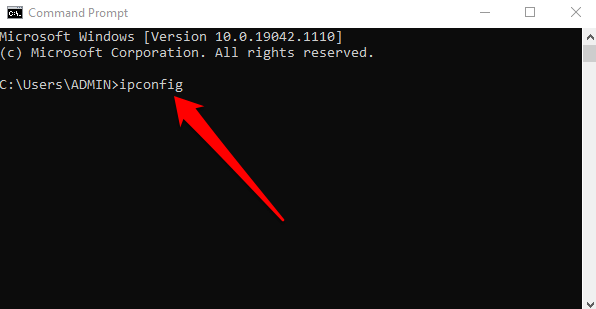
- Type ipconfig and press Enter .
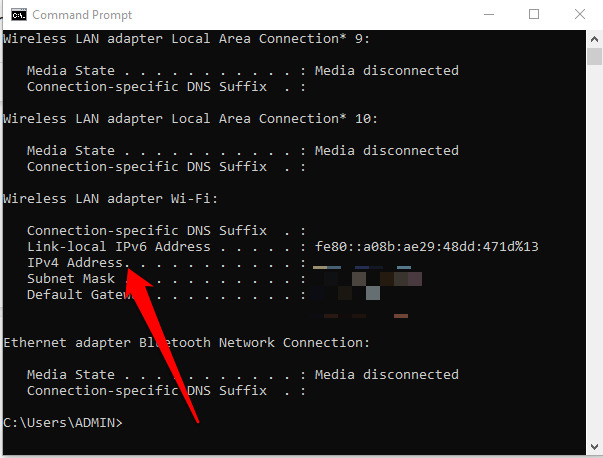
- Find the IPv4 address .
- Type ping followed by a space and the IPv4 address and press Enter .
- Next, type arp -a and press Enter . This will load the dynamic and static connections that use the IPv4 address.
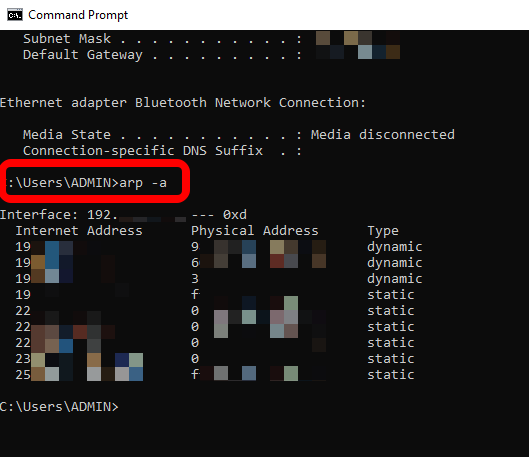
Copy the dynamic IP address you got from the arp command. Open your web browser, paste the IP address and press Enter . If you see a printer setup page with the manufacturer’s logo and other printer information like ink levels or printer status, it means the address you pasted is your printer’s IP address.
Alternatively, you can enter netstat -r in the command line and press Enter .
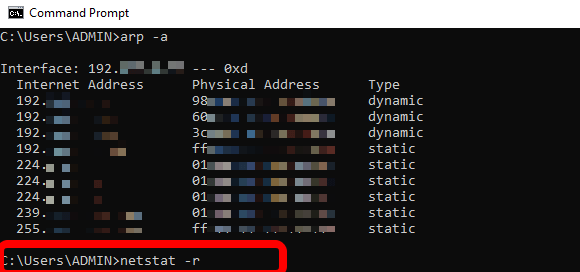
- You’ll see all the network devices connected to your PC and your printer’s IP address.
Note : You can also find your printer’s IP address by checking for the 12-digit number that appears next to the printer’s physical or MAC address.
Find a Printer IP Address Via Windows Settings
You can also find your printer’s IP address via the Windows Settings app.
- Select Start > Settings .
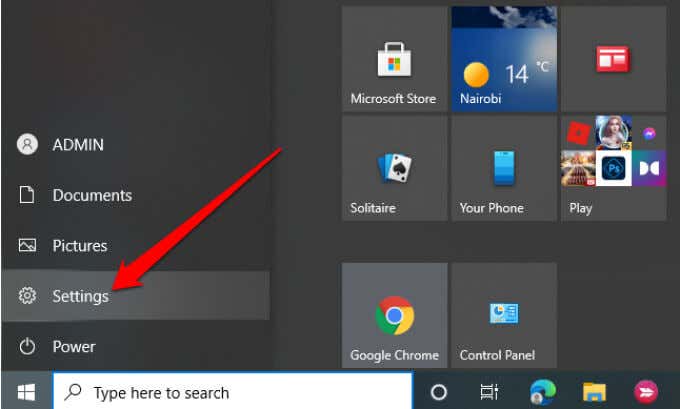
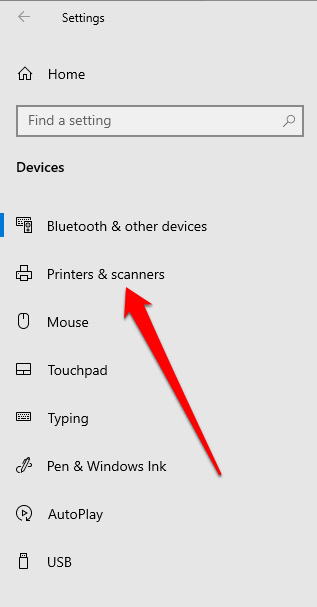
- Next, select Devices .
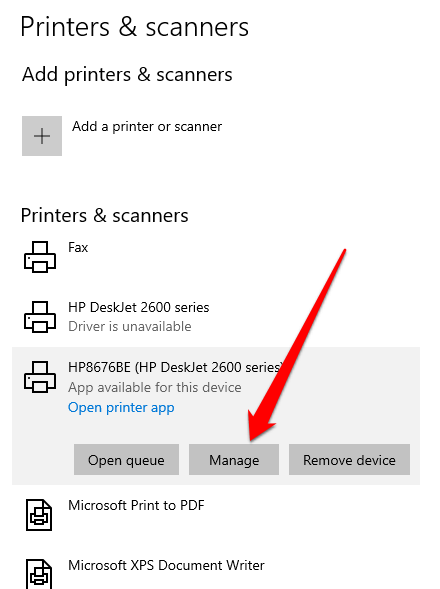
- Select Printers and Scanners on the left pane.
- Click on your printer and then select Manage .
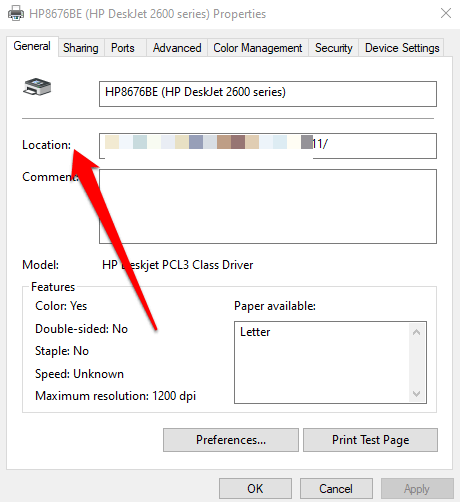
- Select Printer Properties .
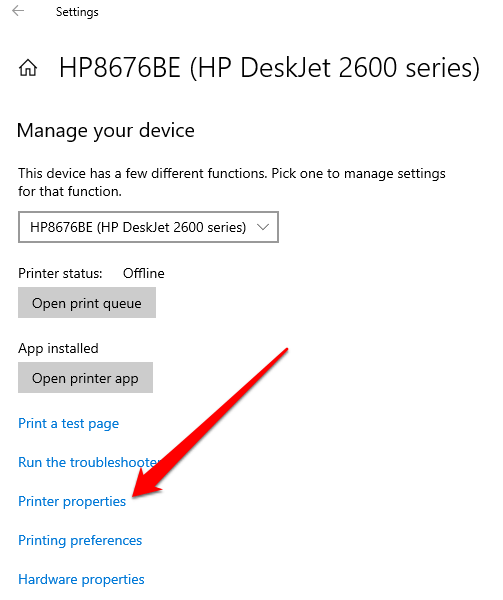
- Check for your printer’s IP address next to the Location field.
How to Find a Printer IP Address on a Mac
You can find your printer’s IP address on a Mac via System Preferences, via connected devices on your router or online using the Common Unix Printing System (CUPS).
Find a Printer IP Address on Mac Via System Preferences
System Preferences on a Mac is where you personalize your Mac’s settings. You can use it to find your printer’s IP address using the steps below.
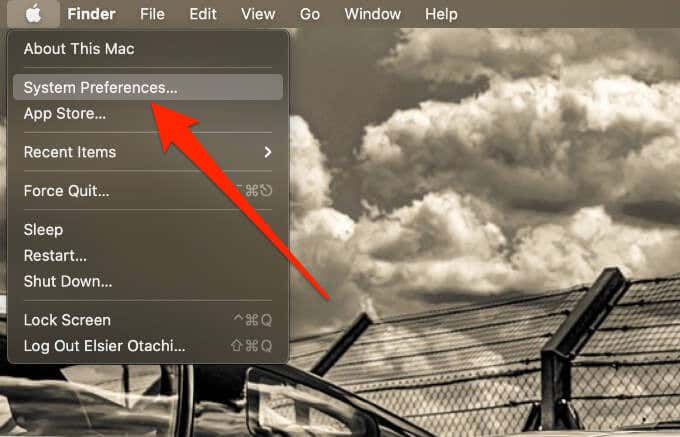
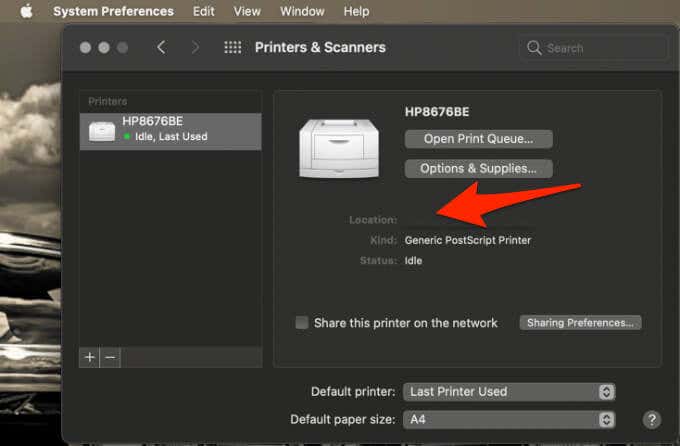
- Select Apple menu > System Preferences .
- Next, select Printers and Scanners .
- Select your printer from the left pane.
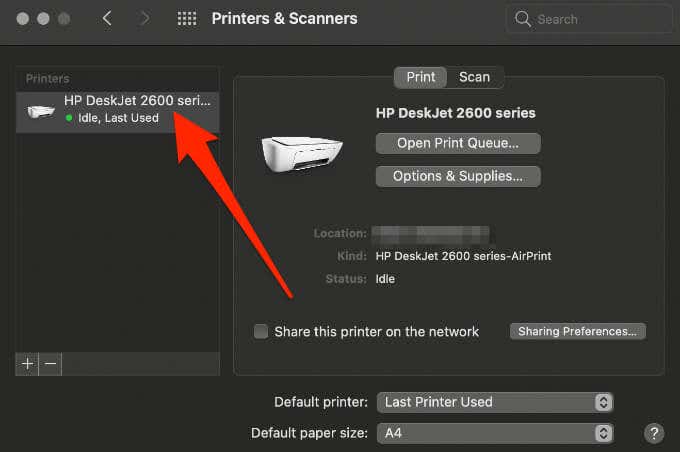
- Check for the printer’s IP address next to Location .
Find a Printer IP Address on Mac Via Connected Devices on Your Router
You can also find your printer’s IP address on a Mac via TCP/IP settings in the System Preferences menu.
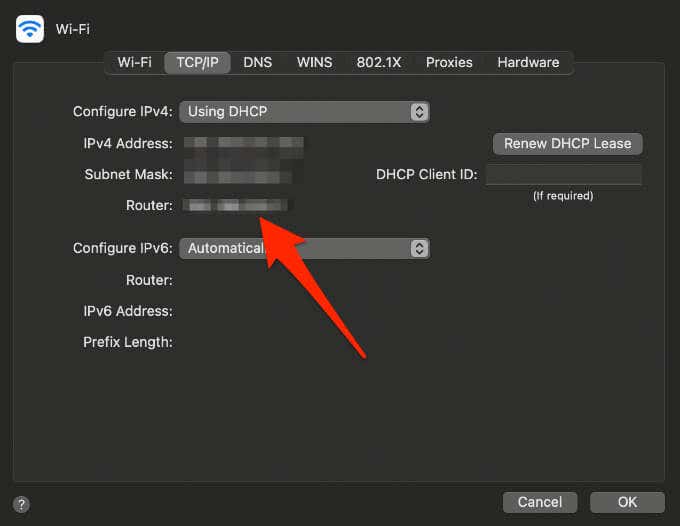
- Select Apple menu > System Preferences > Network .
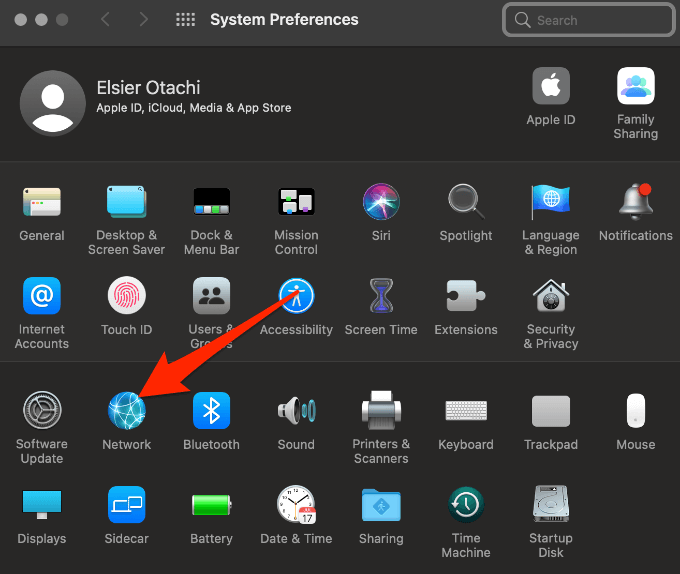
- Next, select Advanced .
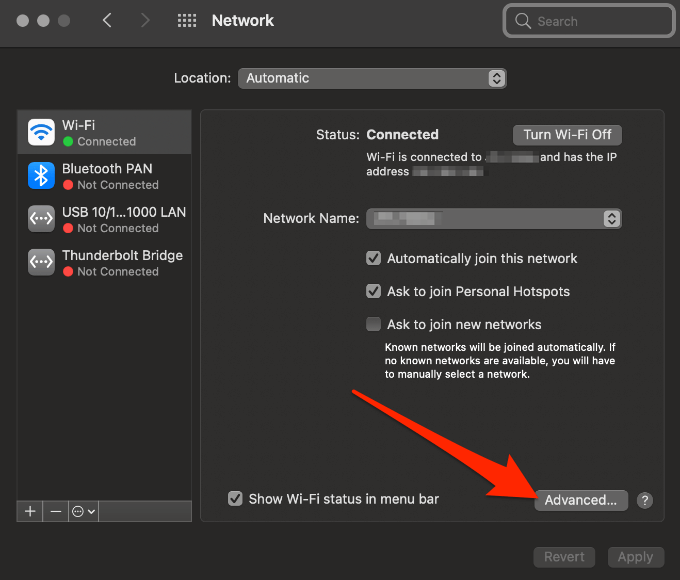
- Select the TCP/IP tab.
- Copy the default gateway next to Router , open your web browser and paste it into the address bar.
- Log in to the router with your admin ID and password, and then select Connected Devices .
Note : The information listed will be different depending on the router you’re using. However, you can check for words like connected device list, network map, network topology or similar terms.
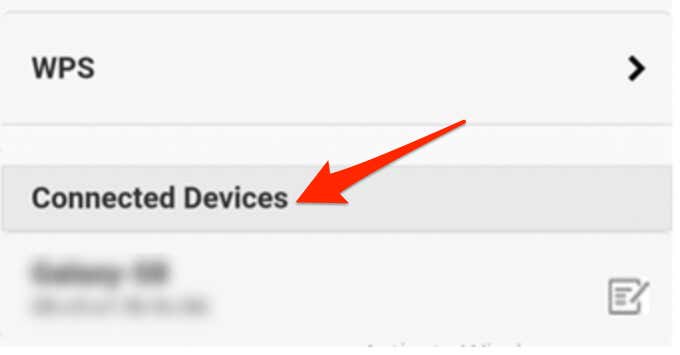
- Select your printer in the host name field and then check for your printer’s IP address in the IPv4 address section.
Find a Printer IP Address on Mac Using CUPS
CUPS is an open-source, modular printing system for UNIX-like operating systems that allow your computer to act like a print server. You can use CUPS to find your Mac’s IP address as follows.
- Select Go > Utilities .
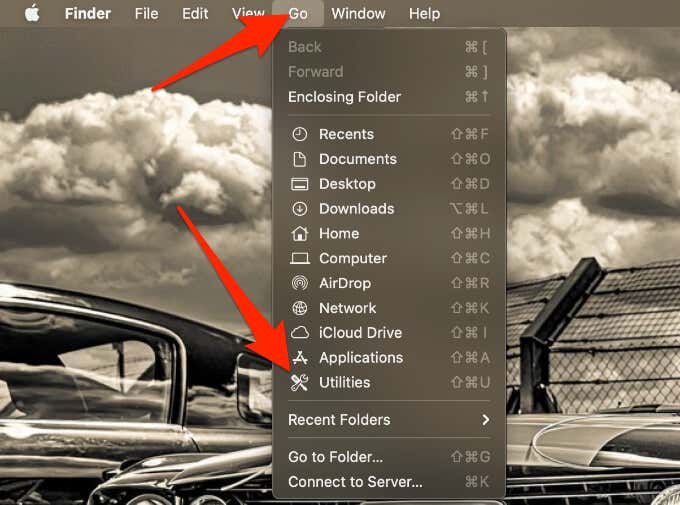
- Next, select Terminal .
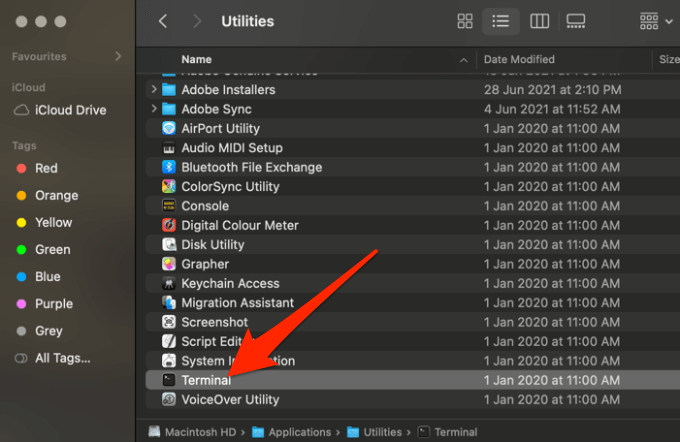
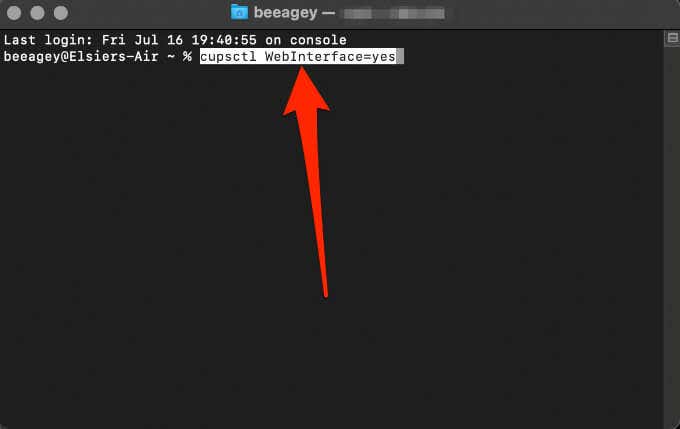
- Enter this command in Terminal: cupsctl WebInterface=yes and press Enter . This will enable the CUPS web interface.
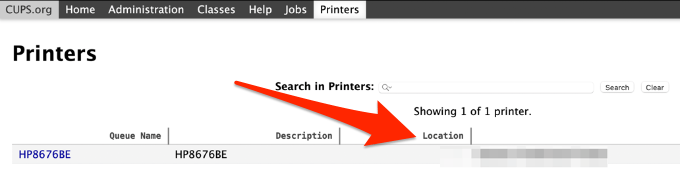
- Next, open your web browser, type localhost:631/printers in the address bar and press Enter .

- Look for your printer’s IP address in the Location column.
Find a Printer’s IP Address Using Your Printer’s Built-in Menu
Your printer’s built-in menu is another method you can use to quickly find your printer’s IP address.
Note : For most printers, the steps below should help you find the IP address, but you can refer to your printer’s manual for exact instructions.
- Press the printer’s Home button to display the printer menu.
- Select either Wireless Settings , Preferences or Options and then check for your printer’s IP address at the top of the box that appears.
Note: If you don’t see the IP address, select View wireless details and check for the IP address there. Some printers may use headings like WiFi Status, Network Status or TCP/IP.
How to Find a Printer’s IP Address Via the Network Configuration Page
If you’ve tried the above steps and still can’t find your printer’s IP address, you can go to the printer’s Settings or Setup page and print it from the network configuration page.
Note : The steps will vary depending on the make and model of your printer. For this guide, we used an HP Deskjet 2600 series printer.
- Press the Wireless and Information buttons simultaneously.

- The wireless network test report and network configuration page will be printed out. You can check for your printer’s IP address from the network configuration page.
Find Your Printer’s IP Address Easily
Now that you know how to find your printer’s IP address, you can set up your printer to your network or fix any connection issues you may be experiencing.
- How to Fix When No Wi-Fi Networks Found on Windows 11 and 10
- How to Fix the “Error – Printing” Status Error in Windows
- 7 Ways to Fix HP Printers ”Driver Is Unavailable” Error on Windows PC
- How to Fix Your Printer’s “Driver is unavailable” Error on Windows
- 7 Ways to Fix ”Windows Cannot Connect to the Printer”
Elsie is a technology writer and editor with a special focus on Windows, Android and iOS. She writes about software, electronics and other tech subjects, her ultimate goal being to help people out with useful solutions to their daily tech issues in a simple, straightforward and unbiased style. She has a BCom degree in Marketing and currently pursuing her Masters in Communications and New Media. Read Elsie’s Full Bio
As a Windows user, a non-working printer could be a simple fix or a time-consuming disaster. If you see the “Error – Printing” status error on Windows, you won’t have much to go on to try and troubleshoot the problem, which can be frustrating and inconvenient to resolve.
Several factors might cause the “Error – Printing” status error, but, in most cases, simple troubleshooting steps like restarting your printer or checking your printer connections may do the trick. To fix the “Error – Printing” status error on Windows, follow the steps below.
Understanding the “Error – Printing” Status Error on Windows
The “Error – Printing” status is a simple, catch-all error code that appears when your Windows PC can’t successfully print . It can be caused by several factors, such as missing paper, outdated or corrupted printer drivers, incorrect printer settings, or issues with the Print Spooler service on your Windows PC.
It can appear in a few different ways, such as “Error – Printing,” “Printer in error state,” or “Print Spooler service not running.” The message may differ, but the result is the same—your printer can’t process or complete the print job.
If you see this error, try some of the troubleshooting fixes below.
Restart Printer and PC
First, restart your devices to see if this resolves the problem.
It’s a good idea to turn off your printer and disconnect its power cord. Next, shut down your PC and unplug its power cable as well. Wait for at least 30 seconds before plugging everything back in.
After the waiting period, reconnect the printer and PC’s power cords. Turn on your printer first, ensuring it’s up and running. Next, turn on your PC. Finally, try printing a test page to see if the “Error – Printing” status error has been resolved.
This restart process might seem obvious, but a clear shutdown and restart can often resolve minor (and unexpected) issues.
Check Printer Hardware and Connection
Printer still not working? It’s a good idea to look more closely at your printer hardware and its connection with your PC.
First, verify that your printer is turned on. Look for an LED or display indicating power, and ensure it’s connected to an electrical outlet. If you have a wired printer, inspect the USB cable connecting the printer to your PC. Make sure it’s properly secured at both ends.
If the USB connection isn’t recognized, try a different USB port or a new cable. Likewise, if the printer is connected over a network, ensure the ethernet cable is connected and the connection is active.
For wireless printers, double-check your Wi-Fi connection. Ensure that your printer connects to the same network as your PC. Most printers have a display or indicator light to show a successful wireless connection. If your wireless printer isn’t connecting , consult your printer’s manual for specific steps to connect to Wi-Fi.
Also, check your printer for issues such as low paper or ink. Without paper or ink, you can’t print, so replenishing the paper or ink should resolve the issue.
Clear Paper Jams
A paper jam may be causing the “Error – Printing” status message on your PC. If your printer can’t push through paper, it can’t continue the printing process.

To resolve this issue, you’ll need to clear any jams from your printer. Depending on your device, this might be difficult to do, so you may need to consult your manual first.
Start by checking the areas where paper enters and exits the printer, then remove any jammed paper. If your printer has an automatic document feeder, open the ADF cover (Automatic Document Feeder) and remove any jammed paper.
Restart Print Spooler Service and Clear Print Queue
After clearing a printer jam, it’s also a good idea to clear your print queue and restart the Print Spooler service (which your printer needs to be able to print). It’s a good idea to do this if your print queue won’t clear after an error occurs during printing.
You can also do this at any point to try and resolve printer errors like the “Error – Printing” message.
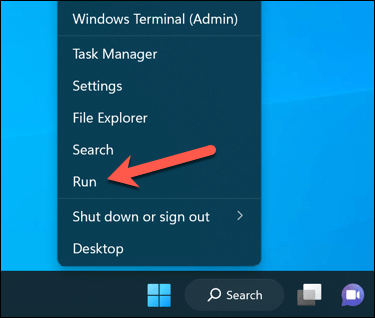
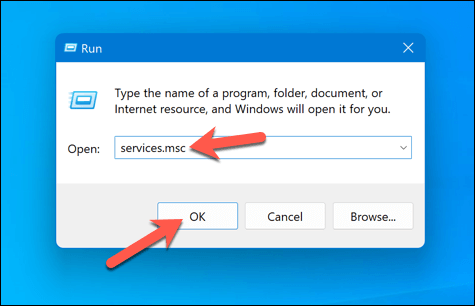
- To begin, right-click the Start menu, select Run, or press the Windows Key + R to open the Run command box.
- In Run , type services.msc and press OK .
- In the Services window, look for the Printer Spooler service and double-click it.
- Press Stop and OK . This will stop the print spooler service, allowing you to clear any leftover print jobs.
- Next, open File Explorer and navigate to the C:\Windows\System32\spool\PRINTERS folder using the address bar. Delete all files in this folder to completely clear the print queue.
- Return to the Printer Spooler service in the Services window and click Start to restart the spooler.
With the paper jams cleared and the print queue emptied, your printer should now return to a ready state, and you can resume printing your documents without any errors.
Update or Reinstall Printer Drivers and Software
Outdated driver software can sometimes lead to the “Error – Printing” status error in Windows. To fix this issue, you should check for new printer software (including new printer drivers) from the manufacturer.
Follow these steps to ensure your printer driver and manufacturer software are up-to-date. It may be a good idea to uninstall existing printer software before proceeding.
- Visit the printer manufacturer’s website and search for your specific printer model in the support or downloads section.
- Find any available updates or new versions of the printer driver software. Ensure the software is compatible with your version of Windows.
- Next, download the latest driver and printer software. If new software is available, download and save the installer to your computer.
- Run the installer and follow the on-screen instructions to complete the installation.
After completing these steps, your printer should begin to start working. However, you may need to restart your PC for any changes to take effect.
Check for New Windows Updates
A new Windows update can fix bugs, and new updates can help resolve common printing issues. You can manually check for new Windows updates to try and resolve the “Error – Printing” status error on your PC.
To check for new Windows updates, follow these steps.
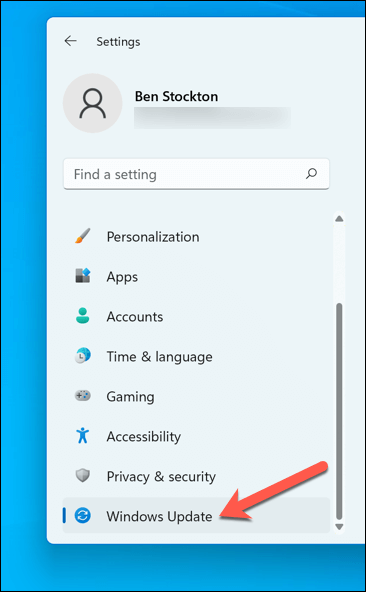
- Right-click the Start menu and select Settings .

- In the Settings window, select Windows Update from the sidebar.
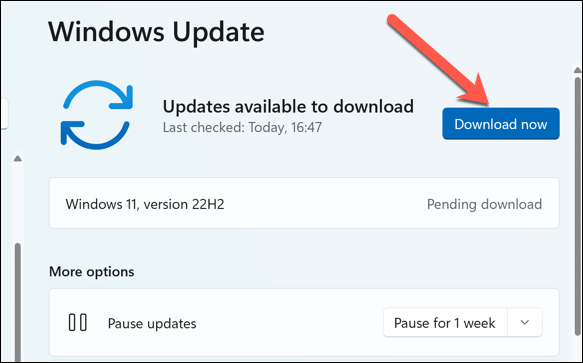
- Next, click the Check for updates button. If there are any pending updates, Windows will automatically start downloading and installing them.
- If it doesn’t, press Download Now to begin the installation.
After updating your PC, restart your computer and try printing again to see if the error is resolved.
Use the Printer Troubleshooting Tool
If you’re still struggling to resolve the “Error – Printing” status error in Windows, you can use the Printer Troubleshooter . This built-in tool helps to identify and fix common hardware and device-related issues.
Follow these steps to run the troubleshooter on your Windows PC.
- Right-click the Start menu and select Settings .
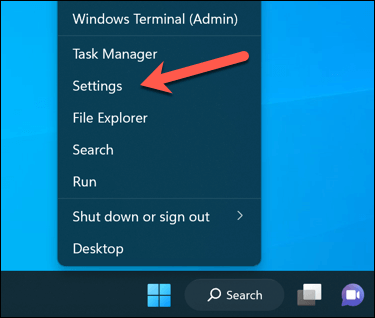
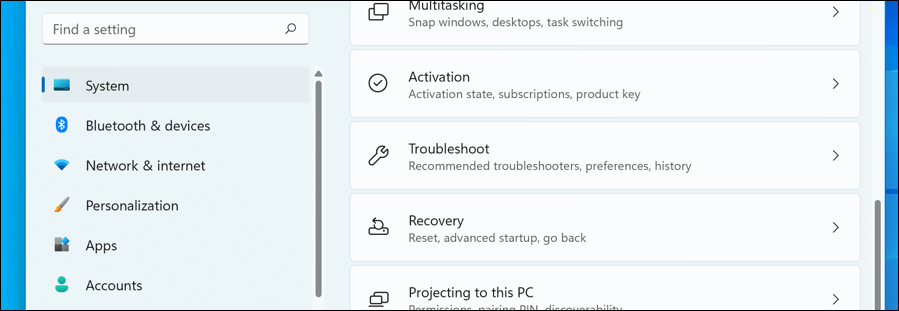
- In Settings , select System > Troubleshoot .
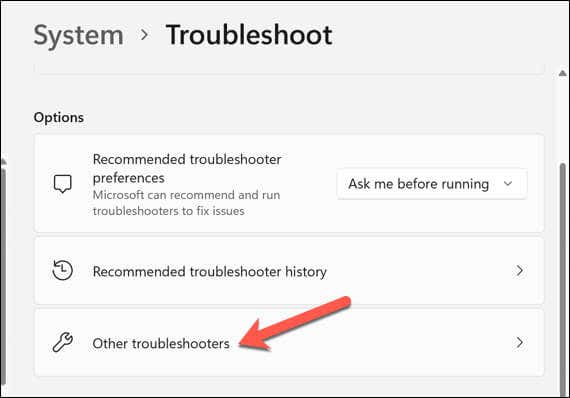
- Select the Other troubleshooters option.
- Next, select the Printer troubleshooter to begin running the printing troubleshooting tool.
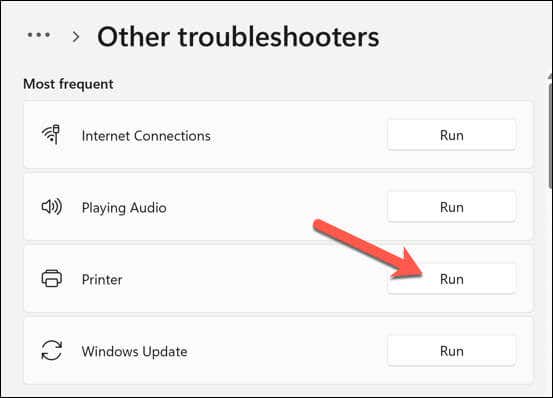
- Click Next and follow the on-screen instructions to detect and fix any problems.
After completing the troubleshooter and resolving any issues it detects, restart your computer, and then check if the “Error – Printing” issue is resolved.
Resolving Common Printer Issues on Windows 11
There isn’t a one-size-fits-all fix for resolving the “Error – Printing” status error on your Windows PC. Most of the time, however, one of the troubleshooting fixes above will resolve the problem.
However, there could be deeper problems with your printer, which means you can’t connect to your printer or print properly. For instance, if you see the error code “0x0000011b” on your PC, there could be a problem with your network that’s preventing you from printing—you’ll need to dig deeper to find and fix the problem.
- 7 Ways to Fix HP Printers ”Driver Is Unavailable” Error on Windows PC
- How to Fix Your Printer’s “Driver is unavailable” Error on Windows
- 7 Ways to Fix ”Windows Cannot Connect to the Printer”
- Print Job Won’t Delete in Windows? 8+ Ways to Fix
- Preparing for Windows 10 End of Support: Upgrading to Windows 11
Ben Stockton is a freelance technology writer based in the United Kingdom. In a past life, Ben was a college lecturer in the UK, training teens and adults. Since leaving the classroom, Ben has taken his teaching experience and applied it to writing tech how-to guides and tutorials, specialising in Linux, Windows, and Android. He has a degree in History and a postgraduate qualification in Computing. Read Ben’s Full Bio
