The last few versions of Microsoft Office have been stable and there are hardly any issues with them. However, occasionally, you might find Microsoft Word is not responding. It just stays stuck on one screen no matter what you do.
There are many reasons Microsoft Word may not respond. Maybe there are issues with the add-ins that you’ve installed? Or maybe the document you’re trying to open is corrupt and causing Word to freeze-up?
Luckily, there are multiple ways to fix these issues with Word on your computer.
Launch Word In Safe Mode & Disable Add-Ins
One way to fix when Microsoft Word is not responding is to use safe mode. This mode lets you open Word only with the essential files and it’ll help you troubleshoot any add-in issues with the app.
- Press and hold the Ctrl key on your keyboard and click the Word shortcut on your desktop.
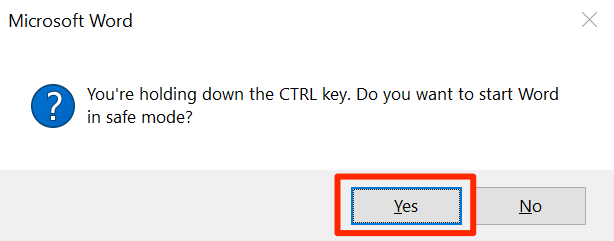
- You’ll get a prompt that asks if you want to open Word in safe mode. Click Yes to continue.
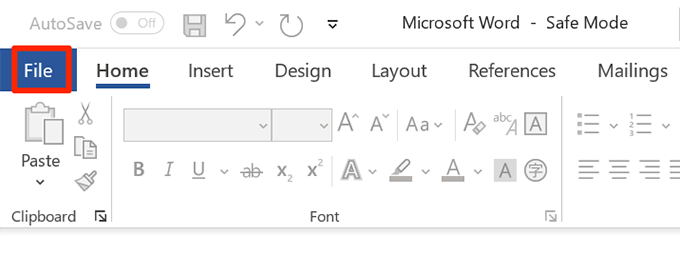
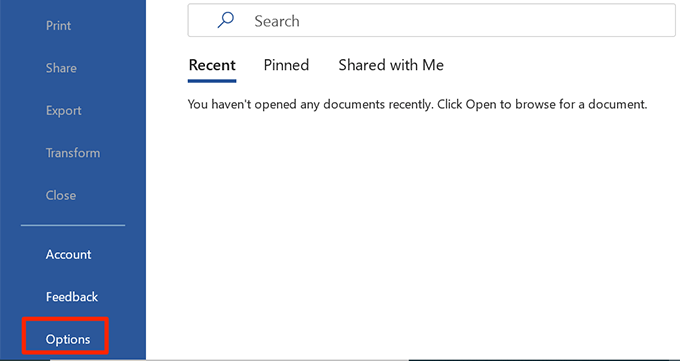
- Click the File menu at the top of your screen.
- Select Options from the left sidebar on your screen. It should be at the bottom of the list.
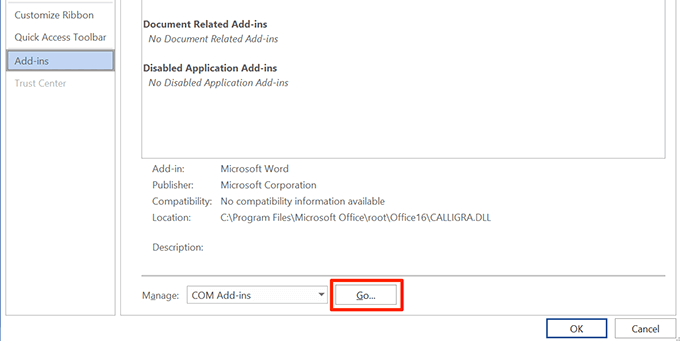
- On the following screen, click the Add-ins option in the left sidebar.
- Find the Manage dropdown menu on the right-hand side pane and click Go next to it.
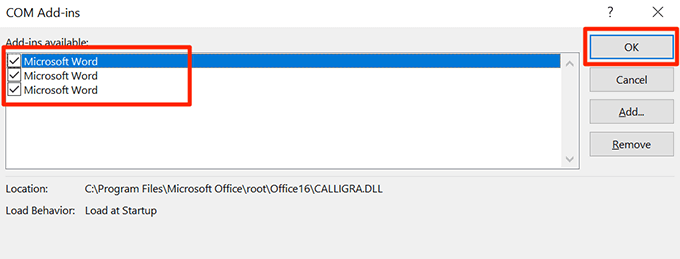
- Untick all the add-ins on your screen and click OK .
- Launch Word in normal mode and it should open.
Fix The Corrupted Word Document
If Word malfunctions or doesn’t respond only with certain documents, there may be issues with those documents. One way to fix this is to repair those corrupt documents and then open them with Word.
- Open Word on your computer. Use safe mode if normal mode doesn’t work.
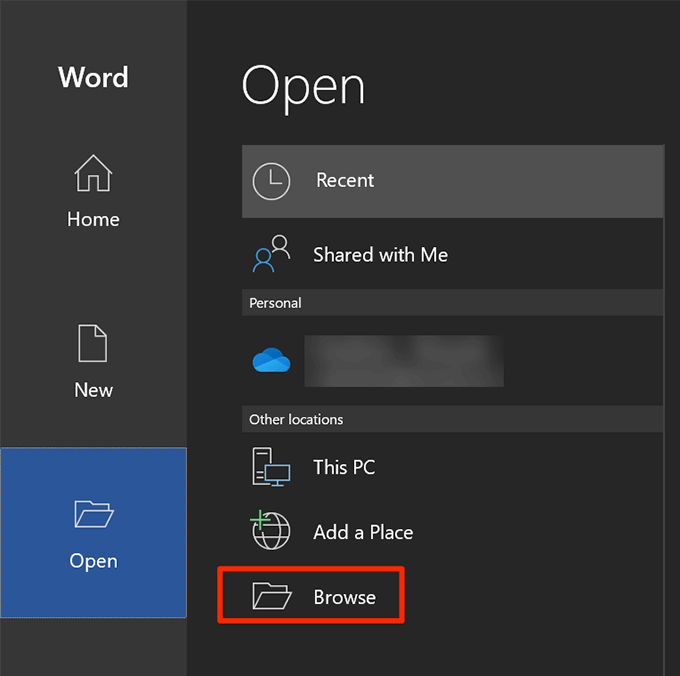
- Click the Open option in the left sidebar.

- Select Browse on the following screen to browse your computer for the problematic document.
- Navigate to the folder where your document is saved, select it, click the arrow icon next to Open , and choose Open and Repair .
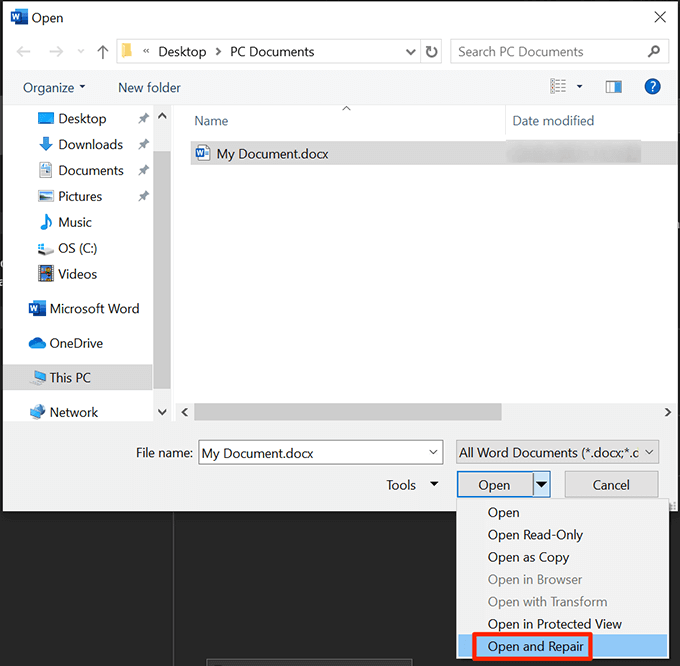
- Word will open your document and repair it for you.
Repair The Microsoft Office Suite
Issues with Microsoft Office apps including Word are common, so these apps come bundled with a utility to fix issues. You can access the utility and select the repair option which will repair any issues with the Office apps on your computer.
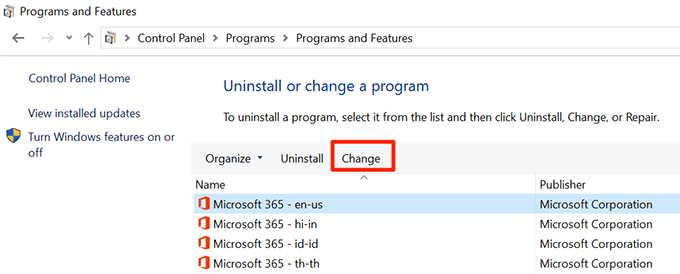
Use Control Panel
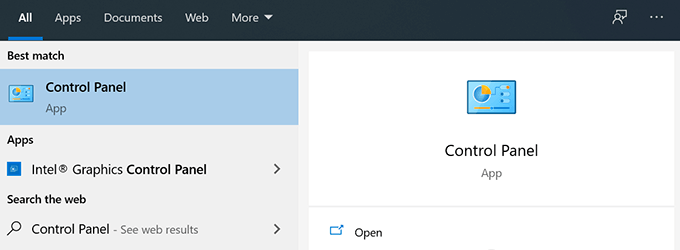
- Open Control Panel on your computer.
- Click the Uninstall a program option. You aren’t uninstalling anything.
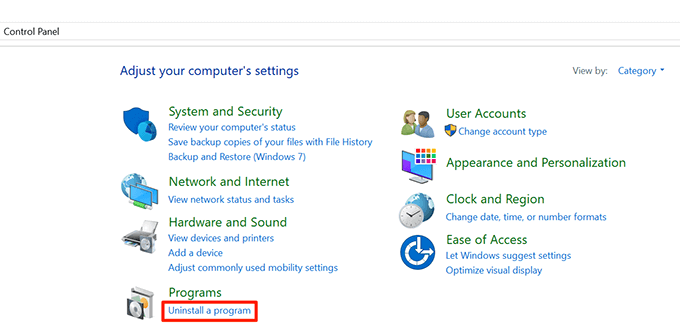
- Select Microsoft Office in the list and click Change at the top.
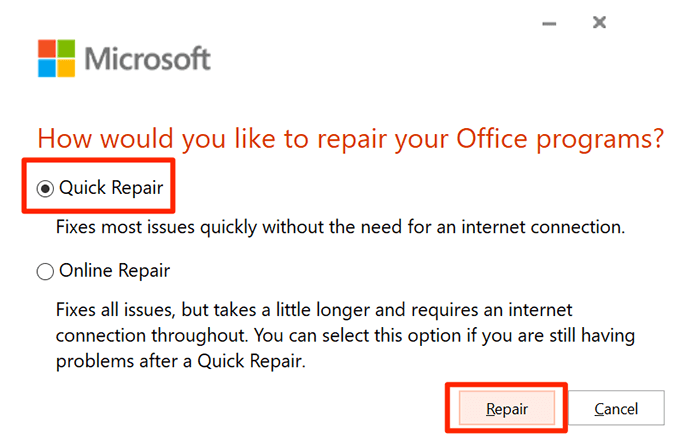
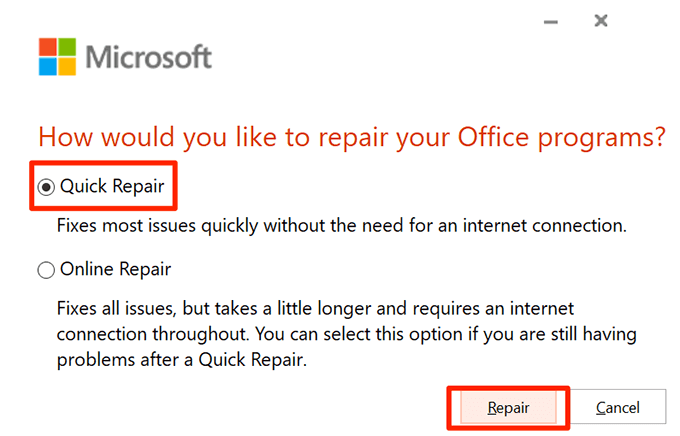
- Choose Quick Repair in the box on your screen and click Repair .
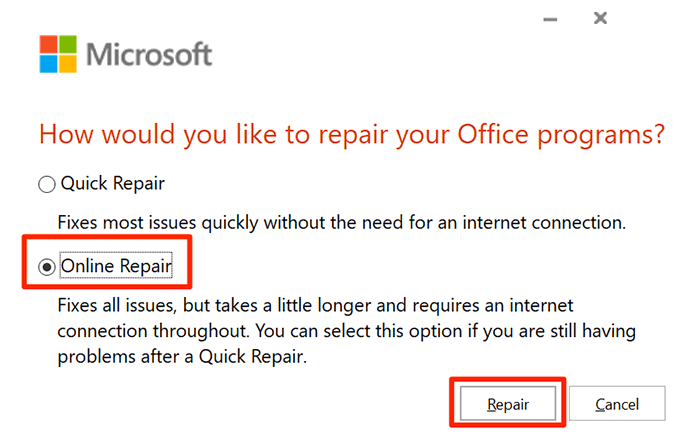
- If Quick Repair didn’t fix the issue, choose the Online Repair option.
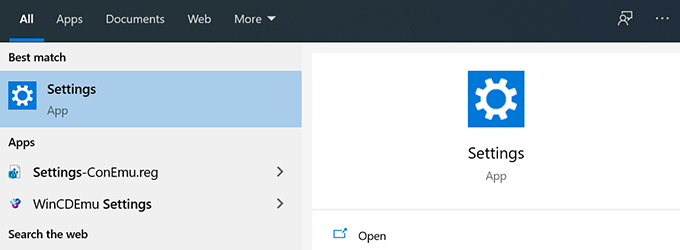
Use Settings
- Launch the Settings app on your PC.
- Select Apps on the following screen.
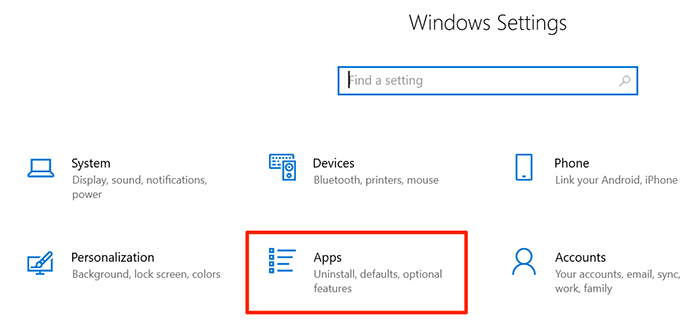
- Find Microsoft Office in the list, select it, and click Modify .
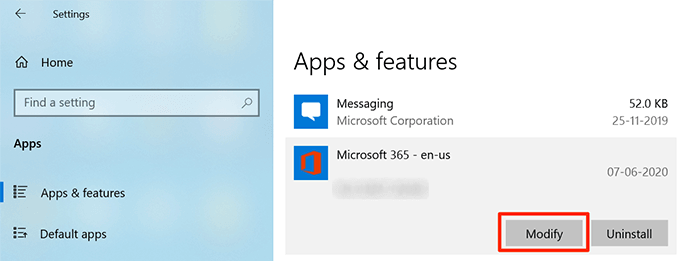
- Choose the Quick Repair option to repair the Office suite.
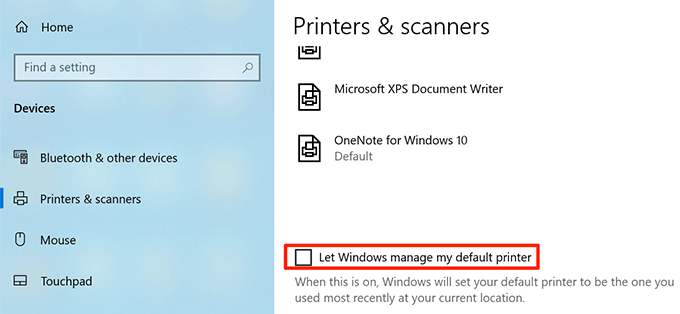
Change Your Default Printer
One reason Microsoft Word is not responding is because you have a faulty printer set as the default printer on your computer. Word is tightly integrated with the printers on your system and any issues with your printers can cause Word not to respond.
Selecting another printer as the default printer should fix this issue.
- Open the Settings app on your PC.

- Click the Devices option on the following screen.
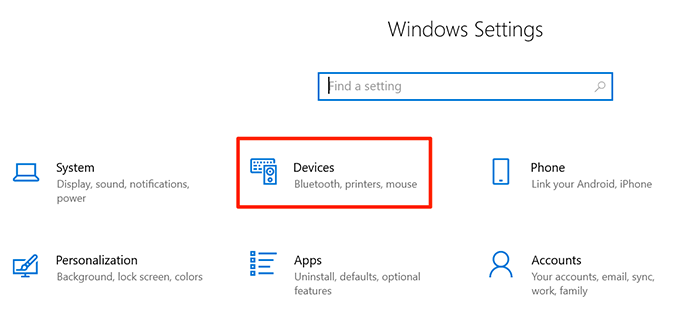
- Choose Printers & scanners from the left sidebar.

- Untick the Let Windows manage my default printer option.
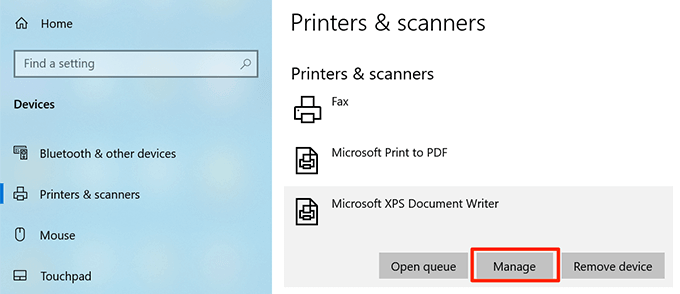
- Find a working printer in the list, click it, and choose Manage .
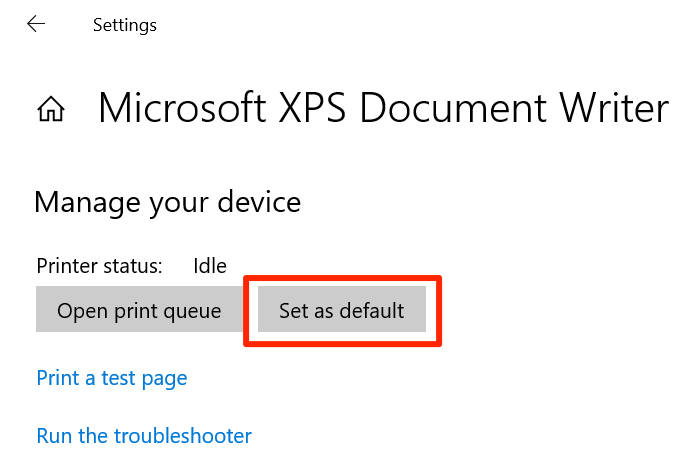
- Click the Set as default button to set your newly chosen printer as the default printer on your computer.
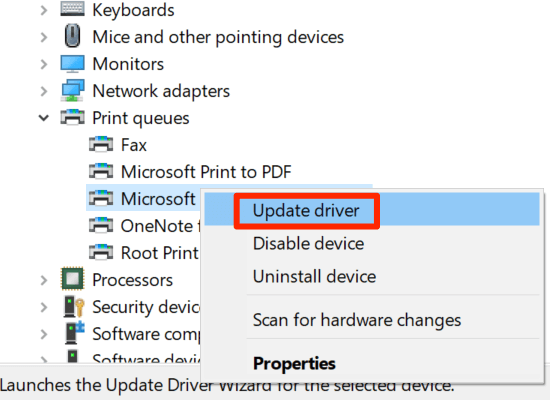
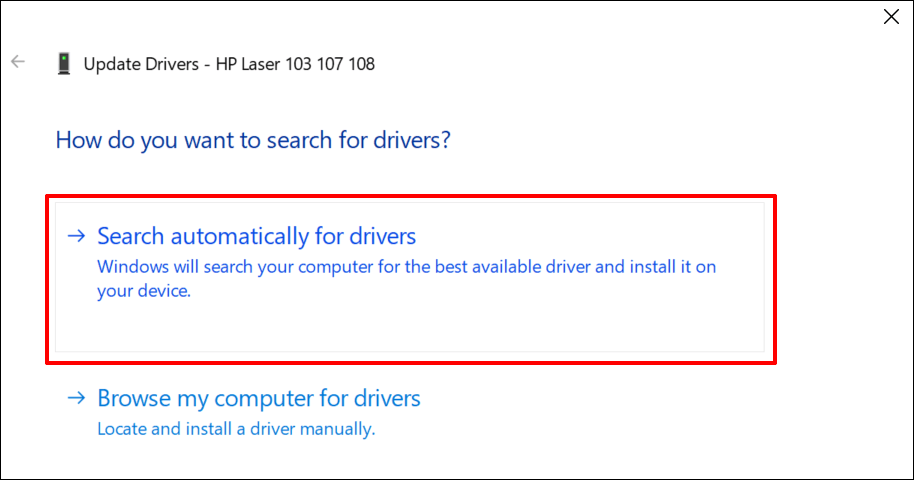
Update Your Printer Drivers
If your printer drivers are obsolete, they could cause Word not to respond as the computer won’t be able to properly communicate with the printer hardware. To fix this, you can update the printer drivers on your machine.
- Search for and open Device Manager using Cortana search.
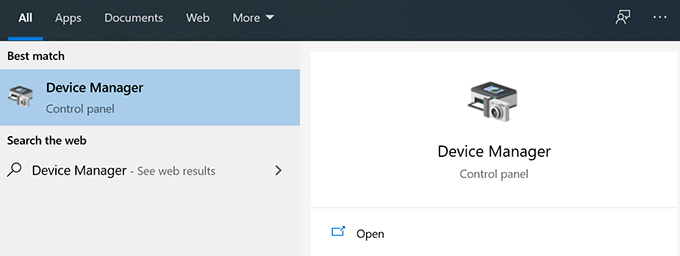
- Select your printer in the list, right-click it, and choose Update driver .
- If you’ve downloaded the drivers to your computer, select Browse my computer for driver software .
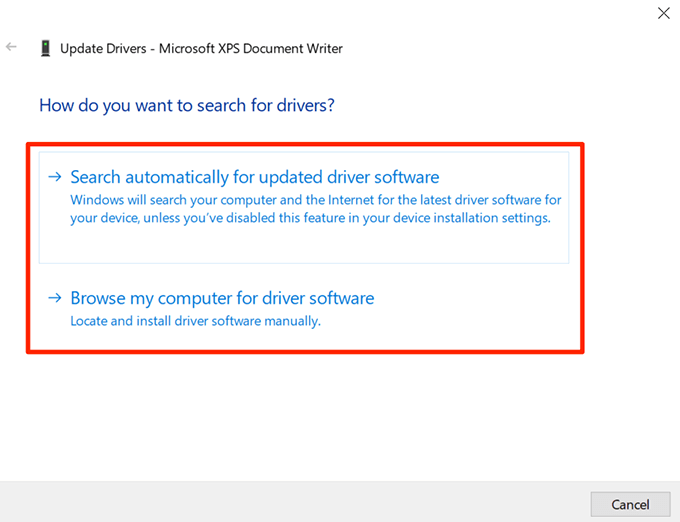
- Select Search automatically for updated driver software if you don’t already have the drivers with you.
Turn Off Your Antivirus Software
Some antivirus programs are known to cause conflicts with various apps. Therefore, we suggest you turn your antivirus program temporarily off and see if that fixes the issue with Word on your system.
Most antivirus software can be turned off by right-clicking on their icons in the system tray and choosing Disable , Turn off protection , or a similar option.
If Word starts responding after you’ve disabled your antivirus, your antivirus and Word aren’t playing well with each other. You may want to remove your current antivirus program and replace it with another one.
Uninstall Recent Windows & Office Updates
If Word is not responding after an Office or Windows update, you can try uninstalling the update and see if that fixes the problem. This should work if the issue is caused by either of these updates.
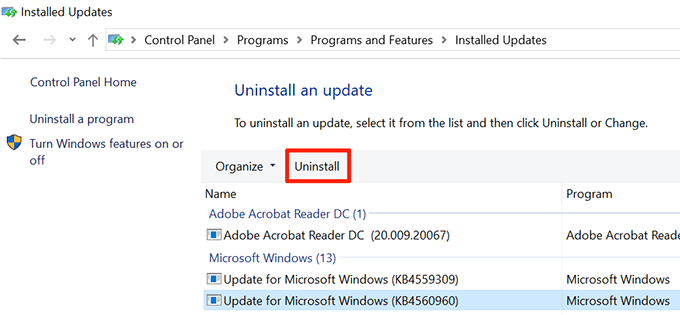
- Launch Control Panel on your computer .

- Click the Uninstall a program option.

- Select the View installed updates option in the left sidebar.
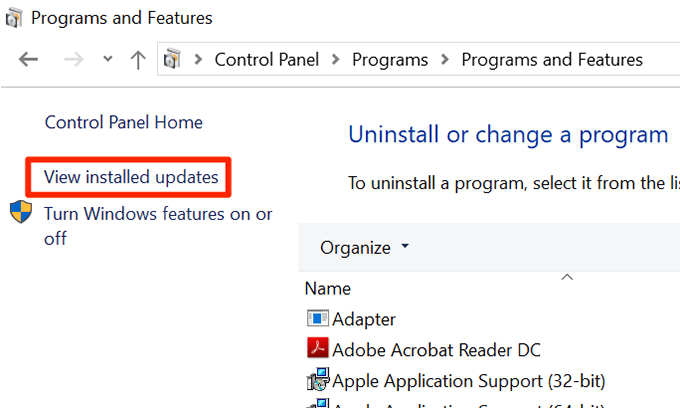
- Select the update that you think is causing the issue and click Uninstall .
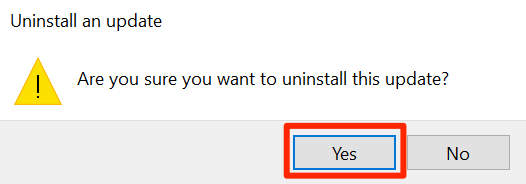
- Click Yes in the prompt that appears on your screen to uninstall the selected update.
Reinstall Microsoft Office On Your Computer
Lastly, if nothing works, you can uninstall Microsoft Office completely from your computer and then clean install it. This’ll fix any issues with the Office apps and Word will no longer have any issues.
Use Settings
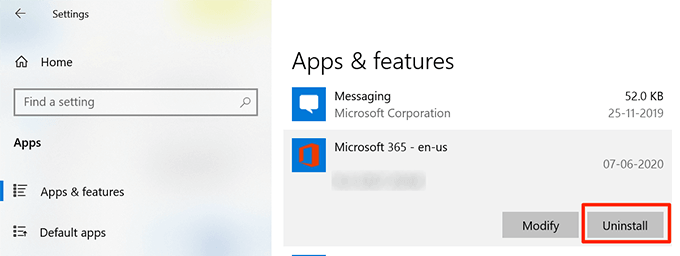
Open Settings on your PC.
Select Apps on the following screen.

- Find Microsoft Office , click it, and select the Uninstall button.
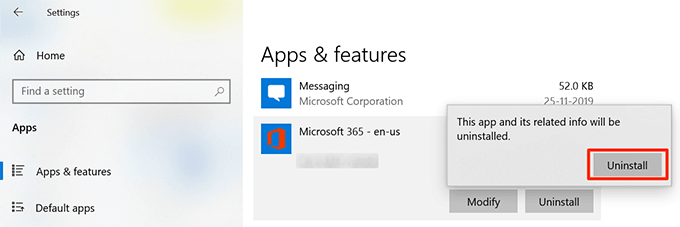
- Click Uninstall again to remove the Office.
- Download Office as you normally would and install it on your PC.
Use Uninstall Support Tool
Microsoft has a dedicated uninstall tool to help you remove the Office suite from your computer.
- Download and install the Uninstall Support Tool on your computer.
- Select your Office version and click Next .
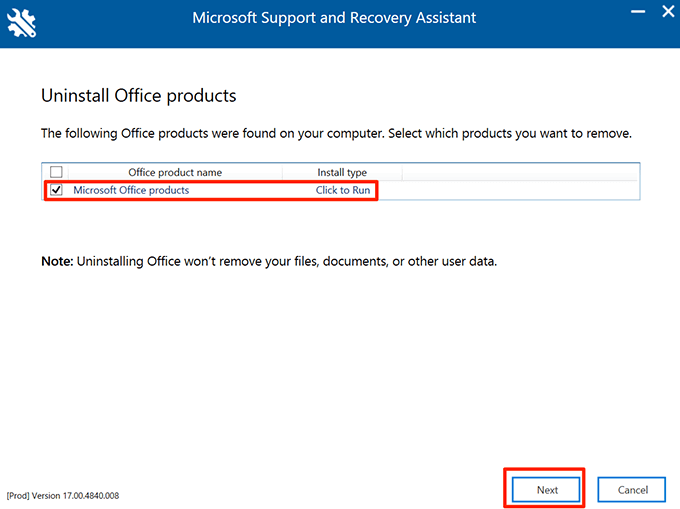
- Checkmark the box on the following screen and click Next .
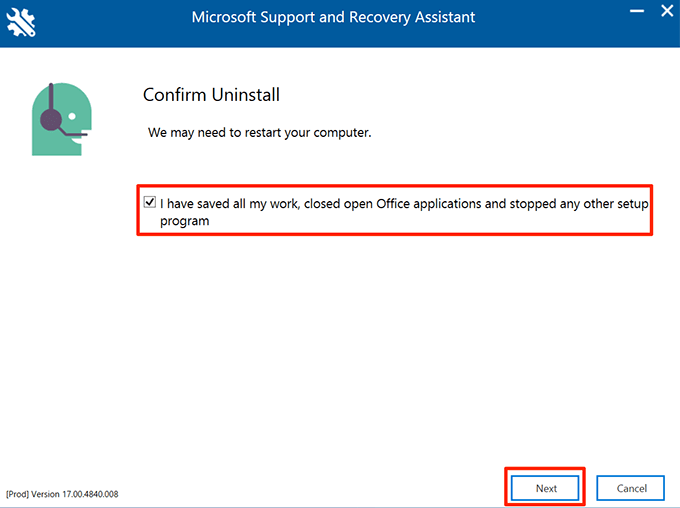
- Reboot your computer when asked and let the tool remove Office completely.
- How to Remove Headers and Footers in Word Documents
- How to Clear Formatting in Word
- How to Remove Unwanted Lines in Word Documents
- How to Select All Text in Word Documents
- How to Insert Arrows in Microsoft Word Documents
Mahesh has been obsessed with technology since he got his first gadget a decade or so ago. Over the last few years, he’s written a number of tech articles on various online publications including but not limited to MakeTechEasier and Android AppStorm. Read Mahesh’s Full Bio
Printers experience several forms of malfunctions, some of which are easy to fix. Fixing printer issues can be a headache—especially on Windows devices—because there’s a wide range of things that could be wrong.
The problem could stem from your PC, the printer, or the connection between both devices. This tutorial highlights ten likely troubleshooting measures for printers that won’t print.
1. Check Paper Tray and Printer Connection
Many printer models won’t print if there’s a loose USB connection or if they’re out of ink or paper. Verify your printer’s ink levels, clean the printhead, fill the paper tray, and avoid using substandard paper. Low-quality paper can cause “Ghost Paper Jams” and other issues that stop your printer from printing documents.
For printers using a wired connection, ensure both cable ends are plugged firmly into your printer and computer. Go through the printer’s manual for instructions on connecting the device to your Windows or Mac computer.
Wireless printers won’t print documents if connected to the wrong Wi-Fi network. Make sure your printer and computer are on the same wireless network. Likewise, check your router settings, disable VPN connections, and make the printer’s IP address static. Refer to our tutorial on troubleshooting Wi-Fi (wireless) printers for more fixes.
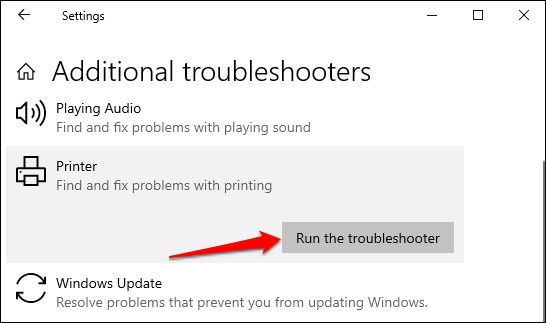
2. Run the Printer Troubleshooter
Windows has a suite of troubleshooting tools that diagnoses and resolves hardware and software problems. We recommend running the Printer Troubleshooter before trying other more complex measures.
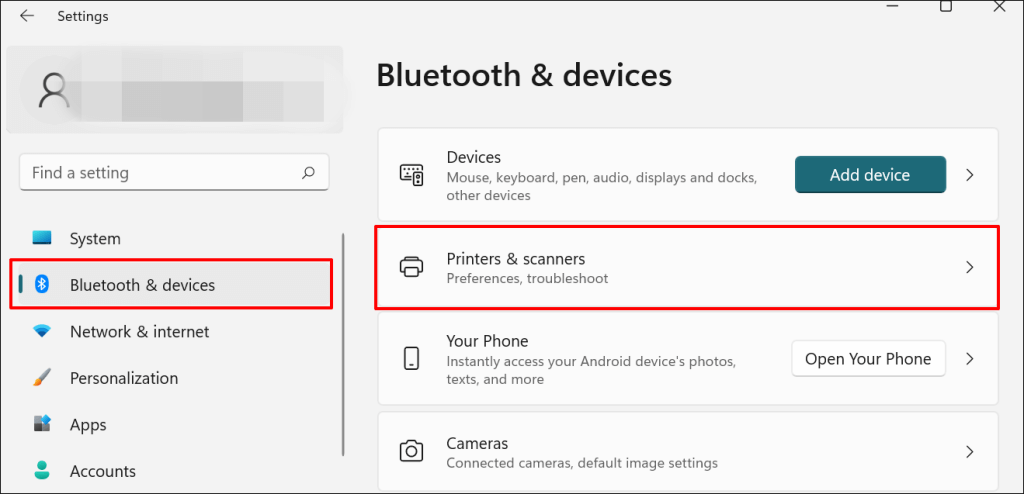
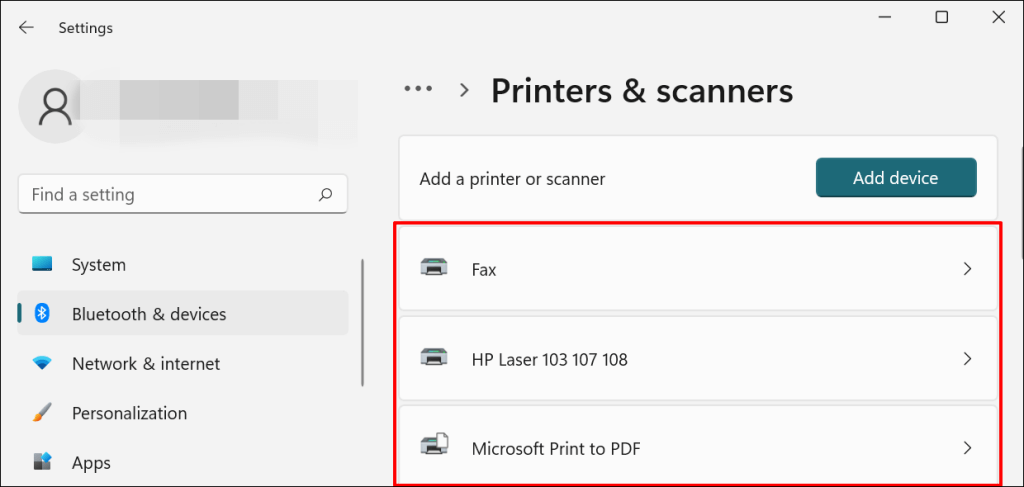
- Go to Settings > Bluetooth & devices > and select Printers & scanners .
In Windows 10, go to Settings > Devices > Printers & scanners .
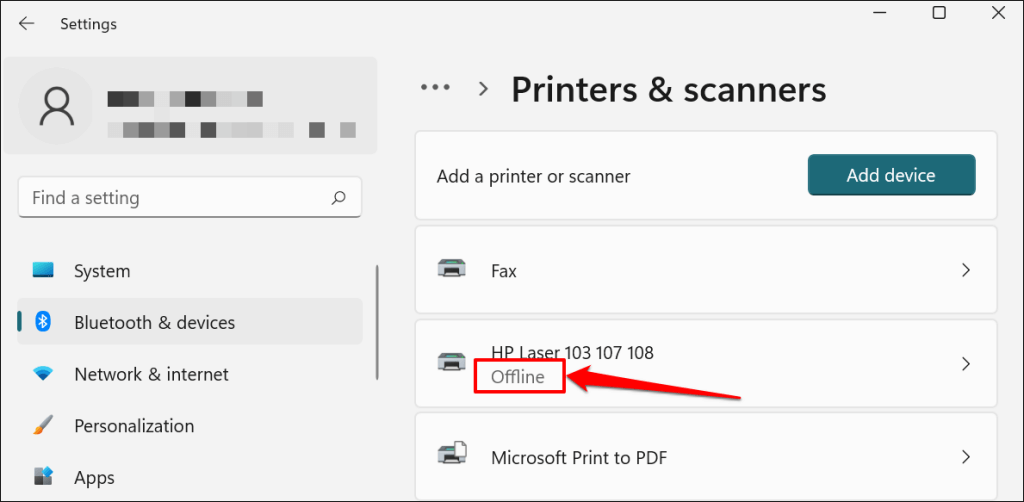
- Select the problem printer from the list of connected devices.
Note: If your printer status reads “Offline,” refer to our troubleshooting tutorial on getting an offline printer back online . Proceed to the next step if your printer is online.
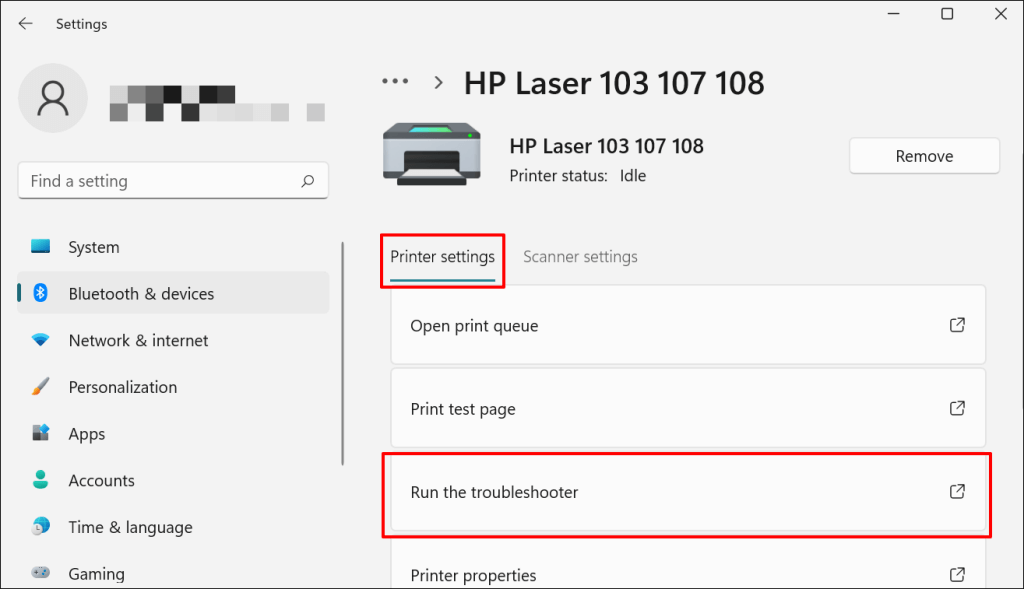
- Select Run the troubleshooter in the “Printer settings” tab.
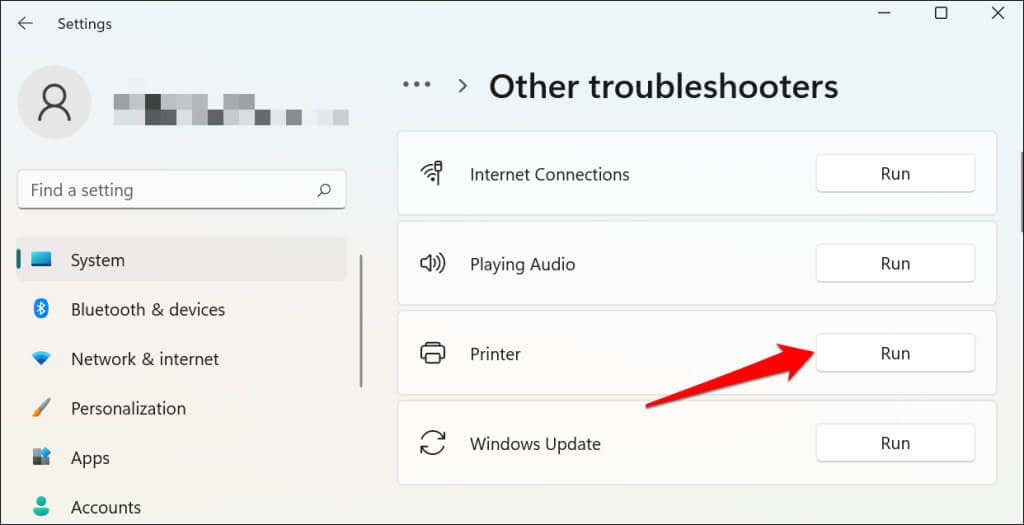
There’s another way to access the printer troubleshooter in Windows 11. Go to Settings > System > Troubleshoot > Other troubleshooters and select Run next to “Printer.”
In Windows 10, go to Settings > Update & Security > Troubleshoot and select Additional troubleshooters > Printer > and select Run the troubleshooter .
Wait for the troubleshooter to run the necessary check on the printer, its drivers, and other associated processes.
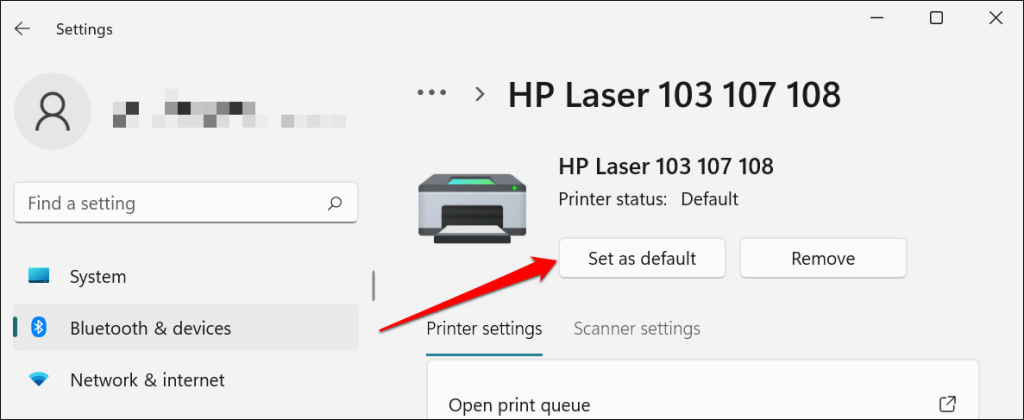
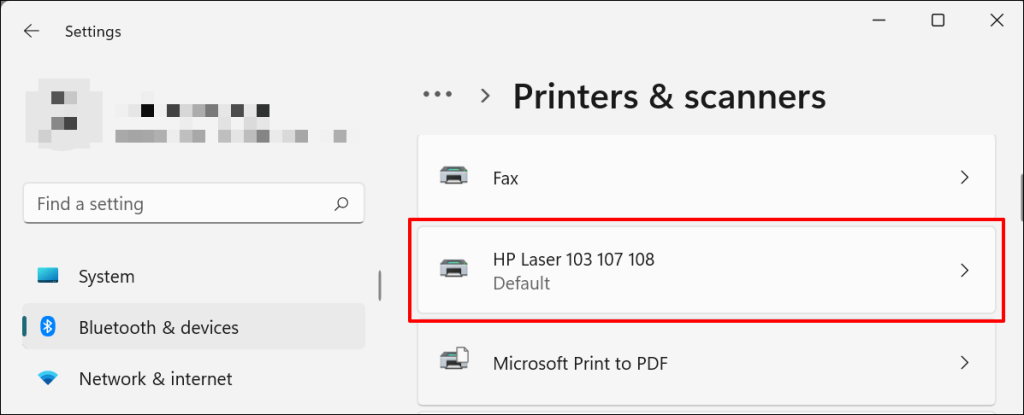
3. Set the Printer As Default
Windows has a feature that dynamically changes your PC’s default printing device based on your location and other factors. The feature is near-perfect but not failproof. If your PC doesn’t print documents, it might be that an inactive printer is the default printing device.
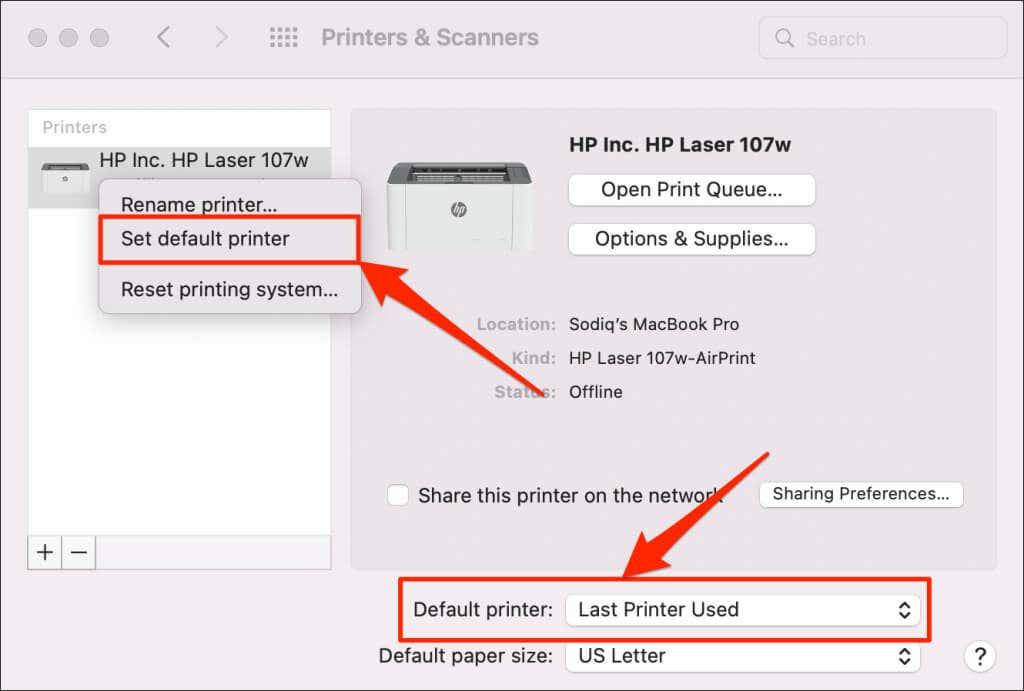
macOS also sets the last printer connected as your Mac’s default printer. Check your computer settings and ensure the active printer is the default device.
In Windows, go to Settings > Bluetooth & devices > Printers & scanners , select the printer, and select the Set as default button.
On Mac computers, go to System Preferences > Printers & Scanners on Mac computers , right-click the printer, and select Set default printer . Alternatively, open the Default printer drop-down menu and select the printer as the default.
4. Clear Your Computer’s Print Queue
When you send a document for printing, your computer first sends the “print job” to the print queue. The print job is immediately removed from the print queue when the printer prints the document. It’s usually a seamless process, but there are times when completed print jobs remain in the queue.
If that happens, subsequent print jobs will also get stuck in the queue and prevent your printer from printing files. Clearing your computer’s print queue might resolve the problem.
Clear Print Queue in Windows
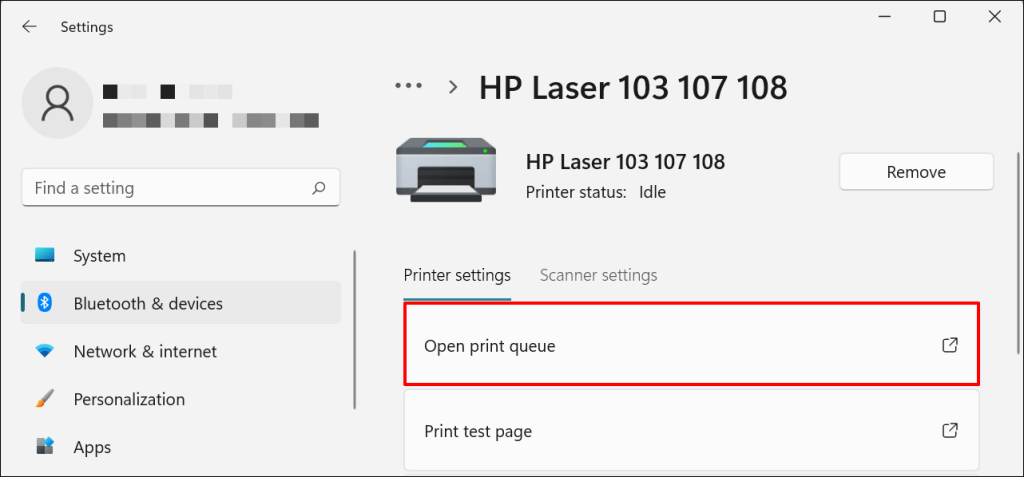
- Go to Settings > Bluetooth & scanners > Printers & scanners and select your printer.
- Select Open print queue .
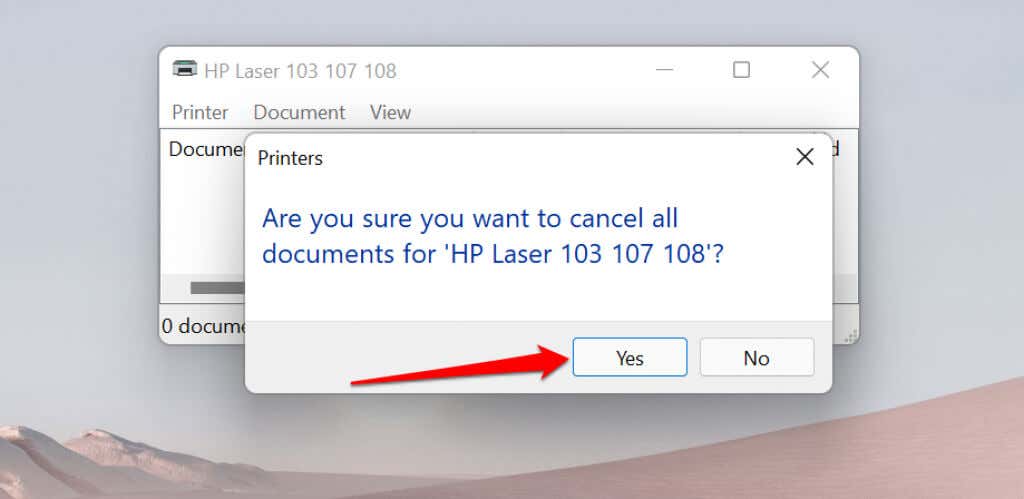
- Select Printer on the menu bar and select Cancel All Documents .
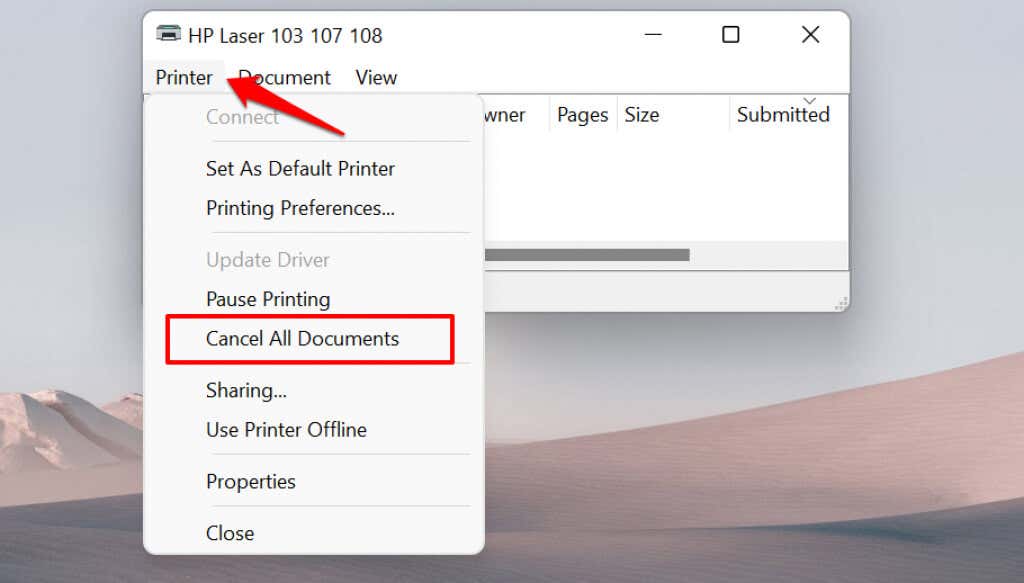
- Select Yes on the confirmation prompt.
[14-why-windows-pc-wont-print-documents]
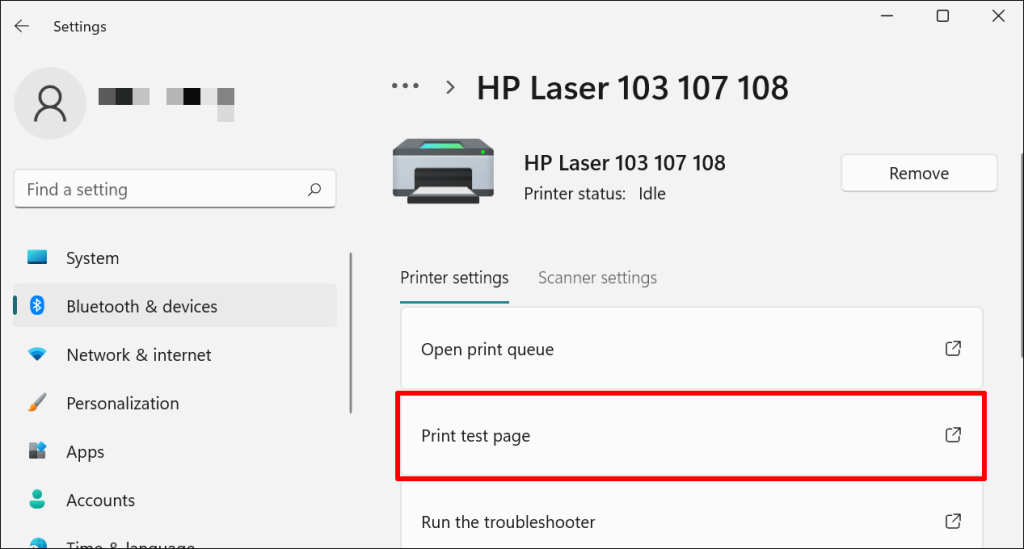
Try printing any document or a test page and check if clearing the queue fixed the problem. Open the printer menu and select Print test page .
If completed documents remain in the print queue, refer to our troubleshooting tutorial on deleting stuck print jobs in Windows .
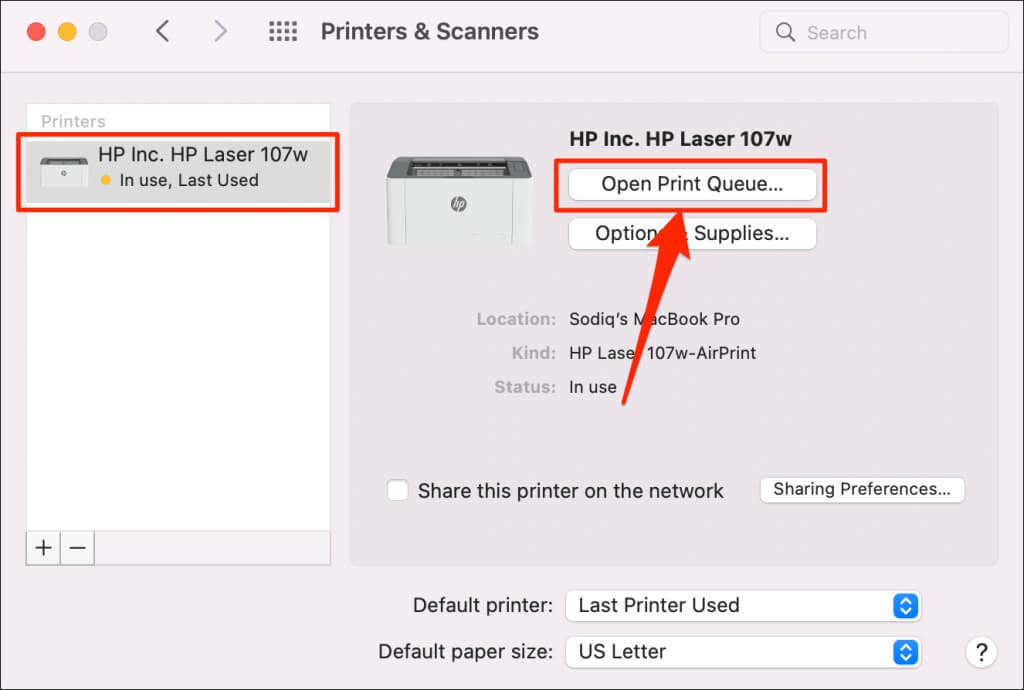
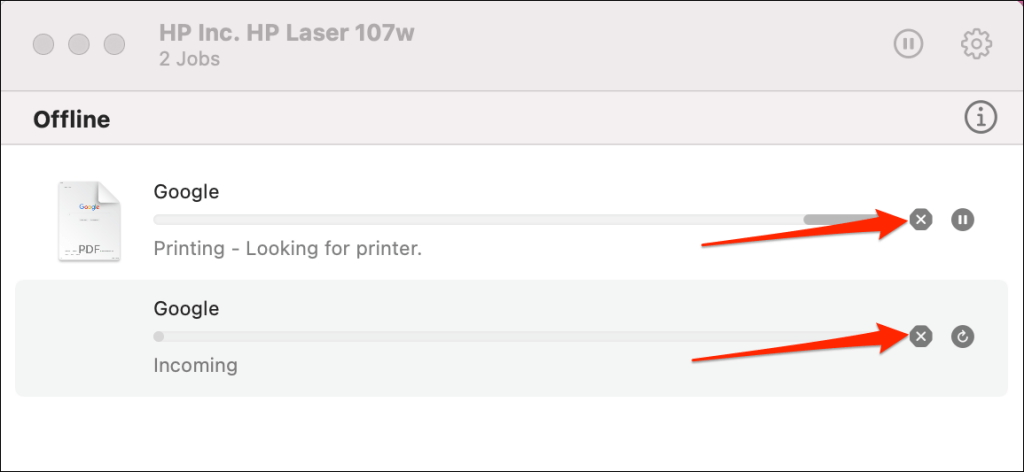
Clear Print Queue in macOS
- Go to System Preferences > Printers & scanners , select the printer on the sidebar, and select Open Print Queue .
- Select the x icon next to the pending print jobs to remove them from the queue.
5. Update Printer Driver
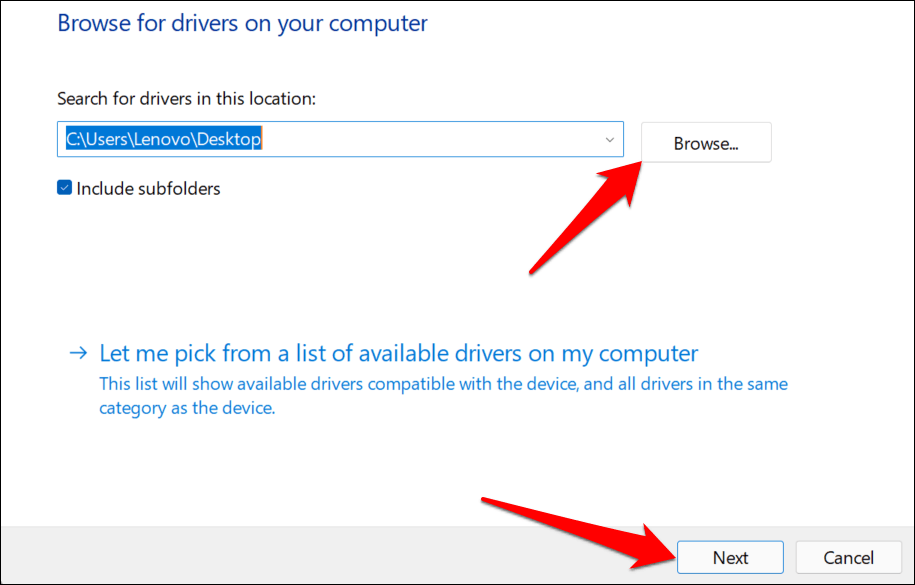
Your printer might not receive print jobs from your PC if its driver is corrupt or outdated. Although Windows automatically installs driver updates, some factors (e.g., a metered internet connection) may prevent that from happening. Here’s how to manually install a driver from your computer or the internet.
Check the printer’s manufacturer website and download the latest driver updates for your printer model. Plug the printer into your computer and follow the steps below.
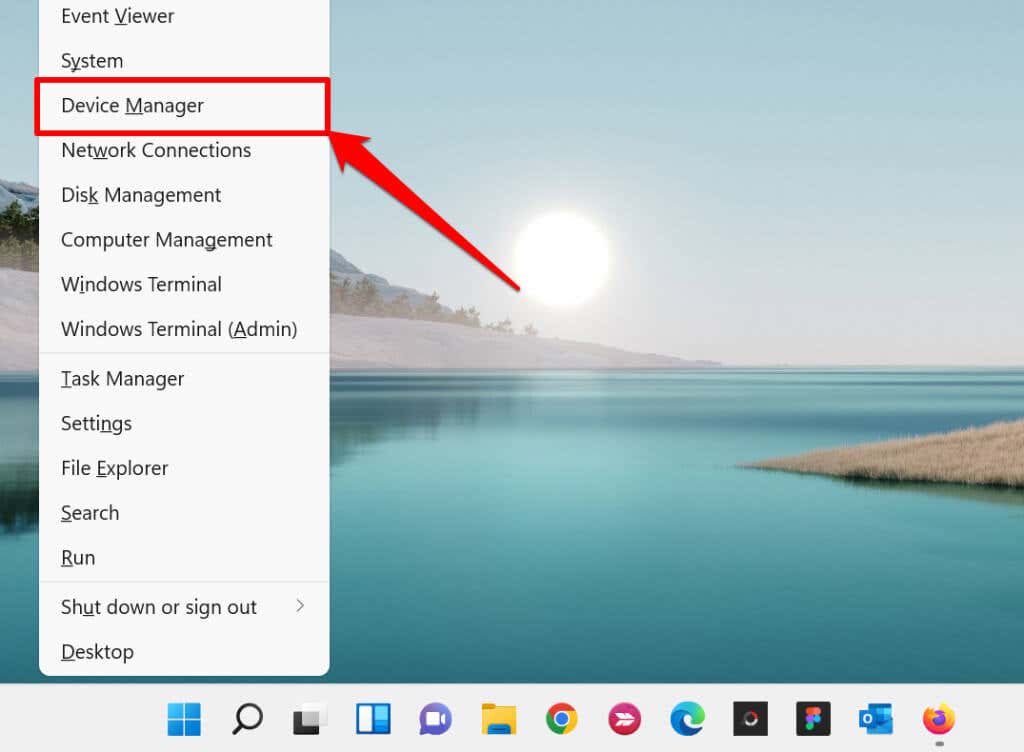
- Right-click the Start Menu or press the Windows key + X to open the Quick Access Menu. Select Device Manager to proceed.
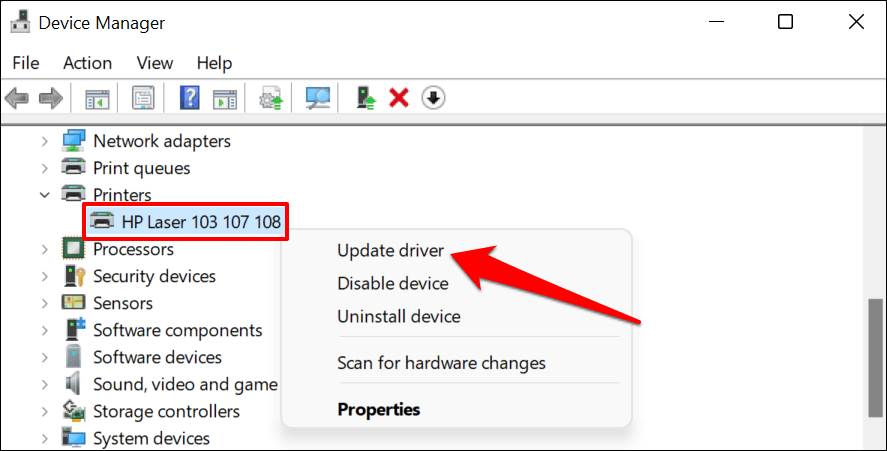
- Expand the “Printers” category, right-click the printer’s driver, and select Update driver .
- Select Search automatically for drivers and wait for Windows to search for the best driver available for the printer. The process requires an internet connection, so ensure your PC is connected to a Wi-Fi or Ethernet network.
Alternatively, select Browser my computer for drivers to manually install a driver you downloaded from the printer manufacturer’s website. Afterward, choose Browse , navigate to the driver’s location on your PC, and select Next to install the update.
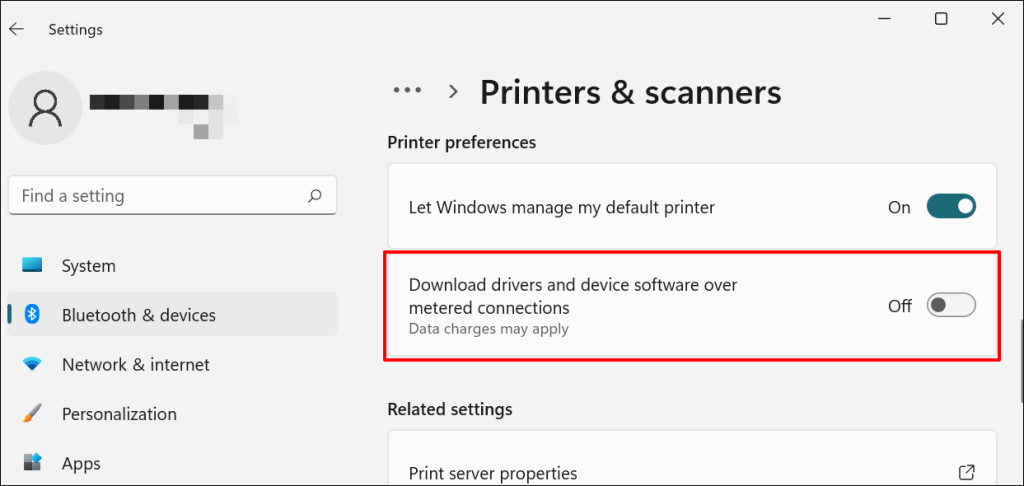
We recommend configuring Windows to automatically download drivers for your printer, especially if you’re using a metered connection.
Go to Settings > Bluetooth & devices > Printers & scanners and toggle on Download drivers and device software over metered connections .
If the Device Manager says the printer’s driver is up-to-date, check the manufacturer’s website for confirmation. You’ll find driver update history in the “Download,” “Software,” or “Drivers” section of the printer manufacturer’s website. Contact the manufacturer if you don’t know how to find, install, or update your printer’s driver update.
6. Reboot Your Devices

Power-cycling your printer and computer can help both devices re-establish a connection. Unplug your printer’s power cord and shut down your computer. Remember to close any open apps or documents so you don’t lose unsaved changes.
Restart both devices, connect your printer to your PC, and check if you can now print documents.
7. Reinstall Printer Driver
Reinstalling a faulty or corrupt driver can resolve issues causing your printer to malfunction. The operation entails deleting or uninstalling the printer driver , restarting your computer, and installing it from scratch. Note that this operation may affect any customizations made on the printer’s settings and preferences on your computer.
- Type device manager into Windows Search and select Device Manager .
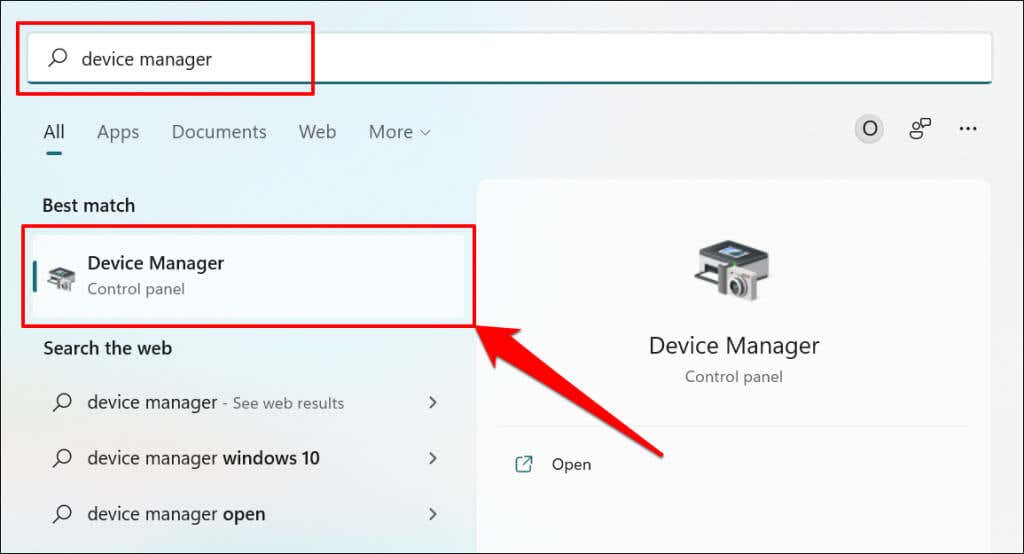
- Expand the “Printer” section, right-click the printer’s driver, select Uninstall device , and select Uninstall on the pop-up.
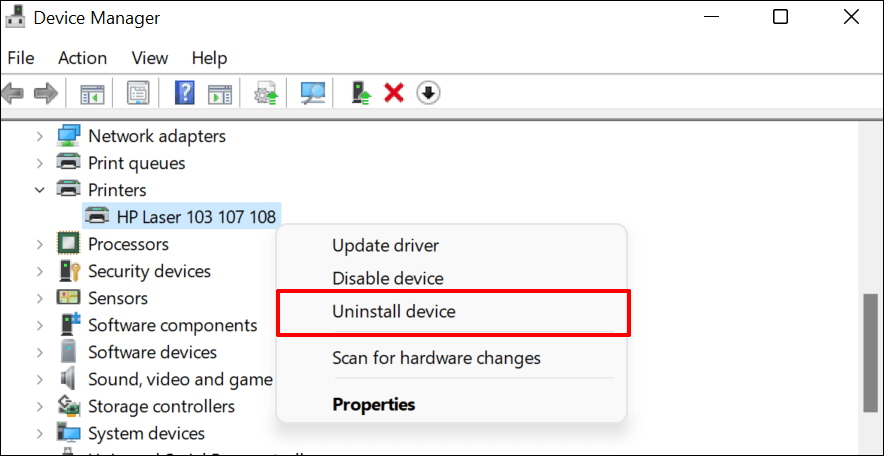
You should also remove the printer from your PC’s memory.
- Go to Settings > Bluetooth & devices > Printers and scanners , select the printer, and select the Remove button.
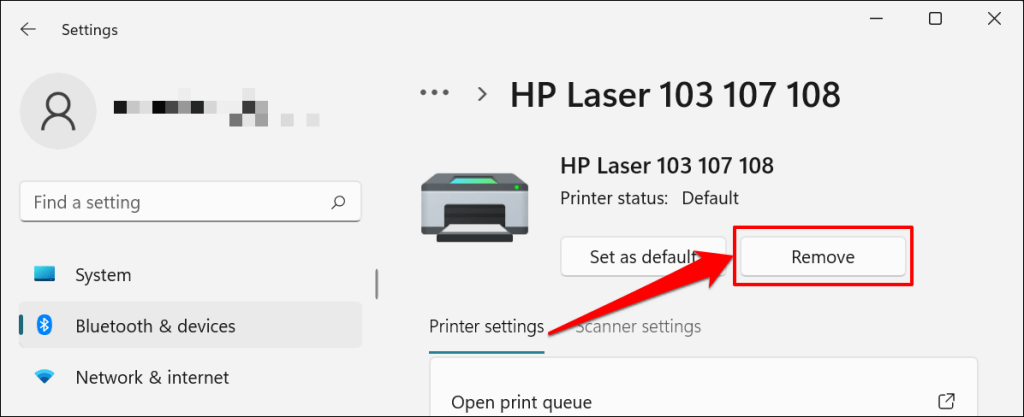
- Select Yes on the confirmation prompt.
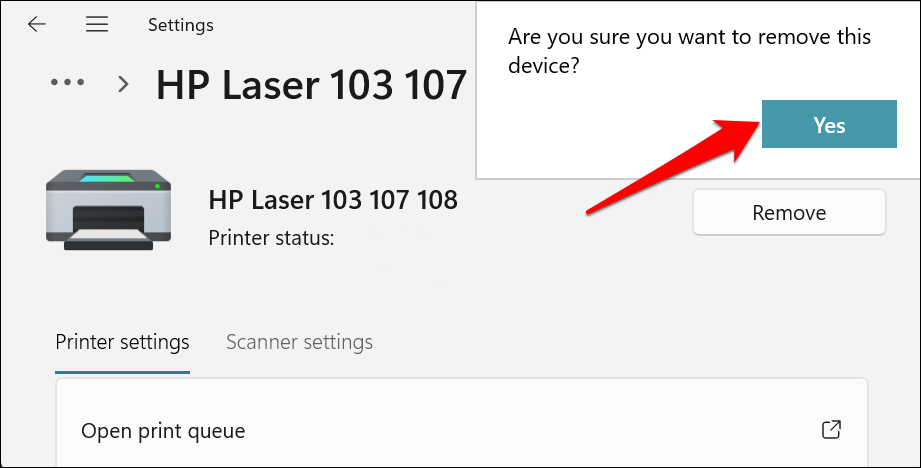
Restart Windows and reconnect the printer to your computer. Windows should automatically install the printer’s driver when it connects to your PC.
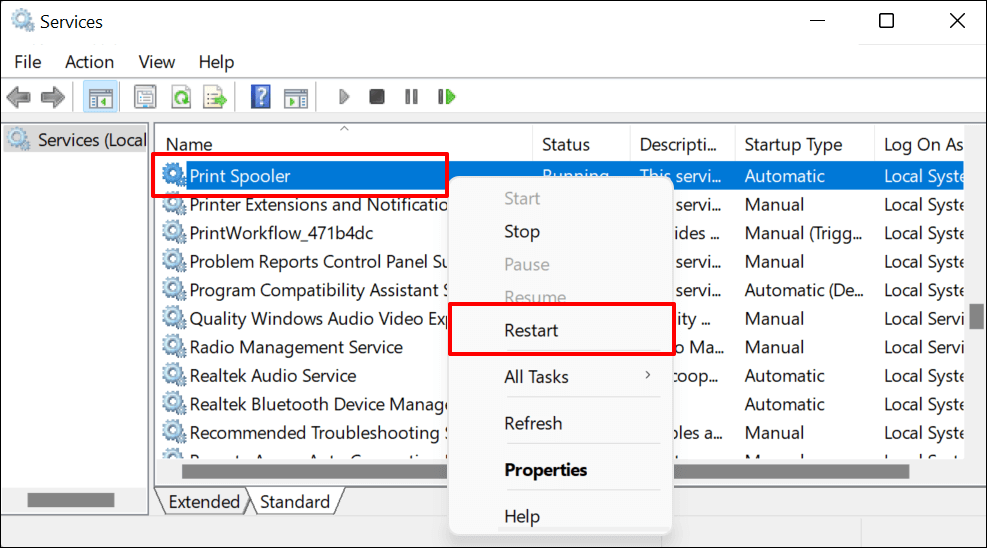
8. Restart the Printer Spooler
Printer Spooler is the system service that manages printers and print jobs on Windows devices. Temporary system glitches can affect the Printer Spooler’s performance and trigger printing-related problems. Restarting the print spooler service can restore the service to normalcy.
- Open the Windows Run box (press Windows key + R ), type services.msc in the dialog box, and press Enter .
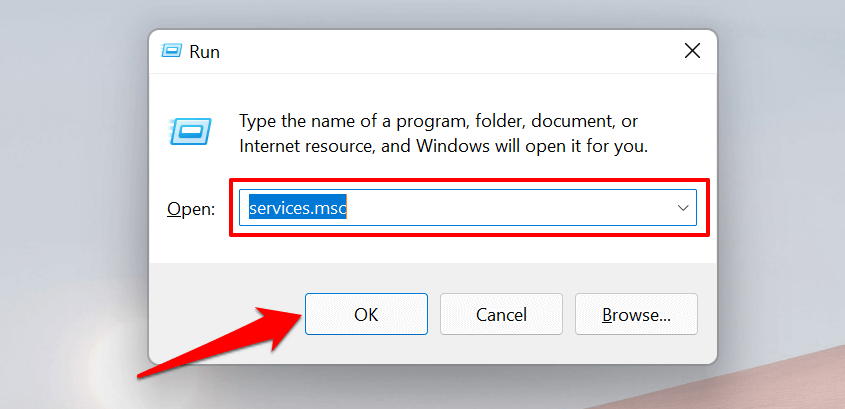
- Right-click Printer Spooler and select Restart .
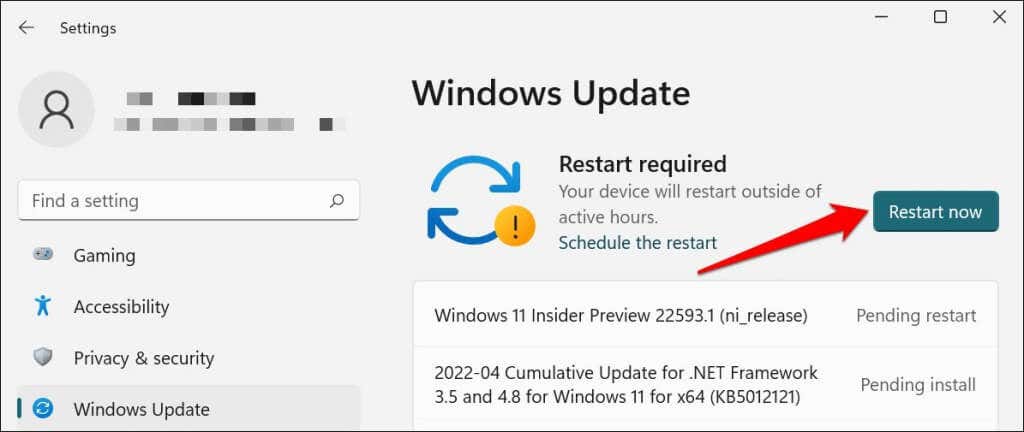
9. Update Your Computer
Asides from fixing software bugs, Windows Updates also updates outdated or buggy drivers. Head to the Windows Updates menu and install the latest Windows build or security patches available for your computer.
In Windows 11, go to Settings > Windows Update and wait for Windows to check for updates. You may need to restart your computer if Windows has already downloaded the update. Select Restart now to update and reboot your computer.
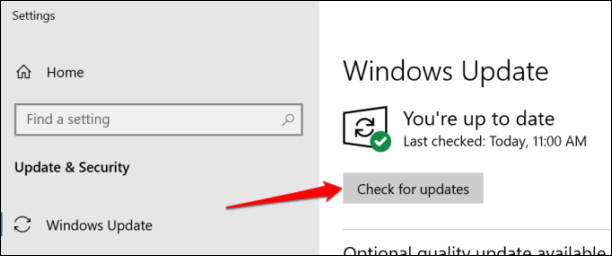
In Windows 10, head to Settings > Updates & Security > Windows Update and select Check for updates . Make sure your computer has an internet connection.
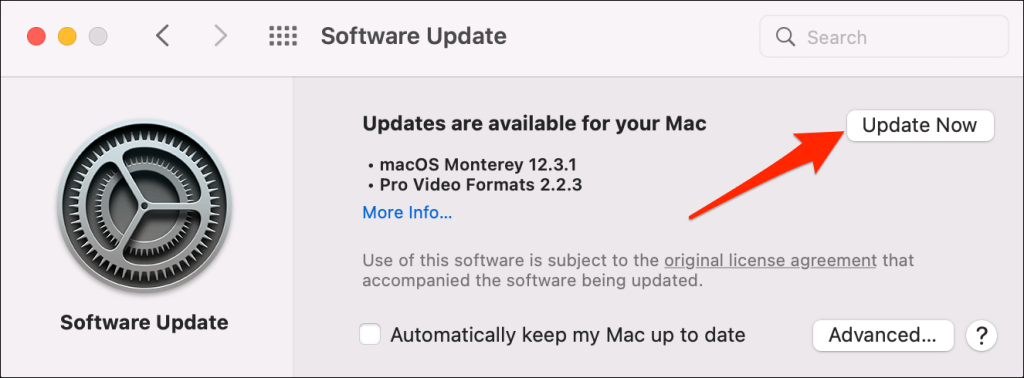
In macOS, go to System Preferences > Software Updates and select Update Now (or Upgrade Now ).
[32-update-mac-computer]
10. Run the Printer’s Utility Software
HP has a Print and Scan Doctor utility (HP Smart for Mac) that diagnoses problems with HP printers. The tool can detect empty ink cartridges, outdated driver software, blocked nozzles, print feed errors, and other printer problems.
Samsung Printer Experience is the utility that manages Samsung printers. The app has loads of troubleshooting guides for printing problems on Samsung printers. The Canon Inkjet Print Utility is also available for Canon inkjet printers.
Download and install your printer’s utility software on your computer and run the tool according to the manufacturer’s instructions.
Pay Attention to Physical Indicators
Printers have status lights or LCD screens that display error codes. These lights point out the root cause of some printing issues. Check the printer’s instruction manual to learn what the indicator lights and error codes mean and their respective solutions. Contact the printer manufacturer if your printer still won’t print after running these troubleshooting measures.
- How to Fix the “Error – Printing” Status Error in Windows
- HP Printer Not Printing Black? 10 Fixes to Try
- How to Fix Missing or Failed Printhead Error on HP Printers
- How to Add a Printer to Your Chromebook
- How to Fix the Printer Error “0x0000011b” on Windows
Sodiq has written thousands of tutorials, guides, and explainers over the past 4 years to help people solve problems with Android, iOS, Mac, and Windows devices. He also enjoys reviewing consumer tech products (smartphones, smart home devices, accessories, etc.) and binge-watching comedy series in his spare time. Read Sodiq’s Full Bio
