Do you suspect that a neighbor is using your wireless Internet connection? It could be that your Internet connection is slower than it should be or that your devices keep disconnecting from the router. Someone connected to your wireless router can also access shared folders on your network, so data theft is a real threat. Luckily, there are ways to detect unknown connections to your network and ways to stop them from connecting.
The main defense against wireless leechers is securing your wireless router. Even though most wireless routers from ISPs come with long passwords, someone can still gain access by simply copying the password printed on your wireless router, since most people don’t change the default password set by their ISP.
If you have a router that you bought on your own, no one will be able to use the password written on the router unless you don’t change the default password. We’ll talk about all this below. Let’s first talk about how to detect wireless leechers.

Detect Unauthorized Wireless Connections
There are basically two ways to go about detecting all the devices connected to your wireless router: either check on the router itself or use a device already connected to the network to scan the entire network. I prefer the latter method because it’s less complicated, however, I will mention both ways.
The first step is to connect to your wireless router from your web browser. In order to do that, you have to type in the IP address for your router. If you don’t know it, read my post on determining the IP of your wireless router . Once you have that, you’ll need to login using the username and password.
If you don’t remember the password or you never changed the default password, that’s a problem. In either of these cases, I recommend resetting your wireless router to factory default settings and starting from scratch. It may sound like a monumental task, but it’s really not.
First, read my post on resetting your wireless router , which is fairly easy to do. Next, don’t worry if you don’t have the paperwork for your router anymore because you can either find the default password on the router itself or you can find default router passwords online .
Once you are able to log into your router, you can check what IP addresses have been allocated on the network. Usually, this information is located somewhere on the main page and can be called something like Devices, My Network, IP Address Allocation, Attached Devices, Wireless Status, Connected Devices, DHCP Clients Table, etc. It really depends on the router you have, but you should see a list like the one shown below.
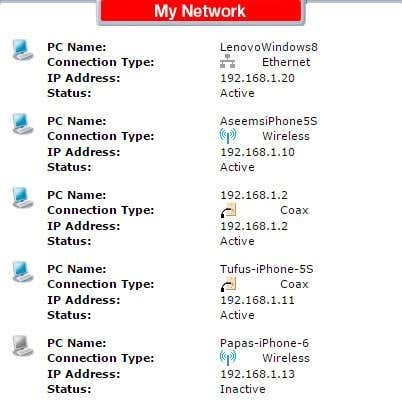
Most new routers will also show you the name of the devices, so it’s easy to tell if the device is a phone, tablet, printer, IP camera, NAS, streaming device, laptop or computer. If you can’t figure out what device is associated with an IP address, you can always try to paste that IP into your web browser and see if it loads a web page. Some printers, camera, etc. will have their own web interfaces that you can connect to via the browser.
If all of that is too complicated, another method to find connected clients is to use a smartphone app. For Apple devices, I recommend Net Analyzer Lite and Fing Network Scanner . Fing is also available in the Google Play Store .
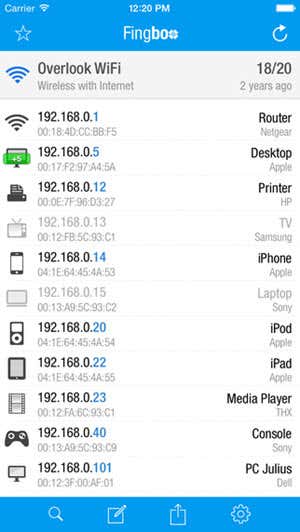
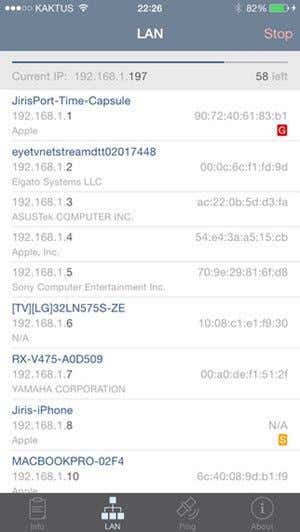
These apps are actually better than going directly to the router most of the time because they can give you more information about the device. Fing can even figure out if you have a console on your network, which is pretty cool.
Now it should be pretty easy to find a device that is not supposed to be connected to your network. If this is the case, what can you do? Keep reading to find out how to secure your wireless network.
Secure Wireless Network
The first step you should take if you think your network has been compromised is to completely reset your router as mentioned earlier or buy a new router if the current one is old. If someone was able to connect to your wireless router, they could have also compromised the router and may be able to monitor all activity on the network.
The next step is to log into your router and to immediately change the default login for the router. Many people assume that setting a strong WiFi password is all they need, but this is not case. It is true that in order for someone to log into your router, they first have to be connected to the wireless network. However, there are many times when you have guests who you cannot trust fully that need to connect to your wireless network for a short time.
Router Admin
Once connected, if they are the hacker type, they might try connect to your router and try the default username and password to log in. If you never changed it, they now can access your router and have full control over your WiFi network. So change the router login password immediately.
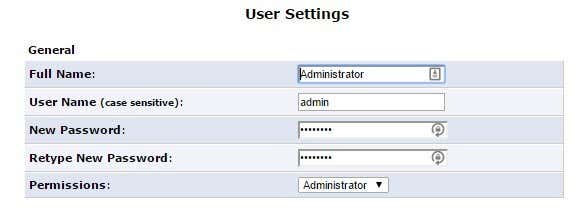
If you can change the username also, go ahead and do that. Admin is the absolute most common username on routers and changing it makes it much harder for someone to gain access to your router. If you have a wireless router from an ISP, the username and password for the router admin interface is also printed right on the device, so make sure to change it from the default values.
You’ll have to poke around the various setting and configuration pages as these options are located in different places for different vendors. Now that you have changed the router login info, the next step is to setup the wireless security.
WPA/WPA2
There are three main ways to secure your router at this point: choosing between WEP, WPA, and WPA2 encryption, disabling SSID broadcast and enabling wireless MAC authentication. I firmly believe you really only need to use WPA2 encryption with a long key to be very secure, but some people like to take extra precautions and it could be worth the extra effort if you have very sensitive information stored on your devices.
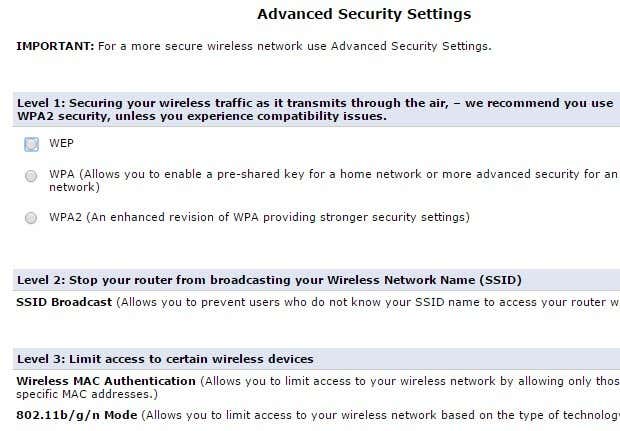
Some routers make this really easy for you, like the Verizon FIOS router advanced security settings page shown above. You should only use WPA2 , if possible. WEP is very insecure and WPA can be cracked fairly easily. If you have devices on your network that cannot connect once you setup WPA2, then you should pick the option that has WPA + WPA2 Personal . Make sure you choose a long password. Note that it doesn’t have to be a bunch of random numbers, symbols, or letters to be secure. A strong password just has to be a long passphrase.
If you’ve followed the steps above, resetting your router, configuring the admin password and using WPA2, you can pretty much be certain that anyone previously connected to your wireless network is now disconnected.
If you want to go further, you can read my post on disabling SSID broadcast , but it really doesn’t make your network much more secure. Enabling MAC address filtering will make your network more secure, but it makes everything a lot less convenient. Every time you want to connect a new device to your network, you’ll have to find the MAC address for the device , log into your router and add that to the filtering list.
In conclusion, if you suspect unusual activity on your network, you should immediately follow the steps outlined above. There are chances someone may be monitoring your computer if they are connected to your network, so it’s better to be safe than sorry. If you have any questions, post a comment. Enjoy!
- How to Fix Slow Wi-Fi on Your Smartphone
- 7 Best Machine Translation Software (or AI) to Try in 2025
- What Does the Green Dot Mean on Facebook?
- How to Turn off Hardware Acceleration in Chrome
- How to Check VRAM in Windows 10, 11, and macOS?
It’s handy and straightforward to let the router use DHCP to decide what IP addresses devices get. We don’t have to pick them, assign them, and better yet, try to remember them.
Devices like printers often have web-based management, which can be configured and maintained from anywhere. That makes printers a top candidate for static IPs .
Why Assign a Static IP Address to a Device?
It seems like more work, yet it does make life simpler and easier. If the device needs to be accessible from other devices, a static IP address is the way to go. Imagine having a web server where the IP address changes daily. It’s like changing your phone number every day.
When thinking of other devices that need to be accessible from anywhere, smart TVs , security systems , home automation , and camera systems come to mind.
Another reason, to a lesser extent, is security. A router can issue hundreds, if not thousands of IP addresses. It doesn’t care whose device it is. By using static IPs and limiting the number of IP addresses available, rogue devices have a harder time getting on the network. It can also help resolve an IP address conflict .
What IP Addresses Can I Use?
The Internet Assigned Numbers Authority (IANA) has set aside the following blocks of IPs for private use. Private use means you can only use the IP addresses in a private network. They aren’t for the outside world. IANA defines the following ranges for private IPs:
- 10.0.0.0 to 10.255.255.255 – equals 16,777,214 IP addresses
- 172.16.0.0 to 172.31.255.255 – equals 1,048,574 IP addresses
- 192.168.0.0 to 192.168.255.255 – equals 65534 IP addresses
If the router is being used already, it has a range. It’s easiest to stick with that range. Some routers pre-define the range.
Make a Static IP Plan
If the network has ten or fewer devices connected, a plan isn’t necessary. Just put them all in a single range, like 192.168.2.10 to 192.168.2.19. Skip the rest of this section.
If the network has more than ten devices, it’s wise to make a plan. This is just one way to make a plan. If it doesn’t work for you, change it.
- Count all the devices that will connect to the network.
- Group the devices by type. For example, there may be 3 phones, 2 smart TVs, 4 cameras and a DVR, 2 IoT devices like smart fridges, and a printer.
- Assign blocks of IP addresses for each device type and leave room for growth. If the 192.168.2.0 to 192.168.2.255 range is being used, the blocks might be assigned like: Phones and tablets: 192.168.2.20 to 192.168.2.29 TVs: 192.168.2.30 to 192.168.2.39 Cameras and DVR: 192.168.2.40 to 192.168.2.49 IoT devices: 192.168.2.50 to 192.168.2.59 Printers: 192.168.2.60 to 192.168.2.69
Some best practices for using ranges:
- Begin a device type IP range with a number ending in zero and end the range with a number ending in 9
- Increment ranges in tens. Any less can become confusing, and you can easily outgrow them. Plus, it allows for additional devices of the same type in that range. If the number of devices is already close to 10, make the range cover 20 IP addresses, like 192.168.2.40 to 192.168.2.59.
- Whatever the router’s IP address is, leave its entire block open for the addition of networking equipment, like other routers, switches, firewalls, etc. For example, if the router uses 192.168.2.1, then reserve 192.168.2.2 to 192.168.2.9 for networking equipment.
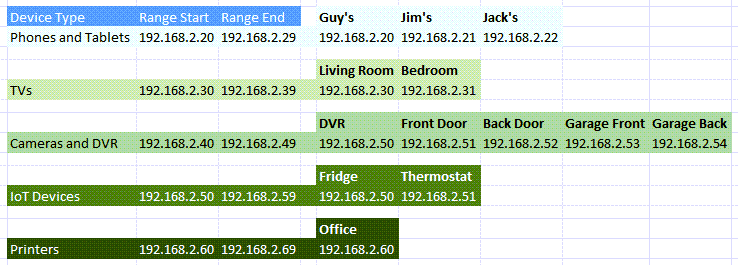
- In a spreadsheet, assign the devices their IP addresses. This becomes an inventory of devices and makes it easier to identify the devices on the network. It’s a good idea to assign the first IP in a range to controller devices. For example, the DVR is the controller of the cameras, so it will have an IP of 192.168.2.50.
If you plan it on a spreadsheet, it may look like this:
How to Assign Static IPs to Devices in the Router
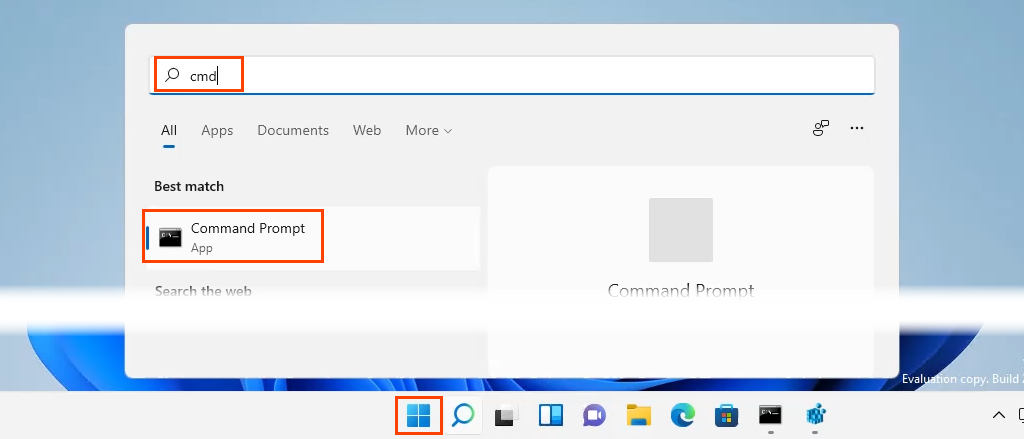
- Consult our article on how to find the IP address of the router if you’re using a Mac or not comfortable using the Command Prompt. Select the Start menu and search for CMD . Command Prompt will be the top result, so select it.
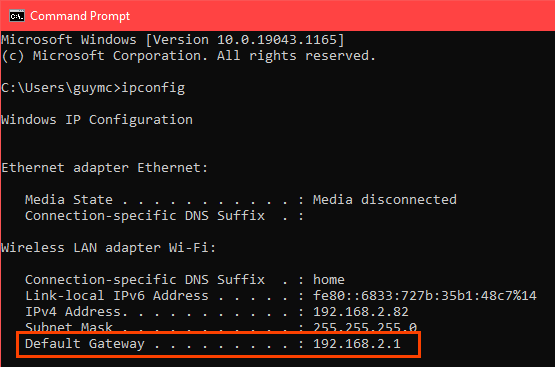
- When the Command Prompt window opens, enter the command
ipconfig
and press Enter .

The value for Default Gateway is the IP address of the router. Write this down somewhere.
- Open a web browser and enter the IP address of the router in the location bar , then press Enter . This will open the router’s web-based management page.

Assign Static IPs – Asus Router
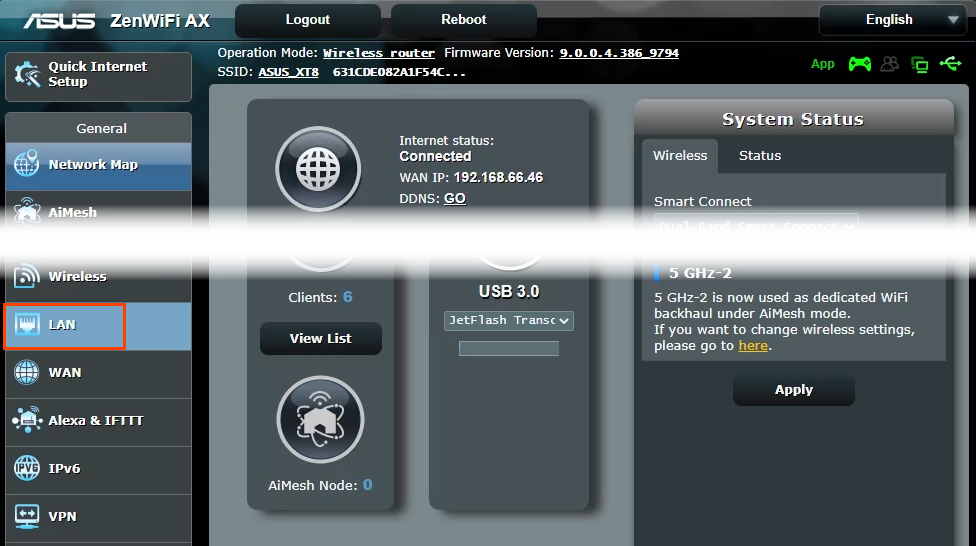
- Login to the Asus router, find the LAN button, and select it.
- Select the DHCP Server tab. This router allows for staying in DHCP mode while assigning static IPs to selected devices. If desired, it can be configured to use only static IPs.

- Scroll to the Manual Assignment section. Where it reads Enable Manual Assignment , select Yes .

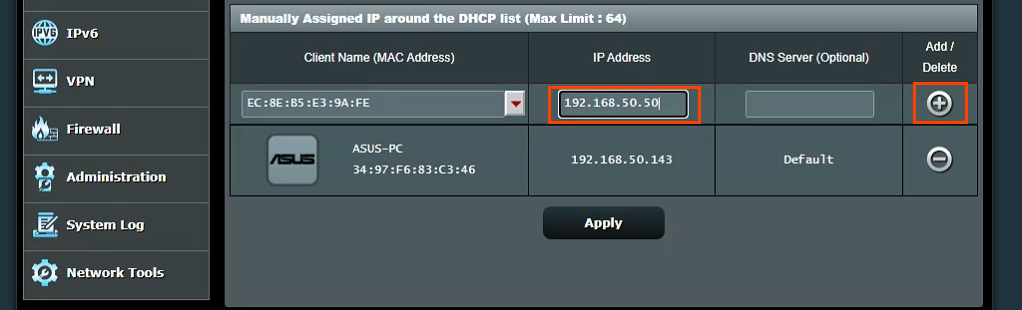
- Select the drop-down box under Client Name (MAC Address) and choose a device in the Manually Assigned IP around the DHCP list. All devices currently connected to the router are listed. To see devices that you previously connected, select Show Offline Client List .
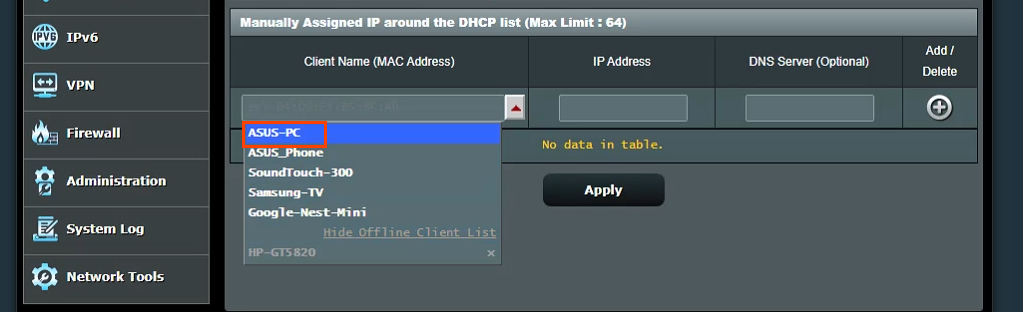
It will show the device’s current IP address in the IP Address field. This can be left as is, or it can be changed at this point. Add the IP address of a DNS server in the DNS Server (Optional) field, if needed. Select the plus sign button to add the device to the list of manually assigned IP devices. Repeat this for all the desired devices.
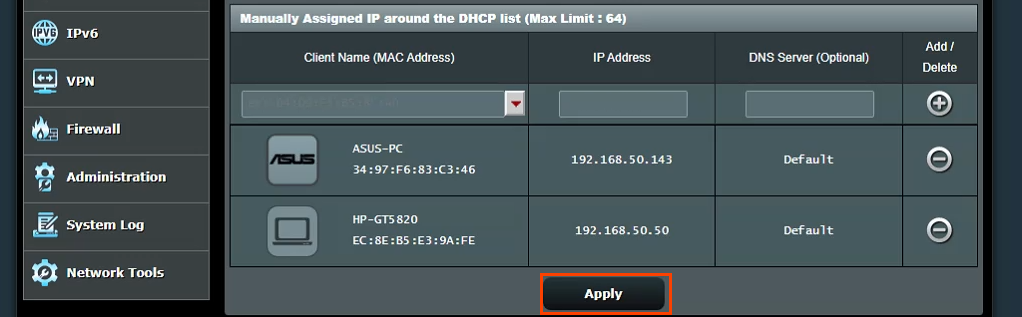
Once all the desired devices have been assigned static IPs, select the Apply button to set the changes.
Assign Static IPs – TrendNet Router
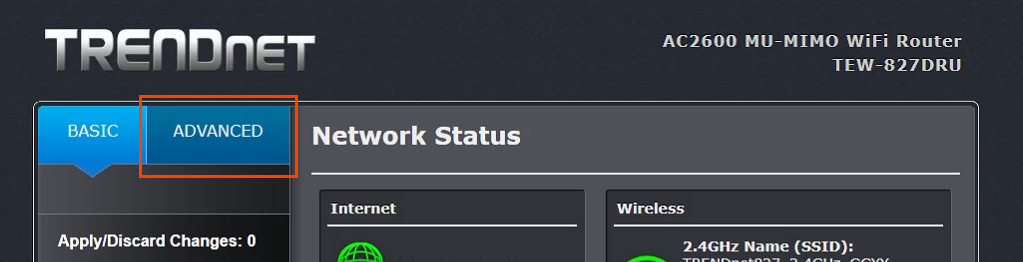
- Log in to the TrendNet router and select the Advanced tab.
- In the left-side menu, select Setup , then select LAN Settings .

- Scroll down to the Add DHCP Reservations section. Check the Enable box, then enter the details of the device to receive a static IP address. Ensure the details are correct and then select Add .
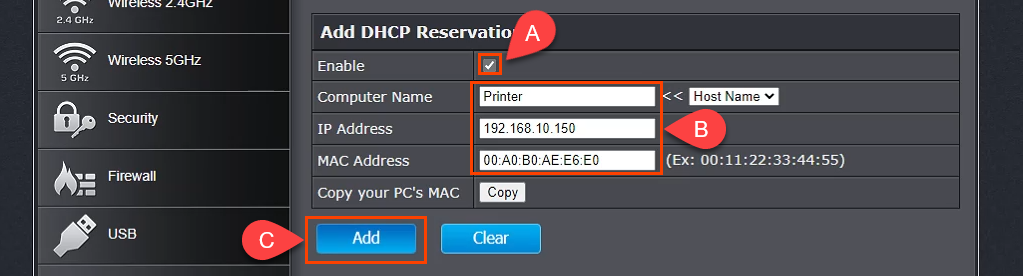
- The device just added will show in the DHCP Reservations Ready Group . If everything is correct, select Apply and the device will have a static IP.

Assign Static IPs – Belkin Router
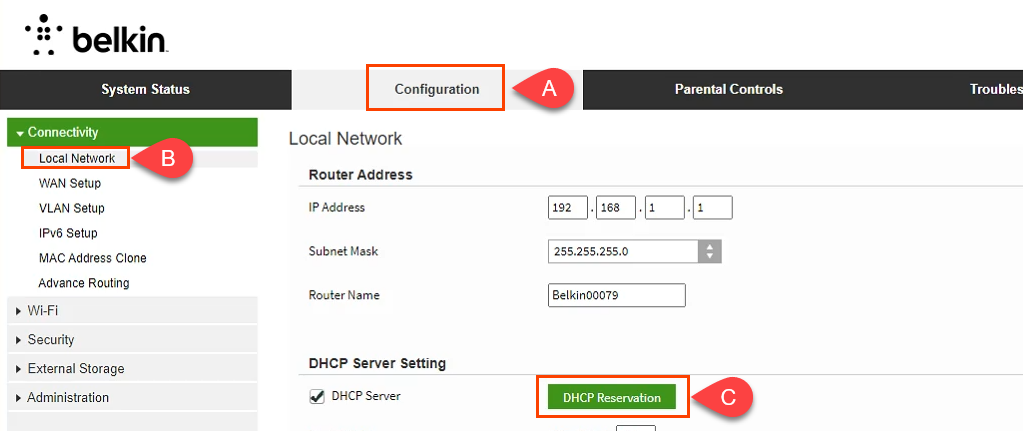
- Log in to the Belkin router and select the Configuration tab. Then under Connectivity select Local Network. Now select the DHCP Reservation button.
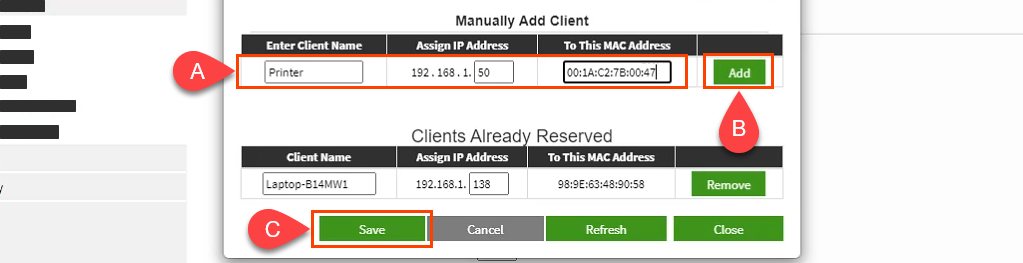
- In the DHCP Client Table window, any devices that are currently connected are shown. If it’s the device that requires a static IP address, check the Select box, then select Add Clients .

- In the same window, you can manually add clients as well. First, enter the device details, then select the Add button. Once all the devices requiring static IP addresses are defined, select Save to commit the changes.
What About Assigning Static IPs on Other Routers?
There are at least a dozen router makers out there, and each has several models of routers. It’s just far too many to cover all of them. Reading through the instructions above, though, you’ll see that there’s a pattern; find out where to work with the LAN, look for something named like DHCP Reservation, then follow through to assign IP addresses. If you’re running into issues, please let us know. One of our writers or knowledgeable readers will likely have the answer.
- How to Fix Slow Wi-Fi on Your Smartphone
- How to Reboot a WiFi Router
- How to Splice an Ethernet Cable
- Cellular Data or Wi-Fi: Which Should You Use on Your Smartphone?
- How to Connect a Router to Another Router
