Normally, when multiple people need to have access to a Windows computer in a network, you need to use a server version of Windows (such as 2003) running Terminal Services.
However, you need to by licenses from Microsoft to do this. If you only need one person to access a computer remotely at a time, Windows allows you to do this without Terminal Services, in Windows XP as well as in Windows Server 2003.
Right-click on My Computer on the Start menu and select the Properties option from the pop-up menu.

The System Properties dialog box displays. Click the Remote tab. In the Remote Desktop box, click the Allow users to connect remotely to this computer check box.

Note the Full computer name so you can use that when logging in.
To specify which users of the computer are allowed to log on remotely, click the Select Remote Users button. The Remote Desktop Users dialog box displays.

Click the Add button to add a user to the list. The Select Users dialog box displays.

Type the name of the desired user in the Enter the object names to select text box and click the Check Names button. The full name of the user is filled in. Click OK .
The user displays in the list on the Remote Desktop Users dialog box. Click OK .

You are returned to the System Properties dialog box. Click OK .
Select Accessories | Communications | Remote Desktop Connection from the Start menu.

The Remote Desktop Connection dialog box displays.

Enter the Full computer name you noted earlier in the Computer edit box and click Connect . The drop-down list provides access to computers you have logged in to before.
Enter your user name and password on the dialog that displays and click OK . Your desktop on the remote computer displays. To close the connection, just log out of your account like you would normally.
If you need to remotely connect to a computer that is not on the same network, i.e. across the Internet, the only thing you have to do is configure your router for remote desktop access and use the public IP address of the computer you want to connect to.
- Connect to Network Printer in Windows XP
- HDMI Cable Types and Specifications Explained
- Flat vs Round Ethernet Cables: What’s Different and Which Is Better?
- USB-C vs HDMI: What’s Different and Which Is Best for Video Output?
- What Is Bluetooth 5 and How to Upgrade?
Founder of Help Desk Geek and managing editor. He began blogging in 2007 and quit his job in 2010 to blog full-time. He has over 15 years of industry experience in IT and holds several technical certifications. Read Aseem’s Full Bio
If you are in a corporate environment, you probably can only print to networked printers, unless you are one of the lucky few to have a personal desktop printer. For the rest of us, you have to manually connect to the network printer in one of two ways.
If you are in a domain, then you’re lucky because all you have to do is search and a list of all the printers on the network will show up! If you need to connect to a network printer via IP address, it’s a bit different. I will show you how to do both in this article!
Connect to a Network Printer on a Windows Domain
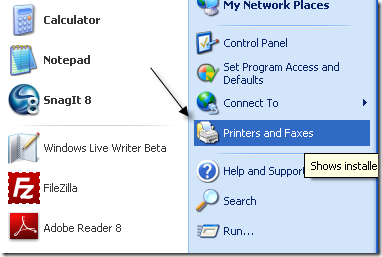
Whichever method you are using, you will always have to click on Printers and Faxes from the Start Menu or from the Control Panel.
Now click on Add Printer in the left hand menu under Printer Tasks .

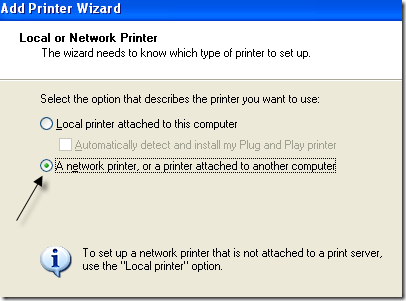
On the Welcome screen click Next . Choose A network printer, or printer attached to another computer and click Next.
Now if you are on a domain, you want to choose Find a printer in the directory and click Next . This will search for all printers in Active Directory.

Click the Find button and you should get a list of all the networked printers available in Active Directory.
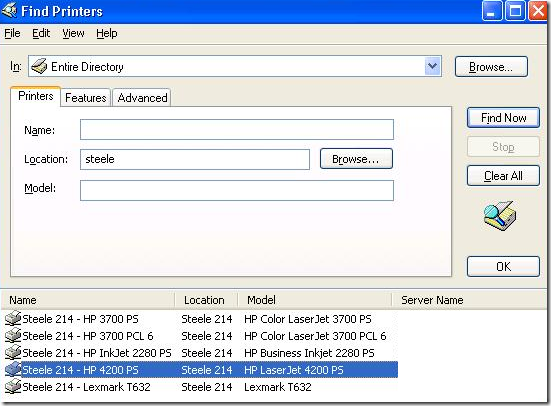
Just double-click on the printer and it will install automatically.
Connect to Network Printer via IP Address
If you are not part of a Active Directory domain, then you will have to connect to the network printer via its IP address. In order to do this, you will first need to know the IP address of the printer. You can do that by printing the configuration page for the printer. It will list out all of the settings, including the network configuration.

For connecting this way, instead of selecting A network printer , you will choose Local printer attached to this computer and make sure to uncheck the Automatically detect and install my Plug and Play printer .

Click Next, choose Create a new port and select Standard TCP/IP Port .

On the Welcome screen, click Next and then type in the IP address of the printer in the Printer Name or IP address box.

If the network card for the printer cannot be identified, you might get a dialog about the device type. Just leave the default “ Generic Network Card ” option and click Next.
Now you will have to choose the driver for the printer you want to install. If it is not in the default list provided by Windows XP, you will have to download it, click Have Disk and point to the location of the printer driver. Click Next when you are done.

Give your printer a name and choose whether you want to use it as the default printer or not. Click Next and choose whether you want to share the printer with other users on the network. Finally, click Next and you will be given the option to print a test page.

That’s it! The printer should now show up in the list of printers when you to go to the Printers and Faxes dialog. If you are having any problems connecting to network printer, post a comment and I will try to help! Enjoy!
- Remotely Accessing a Windows XP or Windows Server 2003 Computer
- HDMI Cable Types and Specifications Explained
- Flat vs Round Ethernet Cables: What’s Different and Which Is Better?
- USB-C vs HDMI: What’s Different and Which Is Best for Video Output?
- What Is Bluetooth 5 and How to Upgrade?
Founder of Help Desk Geek and managing editor. He began blogging in 2007 and quit his job in 2010 to blog full-time. He has over 15 years of industry experience in IT and holds several technical certifications. Read Aseem’s Full Bio
