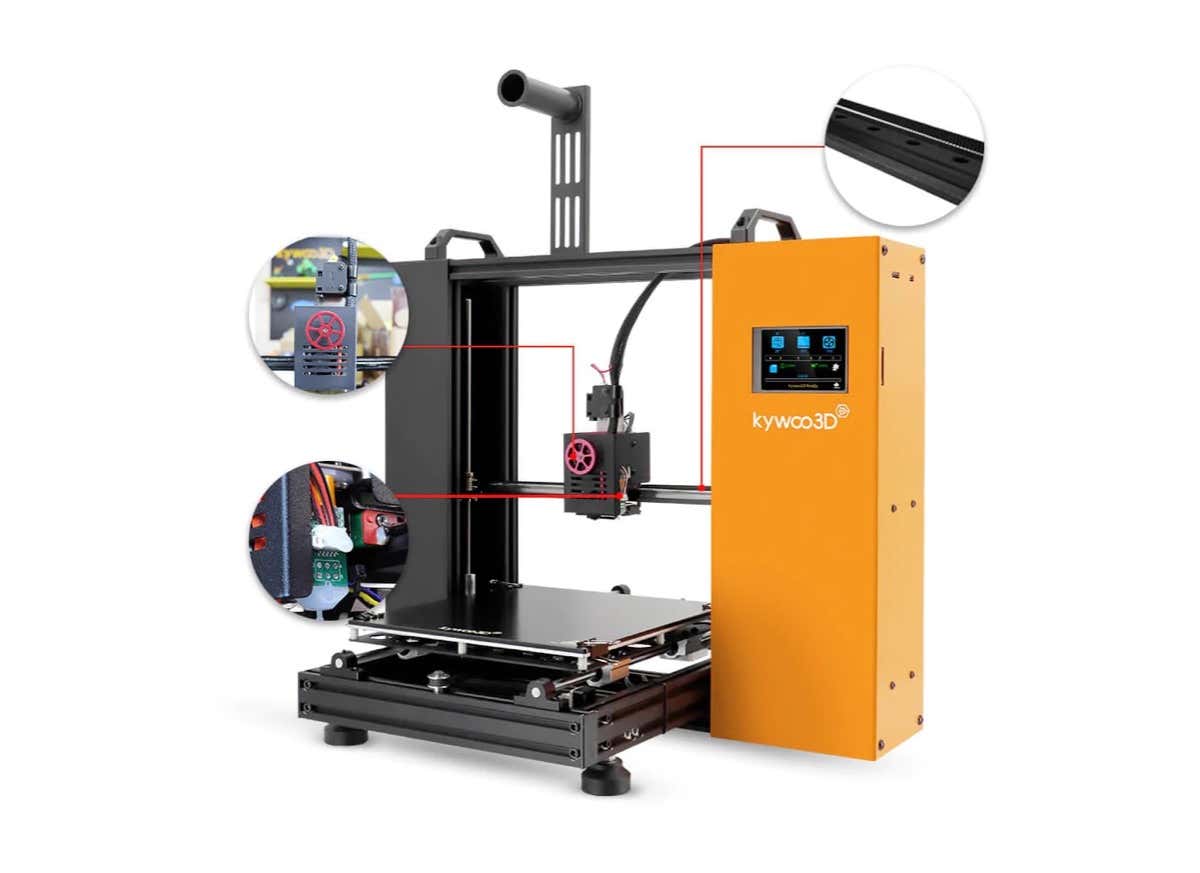
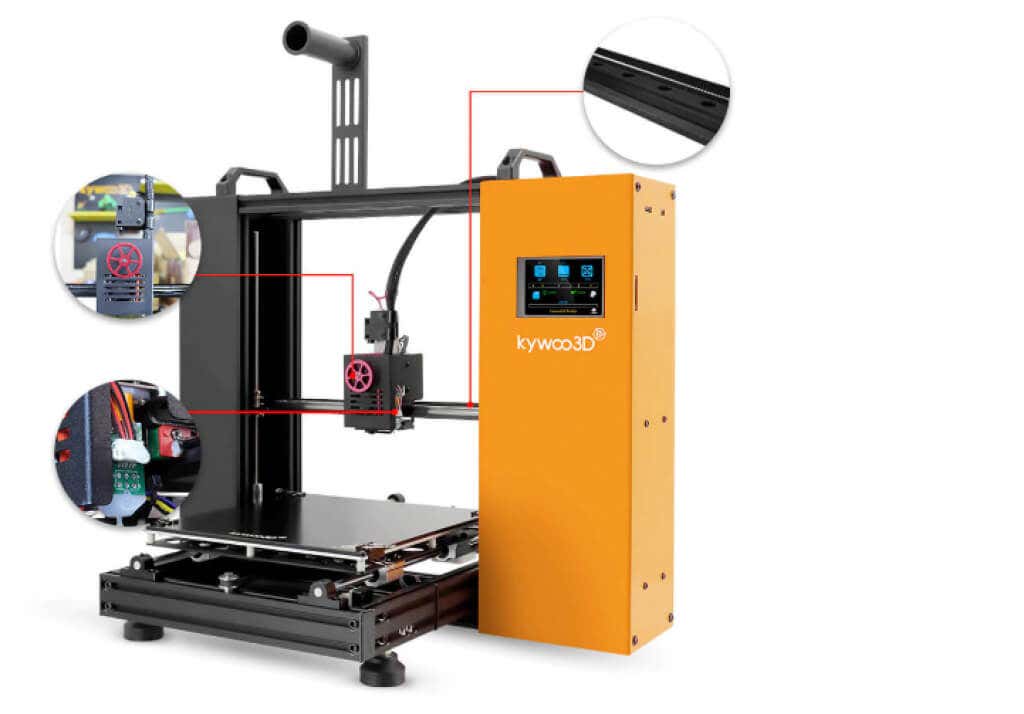
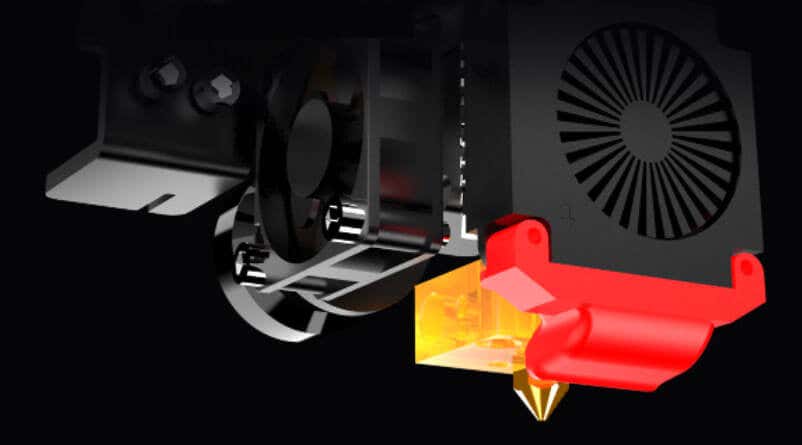
The Tycoon from Kywoo is a direct drive FDM 3D printer with an auto-leveling function, color touch-screen controls, and a few interesting features we haven’t seen in other entry-level printers.
We’ll walk you through the Tycoon’s design, assembly, calibration, and build quality. Then we’ll tell you what 3d printing is like with this reasonably-priced printer.
Kywoo’s Tycoon line includes the Tycoon, the Tycoon Max 3d printer, the Tycoon IDEX (dual extruder), and the Tycoon Slim, which has a design similar to the Ender3, Anycubic Vyper and Kobra, or the Voxelab Aquila . We tested Kywoo’s Tycoon model.
Features of the Tycoon by Kywoo
The Tycoon is packed with features including:
- A direct drive extruder mounted to a linear rail for smoother movements
- 240 x 240 x 230mm printing size/build volume
- A BL Touch-style integrated bed-leveling system
- A color LCD HD touch screen
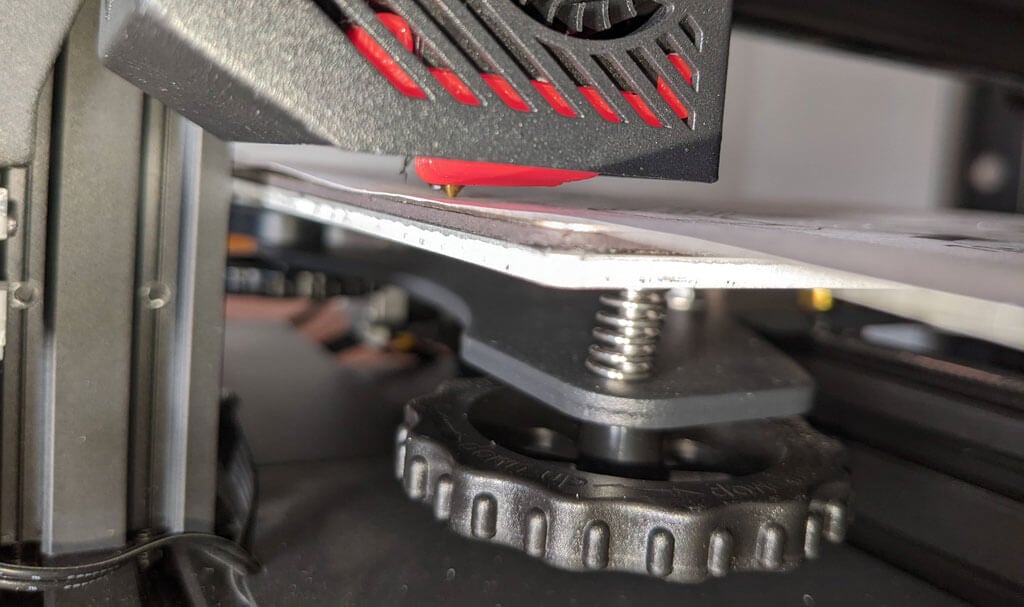
- Dual z-axis screws and motors for better stability
- Glass heated bed
- Extruded aluminum frame
- Adjustable feet
- Support for SD cards and microSD cards
- Wifi connectivity
- Windows/Mac/Linux compatibility
- Y-axis that mounts to linear rods connected to four linear bearings
- Confirmed filament compatibility with PLA, PETG, TPU, TPE, nylon, and ABS (get Kywoo’s reasonably-priced enclosure if you plan to print with ABS)
- One-year warranty, excluding nozzle and build plate sheet
- Lifetime technical support
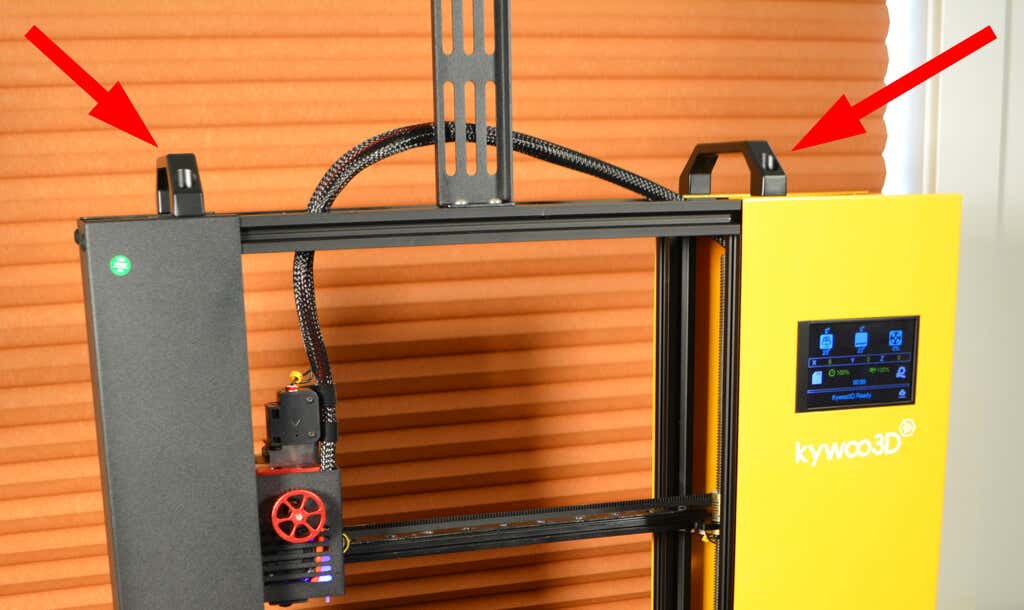
The bold yellow case containing the mainboard and power supply makes the Tycoon the best-looking 3d printer we’ve reviewed so far. Plus, the two carrying handles on the top make it much easier to move than other printers.
The Tycoon has another feature we’ve never seen before —a hand-crank for the E-axis (the extruder), so you can manually push or pull the filament in or out of the nozzle.
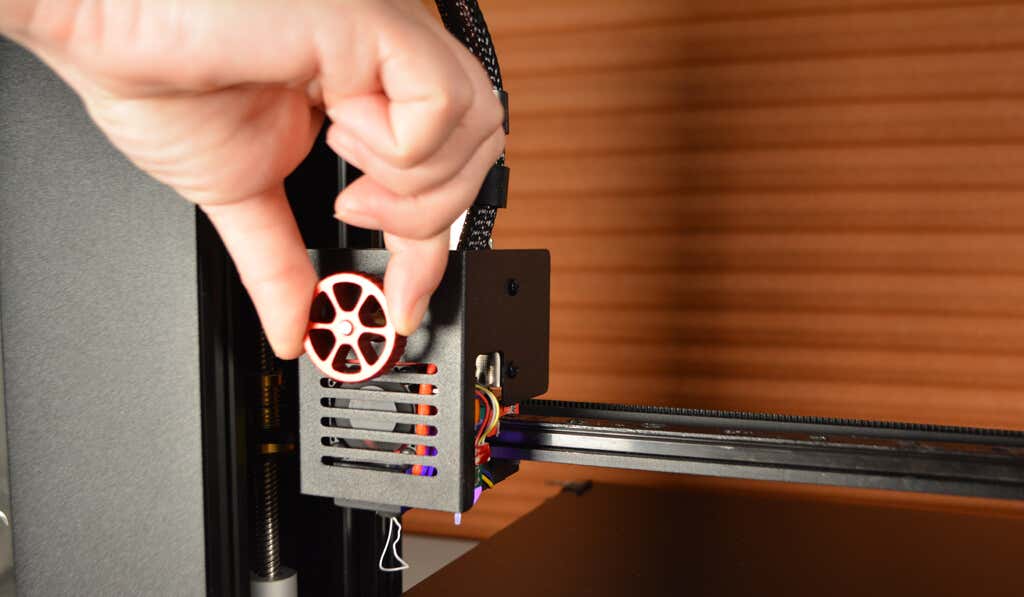
You might think having the firmware load the filament automatically would be better, but controlling the extrusion yourself is extremely satisfying. It also means there’s no need to print an extruder visualizer.
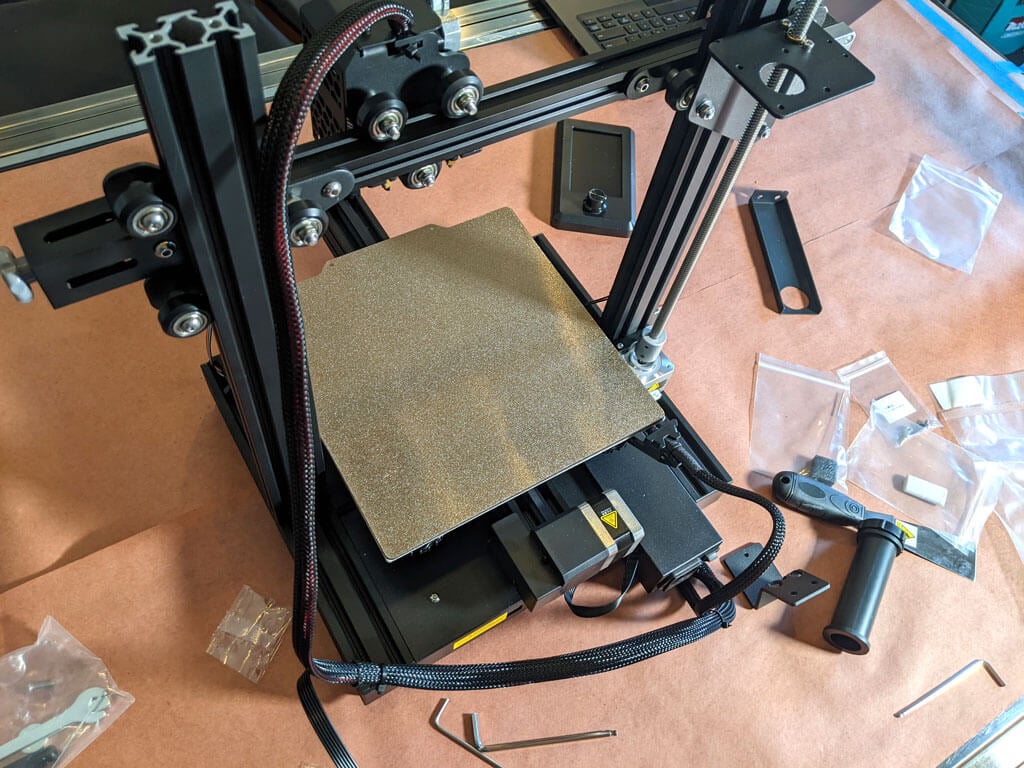
Assembling the DIY Kywoo Tycoon 3D Printer
The instructions weren’t very clear, which is not unusual. But, ultimately, it only took about five minutes to assemble. Furthermore, in hindsight, the steps are obvious.
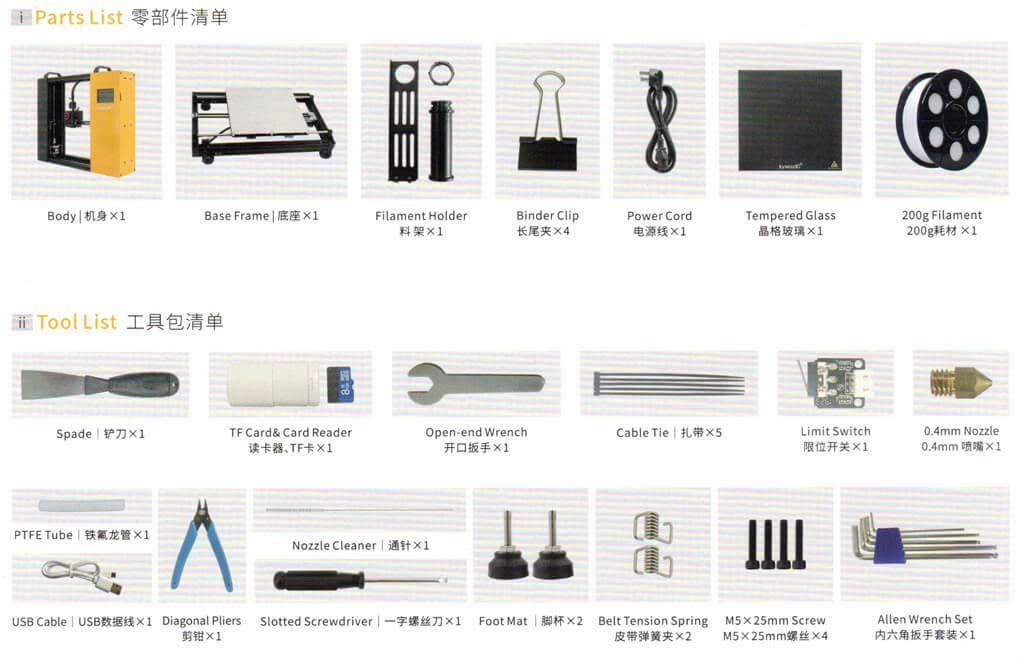
Attach the y-axis to the x and z gantry, add the feet, plug in a few cables, and mount the spool holder. Next, attach the tempered glass bed with binder clips.
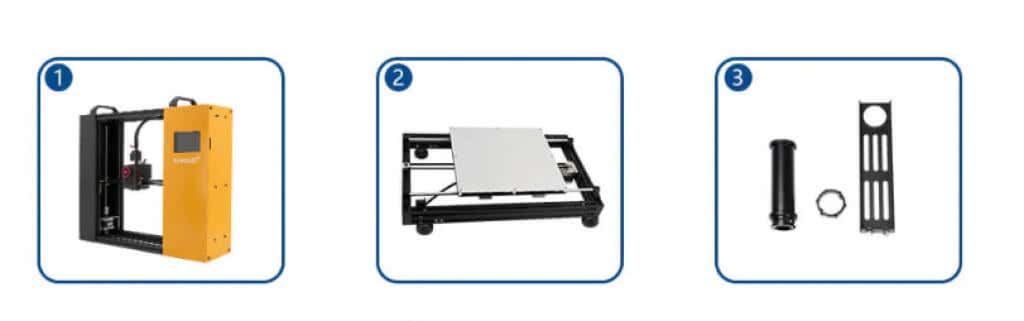
Warning : Make sure you adjust the power supply voltage to the standard for your country. Ours was set to 230v, so we had to change it to 115v. To avoid damage, it’s important to do this before powering the printer on.
Kywoo 3D Printer Calibration
We continued to follow the instructions in the manual by homing the printer via the touchscreen interface. We performed the auto bed leveling function and then pre-heated the nozzle and the bed via the touchscreen. We were pleasantly surprised by the tap and drag controls on the temperature and distance sliders—faster and easier than repeatedly pressing the plus and minus icons (although you can do that, too).
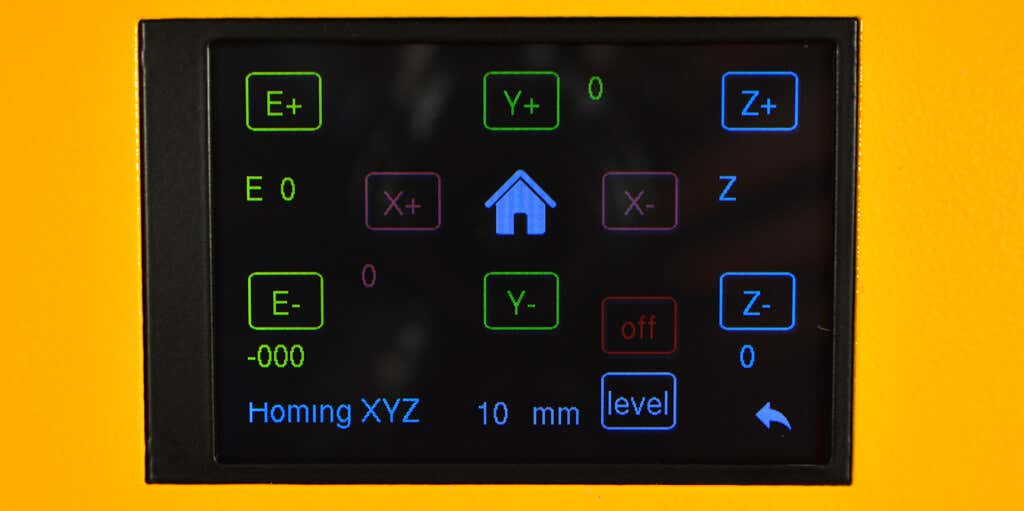
The instructions repeatedly refer to returning to the home screen. Note that the Home icon homes the printer. It’s the Back icon that returns you to the home screen.
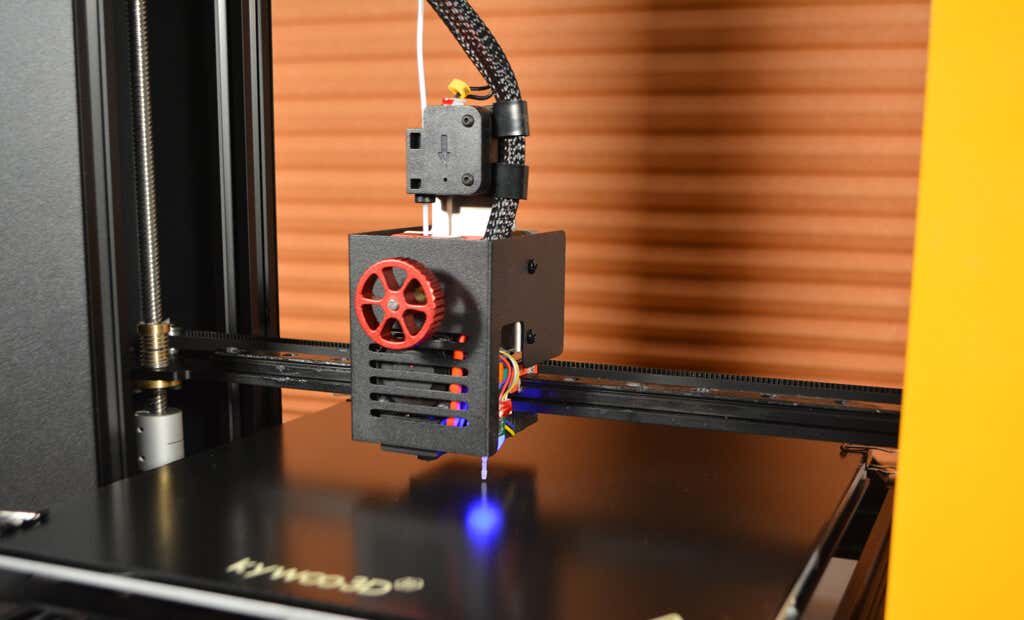
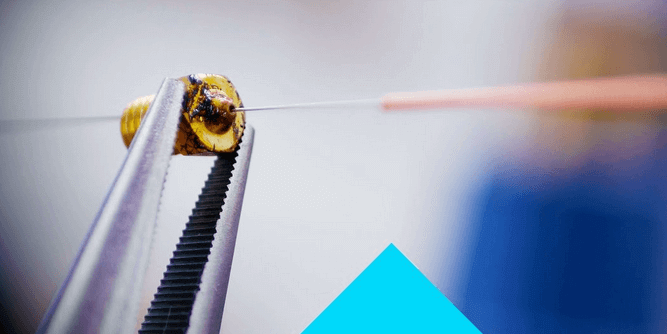
Next we loaded the filament after cutting it to the recommended 45 degree angle with the provided side cutters. We ran the filament through the anti-runout filament sensor into the hotend via the wheel that’s connected directly to the extruder motor.
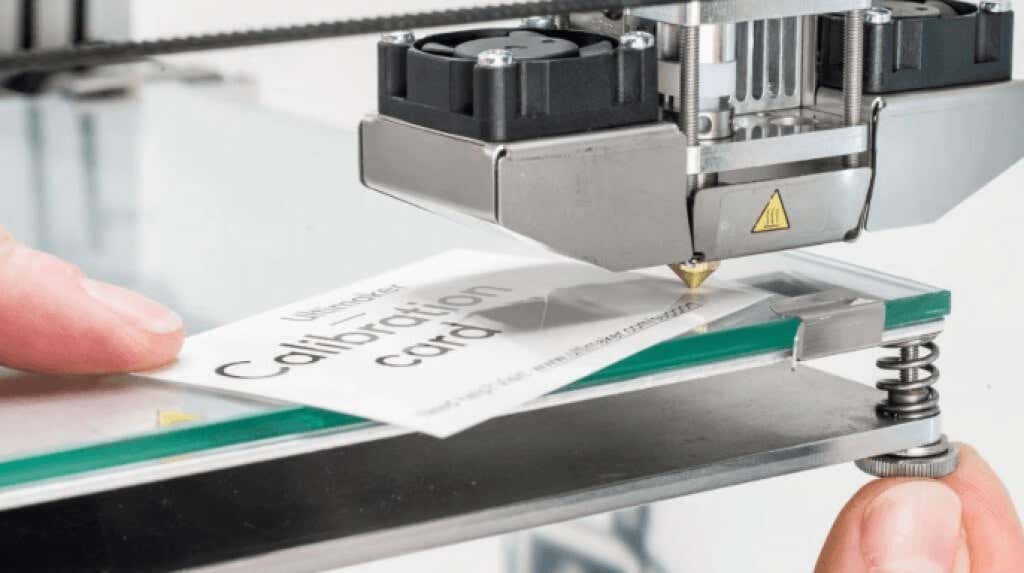
Finally, we adjusted the z-axis offset by running the auto-leveling test file on the microSD card that comes with the printer. As is typical, the z-offset wasn’t perfect out of the box. We had to raise it by a few tenths of a millimeter, but we were able to correct it before the calibration test print was completed.
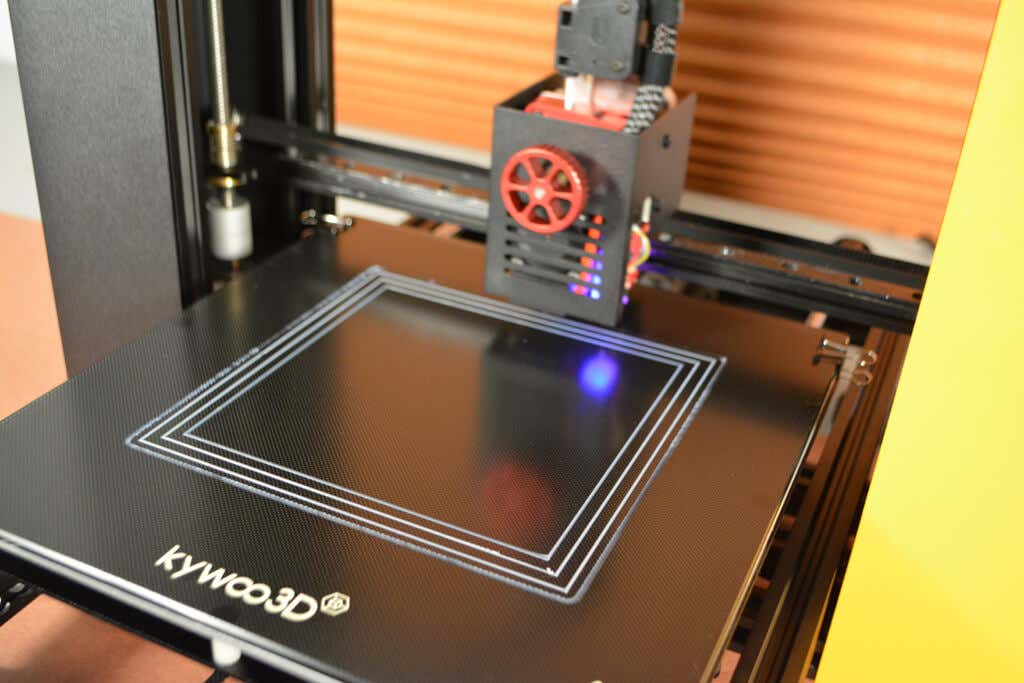
We used the scraper to remove the lines from the test print. Although it was adequate, we prefer thinner, more flexible scrapers for fear of damaging the bed. Even though it looked like we left some scratches on the glass bed, a little isopropyl alcohol cleaned it right up and had it looking good as new.
Build Quality of the Kywoo Tycoon
The Tycoon has a really stiff frame. That’s good because any wobbling might affect the print quality.
The high-precision linear rails make for a stable x-axis, and there was no perceptible play on either the x- or y-axis. We suspect the y-axis bearings may be plastic since they’re so quiet.
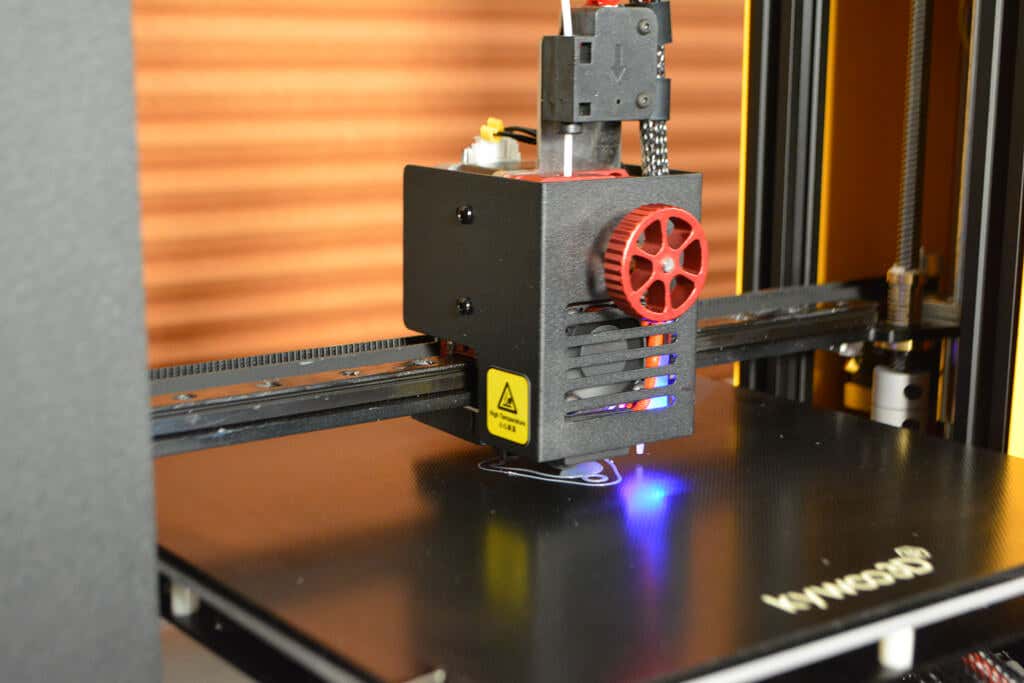
The z-axis has dual motors and z-screws connected by a belt to prevent slippage.The z-axis is by far the noisiest part of the printer, so z-hopping is much louder than other movements on the machine. That’s not to say this is a loud machine—it’s just not as quiet as other machines we’ve tested.
The Tycoon’s First Print
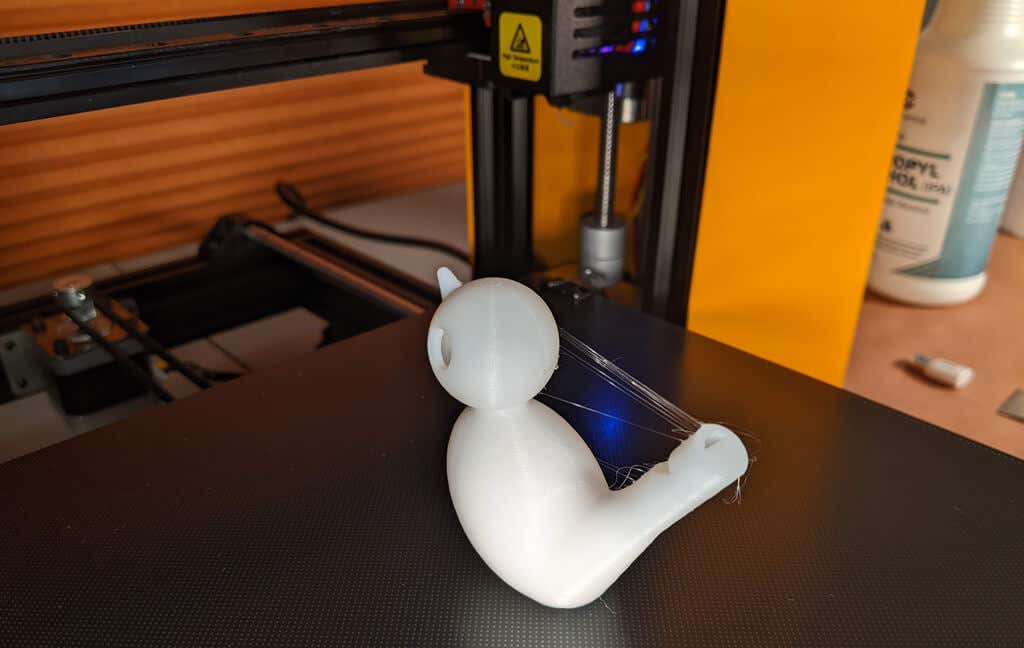
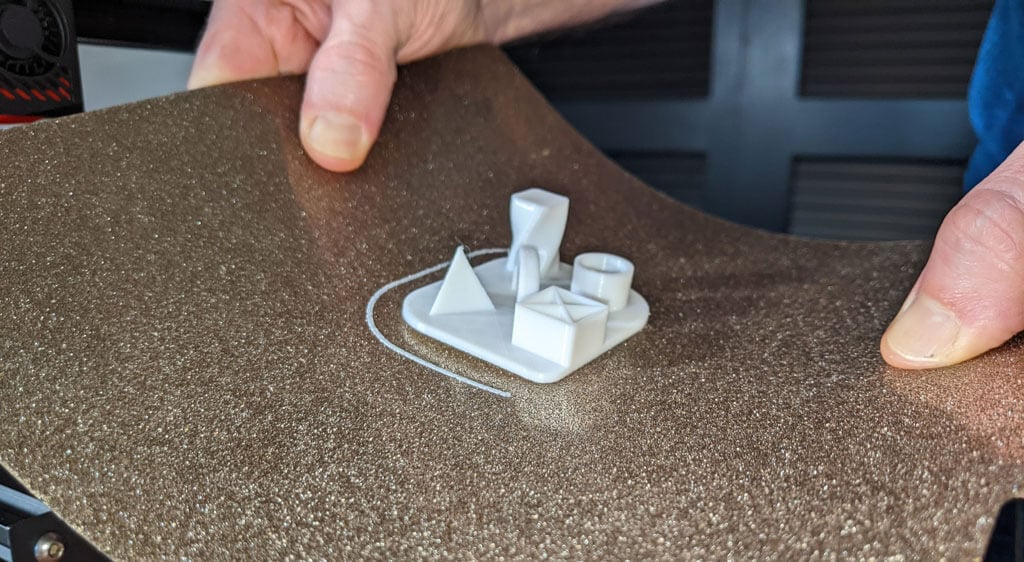
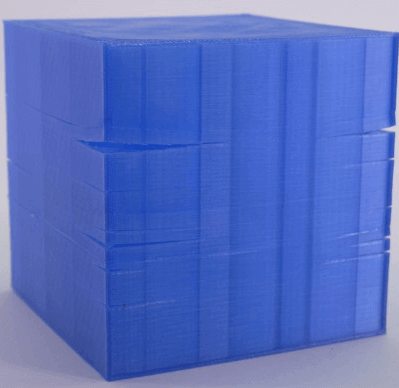
We decided to print the simplest test model first—the ghost model on the microSD card—with the PLA filament that came with the printer. It was quite small and finished in about twenty minutes. The sides and top of the ghost looked fine. We didn’t see any imperfections or stringing.

We were most impressed by the first layer—the bottom side of the ghost. Except for one imperfection caused by our not having removed a little oozing from the extruder when we began the print, the first layer was flawless. In fact, it had a lovely texture imprinted by the glass plate.

We also printed the included bird whistle model which finished in about two hours. There was some stringing, but it was easily removed and turned out just as nice as the ghost print.
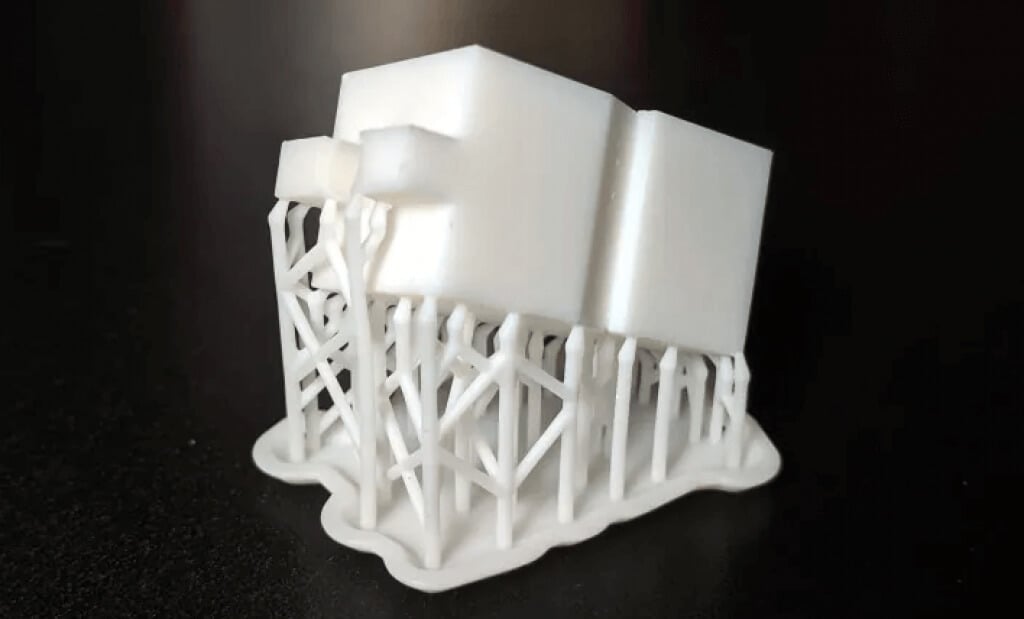
We did think the test models could have printed a bit faster. On the other hand, included test files usually don’t push the printer’s capabilities. Therefore, we decided to print a good old benchy, sliced with Cura 5 using their recommended settings at the maximum recommended speed of 80mm/second with 40mm/second outer walls. The print took fifty minutes.
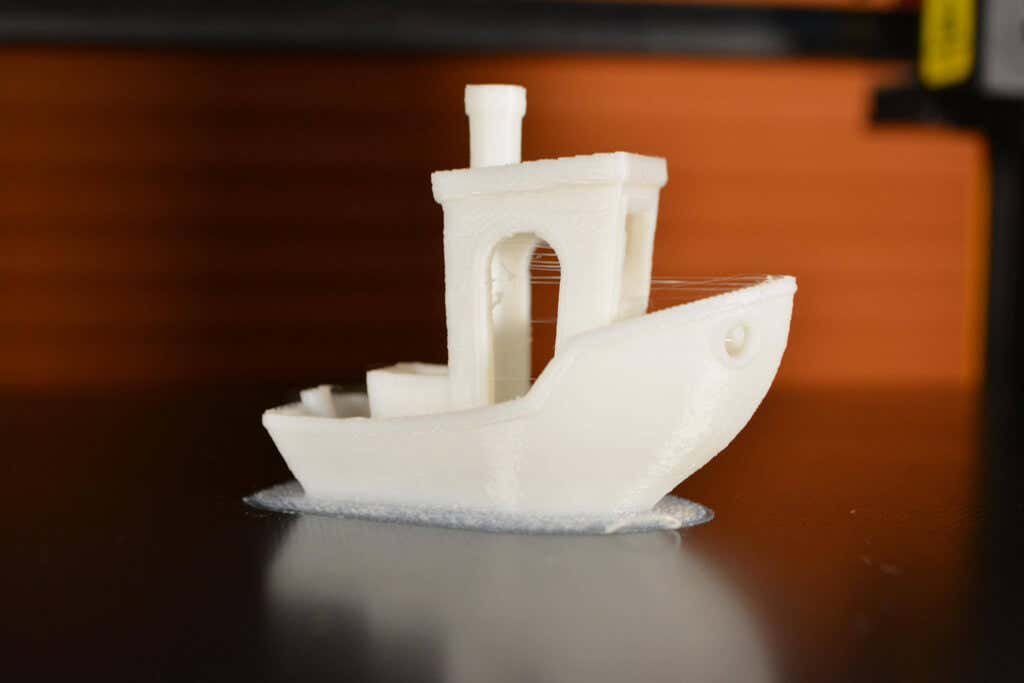
You can see some stringing on the arches and across the bow. That’s probably because of retraction settings or moving too fast to adequately cool the layer. Overall, though, it looks good considering we pushed the printer to its maximum speeds.
Cut to the Chase
The Tycoon has a lot of features for the money. We especially liked the linear rail equipped x-axis, the satisfying manual extruder wheel, and the very attractive housing. It’s super-solid and great for a beginner or a seasoned maker.
We wish it included a removable magnetic bed, although it would be fairly cheap and easy to do that upgrade yourself.
Beginners will appreciate the document on the SD card that explains how to use the Cura slicer to turn 3d models into g-code that the Kywoo Tycoon printer understands. That information is often omitted, and we were glad to see it.
We hope Kywoo is working with Cura to add their line to Cura’s list of default printers. In the meantime, a downloadable profile for Cura and Prusa slicers would be useful, especially for beginners.
Lastly, the Kywoo Tycoon Official User Group on Facebook is fairly active and filled with users and experts willing to help troubleshoot any problems you might have.
Price : From $450.93
*Special thanks to FormerLurker for help in reviewing Kywoo’s Tycoon 3D printer.
- Tribit StormBox 2: The Under $70 Portable Speaker that Stands Out
- ENGWE L20 2.0 Review: The Best Budget-Friendly Foldable E-Bike?
- TopDon TC004 – a Thermal Imaging Camera That Will Give You Predator Vision
- Newyes Portable Wireless Thermal A4 Printer Review
- Eskute Star Folding Fat Tire Electric Bike Review
In this 3D printer review, we’ll let you know what you get when you buy an Aquila S2, what it’s like to build it, and our first impressions about its quality and usability.
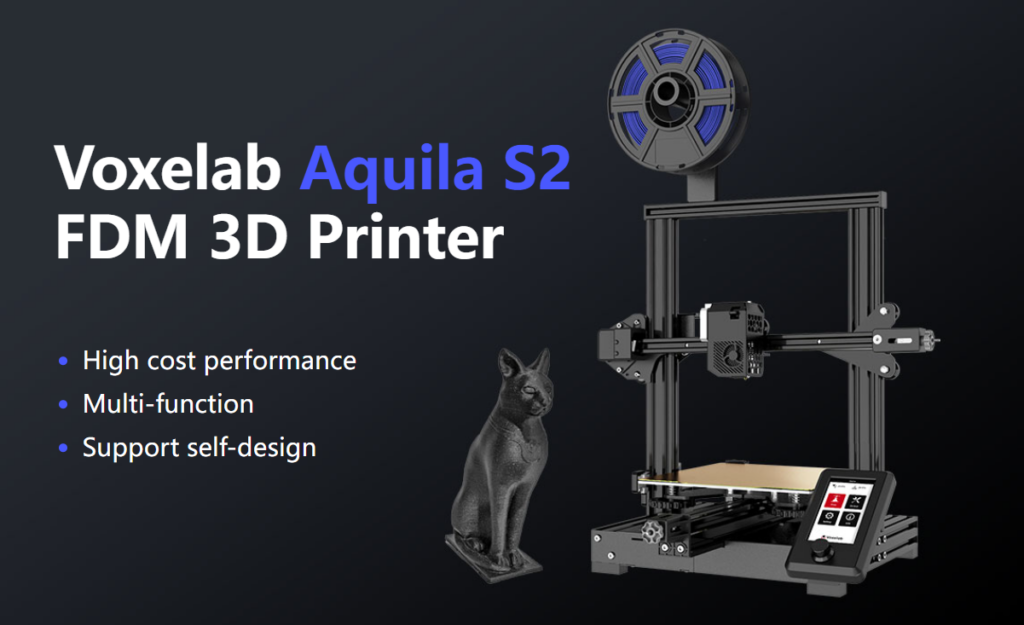
Features of the Voxelab Aquila S2 by Flashforge
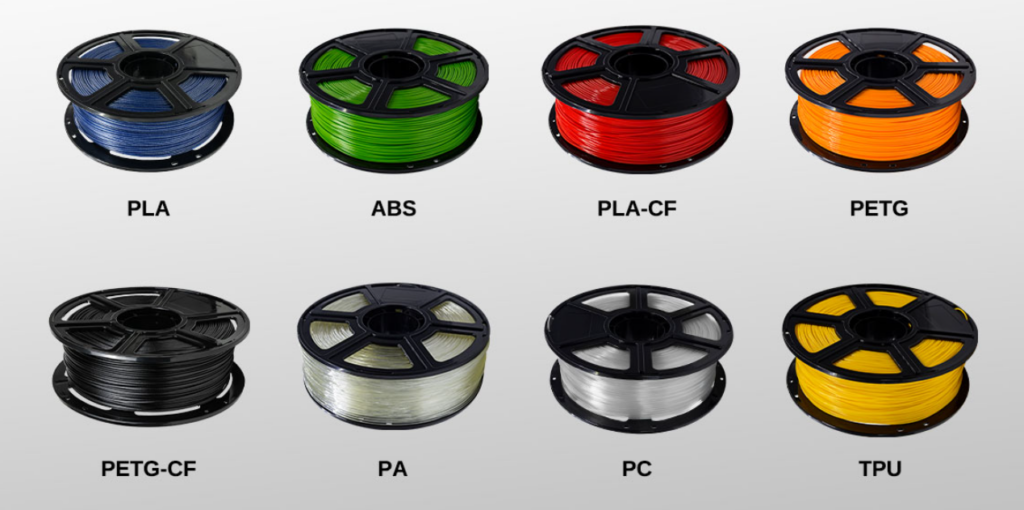
The Voxelab Aquila S2 is an FDM filament printer that will print with PLA filament as well as PETG, PETG-CF, TPU, and ABS filaments and more. FDM is an additive process, making these some of the most versatile and easy-to-use 3D printers, especially compared to resin printers , which are amazing , but are more difficult to use and can be quite messy.
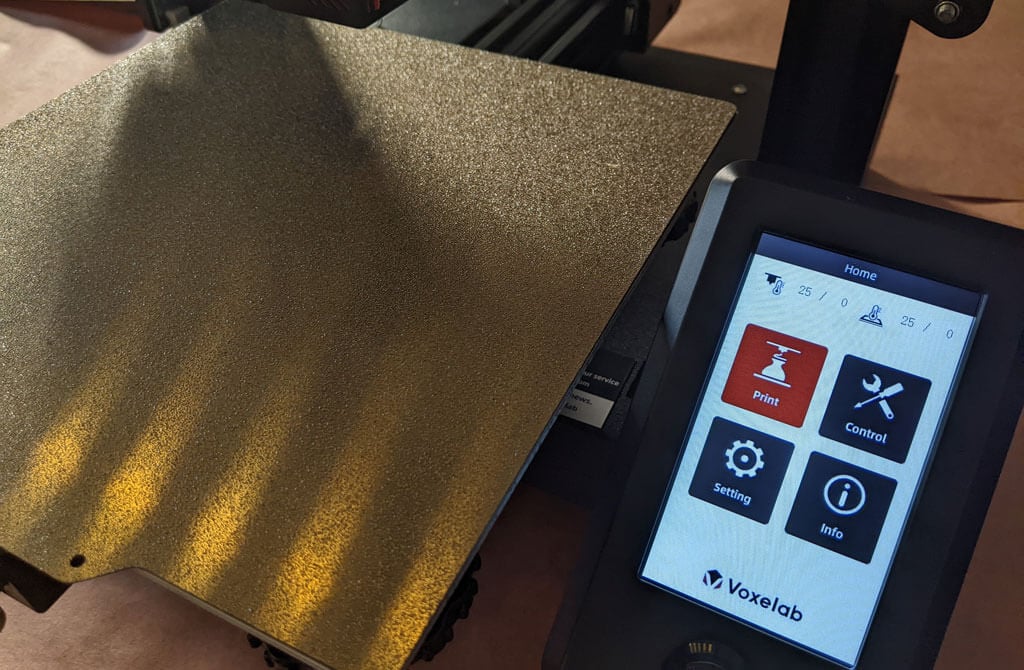
The build volume is a generous 8.7 x 8.7 x 9.4 inches (220mm x 220mm x 240mm), quite similar to the print volume of the Creality Ender 3 V2. Earlier models came with glass beds coated in Carborundum, which is also similar to the Ender. Ours came with a magnetic print bed, which we loved.
We’ll discuss the magnetic bed more below, but suffice it to say, it’s one of the best features of this printer or any printer.
The Aquila is very quiet. The fan is the loudest part. Additionally, it has a hot end with an unusually high temperature for an entry-level printer—up to 300 degrees Celsius, allowing you to use all common filament types.
It has a fantastic LED display, quite like the display on the AnyCubic Vyper. It’s big. It’s clear and colorful. Despite the fact that it’s not a touch-screen, it’s intuitive to use. It has a rotary knob control that you push to make a selection.
A few other observations about the Aquila’s features:
- If you have frequent power outages in your area, you’ll be happy to know that the Aquila can resume printing after a power interruption.
- The Aquila runs a fork of Marlin, probably the most popular open-source 3D printing firmware available.
- You can load files to print via the MicroSD card reader or you can use a serial interface like Pronterface.
- Since most models of the Aquila include the N32 chip, that means you could run OctoPrint and all of the great OctoPrint plug-ins on this printer.
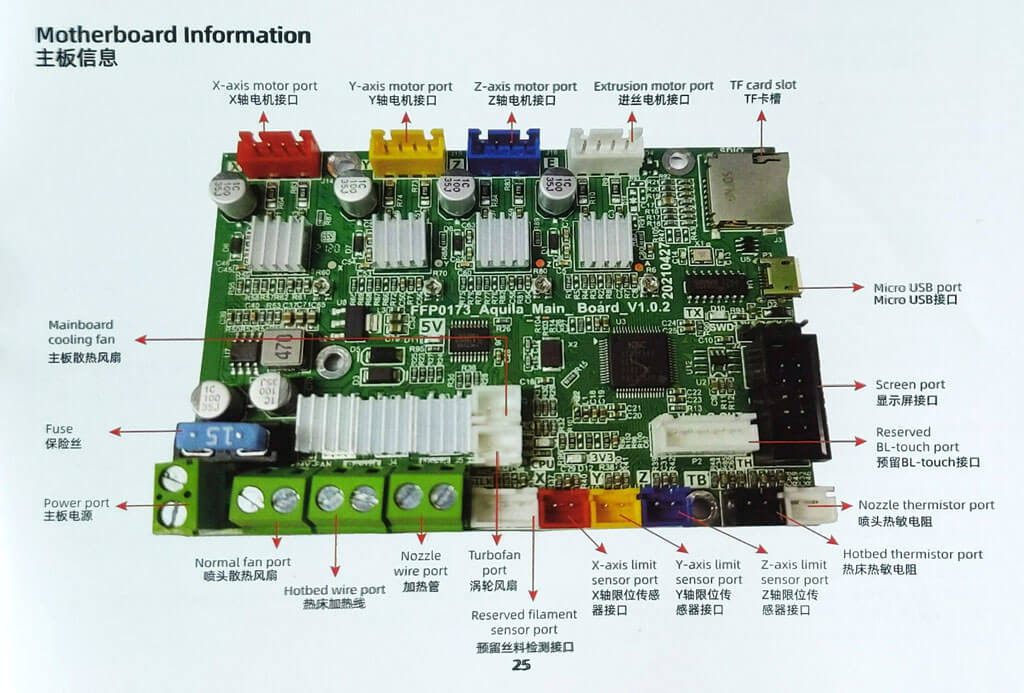
The user manual includes a full schematic of the motherboard, which will come in handy when you inevitably mod your printer.
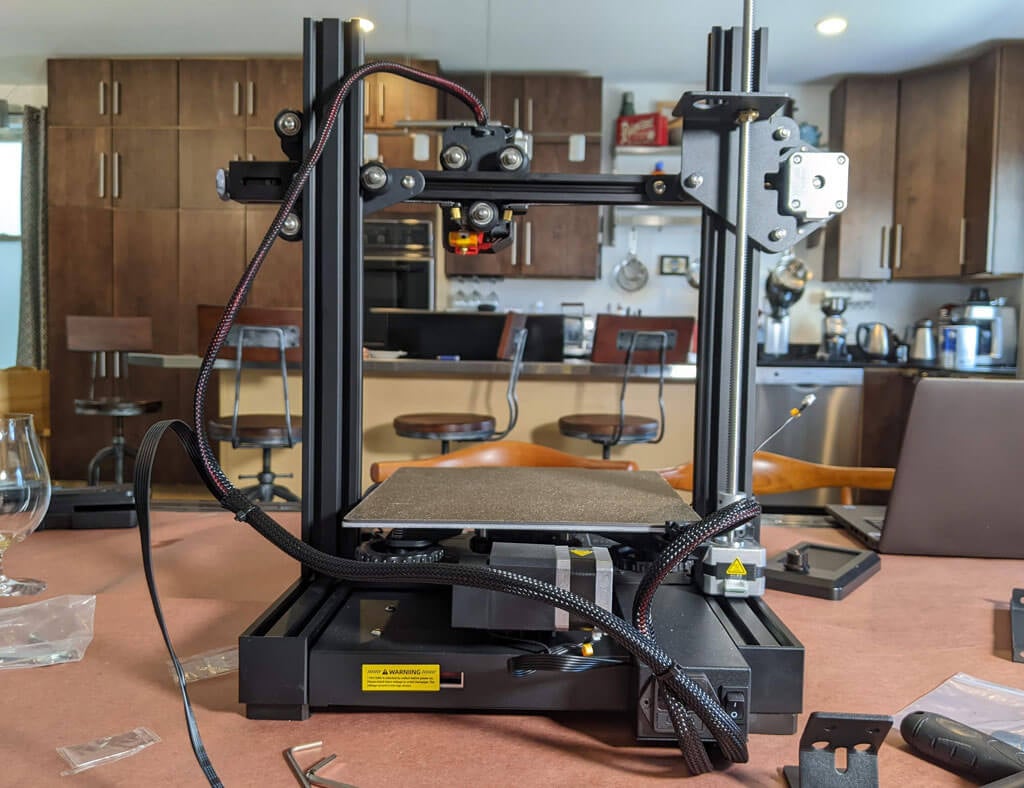
Assembling the Voxelab Aquila S2 3D Printer
If you have any experience with 3D printing, you know to expect a certain amount of frustration when assembling your new printer.
There are a lot of typos and confusing language in the manual. We muddled through, and everything turned out fine.
Beginners will find this printer is easier to build with two people. Also, 3D printers need maintenance. Putting it together yourself will give you the confidence you need to do that maintenance. The included tools are all good quality. You’ll want to keep the particularly good Allen wrenches.
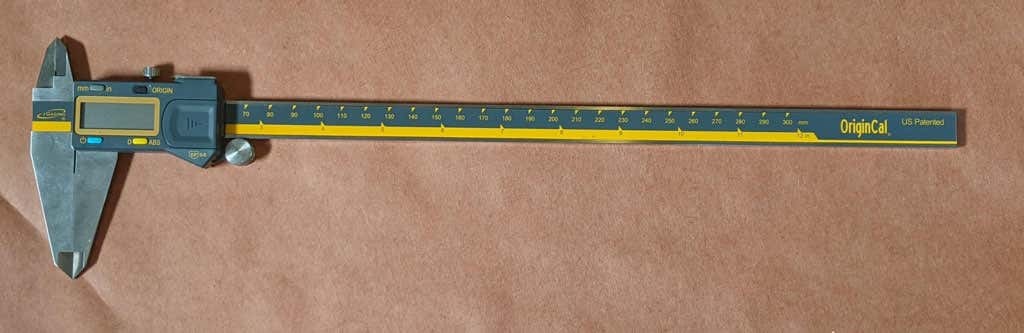
The bolts weren’t labeled, so you might want to use a pair of calipers to figure out which ones are which. It’s not difficult to figure that out, but it would have been nice if they had been labeled.
A beginner might get stuck trying to put this printer together using only the included user manual. It took about an hour to build the printer. They do have a YouTube video that will straighten out any confusion.
Build Quality of the Voxelab Aquila S2
This is a very well put together entry-level printer. It has a direct-drive extruder. It has aluminum extrusions for the x, y, and z axes. The only thing that makes this an entry-level printer vs. a high-end printer is the lack of auto-bed-leveling and the fact that it only has one z-axis screw.
The removable, magnetic PEI bed is something we’d never go without. It’ll save you a lot of grief, time, and scratches.
The belt-tensioners are a great feature that are often lacking in other printers—even some much more expensive printers. Belts need occasional tightening, and it’s nice to be able to do that without disassembling your printer.
The Aquila comes with a spool holder, but that’s the first thing you’ll want to replace and move. You’ll want to take the weight off the top of the printer. It’s a right of passage to print your own spool holder, and one is even included in the sample files that come on the SD card.
Calibration
All printers with manual bed-leveling have a learning curve because the threads are upside-down, so it’s easy to get confused. You could add your own auto-bed-leveling kit to it. That would be a nice project once you get the basics of 3D printing down. To be fair, leveling the bed manually only took about five minutes. If this is your first 3D printer, it might take you a little longer.
Once your bed is level, and you’ve successfully printed the test print, you’ll want to print your own models. Voxelab has a profile you can import into Cura, a free, open-source slicer that can convert STL 3D model files and other formats into instructions your printer understands (gcode). You can use any slicer you want; however, VoxelMaker slicing software is included on the SD card that comes with the printer.
First Print
We recommend starting with the included test model because it’s already calibrated for the printer. It’s on the MicroSD card, and you can access it via the LCD panel. There were no adhesion problems while it was printing, and the print popped off the build plate on its own as it cooled—exactly what you want.
The print speed of the sample file is clearly slower than the printer is capable of, which makes sense for a test print. We did not experience any stringing, and we found the print quality to be impressive given the cost of the printer.
We started printing at a .2mm layer height. The minimum layer thickness is .1mm. If you want higher resolution than that, you may want to consider a resin printer.
Cut to the Chase
This printer is very similar to the Ender 3, and:
- It’s cheaper.
- It has a removable magnetic bed.
- The LCD screen is better.
We recommend the Voxelab Aquila S2 for users who want to save some money and still get some of the features of pricier, high-end printers. We wish it had auto-bed-leveling, but at this price point, we have to say the Aquila S2 exceeded our expectations.
*Special thanks to FormerLurker for help in reviewing the Voxelab Aquila S2 3D printer from Flashforge.
- Tribit StormBox 2: The Under $70 Portable Speaker that Stands Out
- ENGWE L20 2.0 Review: The Best Budget-Friendly Foldable E-Bike?
- TopDon TC004 – a Thermal Imaging Camera That Will Give You Predator Vision
- Newyes Portable Wireless Thermal A4 Printer Review
- Eskute Star Folding Fat Tire Electric Bike Review
3D filament printers can produce anything from holiday ornaments to medical implants, so there’s no shortage of excitement in the process. The problem is getting from your 3D model to the actual print. A lot of things can go wrong and ruin your print, especially if you’re new to this and still figuring out how 3D printing works.
In this article, we’ll show you how to get better results by helping you fix your 3D filament prints gone awry. Check all our troubleshooting tips, apply them step-by-step, and above all, be patient. 3D FDMprinting can be frustrating at times, but it’s rewarding due to its countless real-world applications.
Caucasian man struggling with a modern 3D printer with curls of filament
It’s Not Printing
Is your 3D printer failing to print anything? Don’t worry, this is a common issue. There are quite a few problems that can prevent your printer from extruding any material. Here are the most common issues and how to troubleshoot them.
1. Check the Filament
You’ve prepared the printer and your model but nothing is happening. You might even get some residual filament coming through the nozzle, but your model isn’t being printed.
Your printer has run out of filament. This may sound like an obvious problem, but it’s easy to miss if you don’t have a printer that warns you when you need to add a new spool. Before looking into other possible issues, make sure your 3D printer has plenty of filament to print your model.
2. Check for a Clogged Nozzle
If you’re dealing with a clog, nothing will come out of the printer nozzle. This usually happens when you change the filament or the type of material and there’s some old material stuck in the nozzle. Prevent any blockage altogether by performing regular maintenance and keeping the nozzle clean after every project.
That said, if you forgot to clean the nozzle, you can easily remove a clog with the help of a needle or some other thin object. Stick the needle through the nozzle to remove as much of the remaining filament as possible. You can heat the nozzle while doing this to make your job easier.
Alternatively, you can try to force the new filament through to push through the blockage. This might not work on its own and you’ll have to apply some external pressure to force the old filament out. If you try this method, apply force gently or you might damage your printer.
3. Adjust the Nozzle
If your printer still doesn’t work, the nozzle might be too close to the print surface. When that happens, the filament can’t properly go through the nozzle to form layers. This issue can also lead to missing layers, clogs, or adhesion problems, so make sure to adjust the nozzle height.
Go to the printer’s settings and change the Z-axis value. Increase the parameter to what the printer manufacturer recommends in the manual or make gradual adjustments to the nozzle height until the filament flows normally.
4. Look for Filament Fragmentation
One of the most common 3D printing problems that go unnoticed is filament fragmentation. The filament spool seems fine, but nothing comes out through the hot end. In this case, you might be dealing with fragmentation somewhere between the spool and the nozzle.
This highly depends on the type of material you’re using, whether it’s ABS or PLA, and how old it is. That said, the only solution is to remove the filament to look for any damaged sections. If the material is new but you confirmed that it’s breaking along the way, try a different spool or try reducing the temperature and flow.
5. Is the Print Head Missing the Print Bed?
Did you hear an awful noise while starting to print? The print head might be trying to go off its X- or Y-axis and it’s completely off the print bed. This makes printing impossible and it’s usually caused by a software configuration problem.
Make sure you select the right printer in your slicer software. Each model comes with its own settings parameters included in a configuration file. If you select the wrong model, the print head will be misaligned. That said, you should also update the firmware since outdated configurations can also cause this problem.
The Print Was a Complete Failure
So you managed to get your 3D printer working, but the print turned out to be a complete disaster. This usually happens when the print fails to stick or when the supports don’t work as intended. Whatever the case, here are the most common 3D printing issues.
6. Fixing Terrible Bed Adhesion
One of the most common problems that cause prints to fail is the lack of bed adhesion. The print fails to stick properly to the print bed, so the whole project becomes a waste of time.
First, make sure the print bed is properly leveled and that it’s clean. Any material that doesn’t belong on the print surface can prevent the filament from sticking. Afterward, try using supports or a brim. Go into your slicer’s settings and print using those additional elements.
7. Did the Supports Fail and Ruin Your Print?
As mentioned, using supports can help with print bed adhesion, but they’re also a must-have when printing complex models. Without supports, your print can be affected by other issues like warping edges and layer shifting. Also, using the wrong support type or not having enough supports can ruin your project.
Fortunately, your slicer software should automatically generate the supports you need. Then you add more supports manually if you think your print might be ruined by overhangs, warping, and other issues. That said, you’ll have to experiment with supports depending on your project. There’s no way around this.
8. Extrusion Gone Bad
Sometimes when you think you’ve figured everything out, your printer’s hot end stops extruding filament halfway through the printing process. This will definitely ruin your whole project, but it’s easily preventable.
Make sure you have plenty of filament. Slicing software like Cura should give you a rough estimate of how much filament you’re going to need for your project. Just don’t forget that material types also make a difference when it comes to the estimate, so PLA requirements might not be the same as ABS requirements. Check the roll before you get started.
Afterward, check if your printer’s nozzle is clogged. This can also stop the extrusion suddenly while printing. In that case, refer to our above solutions for clogged nozzles.
Your Print Looks Bad
Despite your best efforts, something went wrong and your print doesn’t look as nice and smooth as it should. A lot of things will influence the 3D printing process and lead to warping, stringing, messy layers, random blobs, oozing, bad infill, and ugly side effects that will ruin your project. Here’s what you can do.
9. Fix Warping

One of the most common problems in 3D printing with filament like PLA and ABS is warping. Your model warps its base upwards and it detaches itself from the print bed. This can also result in cracks, further rendering your print unusable. Fortunately, there are several possible fixes:
- Heat the print platform . By bringing the temperature of the print bed close to the melting point of the material, you can force the first layers to remain perfectly flat. Adjust the temperature through the slicing software based on the manufacturer’s recommendations.
- Recalibrate . Go through the calibration process and level the printing bed. You should also adjust the nozzle’s height and make sure it’s not too close or too far from the platform.
- Use rafts . If there’s an adhesion or contact problem, try adding rafts through your slicer software.
10. Get the First Layer Right
If something goes wrong with the first layer, chances are you’ll have an ugly print. Before you start printing, make sure the print bed is correctly leveled. An unlevel bed is a cause for most failed prints. Afterward, adjust the height of the nozzle and the flow rate.
11. Prevent Cracking
There’s nothing uglier and more useless than a cracked print. If the melted plastic cools off too fast, you’ll probably get some cracks, especially in the top layers. Going from such a high temperature to a low one will make the material contract and that results in cracks. This is usually a problem with large models.
There are two things you can try:
Adjust the temperature of the extruder . Increase it in small increments while not going beyond the filament manufacturer’s recommended values.
Adjust the fan speed . If the cooling fan is blowing too hard on your model, it might be cooling it too quickly. Tweak it in increments until you find the sweet spot. Keep in mind you still need a high enough fan speed to prevent warping and other deformations.
12.Prevent Stringing
Also known as oozing, stringing is one of the most common issues that ruin 3D FDM prints. Thin bits of stringy plastic form on the model when the extruder moves from one point to another.
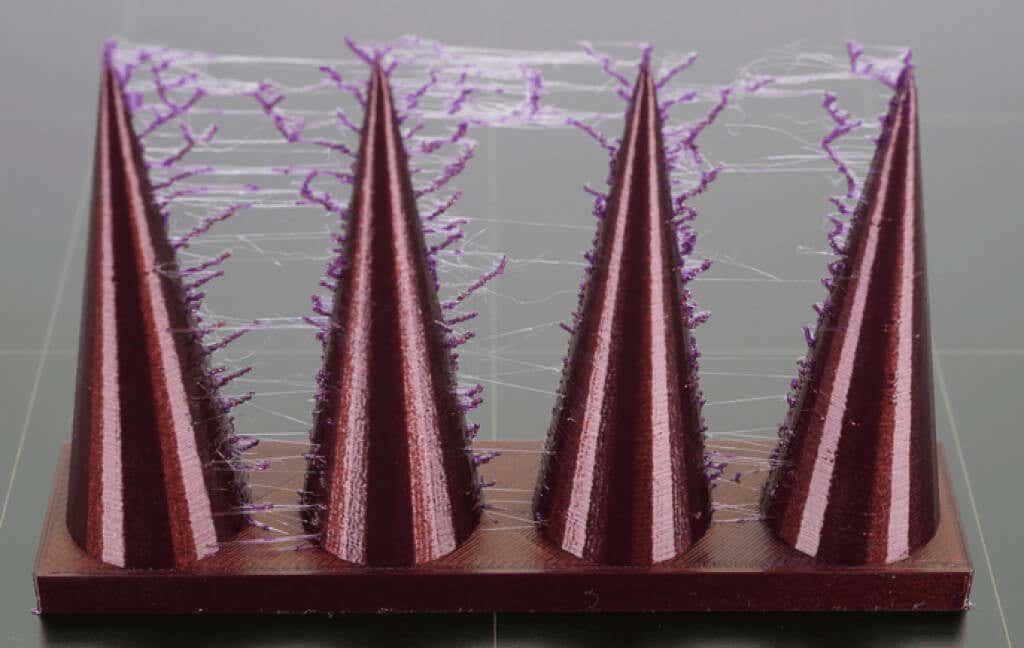
There are several factors you need to check to fix this:
Is the temperature too high? An overheating extruder will make the filament ooze out too quickly. Lower the temperature by a few degrees so it doesn’t leak out so fast.
Increase the movement speed . If the printer doesn’t move fast enough on its X or Y-axis, the extruder can leave thin strings of plastic behind. Go into your slicing software’s settings and adjust the movement speed settings.
Adjust the retraction speed setting . A slow retraction speed will cause the filament to ooze through the nozzle before the extruder can reach its new position. This will spread the plastic from point A to point B like a spider web. Try your slicer’s software pre-configurations and keep in mind the filament material when choosing.
3D Printing Can Be Challenging
Creating a 3D model is highly satisfying, but a lot of things can go wrong and it’s impossible to cover everything in one article. There are many variables to keep in mind when you use an FDM printer, so don’t panic if your 3D print doesn’t turn out as well as you’d hoped. Make sure your printer is properly calibrated and that you’re using high-quality filament. Once that’s out of the way, go through each troubleshooting step.
If nothing helps, give us more details about your 3D printing issues in the comment section below and we’ll do our best to help you out.
- How to Fix Slow Wi-Fi on Your Smartphone
- 7 Best Machine Translation Software (or AI) to Try in 2025
- What Does the Green Dot Mean on Facebook?
- How to Turn off Hardware Acceleration in Chrome
- How to Check VRAM in Windows 10, 11, and macOS?
ÿØÿà JFIF ÿÛ C ÿÛ C ÿ l ÿÄ ÿÄ ÿÚ è±œ£!¨€¤ñ“¥8è!üÚ6é4{oš|áºòœôVéÎö¶_H<
