If you have tried to print a document in Windows 10, you know that it won’t print unless the printer is online. Usually, this just involves turning on your printer and waiting a few seconds for the status to change from offline to online.
Unfortunately, this doesn’t happen all the time. Instead, the printer will remain in offline status even though your printer is on and connected to your computer or to the network. There are quite a few reasons why Windows may not detect that the printer is online and I’ll do my best to cover as many solutions as possible.
Step 1: Power Cycle Devices
The first thing to do before you get deep into settings and tools is to simply try power cycling your printer and computer. A lot of times that fixes the problem. Turn off your printer and turn off your computer. Then power on your printer and wait until it is connected to the network. If you’re using a USB cable, just wait till the printer is finished starting up.

Now turn on your computer and see if the printer is still showing up offline or not. Make sure the printer is fully turned off and not just in power saving mode. If you’re not sure, the best thing to do is to unplug the printer completely for about 30 seconds.
Step 2: Use Printer Software
If your printer is still showing offline, then you can try to use the printer software that came with your printer. These printer utilities can usually detect the printer on the network and fix any issues that are causing the printer to appear offline.
This pretty much applies to all printer manufacturers. If you have a Dell printer , go to the Dell drivers and downloads page, search for your printer and then download the printer application.
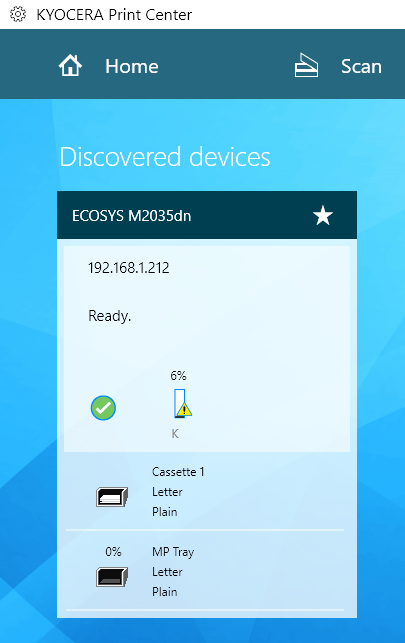
Above is an example of Kyocera Print Center software running on my Windows 10 machine. It will show you the status of the printer and give you additional details like ink levels, etc. If you’re not sure whether or not printer software is installed on your machine, you can check by going to Settings , then clicking on Devices and finally clicking on Printers & Scanners .
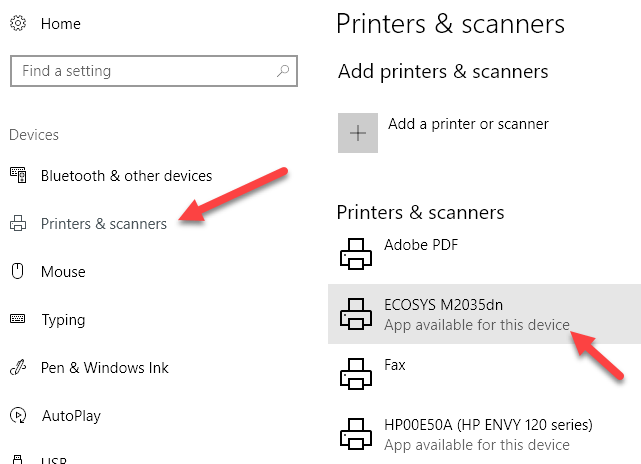
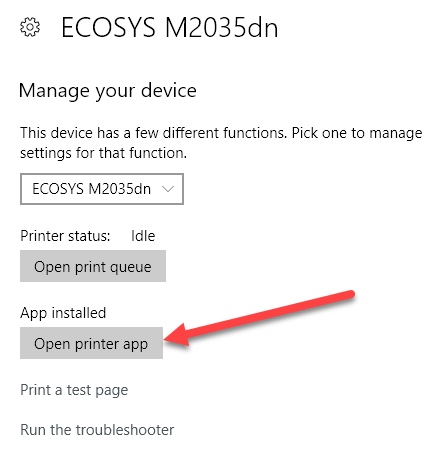
Windows 10 will list out the printers on the right-hand side and if there is a software package installed to manage the printer, it will say App available for this device . If you click on the printer, then click on Manage , you’ll see an Open printer app button.
In my case, I didn’t even know I had the software already installed on my system, so this was helpful.
Step 3: Set Printer Online
Sometimes, even though the printer is online and connected, the settings are incorrectly configured. Open the printer queue by going to Devices and Printers in Control Panel and double-clicking on the printer.
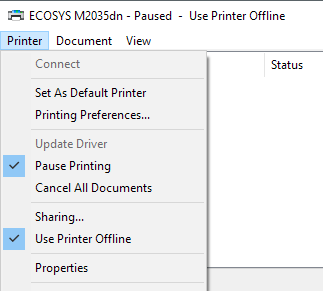
Here you want to click on Printer in the menu bar and then make sure to uncheck Pause Printing and Use Printer Offline .
Step 4: Run the Troubleshooter
If the problem is with the Windows printing subsystem, then running the troubleshooter might help. You can run the troubleshooter by following the steps in Step 2 to get to the Manage your device screen for the printer. Once there, you’ll see the Run the troubleshooter link. Click on that and it will check the spooler service, the network settings, etc.
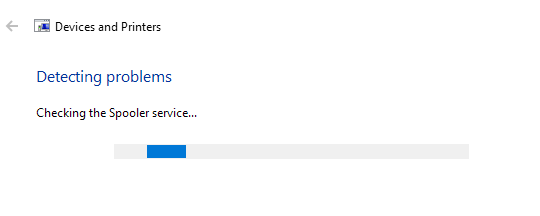
The troubleshooter usually works if the problem is related to Windows.
Step 5: Check Printer Port
If nothing has worked till now, the problem is probably related to the port configuration. This will most likely only apply to a networked printer, which has an IP address. The most likely cause is that the IP address of the printer has changed, but the port configuration still points to the old IP address.
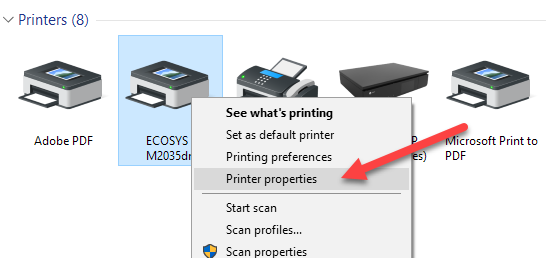
Once you have the IP address, go to Control Panel, Devices and Printers and right-click on the printer. Make sure to select Printer Properties , not Properties at the bottom.
Click on the Ports tab and then scroll down the list until you see the one port that is checked. Select it and then click on Configure Port .
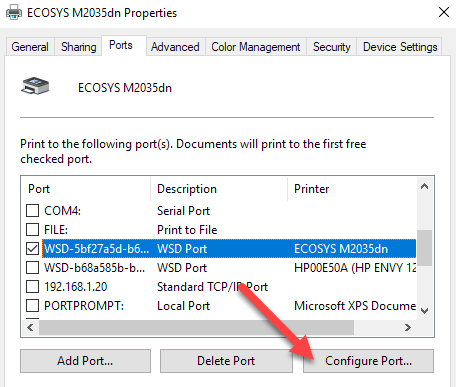
This dialog will tell you the current IP address that it thinks the printer has. If the IP address of the printer is different than the one listed here, then that’s your problem. Simply update the IP address here and you should be good to go.
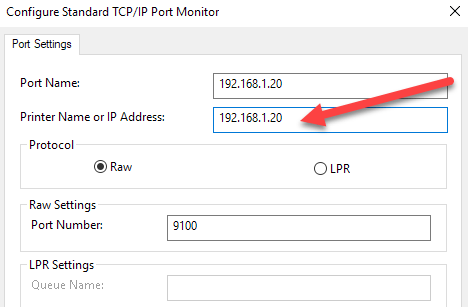
If you get any kind of error, like the one shown below, when trying to configure the port, then it’s probably because it’s configured as a WSD port.
An error occurred during port configuration. This operating is not supported.
The other less technical option is to follow Step 6, which is to delete the printer and then re-add it, thereby automatically using the new IP address.
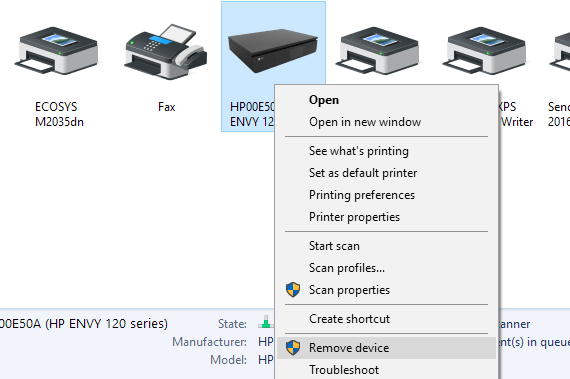
Step 6: Remove and Re-Add Printer
If you can’t get the printer working yet, then your best option might be to remove it and then re-install it. When Windows installs a printer, it will detect it, check all the settings, and make sure the driver for the printer is installed properly.
You can remove the printer by going to Control Panel, Devices and Printers, right-clicking on the printer and choosing Remove Device .
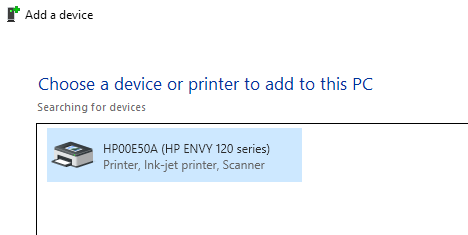
It’s also a good idea to restart the computer once before you reinstall the printer. Note that this will not remove the driver for the printer from your system. If there is some issue with the driver, follow Step 7.
Once you have restarted, click Add Printer and Windows should automatically detect the printer connected locally on connected to your network.
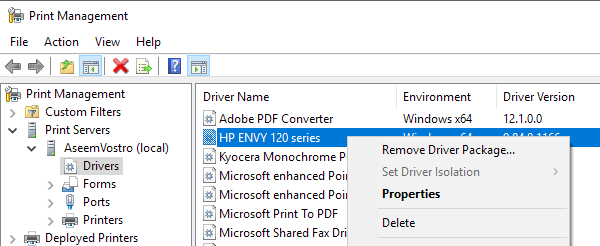
Step 7 – Reinstall Printer Driver
Sometimes the issue can be associated with the current print driver. If this is the case, you should download the latest driver for your printer from the manufacturer’s website. However, before you do that, it’s a good idea to remove the current print driver.
Read my guide on how to remove a printer driver from Windows . Note that the article still applies to Windows 10.
Hopefully, you’ve been able to print by now. If not, I recommend reading my other general guide to troubleshooting printers . In addition to everything above, it’s always a good idea to install the latest Windows updates as those usually contain newer print drivers, which could make your printer work better with Windows 10. If you have any questions, post a comment. Enjoy!
- Preparing for Windows 10 End of Support: Upgrading to Windows 11
- How to Fix a “This file does not have an app associated with it” Error on Windows
- How to Fix an Update Error 0x800705b4 on Windows
- How to Resolve “A JavaScript error occured in the main process” Error on Windows
- How to Fix the Network Discovery Is Turned Off Error on Windows
Founder of Help Desk Geek and managing editor. He began blogging in 2007 and quit his job in 2010 to blog full-time. He has over 15 years of industry experience in IT and holds several technical certifications. Read Aseem’s Full Bio
I’m a huge fan of HP printers and I think overall they are the best printers for businesses as well as consumers. However, they come bundled with the worst possible software that not only bloats and slows down your system, but doesn’t really help all that much in connecting your computer to your printer, which is the main goal of any printer.
Nowadays, a lot of printers are wireless or at least network-capable, meaning you can plug in a network cable and print without actually having to connect the printer to your computer via USB. It’s absolutely ridiculous if you buy a new printer today and it forces you to connect it to your computer for setup.
Unfortunately, setting up a network or wireless printer is far more complicated just because you now have to deal with all kinds of equipment in between the two devices. Even if you can print to your wireless printer today, you may not be able to a month from now if the IP address accidentality changes or if someone turns on a security feature on your router that prevents communication between devices on the network. There are literally hundreds of things that can go wrong.
In fact, I’ve previously written about troubleshooting WiFi printers and gave six possible solutions for fixing most WiFi printing issues. However, there are some issues that are just manufacturer-specific and at that point, it’s a good idea to simply use the diagnostic tools they have provided.
HP Print and Scan Doctor is a free software utility that helps you quickly address most printing and scanning issues with HP printers. This utility works on everything from Windows XP to Windows 10. Unfortunately, there is no Mac version of this utility yet.
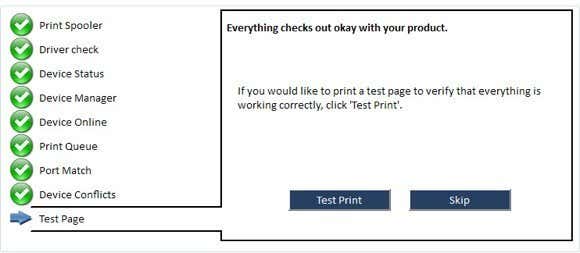
The program checks a bunch of stuff and actually replaces four separate utilities that HP used to have for diagnosing problems with printers. Here’s a quick list of items checked:
Connectivity – If connected via USB, it makes sure the printer is connected properly and if connected via the network, it makes sure your computer is actually connected to the network.
Device Status – Checks to make sure there are no printer errors like out of ink, paper jams, feed issues, etc.
Driver Check – Makes sure the driver is not corrupt or missing.
Device Manager – Checks for issues in Device Manager that could be causing issues.
Print Queue – Clears the print queue if there are stuck jobs.
Port Match/Device Conflicts – Checks the port settings for the printer and makes sure there are no device conflicts with the printer like other drivers or printer brands.
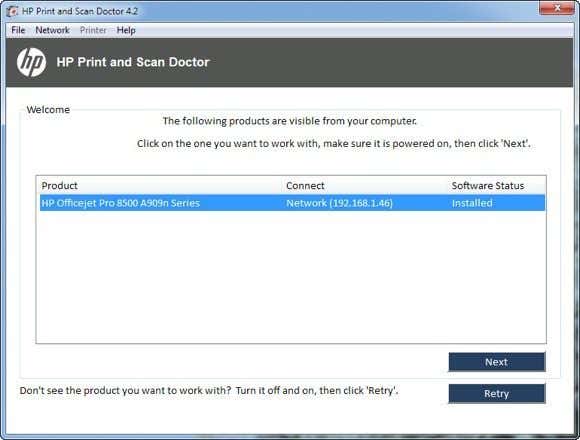
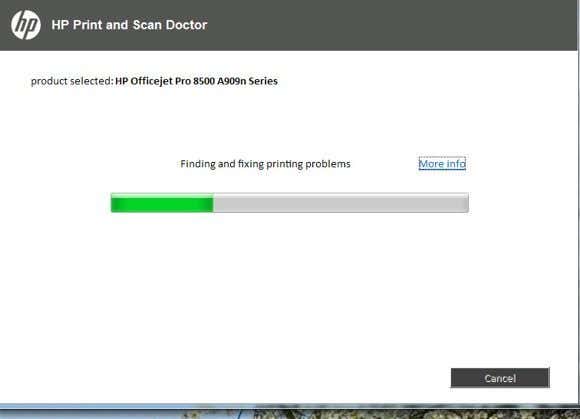
When you start the program up, it will go ahead and perform a search for any HP printer connected via USB, ethernet or wirelessly. Once it shows up, you can then click Next and continue to screen where you can diagnose problems with the printer.
Now what if you’re having issues even getting the printer to show up properly? In that case, the program won’t be able to find your printer and you’ll see this screen:
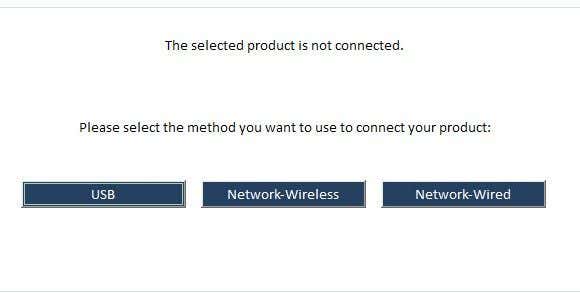
Depending on how you want to connect the printer, the program will give you tips for getting the printer connected. Unfortunately, until you get the printer online at least, the program can’t help you very much. If you have a wireless or network printer and have no idea why it’s not getting an IP address, then connect it to the computer using a USB cable first.
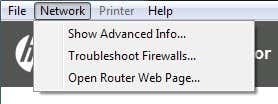
The program also has a menu option called Network where you can see advanced info about your network and you can disable the firewall ( Troubleshoot Firewalls ). That seems to be a major cause of communication errors, so they have that option built right into the program.
Now once your printer shows up in the list like in the first screenshot, go ahead and click Next . Here it’ll detect whether your printer is the default printer or not and give you the option to make it default by clicking a button.
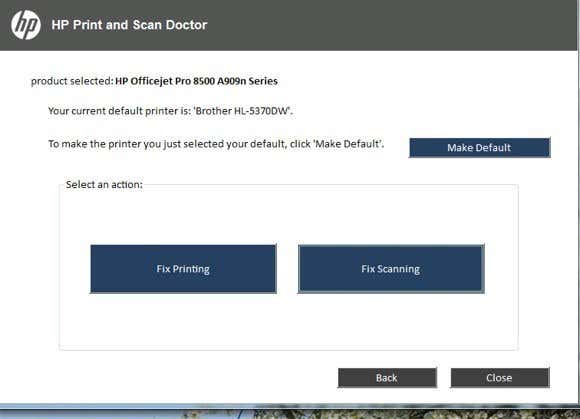
Now to diagnose and fix any problems, click on Fix Printing or Fix Scanning . If you have an HP All-in-One printer that can print and scan, then you can pick exactly which issue is causing problems.
The program will go ahead and start analyzing the printer and your system to see what issues are preventing the printer from printing or scanning. If it finds problems, it will list them out and help you resolve them. If everything is ok, you should see a bunch of green check marks and the option to print a test page.
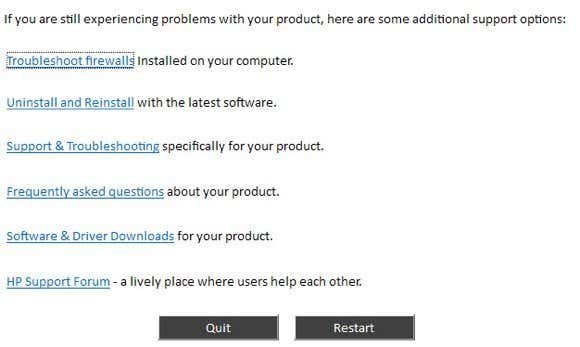
Lastly, the program has some last resort options if the printing issues have not been resolved. You can troubleshoot the firewall, uninstall and reinstall the printing software and get support information for your specific product.
Overall, it’s an excellent tool and makes me wish HP created driver packages for their printers like they created this tool: simple, sleek with no extra fluff. If you’re having issues printing with your HP printer, make sure to download and run the Print and Scan Doctor. Have any questions? Post a comment. Enjoy!
- Google One Explained: Is It Worth Subscribing To?
- What Is Stremio? A Faster Media Center for Your PC
- Stack Browser Review: How It Makes You More Efficient
- O&O ShutUp10 Review – Stop Microsoft From Spying on You
- NetSpot App Review – Professional WiFi Analyzer, Tester, and Troubleshooter
Founder of Help Desk Geek and managing editor. He began blogging in 2007 and quit his job in 2010 to blog full-time. He has over 15 years of industry experience in IT and holds several technical certifications. Read Aseem’s Full Bio
‰PNG IHDR • ƒ åâg PLTE&hæ÷ÿÆæúéúÿèùÿçøÿèøÿéùÿ ?RÿÿÿRÖýÇçû<
Times change and so does Windows. If you’ve recently moved from a Windows Server 2012 and Windows 7 or 8 environments into Windows Server 2019 and Windows 10 , things are a little different.
The old ways to connect to a network printer are still there. They may look a little different, too. So we’ll show you how to connect to a network printer in Windows 10 or Server 2019. Our favorite way is the last method.
Use Add Printers & Scanners
The new Windows Settings world works the same as in the Control Panel , but it looks different enough to cause confusion for some. Note that if this is at work and you’re not an administrator, the printer must be on the network and the driver already installed. If it’s not installed, you’ll get a prompt to enter the administrator account name and password.
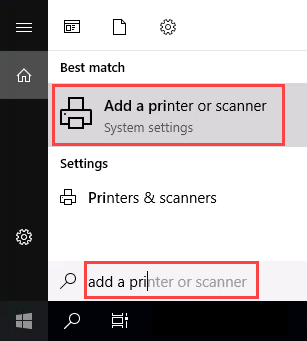
- In the Start menu, type add printers . When the result Add a printer or scanner shows, select it.
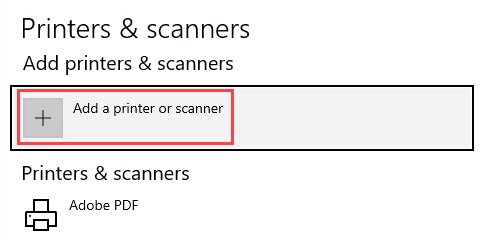
- When the Printers & scanners window opens, select Add a printer or scanner . It will start searching for available printers.
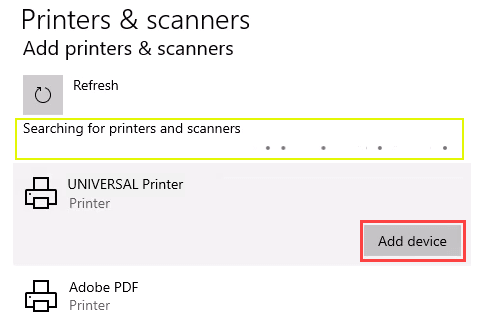
- It may look like it’s still searching, even though all the printers available are showing. Find the printer needed, select it, and then the Add device button will show. Select it.
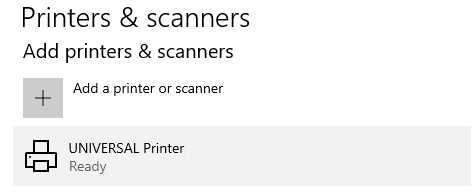
- The printer will install. There’ll be a progress bar and when it’s done, it’ll say Ready .
Connect to a Network Printer Through a Network Share
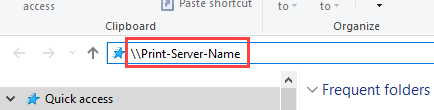
Here’s a way to install a printer that’s different from what you may be used to. It requires that the printer is shared and on the network. Unless you’re the administrator, the driver needs to be installed on your local machine or server. You need to know the path to the share as well. It will look something like Print-Server-Name , where Print-Server-name is the name of the server.
- Open File Explorer . In the location bar, enter the printer share path and then press the enter key. File Explorer will find the share.
All the shared printers will show.
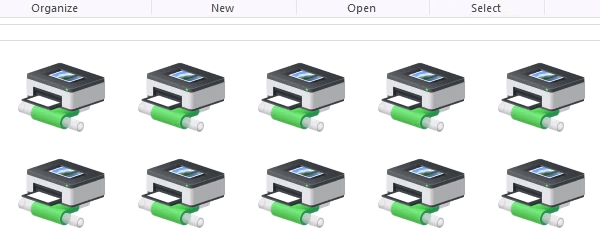
- There are two options: Install a single printer Install several printers at one time
To install a single printer, double-click on it.
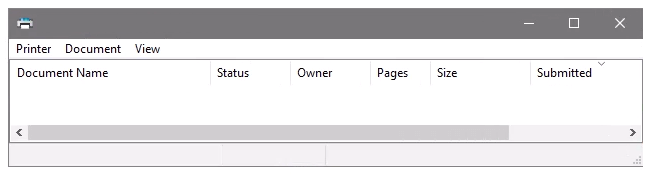
When the installation finishes, you’ll see the newly installed printer’s print queue window.
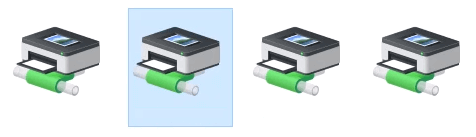
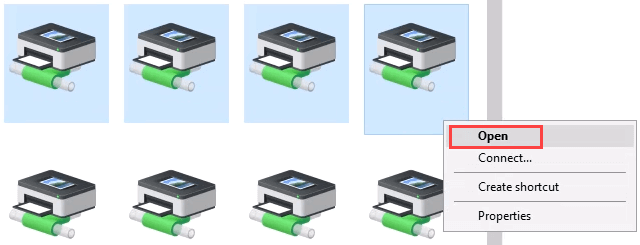
- To install several printers at once, select printers by clicking and dragging a rectangle around them, or hold down the Ctrl key while selecting printers individually. Either right-click and select Open or simply press the Enter key.
Connect to Network Printer via Control Panel
The good old control panel is still there. If you’ve used it before, you know what to do. If not, it’s almost the same as adding a printer through Settings.
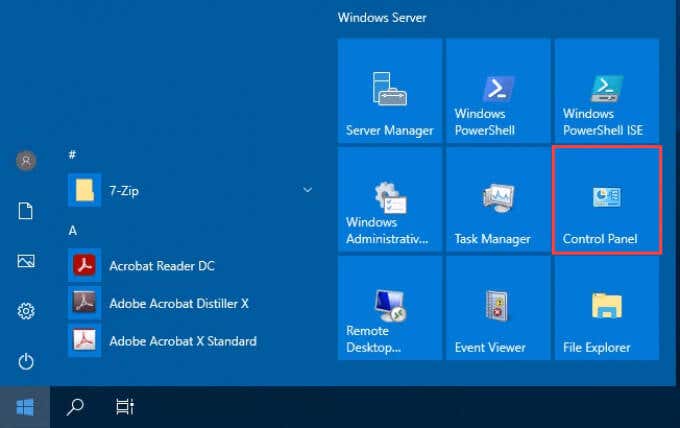
- Open the Start menu and select Control Panel . If it’s not there, start typing control and it will show.
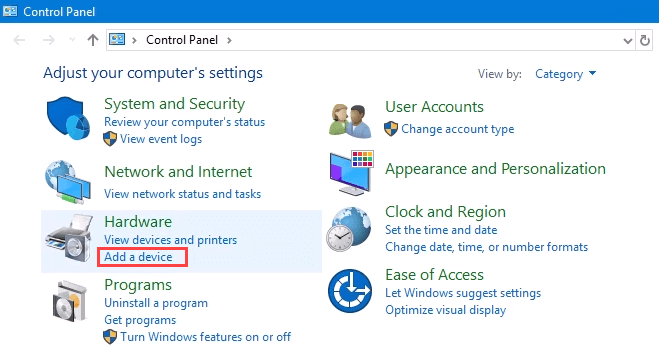
- Select Add a device in the Hardware category.
- Select Add a printer .
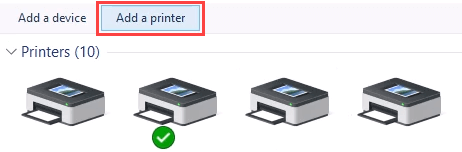
- It will show a selection of printers. Select the one needed and then select Next .
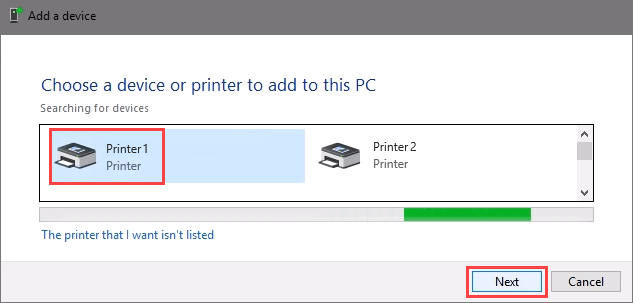
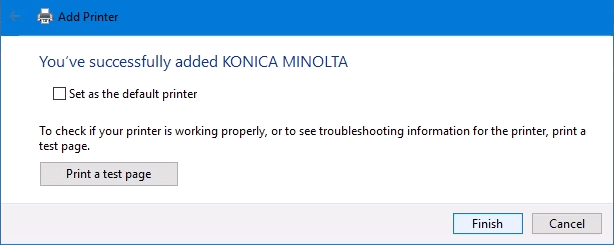
The printer will start installing. It may take a few seconds or minutes.

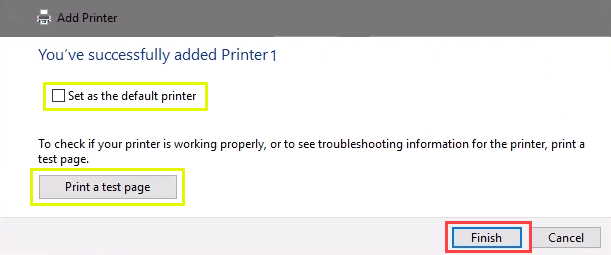
- Once the success window opens, there are options to Set as the default printer and Print a test page . Set the printer as default if needed. It’s always a good idea to print a test page. To exit, select Finish .
Connect to Network Printer via IP Address
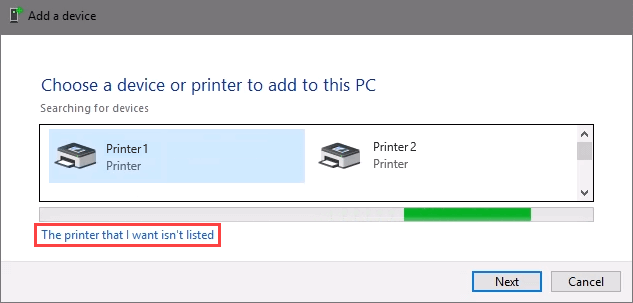
The printer you want to install might not be easily visible, but if you have the IP address for it you can use that to connect with the printer. Administrator rights may be required. The first part is the same as adding a printer through the Control Panel until you get to the step to choose the printer. Let’s pick it up from there.
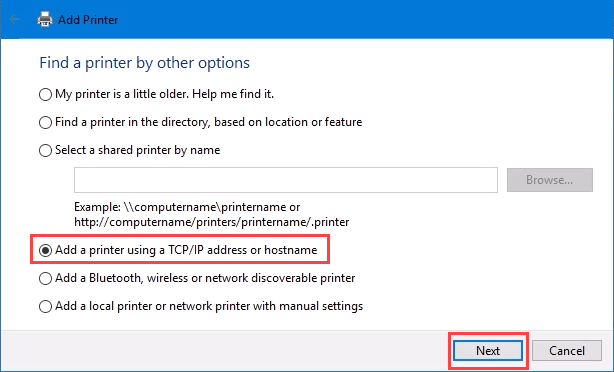
- At the Add a device window, select The printer that I want isn’t listed .
- If administrator rights are required, select Add a local or network printer as an administrator .
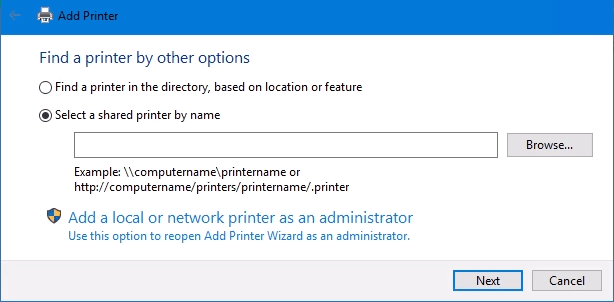
Otherwise, the window below will show. Select Add a printer using TCP/IP address or hostname then select Next .
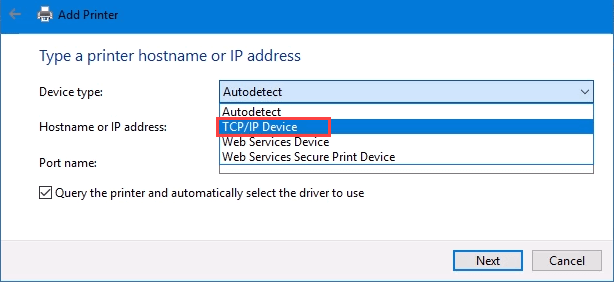
- For Device type: there are several choices. Web Services Device and Web Services Secure Print Device are used for special cases. If you don’t know what those mean, you probably don’t need them. Autodetect may make the wrong choice as well. Select TCP/IP Device .
Enter the IP address in the Hostname or IP address: field. Notice how the Port name: field auto-populates with whatever is entered. The port name can be left as is or changed. In most cases, Query the printer and automatically select the driver to use remains checked.
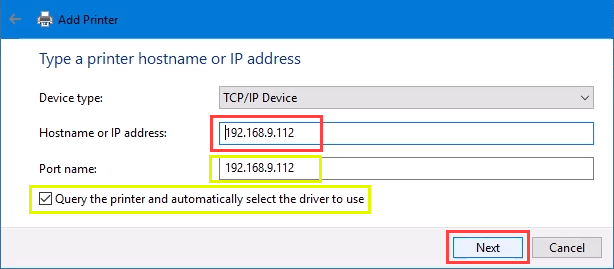
Sometimes an organization will use a universal printer driver to keep things simpler and use less storage. It also keeps the registry small and login times faster. The HP Universal Print Driver works well for HP and many other printers. Select Next .
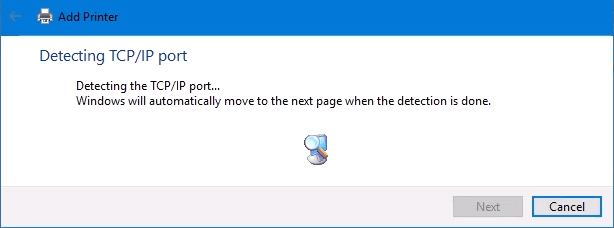
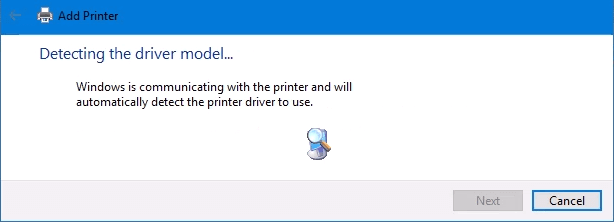
It detects the TCP/IP port to see if it exists.
Then it detects the driver model needed.
- Normally, Windows will find a driver already installed, offer the option to replace the driver, or ask to install a driver. If it’s on the network already, it probably installed the driver already. Select Use the driver that is currently installed and select Next .

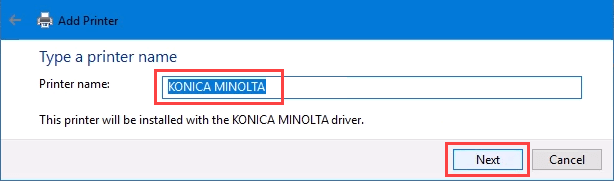
- It will auto-select a name for the printer. That can change as needed. Select Next .
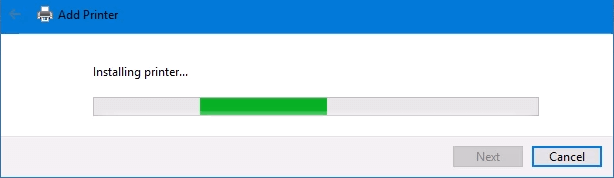
The real installation begins.
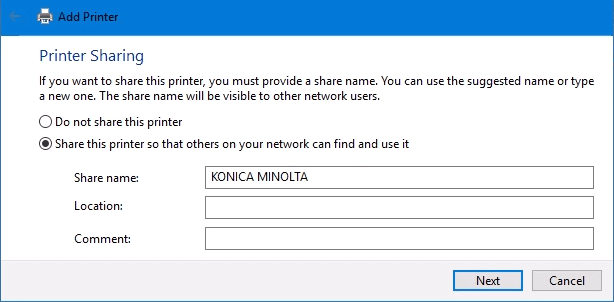
- If sharing the printer, add a location so others can see where the printer is located.
It successfully installed the printer. Set it as the default or not as needed. As always, it’s a good idea to Print a test page . Select Finish closes out the window.
Connect to a Network Printer via PowerShell
Finally, the last, and possibly best, way to connect network printers is with PowerShell . Why is this best? If you’re a System Administrator and have dozens of printers to connect, or if you need to make sure the printer is connected every time the server starts or someone logs in, a PowerShell script is best. It’s fast, done once, and easy to call many times.
You will need to know:
- Printer IP address
- Printer driver name
- What to name the printer
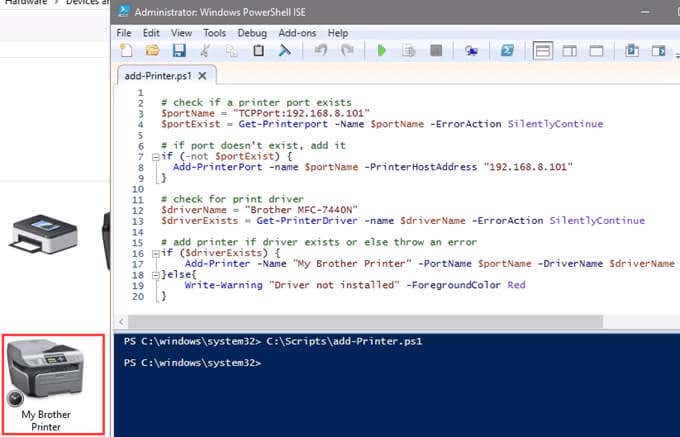
Following is a sample script. Make it into a looping script to install several printers at a time, or make it a function to call from other processes.
check if a printer port exists
$portName = “TCPPort:192.168.8.101”
$portExist = Get-Printerport -Name $portName -ErrorAction SilentlyContinue
if port doesn’t exist, add it
if (-not $portExists) { Add-PrinterPort -name $portName -PrinterHostAddress “192.168.8.101” }
check for print driver
$driverName = “Brother MFC-7440N”
$driverExists = Get-PrinterDriver -name $driverName -ErrorAction SilentlyContinue
add printer if driver exists or else throw an error
if ($driverExists) { Add-Printer -Name “My Brother Printer” -PortName $portName -DriverName $driverName } else { Write-Warning “Driver not installed” -ForegroundColor Red }
When the script is run, it takes maybe 3 seconds. Then you’ll see the printer installed.
Any Other Ways to Connect to a Network Printer?
We’ve given you several ways to connect to a network printer or several printers. One of them will be the best way for you. There is at least one other way, and that’s by the Command Prompt.
- Preparing for Windows 10 End of Support: Upgrading to Windows 11
- How to Fix a “This file does not have an app associated with it” Error on Windows
- How to Fix an Update Error 0x800705b4 on Windows
- How to Resolve “A JavaScript error occured in the main process” Error on Windows
- How to Fix the Network Discovery Is Turned Off Error on Windows
Guy has been published online and in print newspapers, nominated for writing awards, and cited in scholarly papers due to his ability to speak tech to anyone, but still prefers analog watches. Read Guy’s Full Bio
