The iPhone is an incredibly versatile device. Aside from keeping you connected, it also lets you browse the internet, listen to music, play video games, shoot photos and videos … the list goes on and on. If you just got an iPhone, you’re in for quite a ride. You must, however, come to grips with “gestures” first. But what are gestures on iPhone?
Gestures are various finger-based actions that you can perform on the iPhone’s touch-screen. They help you interact with iOS (the operating system that powers the iPhone) and the apps that run on it. Essentially, anything that you do on your iPhone can be done with a gesture.

Below, you will find all standard gestures for the iPhone, and how and when you should use them.
Tap
A tap is the most basic (and most-used) of all gestures on the iPhone.
Whenever you want to select or activate an item you see on-screen, just tap it with your finger.
Whether it’s opening an app from the iPhone’s Home screen or selecting letters on the onscreen keyboard, a tap is all it takes.
Swipe
A swipe involves a brief drag and release of your finger over the iPhone’s screen. It’s a gesture mostly used for navigation, and just like the tap, you’ll use it a lot.
For example, swiping to the left or the right of the Home screen allows you to move between pages. The same applies when flicking through a photo album or an ebook. Additionally, swiping up or down lets you scroll within apps and websites.

The swipe gesture also helps you trigger various actions and features in iOS, mainly on iPhones with Face ID . They consist of the following:
Swipe up from the bottom to get to the Home screen while using any app.
Swipe from the lower-left to the center of the screen to bring up the App Switcher.
Swipe to the left or right at the bottom to move among open apps.
Swipe down from the top-right corner of the screen to open the Control Center .
Swipe down at the bottom to trigger Reachability mode.
Swipe down the front top-center of the screen to open the Notification Center.
Tap & Hold
A tap and hold gesture (which requires pressing and holding your finger) can reveal various useful options depending on where you perform it. You may also see it referred to as the long tap or the long press. In some instances, the gesture provides haptic feedback from the iPhone’s Taptic Engine.
Tapping and holding the Camera app icon on the Home screen, for example, brings up a nifty shortcut menu that deep-links to the Portrait and Video modes. When performed on a hyperlink in Safari, the same gesture opens a preview window of the site that it points at.

There are numerous other instances of tap and hold, a few of which are as follows:
- Tap and hold a vacant area within the Home screen to enter “jiggle” mode.
- Tap and hold keys within the onscreen keyboard to reveal alternative characters.
- Tap and hold files and folders within the Files app to reveal contextual menu actions such as Copy, Move, and Rename.
- Tap and hold on text within apps and webpages to bring up highlight selection handles.
- Tap and hold messages in the Mail app to preview them.
Drag
As the name implies, a drag gesture helps you move stuff around. It involves pressing and holding an item and then dragging it to another position. For example, you can use this gesture to rearrange Home screen icons , stack widgets, organize files and folders within the Files app, reorder lists in apps such as Notes and Reminders, and so on.

Pinch
The pinch gesture allows you to zoom into and out of items such as photos and web pages. With a couple of fingers held slightly together, simply push them apart to zoom in or together to zoom out.
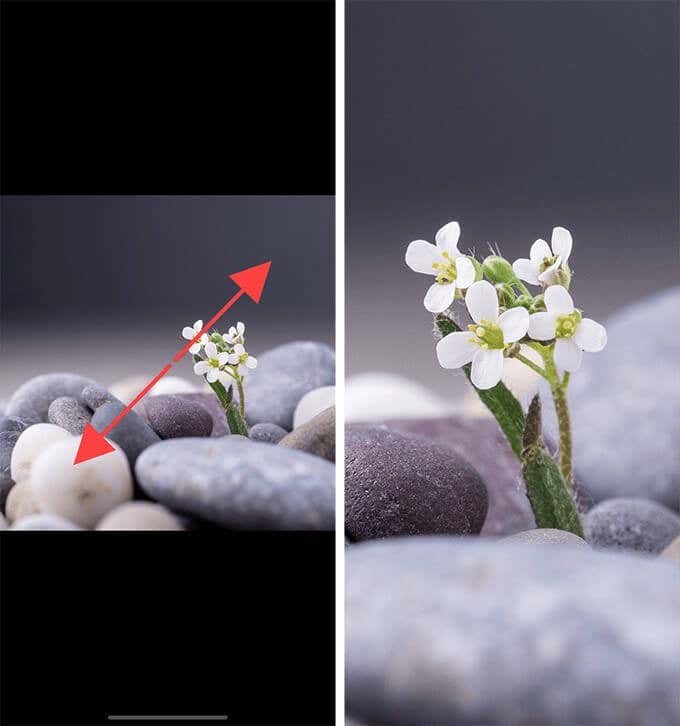
Depending on the image or webpage, you can repeat the gesture multiple times.
Double-Tap
A double-tap, which involves tapping twice in quick succession, is another gesture that allows you to zoom in and out. While it’s faster compared to the pinch gesture, it’s mostly limited to images. Also, pinching offers more zoom control compared to double-tapping.
If you use an iPhone with Touch ID, you can use the double-tap gesture on the Home button to trigger Reachability mode.
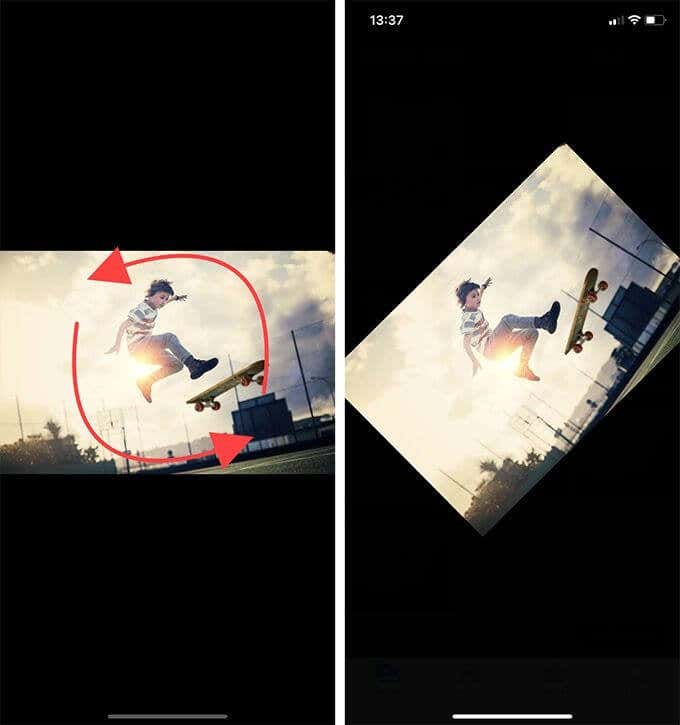
Rotate
The iPhone also has a gesture reserved for rotating items such as images. It requires placing a couple of fingers apart on the screen and then rotating clockwise or counterclockwise in the direction you want to rotate.
Three-finger Pinch
The three-finger pinch allows you to copy highlighted text to the clipboard . The gesture is a tad tricky to nail down at first, but it merely involves placing three fingers apart and moving them together simultaneously.
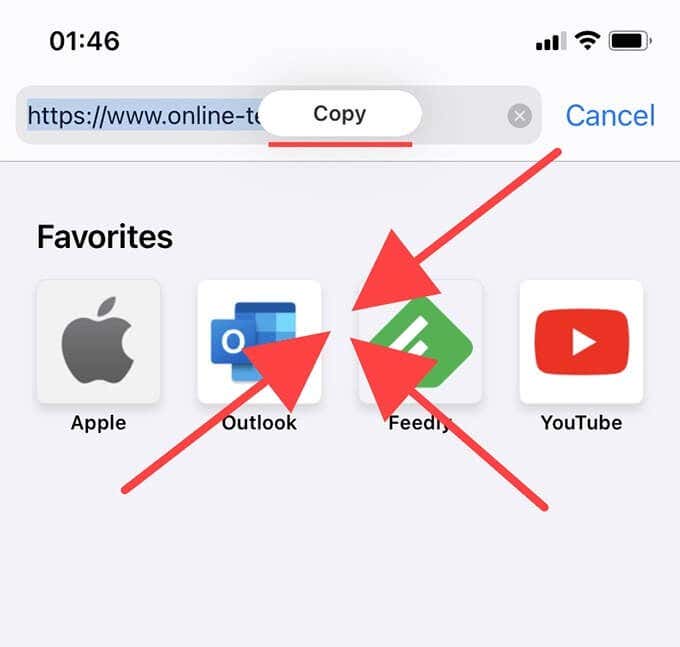
You will see the “Copy” badge flash to the top of the screen as a confirmation. You can then paste the copied text elsewhere by pinching out with three fingers.
Three-finger Swipe
The three-finger swipe is a text-specific gesture. Swipe with three fingers to the left to undo any text that you’ve typed. Conversely, swipe to the right with three fingers to redo the text.
Shake
A shake is a special iPhone gesture that doesn’t involve the touch-screen. Instead, you shake the device itself briefly to undo your last action . If you deleted or archived an email accidentally, for example, simply shake your iPhone, and then tap Undo to get it back.

The gesture also extends to undoing text, but the three-finger swipe is much more convenient for that.
Gesture Your Way Through
Most of the gestures above are commonplace throughout the iPhone, and they should help a lot when dealing with practically anything that you come across while using it. There’s a lot more to certain gestures (swipe, tap and hold, drag, etc.), so don’t stop experimenting. Also, do be prepared to stray into custom gesture territory in apps such as video games.
- How to Use Your iPhone as a USB Drive on Mac and PC
- How to Turn Off Password Suggestions on iPhone
- How to Accept Invite to Shared Album on iPhone
- How to Send Emails on iPhone
- iPhone Not Sending Emails? 10 Fixes to Try
Passcodes suck. They take a long time to type in, it’s easy to forget them and most people probably pick something really easy to guess, which hurts their security. This is why biometric unlock methods are so popular.
All but the most inexpensive smartphones now have fingerprint scanners built-in. One little touch and your phone unlocks, which is pretty convenient. But more devices are also now using facial recognition instead since screens are getting so large. Apple is no different and offers devices that use both of these technologies to secure them. Technologies that are officially known as Face ID and Touch ID.

But how do Face ID and fingerprint scans work?
What Are Face ID & Touch ID?
The obvious answer to this question is that Face ID is a face unlock system and Touch ID is a fingerprint unlock system. Job done. End of article. Right? Well, it’s a little more complicated than that because although lots of different companies use faces and fingerprints to unlock their devices, they don’t all work in the same way.
These two biometric systems are Apple’s proprietary solutions to the biometric problem. This matters because companies like Apple feel that their approach and technology are more secure than their competition. It matters because hackers and other security specialists have managed to fool systems like these in the past.
As you’d expect, there’s a race between the creators of biometric security sensors and those who want to defeat them. You must know how the sensors on your Apple device work and what their limitations are.
How Does Face ID & Touch ID Work?
Touch ID is Apple’s most mature biometric system and you’ll find it on certain models of iPhones, iPads, and MacBook Pros. Its sensors use the sapphire crystal as the button material. This is very hard and incredibly resistant to scratches, which is why high-end smartphone cameras also use sapphire lens covers.
When you place your finger on the button, a very high-resolution image is taken of your fingertip. A proprietary software algorithm then examines the image, transforming your fingerprint into pure math. This is then compared to the stored mathematical transformation of the fingerprint that was registered when Touch ID was set up. If they match, then the device unlocks.

Face ID works in a pretty smart way as well. Many devices use a normal camera for facial recognition. It compares the photo it has on record with the one you are presenting to unlock the device. The software that does the facial matching is quite sophisticated, but many of these cameras can’t tell the difference between a photo or a mask, so they can be fooled into unlocking.
Face ID, on the other hand, makes use of a specialized TrueDepth camera to create a very detailed depth map of your face. One with over 30 000 points. It combines this with an infrared image of your face to create a facial profile. The neural net machine learning hardware components of modern Apple mobile device processors make this level of sophistication possible.
So how secure are these technologies and are they good enough for you to trust?
General Biometric Security Flaws
First of all, some security vulnerabilities apply to biometric systems in general. The biggest problem with using an aspect of your biology to unlock something is that you can’t change it. If someone managed to make a perfect copy of your fingerprint or face, they could unlock anything. If someone figures out a password or passcode, just change it.

This sort of thing has happened in the past and the way that biometric sensors have got around it is by becoming more detailed and looking at multiple aspects of your biology. For example, finer details of your fingerprints or the presence of body heat. Those who want to defeat these systems have to get better at replicating your biology, which is impractical for the average hacker at a certain point.
The biggest weakness of biometric systems is a pretty simple one. Someone can simply take your finger or face and force you to unlock your device. That’s different from a password or code which you can “forget” or otherwise withhold. We’ll deal with this scenario at the end of the article.
How Secure Are Face ID & Touch ID?
This is a bit of a loaded question since that depends on what your definition of ‘secure’ is. Usually, the security of systems like these is expressed as the odds of someone randomly beating them. That’s the “brute force” method of cracking a digital lock. For Touch ID there’s only a 1 in 500,000 chance of someone’s fingerprint being similar enough to yours that Touch ID will be fooled.
Of course, that’s very different compared to someone making an impression of your fingerprint or creating fake ones from a scan. Then again, how likely that is to happen depends on who you are and if someone would be motivated to take this extreme path. If you’re a VIP who draws this sort of attention, you shouldn’t be using biometrics, since they aren’t secure enough at that risk level in our opinion.

Face ID is more secure from a brute force perspective according to Apple’s numbers. With a one-in-a-million chance of a random person looking enough like you. Identical twins are perhaps the exception here. So what about photographs or masks that replicate your face? Face ID has countermeasures for this. As mentioned above, photos won’t work since the camera can sense depth. It uses neural net technology to also mitigate against the use of masks.
There are no numbers to tell us how effective this is, but once again for the average user, no one is going to spend thousands or even millions of dollars creating technology to defeat Face ID. If you’re the president of a country, don’t use biometric locks.
Activating The iOS Biometric Killswitch
Now only one issue remains. What if someone is in a position to force you into unlocking your phone? They just have to point it at your face or put your finger on it, after all. If you think you may be entering this situation, you can simply click the on/off button five times and biometrics will be disabled in favor of a passcode.
On the iPhone 8 and up you need to squeeze the side button and either of the volume buttons. These methods could be different when you read this, so be sure you look up the biometric killswitch method for your specific iOS device.
In short: Face ID and Touch ID are plenty secure for most people, but not for people who need military-grade security. If you are however very paranoid, use a six-digit passcode instead.
- How to Fix Face ID With a Mask Not Working on iPhone?
- How to Use Face ID on iPhone With a Mask On (No Apple Watch Required)
- Is iPhone Face ID Safe To Use?
- Fix Apple Watch Charging Problems (All Models)
- How to Use Your iPhone as a USB Drive on Mac and PC
