Perhaps you’ve heard the IT person at work talk about GPOs or user policies. Or, maybe, you would like to know how to have better control over your computer. In any case, the Windows 10 Group Policy Editor is the tool to use. With it, you can work with Group Policy Objects (GPO) to customize your computer’s functions and the user experience.
In a network environment, the Group Policy Editor is used to configure everything from what programs are allowed to run to desktop customization. It does this in partnership with the Active Directory . For the average Windows 10 user who doesn’t have Active Directory, we can still use Local Group Policy Objects (LGPOs) to configure our computers.

Where Do I Find the Windows 10 Group Policy Editor?
If you have Windows 10 Home edition, you don’t have the Group Policy Editor. It’s only included with Windows 10 Pro and Windows 10 Enterprise.
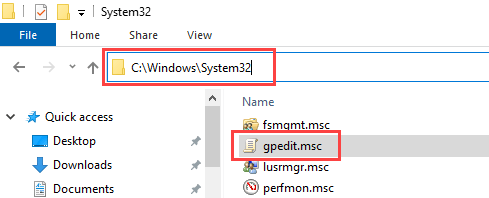
The actual program name is gpedit.msc and it’s generally located at C:WindowsSystem32gpedit.msc or %windir%System32gpedit.msc.
But you don’t have to open File Explorer to find it every time you want to use it. There are several ways to access the Group Policy Editor.
- Open the Start menu and search on gpedit.msc .
- Press Windows Key + R . Type gpedit.msc in the Run window and select OK .
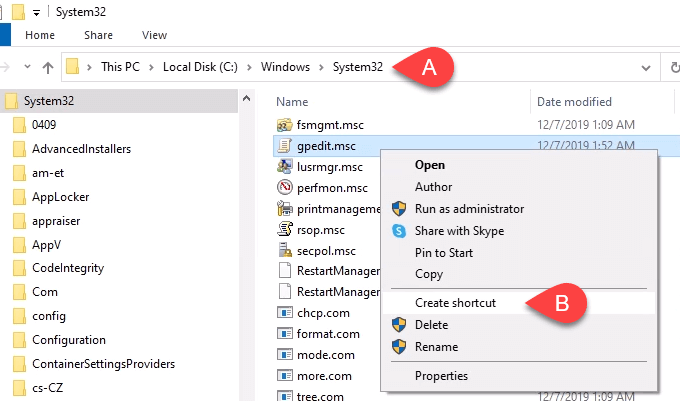
- Create a shortcut to the gpedit.msc and place it on the desktop. In File Explorer, navigate to C:WindowsSystem32gpedit.msc. Right-click on gpedit.msc and select Create a shortcut .
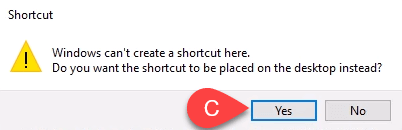
- A window will pop up that reads, “Windows can’t create a shortcut here. Do you want the shortcut to be placed on the desktop instead?” Select Yes . You can move the shortcut wherever you want after it’s created.
A Guided Tour Of The Windows 10 Group Policy Editor
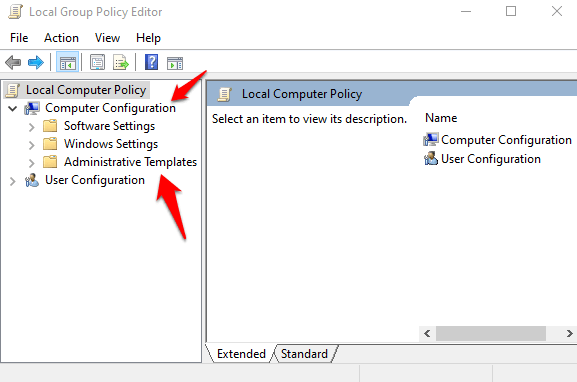
Once you have the Group Policy Editor opened, you’ll notice two main categories on the left side of the window. There are Computer Configuration and User Configuration .
The policies in Computer Configuration will apply to the entire computer and affect the functioning of the computer and the operating system in general. These settings do not change depending on who is logged in to the computer.
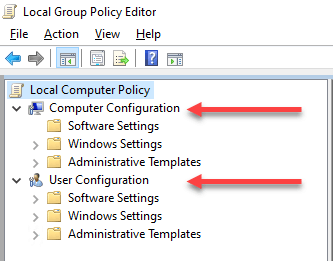
The policies in User Configuration apply to the users. The User Configuration policies are ideal for customizing the user’s desktop experience. If you are only changing the local group policy objects (LGPO), it will apply to all users on that computer.
If you are taking care of servers and applying the group policy in your Active Directory, the settings may apply to all or some users. It all depends on what level the policies are applied.
As you drill down into the different sections, you’ll see different areas for different applications or services. Make special note of what’s under the Administrative Templates sections in both Computer and User Configuration.
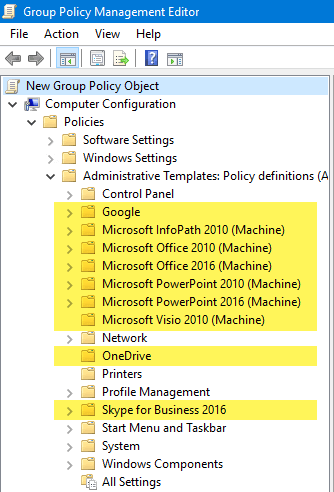
Administrative Templates can be added for many different apps you may install. For example, there is a large set of Administrative Templates for Microsoft Office that can be added to the Group Policy Editor. Even non-Microsoft companies, like Google, FoxIt PDF reader, and LogMeIn remote desktop access provide Administrative Templates for you to use. It’s a bit of a process to download and install them, but it’s not that hard.
There are far too many policies for us to go through them all and describe what they can do.
If you’d like to see all the Administrative Template policies available under either Computer or User Configurations, navigate to Administrative Templates > All Settings and select it. In the right-hand pane, you’ll see a long list of possible settings. In the image below, there are 2500 settings. There may be more on your computer or server.
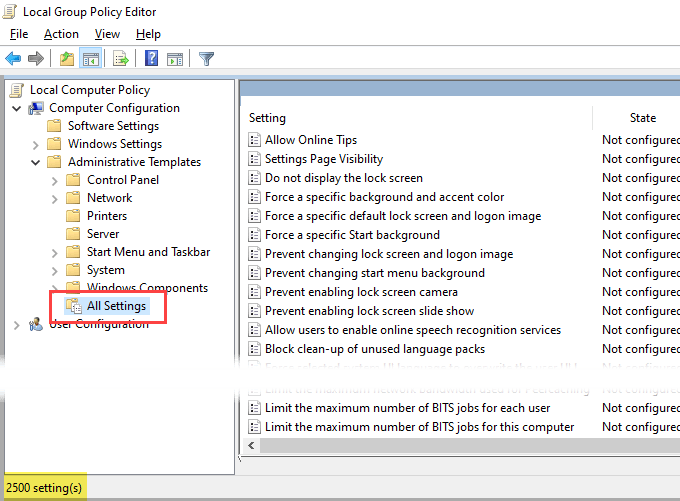
When this was written, there were over 4200 policies native to Windows. That’s not including the different Administrative Templates one can add.
If you’re interested in going further into all the Microsoft policies, you can download Microsoft’s Group Policy Settings Reference for Windows and Windows Server .
What Can I Do With the Windows 10 Group Policy Editor?
Think of the Group Policy Editor as your safe way to work in Windows Registry . Group Policy Editor won’t allow you to change everything you could in the Windows Registry, but it does allow you to change almost everything you’d want to change in Windows Registry.
Security policies are a great place to start. Let’s go through setting a policy to disable the Windows Command Prompt .
With the Group Policy Editor open:
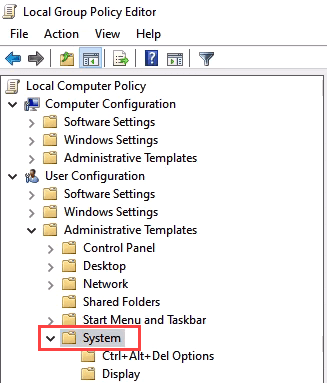
- Navigate to User Configuration > System .
- In the right pane, select Prevent access to the command prompt . Open by double-clicking on it.
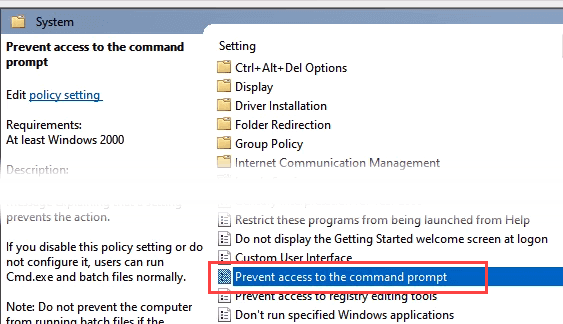
- To simply enable it, click on the Enabled radio button.
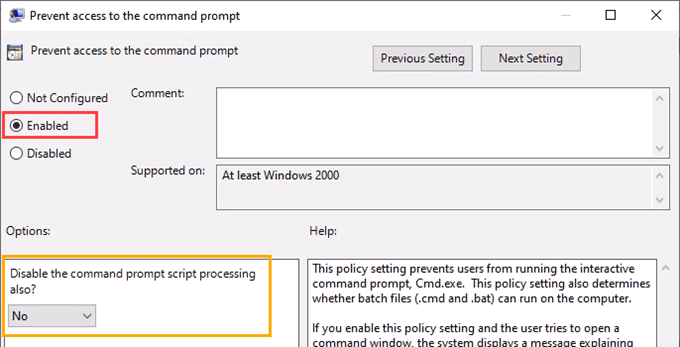
- This is optional. You can also prevent running batch scripts by changing the Disable the command prompt script processing also? from No to Yes . Take a moment to read through the Help: section to fully understand what this setting can do. If you need to run batch files for system maintenance, do not turn this on.
While you’re in this area, check out other settings like Prevent access to registry editing tools and Run only specified Windows applications . These are good security settings to work with as well.
There are so many things you could do, and we have articles for you about many of them. We can show you the best way to disable Cortana , how to enable biometrics so Hello Fingerprint works , and how to set granular password policies for users . Get in there, take a look around and you’ll be pleasantly surprised how much you can control and customize your computer using the Windows 10 group policy editor
- Preparing for Windows 10 End of Support: Upgrading to Windows 11
- How to Fix a “This file does not have an app associated with it” Error on Windows
- How to Fix an Update Error 0x800705b4 on Windows
- How to Resolve “A JavaScript error occured in the main process” Error on Windows
- How to Fix the Network Discovery Is Turned Off Error on Windows
Guy has been published online and in print newspapers, nominated for writing awards, and cited in scholarly papers due to his ability to speak tech to anyone, but still prefers analog watches. Read Guy’s Full Bio
Windows Hello is a more secure way of logging into your Windows 10 device without struggling to remember your password . The futuristic login technology uses biometric authentication that’s faster, more secure and easier to access your computer using fingerprint or facial recognition, with enterprise-grade security to boot.
These biometric markers allow you to sign into online devices, apps or networks, plus you can pair a Bluetooth device like your smartphone to your computer and use the Dynamic Lock feature in Windows Hello to lock your computer automatically.
As great as this service sounds, you may sometimes find that the Windows Hello fingerprint is not working because of hardware issues, system corruption, software conflicts, incorrect settings, or faulty, obsolete and incompatible drivers.
If your computer’s fingerprint sign-in with Windows Hello isn’t working, maybe after an update or other changes on your computer, try some of the workarounds in this guide to help you restore the function.
Fixes For Windows Hello Fingerprint Not Working In Windows 10
- Install updates manually.
- Run Hardware & Devices troubleshooter.
- Reset fingerprint & facial recognition options.
- Enable Biometrics in Group Policy Editor.
- Modify Windows Hello Group Policy settings.
- Update System Drivers.
- Perform a Windows Reset.
- Turn off Fast Startup.
- Check for & uninstall updates that caused the problem.
- Reset fingerprint login.
- Reinstall fingerprint software.
- Repair System Files.
- Restart Credentials Manager Service.
How To Fix Windows Hello Not Working In Windows 10

Many reported cases of fingerprint malfunction in Windows Hello are experienced after installing Windows updates, like the 1809 version that caused many issues like system crashes, data loss, failure to boot up, and application crashing among other problems.
Before you use any of the fixes below, check for the following:
- Your device is running Windows 10 and not another version of the operating system; otherwise you can’t use Windows Hello. Consider upgrading to Windows 10 in this case.
- Check that your device has a fingerprint sensor or reader. Some machines may have but they’re probably too old and there’s no available Windows 10 driver for it so the service won’t work.
- Check that your device is compatible with Windows Hello service.
- Check that your internet connection is strong and your device is connected, otherwise Windows Hello won’t work.
- Check for any dust or dirt on the fingerprint scanner as this would affect the reading. If it has any scratches on the sensor, get the machine repaired.
- Use the same finger and position you used when registering your fingerprint with Windows Hello to sign in.
Install Updates Manually
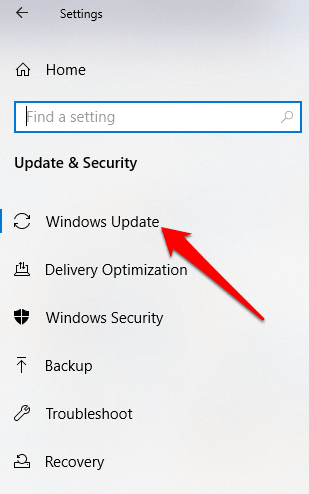
With the Windows Hello fingerprint sign-in not working, you’ll need to revert to using your password or PIN to login and check for Windows Updates manually.
- Once signed in, go to Settings > Update & Security > Windows Update

- Install all pending and detected updates, and restart your computer. Try signing in with fingerprint authentication again.
Run Hardware & Devices Troubleshooter
This will scan and detect any possible hardware and devices issue in the system.
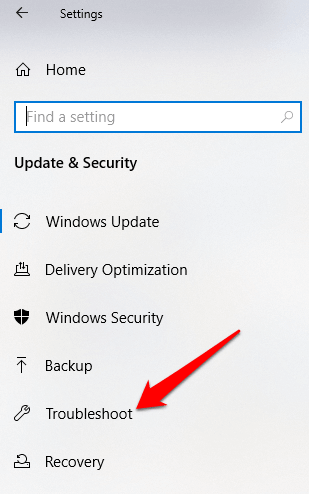
- Click Start > Settings > Update & Security > Troubleshoot .
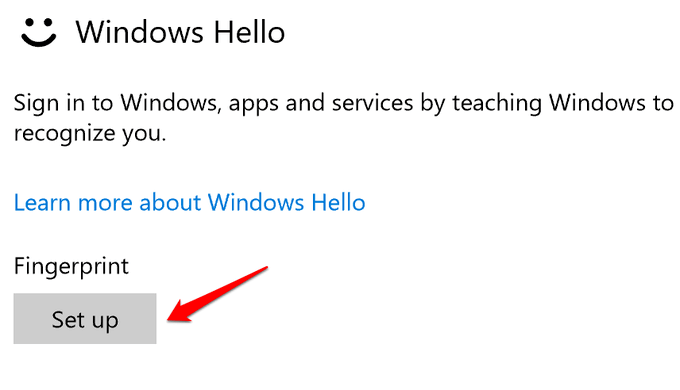
Reset Fingerprint & Facial Recognition Options
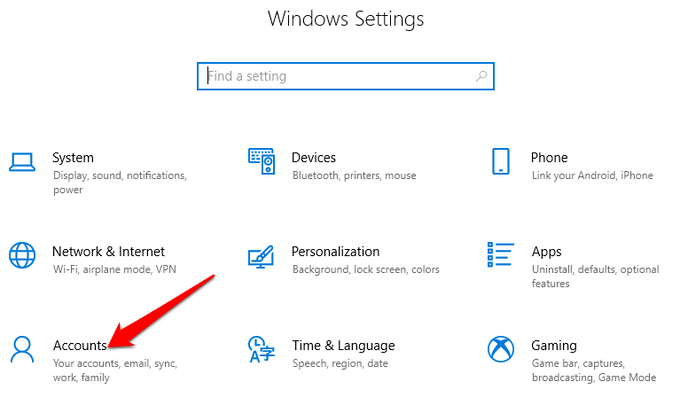
- Click Start > Settings > Accounts .
- Click on Sign-in options .
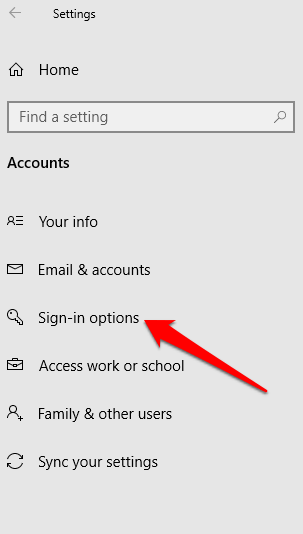
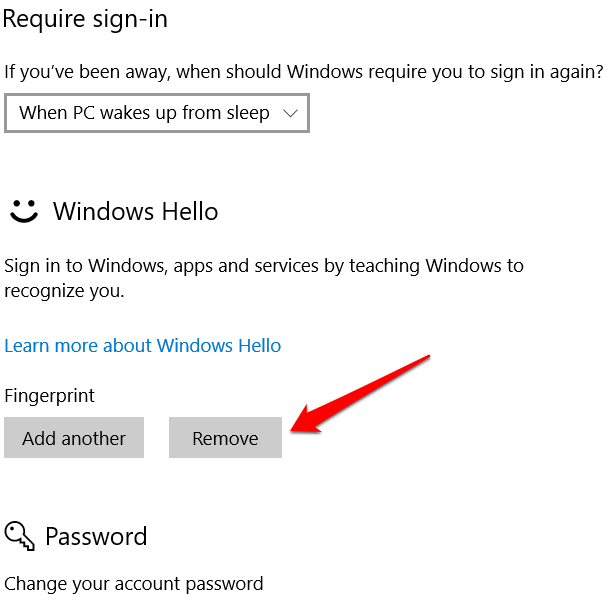
- Find Facial Recognition or Fingerprint options, and click on the Fingerprint option.
- Select Remove , and do the same for Facial Recognition .
- Next, click Get Started and follow the instructions to reset the Facial Recognition and Fingerprint sign-in options, and then restart your computer.
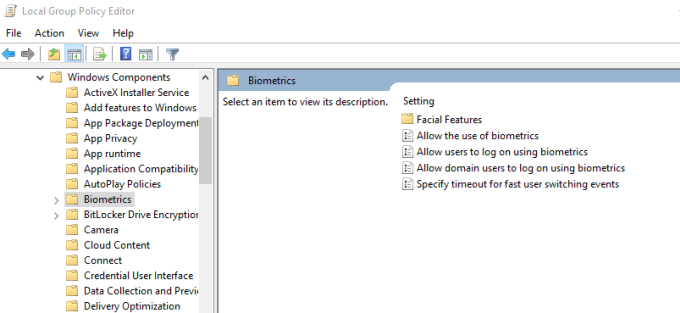
Enable Biometrics In Group Policy Editor
- Type gpedit in the search box and click Edit Group Policy .
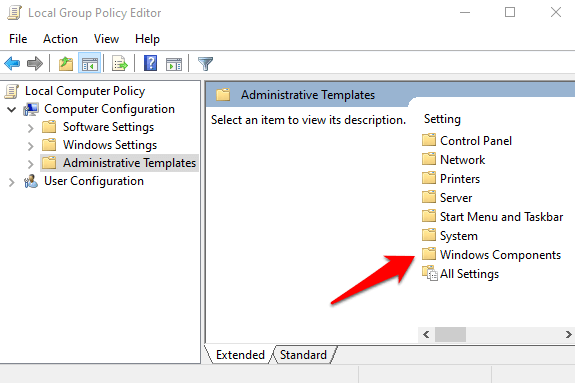
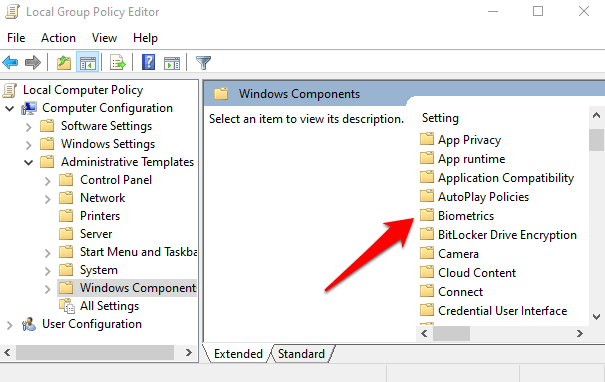
- Click Computer Configuration > Administrative Templates .
- Double-click Windows Components .
- Double-click Biometrics in the right pane and check whether all its settings are configured.
- If they show Not Configured , this is probably why the Windows Hello fingerprint sign-in isn’t working.
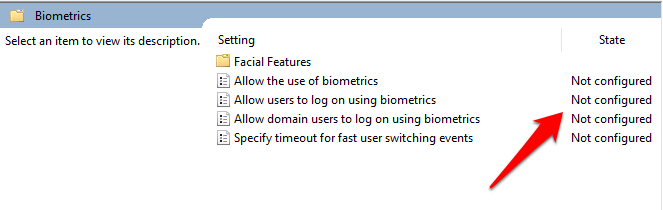
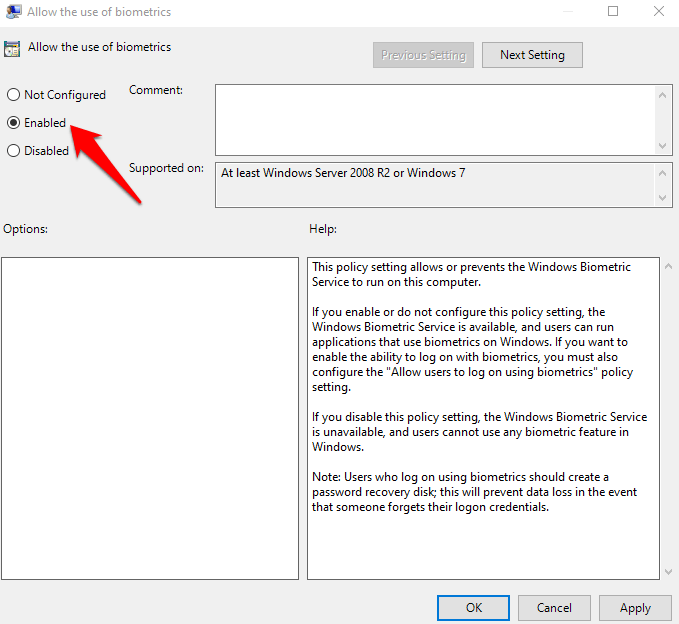
- Right-click each Biometric setting, select Enabled and then click Apply > OK .
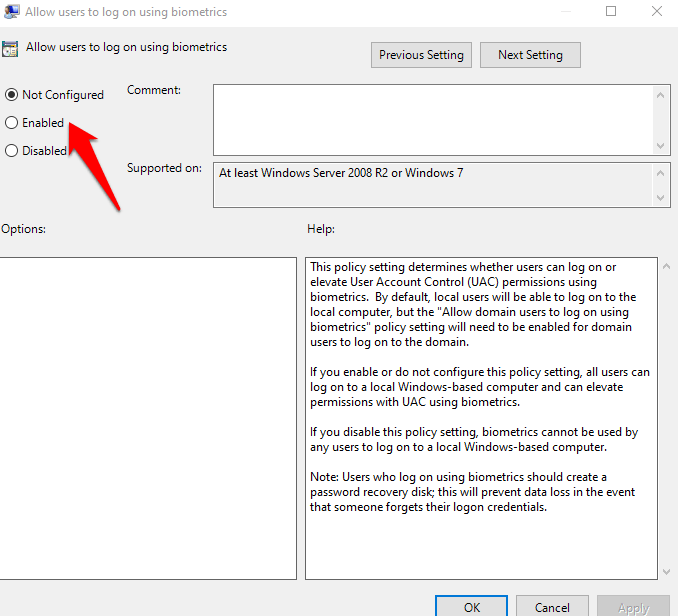
- Double-click Allow user to login using biometrics and select Enabled .
- Click Apply > OK .
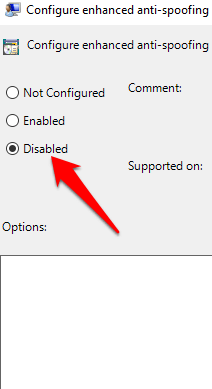
Modify Windows Hello Group Policy Settings
A Windows Update may have made some changes to some important Group Policy settings, so you may want to check Windows Hello settings in the Group Policy Editor. The first four steps are the same as the example above.
- Right-click Start > Run . Type gpedit and press Enter .
- Click Computer Configuration > Administrative Templates .
- Next, double-click Windows Components .
- Double-click Biometrics .
- Double-click Facial Features .
- Right-click Configure enhanced anti-spoofing and select Edit .

- Disable Configure enhanced anti-spoofing and restart your computer to see if it resolves the Windows Hello fingerprint sign-in problem.
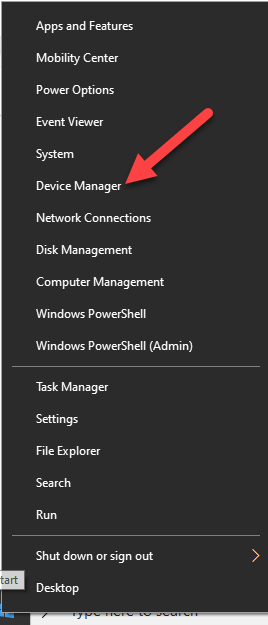
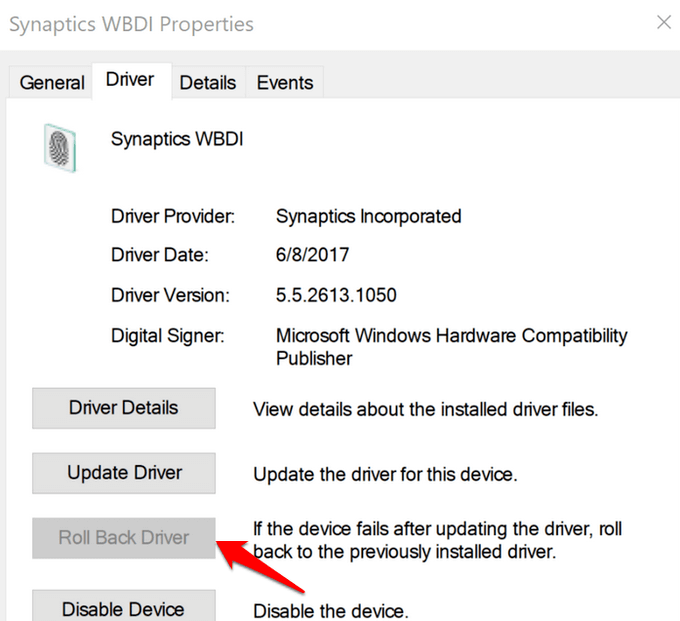
Update System Drivers
Some drivers, in this case the fingerprint reader driver, may have been corrupted at some point, either during an update or other process, causing the fingerprint sign-in to malfunction.
- To resolve that, you can update the drivers by right-clicking Start > Device Manager .
- Find the relevant drivers under Biometric devices , right-click your device and select Remove driver software .
- Do this for all drivers related to Windows Hello and restart your device.
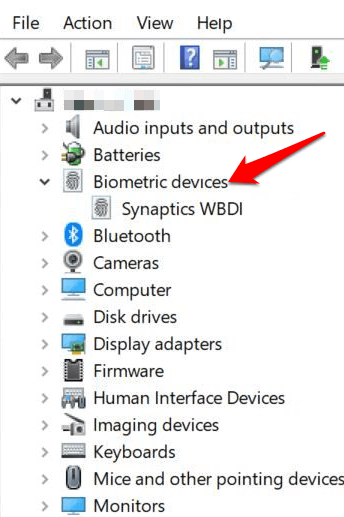
- Right-click and select Scan for hardware changes and the system will detect and install the drivers again.
- You can also roll back the corrupted or outdated driver to its previous version by double clicking Biometric Devices and select Roll Back Driver in the properties section.
- Click OK once it’s done.
Perform a Windows Reset
When you reset your Windows device, it repairs damages to all the system files so that Windows Hello can work normally again. It also resets your device settings to the default Windows settings.
- To refresh the device, go to Settings > Update & Security > Recovery > Reset this PC and click Get Started .
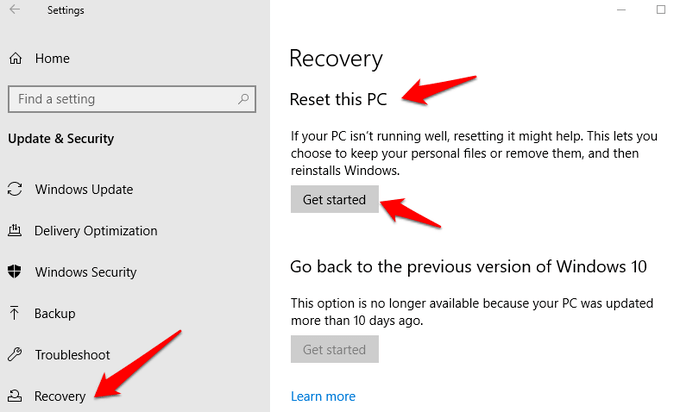
Note: This action will permanently erase your computer data so ensure you backup or copy your data to external or cloud storage before doing anything.
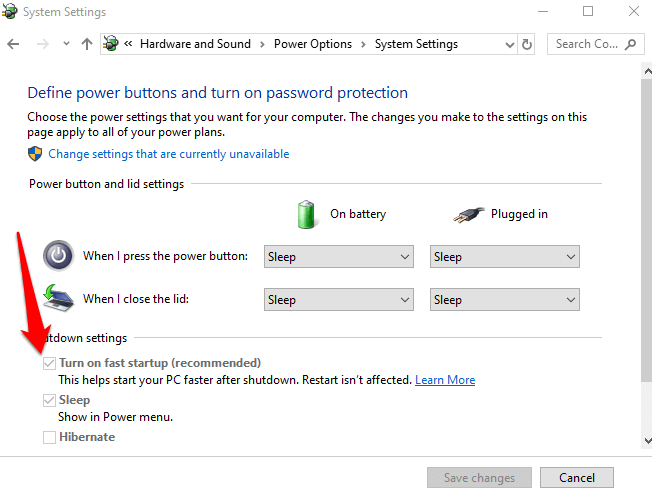
Turn Off Fast Startup
- Click Start > Settings > System > Power & Sleep
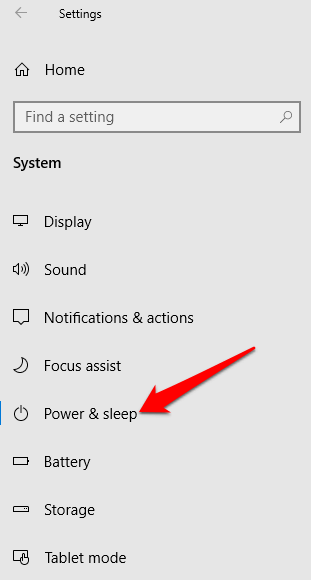
- Click Additional Power Settings .
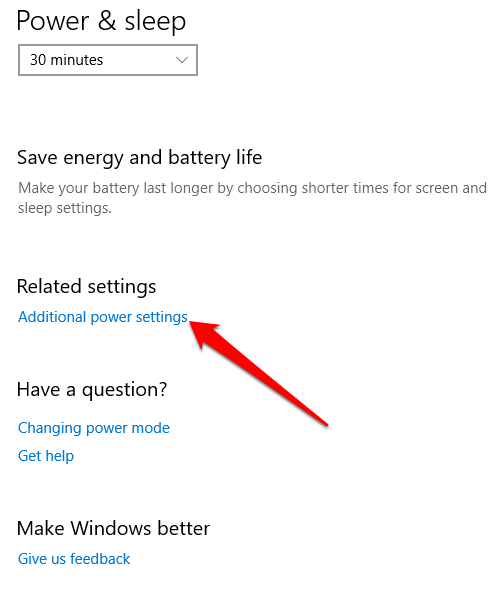
- Next, click Choose what Power button does .

- Click Change Settings that are unavailable and uncheck the Fast Startup box if it’s selected, and click Save changes .
Check For & Uninstall Updates That Caused The Problem
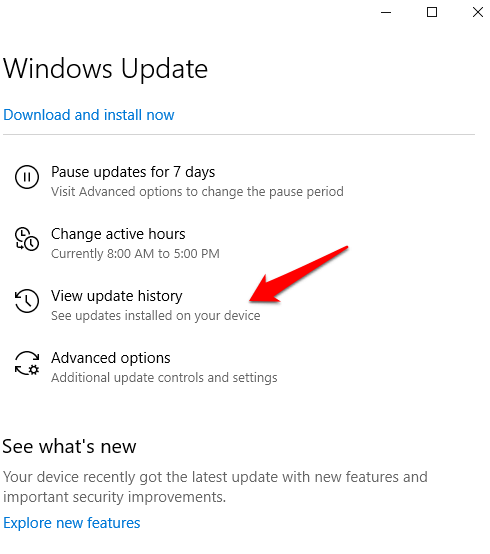
If the fingerprint sign-in issues first started after installing Windows Updates, check for the installed updates and uninstall them.
- Click Settings > Update & Security > Windows Updates .
- Go to View Update History .
- Click the Uninstall Updates link.
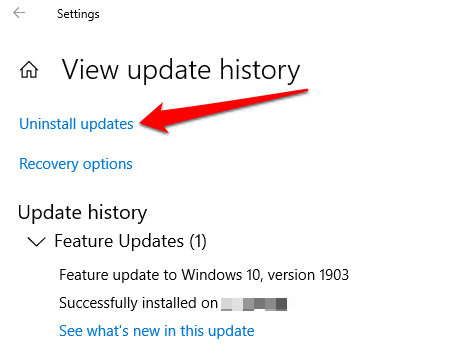
- A new screen will open showing the Installed Updates . Right-click each and select Uninstall .
- Restart your computer and check if Windows Hello fingerprint sign-in works again.

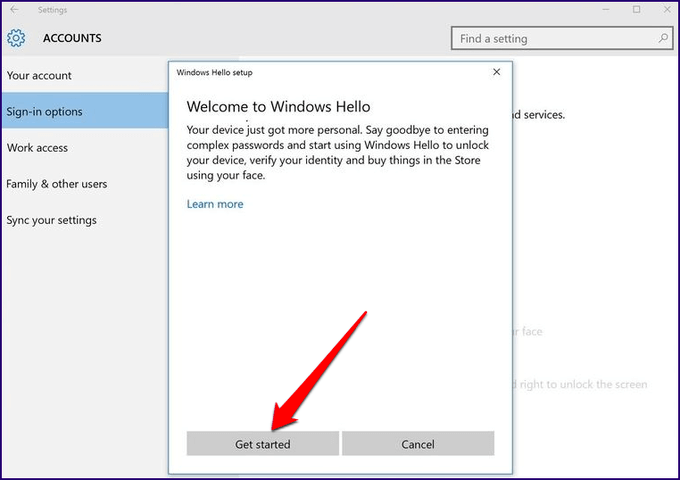
Reset Fingerprint Login
If the issue persists, you can reset your fingerprint login and see if that helps.
- In the search box, type sign-in and press Enter to open the Accounts menu.
- Go to Sign-in options and click Set up under the Windows Hello Fingerprint section.
- Click Get Started and follow the instructions to set up your fingerprint sign-in again.
Reinstall Fingerprint Software
- Click Start > Settings > Apps . In Apps and Features .
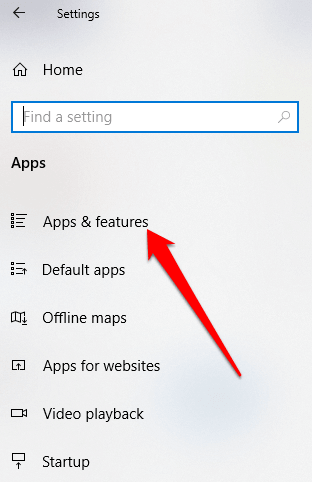
- Find your fingerprint reader and click on it. Click Uninstall and confirm the action.
- Right-click Start > Device Manager and expand the Biometric devices category.

- Find your fingerprint reader, right-click, then select Uninstall device, and confirm the action.
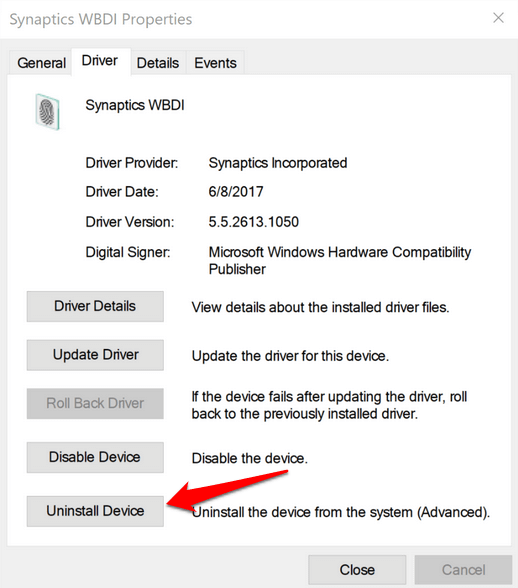
- Restart your computer to apply the changes and check if fingerprint works again.
- You can prevent your computer from disabling the fingerprint reader by going to Device Manager > Universal Serial Bus Controllers category and find the USB Root Hub .
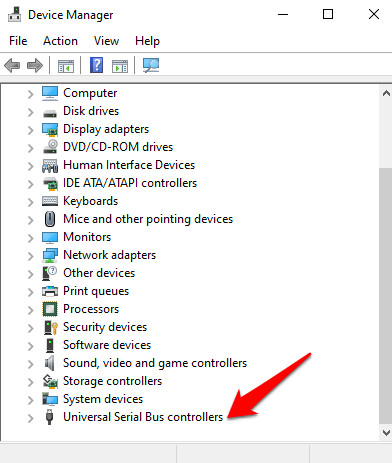
- Double-click USB Root Hub to open its Properties .
- Uncheck the Allow the computer to turn off this device to save power option box under the Power Management tab. Repeat for all USB Root Hub entries.
Repair System Files
File corruption is one of the causes of the fingerprint reader malfunctioning when you’re trying to sign in using the Windows Hello service. you can use the built-in System File Checker to rectify things.
- Type CMD in the search box and select Command Prompt>Run as administrator.
- In the Command Prompt dialog box, type sfc /scannow and press enter to run the command.
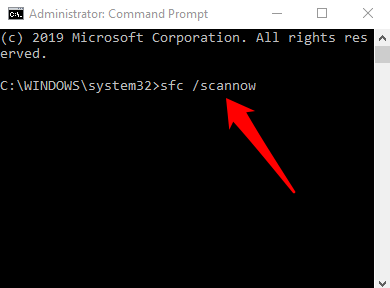
The system files will be scanned, after which you can restart your computer and see if the fingerprint issue is resolved.
Restart Credentials Manager Service
- Right-click Start > Run and type services.msc. Press Enter to open the Services window and search for the Credential Manager Service .

- Double-click the Credential Manager Service to open the Properties window and go to Service Status .
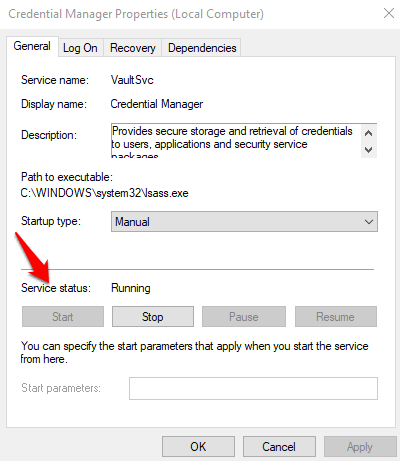
- Click Stop , and then click the Start button again to restart the service.
- Click Apply>OK and check if the fingerprint works again.
If nothing else works, you can switch to a different fingerprint reader.
- Preparing for Windows 10 End of Support: Upgrading to Windows 11
- How to Fix a “This file does not have an app associated with it” Error on Windows
- How to Fix an Update Error 0x800705b4 on Windows
- How to Resolve “A JavaScript error occured in the main process” Error on Windows
- How to Fix the Network Discovery Is Turned Off Error on Windows
Elsie is a technology writer and editor with a special focus on Windows, Android and iOS. She writes about software, electronics and other tech subjects, her ultimate goal being to help people out with useful solutions to their daily tech issues in a simple, straightforward and unbiased style. She has a BCom degree in Marketing and currently pursuing her Masters in Communications and New Media. Read Elsie’s Full Bio
