If you have a network of computers in your home or workplace, one of the things you need to control is which users or apps get to change things in that system.
One way to prevent unauthorized changes is to have one person as the network administrator. However, it’s not enough just to have one person managing everything, which is where the User Access Control (UAC) feature comes in.

This guide explains what UAC is and how you can disable it in Windows 10.
What Is UAC?
UAC is a security feature in Windows 10 that prevents unauthorized or inadvertent changes to the operating system. The feature was first a part of the Windows Vista security system and has since been improved with each new version of Windows.
Such changes can be initiated by users, viruses, malware, or applications. But if the administrator doesn’t approve the changes, they won’t be executed.
Among the changes that require administrative privileges include:
- Running Task Scheduler
- Making changes to UAC settings
- Windows Update configurations
- Adding or removing user accounts
- Changing system-wide files or settings in Program File or Windows folders
- Viewing or changing other users’ files or folders
- Running apps as administrator
- Installing or uninstalling apps and drivers
- Changing Windows Firewall or system date and time settings
- Configuring Family Safety or Parental Controls
- Changing users’ account type
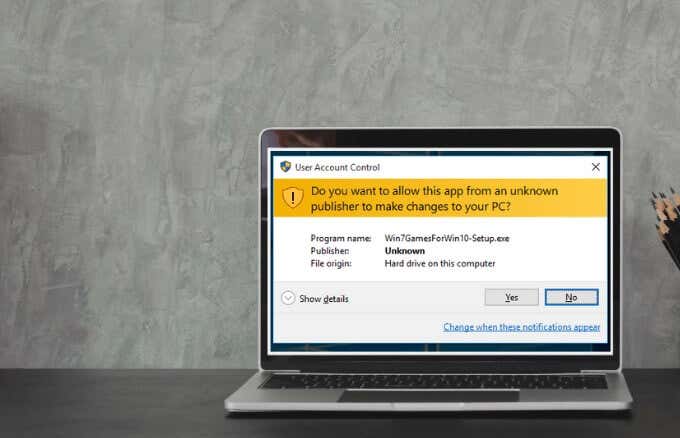
Each time you run a desktop app that requires admin permissions, the UAC pops up. You’ll also see it when you want to change important system settings that require admin approval.
Any users on your network can sign into their computers using a standard user account, but any processes they launch will be performed using access rights granted to a standard user.
For example, any apps started using Windows Explorer will run with standard user level permissions. This includes apps included with Windows 10 itself.
For legacy apps, which aren’t designed with security in mind, additional permissions are often required to run successfully. More permissions are required for actions such as installing new software and changing Windows Firewall configurations , as this requires administrator account level permissions.
If you need to run an app that requires more than standard account user rights, you can restore more user groups to the token in order to manage apps that make system level changes to your computers or devices.
UAC Slider Levels in Windows 10 and What They Mean
In Windows Vista, there were only two UAC options: On or Off. In Windows 10 however, there are four UAC levels to choose from:
- Always Notify : Notifies you before users and apps make changes that require admin permissions. It also freezes other tasks until you respond, and is recommended if you often visit unfamiliar websites or install new software.
- Notify me only when programs/apps try to make changes to my computer : Notifies you when programs try to make changes to your computer or install software. This level also freezes other tasks until you respond, but it won’t notify you when you make changes to Windows settings.
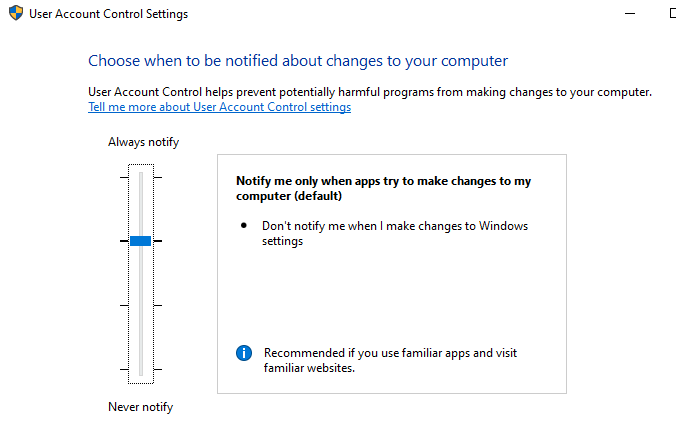
- Notify me only when programs/apps try to make changes to my computer (do not dim my desktop) : Notifies you when a program tries to make changes or install software on your computer. It doesn’t notify you when you make changes to Windows settings and doesn’t freeze tasks until you respond. Choose this level only if it takes long to dim your computer’s desktop.
- Never notify : Doesn’t notify you when a program tries to make changes, install software, or when you modify Windows settings. This setting isn’t recommended, especially if you don’t have a good security suite as it’s much easier for viruses and malware to infect your computer with UAC turned off.
How to Disable UAC in Windows 10
Note : We don’t recommend disabling UAC on your computer as doing this makes it easier for malicious programs to infect and manage your computer. If there are apps that keep triggering UAC, use Windows Task Scheduler to run those apps without admin rights and UAC prompts first, instead of disabling UAC altogether.
If you still want to disable UAC, you can do it via Control Panel, Group Policy, Registry Editor, or using a Command Line.
How to Disable UAC Using Control Panel
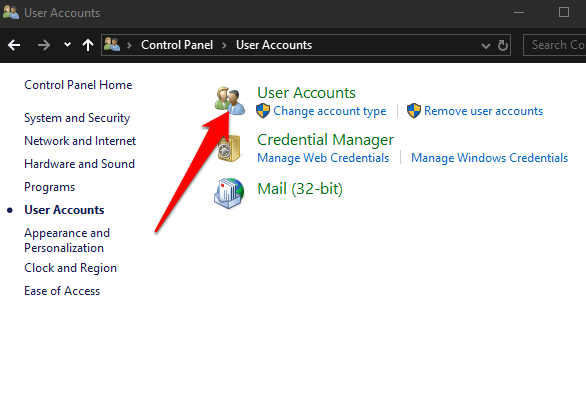
- Open Control Panel and select User Accounts .
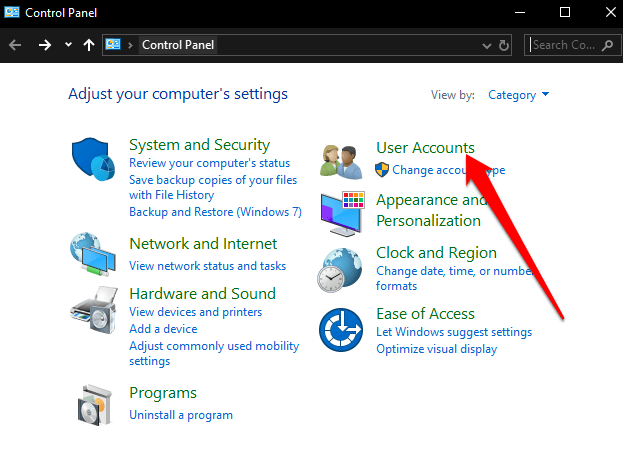
- Select User Accounts again.
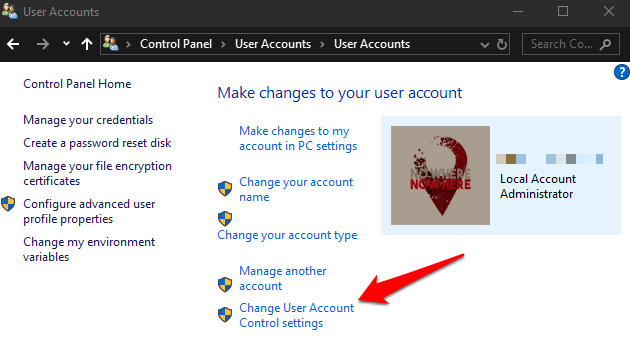
- Next, select Change User Account Control settings .
- If you want to completely disable UAC, drag the slider to Never notify to turn UAC off and then click OK .
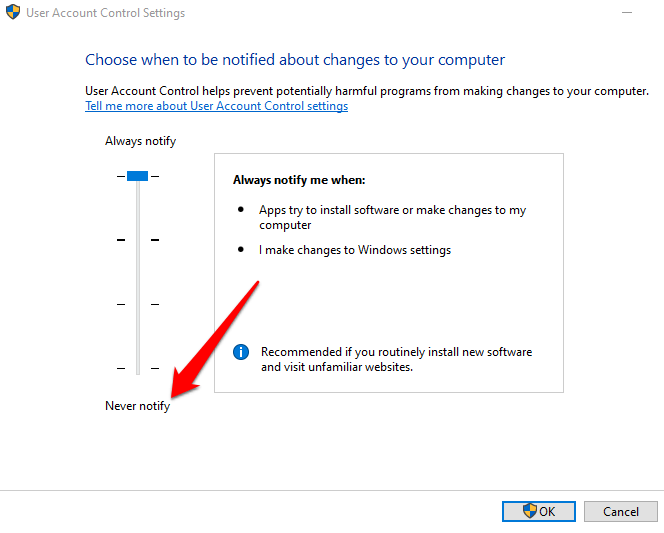
To turn UAC back on, drag the slider to the security level you want and then click OK . Confirm your selection or enter your admin password if prompted to, and then restart your computer to keep the changes.
How to Disable UAC Using a Command Line
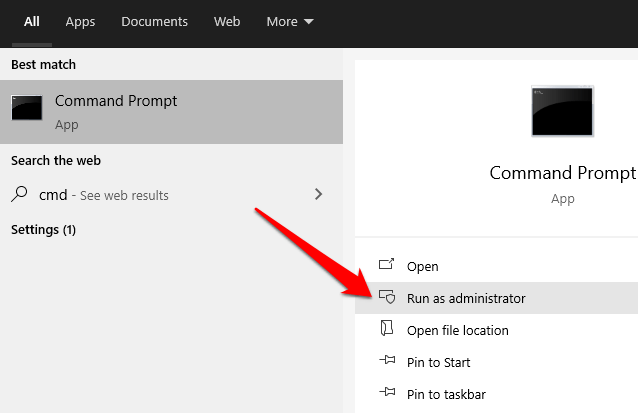
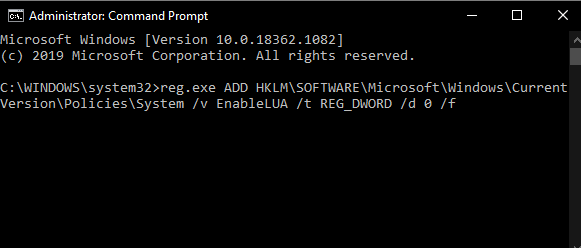
- To do this, type CMD in the search box, and select Run as administrator .
In the Command Prompt box, enter this command and press Enter:
reg.exe ADD HKLMSOFTWAREMicrosoftWindowsCurrentVersionPoliciesSystem /v EnableLUA /t REG_DWORD /d 0 /f
- Restart your computer for the changes to take effect.
If you want to enable or turn UAC on again, enter this command:
reg.exe ADD HKLMSOFTWAREMicrosoftWindowsCurrentVersionPoliciesSystem /v EnableLUA /t REG_DWORD /d 1 /f
How to Disable UAC Using Group Policy Editor
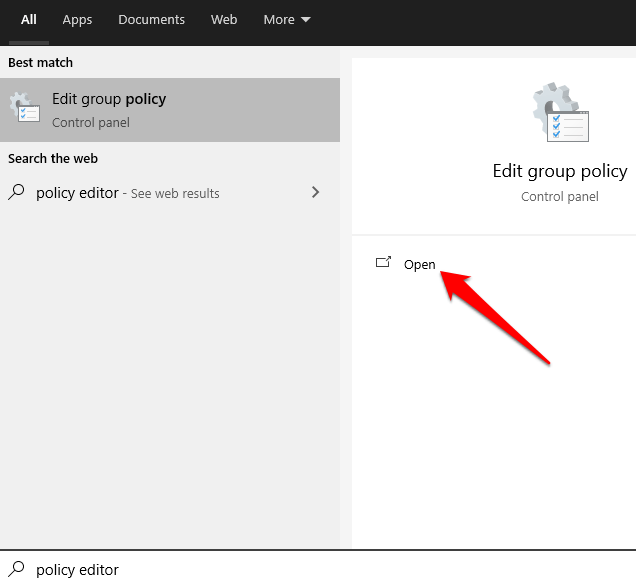
- To do this, type Policy Editor in the search box and select Edit Group Policy .
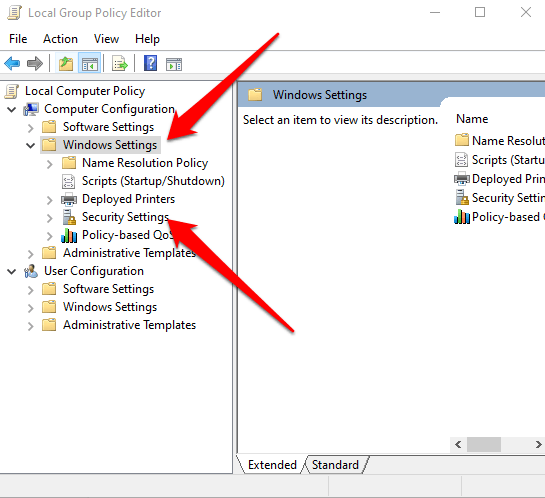
- Select Computer Configuration > Windows Settings and then select Security Settings .
- Next, select Local Policies > Security Options .
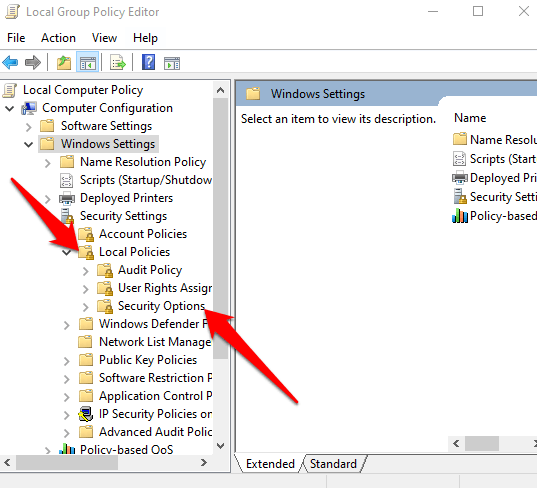
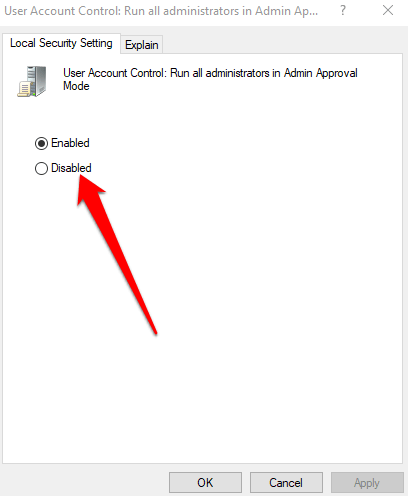
- Scroll down and double-click on User Account Control: Run all administrators in Admin Approval Mode .
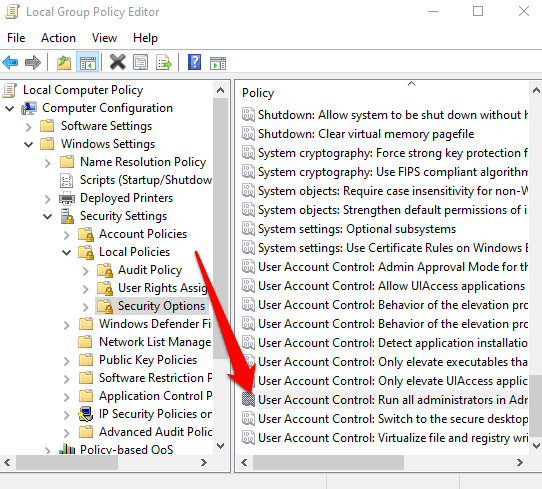
- Select Disabled > OK .
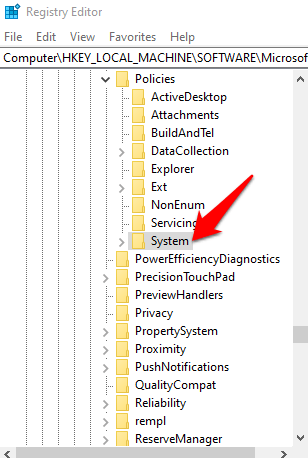
How to Disable UAC Using Windows Registry
You can also disable UAC via the Windows Registry. However, before you do that, make sure you back up the registry to avoid any system issues.
- To disable UAC via Windows Registry, right-click Start > Run , enter regedit.exe and press Enter on your keyboard.
- Follow the path: HKEY_LOCAL_MACHINESOFTWAREMicrosoftWindowsCurrentVersionPoliciesSystem
- Next, double-click on the key EnableLUA and change the value data to 0 .
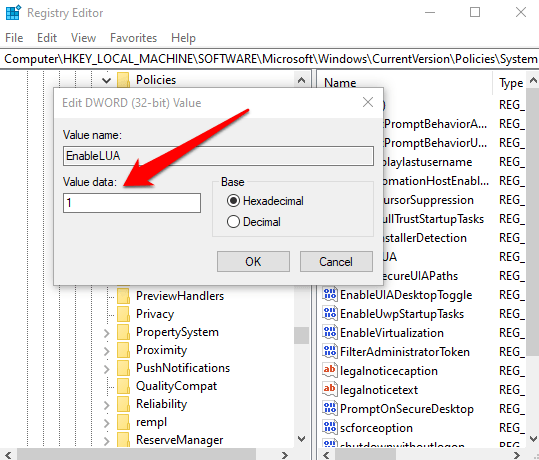
- Save the changes and reboot your computer.
Take Control of Your Accounts
UAC makes all the difference between standard user accounts and administrator accounts. With the feature, you have a basic level system security that helps save your system from malicious processes even with a security suite in place.
- Preparing for Windows 10 End of Support: Upgrading to Windows 11
- How to Fix a “This file does not have an app associated with it” Error on Windows
- How to Fix an Update Error 0x800705b4 on Windows
- How to Resolve “A JavaScript error occured in the main process” Error on Windows
- How to Fix the Network Discovery Is Turned Off Error on Windows
Elsie is a technology writer and editor with a special focus on Windows, Android and iOS. She writes about software, electronics and other tech subjects, her ultimate goal being to help people out with useful solutions to their daily tech issues in a simple, straightforward and unbiased style. She has a BCom degree in Marketing and currently pursuing her Masters in Communications and New Media. Read Elsie’s Full Bio
If you connect to different printers across several locations all the time, you’ll probably not use all of the printers installed on your device – probably just once or twice. However, your device ends up with many printers installed on it without you realizing it.
Thankfully, you can remove any printer you’re no longer using, except it doesn’t completely get erased from your device – the printer driver remains in your device’s inventory in case you need it again.

If you’re sure you won’t need it, you can remove or uninstall old, obsolete or uninstalled printer drivers , and leftover driver packages or registry entries from your device.
We’re going to walk you through five ways to completely uninstall printer drivers in Windows 10.
How To Remove Or Uninstall Printer Drivers In Windows 10
These are a few of the ways you can remove printer drivers in Windows 10:
- Uninstall printer software using Settings.
- Remove printer driver from Print Server Properties.
- Uninstall printer driver using Control Panel.
- Use Print Management to remove old printers.
- Delete old printers via Registry Editor.
- Uninstall printer using Command Prompt.
- Remove a printer using PowerShell.
- Delete remnants from Windows driver store.
Uninstall Printer Software Using Settings
If you don’t need a particular printer anymore, you can follow the usual steps to uninstall a printer from Settings and then uninstall its software, especially if using a third-party utility.
If the Settings app installed other tools to manage your printer automatically, you’ll have to manually remove the leftover software.
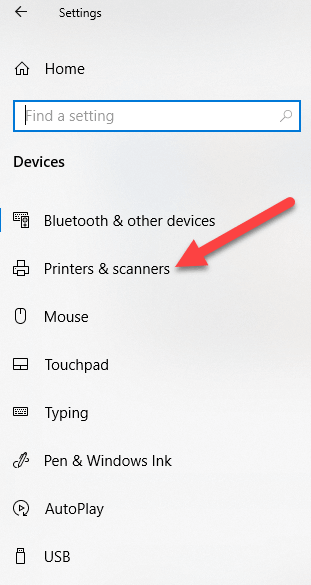
- Open Settings>Devices.
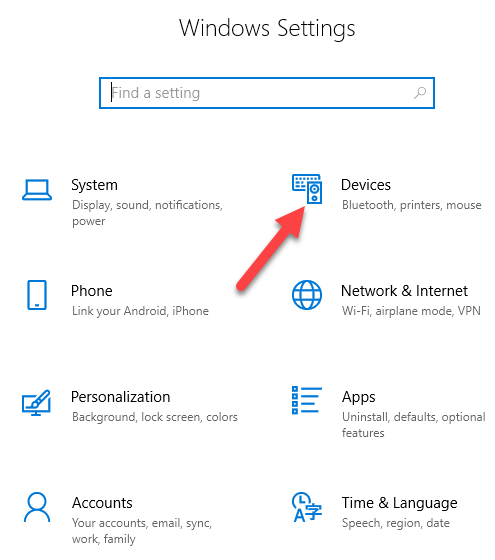
- Click Printers & Scanners .
- Select your printer, click Remove device , and click Yes when asked to confirm the deletion.
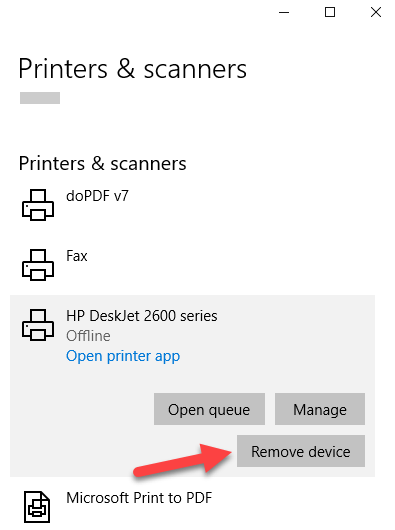
Note: The steps above only remove the printer from the list, so you’ll need to remove any leftover printer software or related applications.
- Open Settings>Apps .
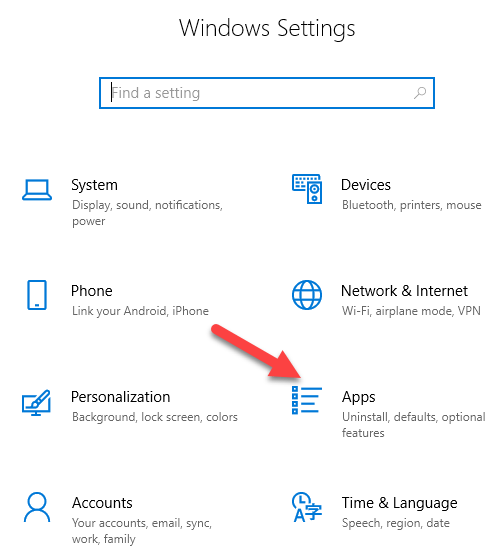
- Click Apps & Features and select the printer software you’d like to remove.
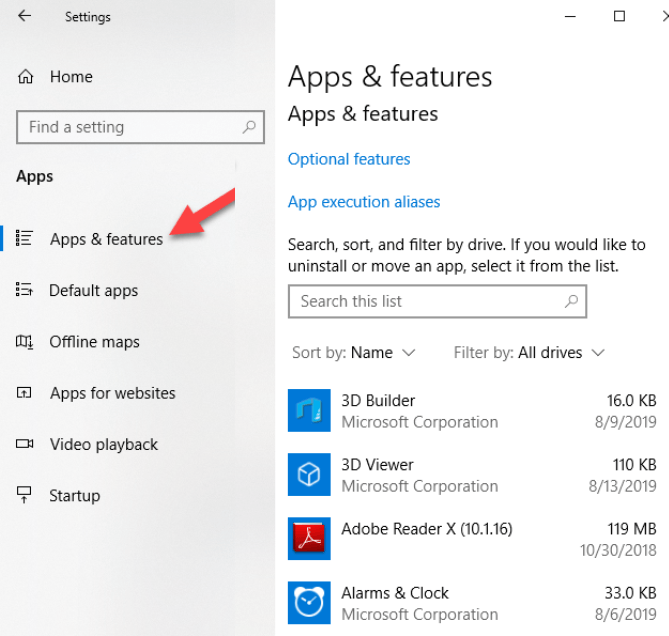
- Click Uninstall and follow the steps to completely remove any leftover printer-related applications.
Remove Printer Driver From Print Server Properties
If you’re still seeing an old printer, or one that you previously uninstalled, appearing on the Printers & Scanners page, you can remove or uninstall the printer driver and driver packages.
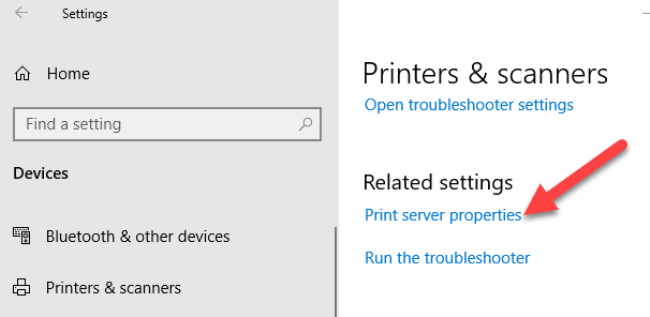
- Open Settings>Devices>Printers and Scanners on the left pane.
- Scroll down to Related settings and click Print Server Properties . Alternatively, you can right-click Start>Run and type printui /s /t2 to go to the Print Server properties page directly.
- Select the Drivers tab. From the list, click on the old printer entry and select Remove .
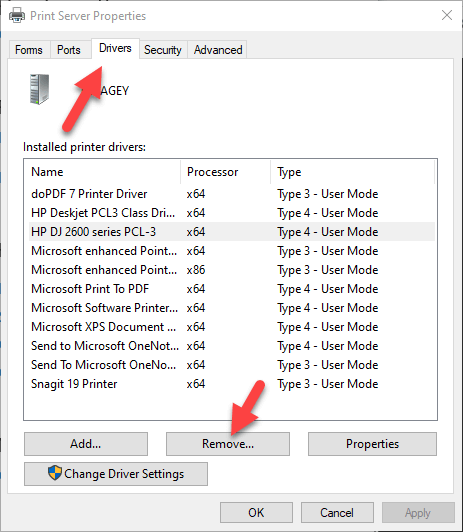
- You’ll get two options in a popup – Remove driver or Remove driver and driver package . Select the latter and click OK .
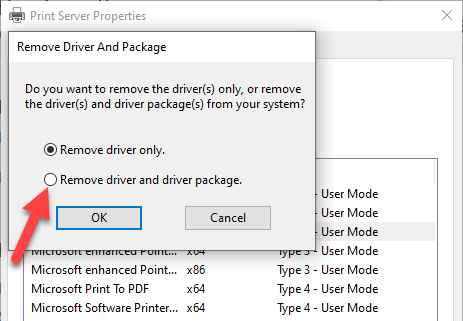
- If you get a confirmation prompt to Remove Driver Package , click Delete .
Uninstall Printer Driver Using Control Panel
You can remove and uninstall your printer and leftover printer driver or related apps from Control Panel using these steps.
- Open Control Panel>Hardware and Sound .
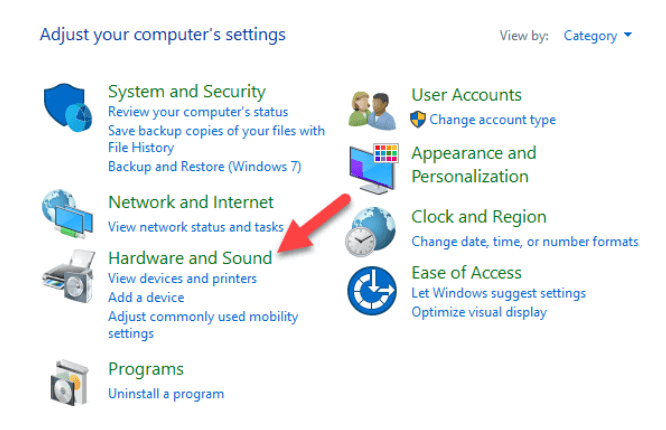
- Click Devices and Printers .

- Under Printers , right-click your device and click Remove device . Click Yes to confirm the action.

- Next, go to Settings>Apps>Apps & Features and select the software you want to remove.
- Click Uninstall and follow the on-screen steps to completely remove the printer software.
Use Print Management To Remove Old Printers
Ideally, if you used the Print Server properties method above, it should remove and uninstall the printer driver. However, you can use the Print Management console to completely remove printers you no longer use, and their drivers.
The Print Management dialog shows you the printers and current print jobs on your device. Before you delete the old printer driver though, make sure it’s not being used by any other printer.
- Open Control Panel>System and Security .
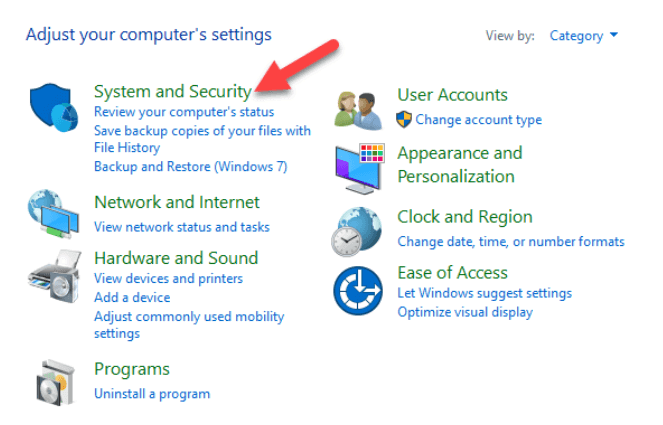
- Click Administrative Tools .
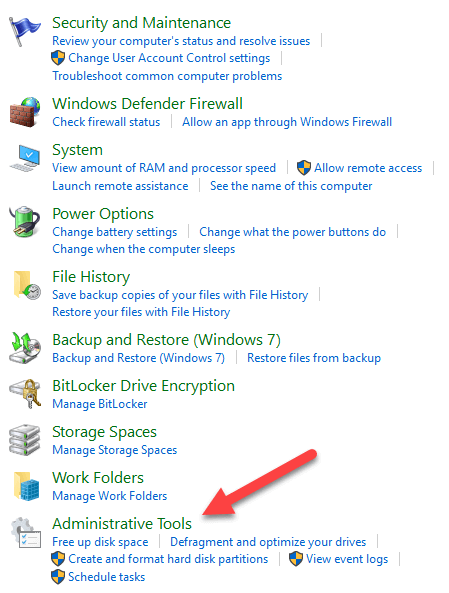
- Double-click the Print Management shortcut.
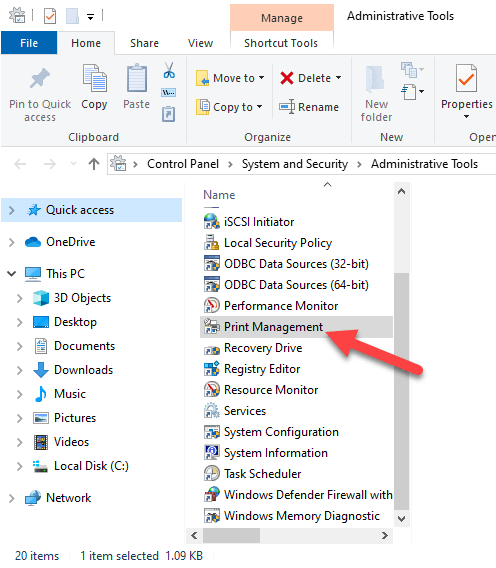
- Under Custom Filters , select All Printers .
- Right-click the printer you want to remove.
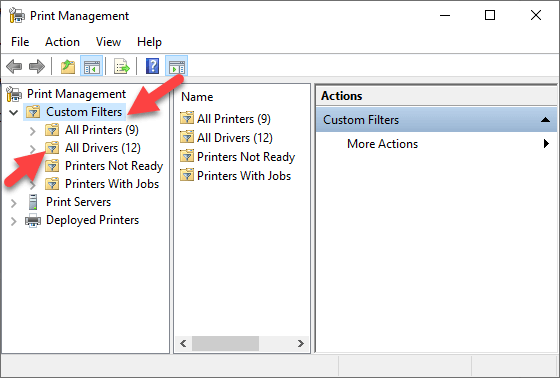
- Click Delete and Yes to confirm the action.
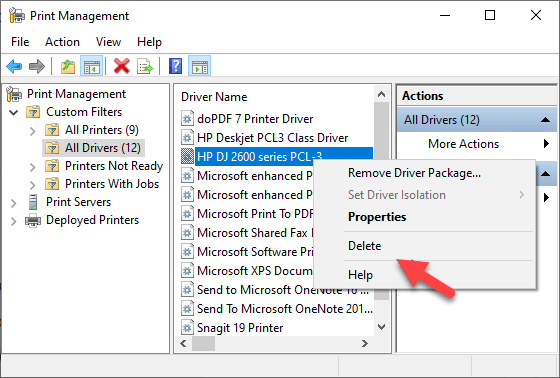
- Open Settings>Apps>Apps & Features and click the printer software you want removed.
- Click Uninstall and follow on-screen instructions to completely remove the printer driver.
Delete Old Printers Via Registry Editor
If you open the Add a printer page and find old printers still listed there, edit the registry to remove leftover entries. To do this, start by creating a system restore point, and then follow the steps below.
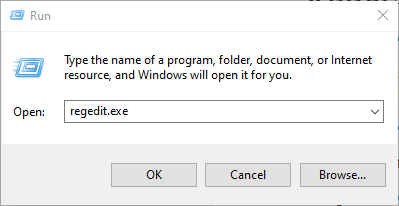
- Right-click Start>Run .
- Type regedit.exe and click OK (or press Enter on your keyboard) to open the Registry Editor.
Find the registry key:
HKEY_CURRENT_USERSOFTWAREClassesLocal SettingsPrintersRoamed
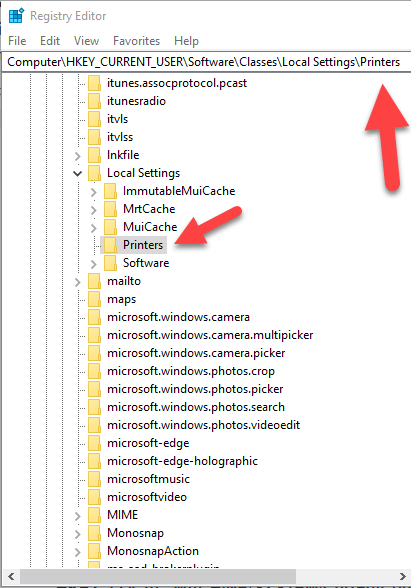
- Right-click the printer from the right pane, and select Delete .
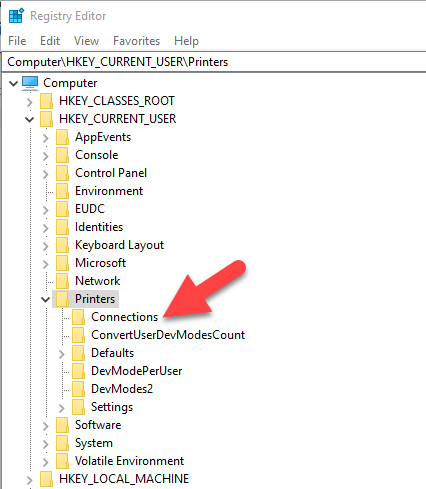
- Check printer entries and delete unwanted items by going to this key: HKEY_CURRENT_USERPrintersConnections
Next, go to this key:
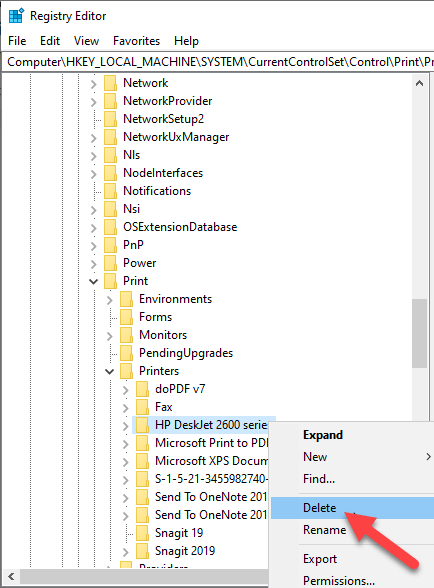
HKEY_LOCAL_MACHINESYSTEMCurrentControlSetControlPrintPrinters
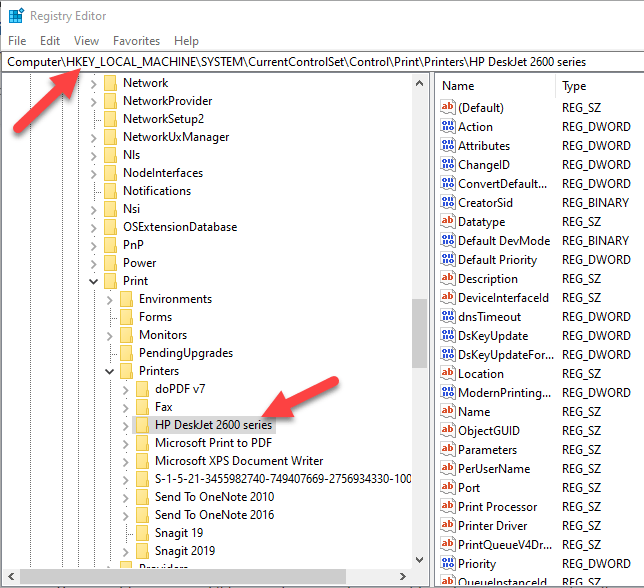
- Click to expand the key, right-click your printer and select Delete .
Some subkeys may still have references to your old printer, so you can clear the following as well:
HKEY_LOCAL_MACHINESYSTEMCurrentControlSetControlPrintEnvironmentsWindows NT x86DriversVersion-3 HKEY_LOCAL_MACHINESYSTEMCurrentControlSetControlPrintEnvironmentsWindows x64DriversVersion-3 HKEY_LOCAL_MACHINESYSTEMCurrentControlSetControlPrintEnvironmentsWindows x64DriversVersion-4
Once this is done, exit the Registry Editor.
Uninstall Printer Using Command Prompt
If you’re a fan of command lines, the Command Prompt is another tool you can use to delete a printer and remove related drivers and apps.
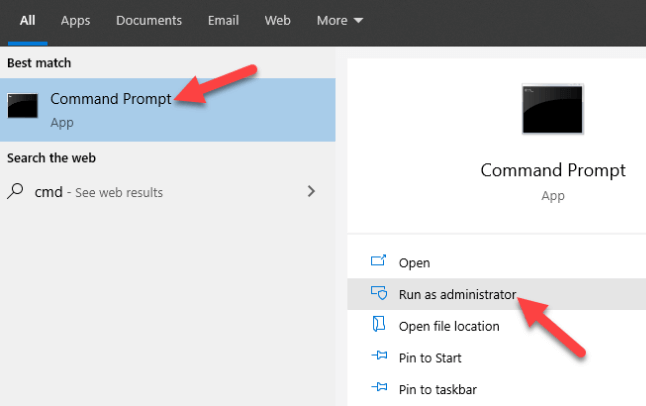
- Click Start and type CMD in the search bar.
- Click Command Prompt and select Run as administrator from the right pane.
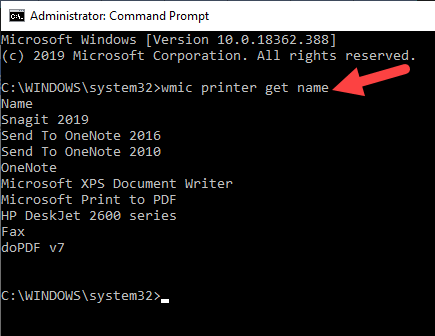
- In the Command Prompt window, type this command: wmic printer get name and press Enter to see the list of printers on your device.
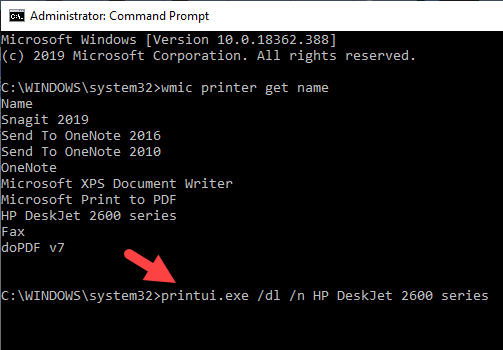
- To uninstall the printer, type printui.exe /dl /n “YOUR-PRINTER-NAME” and press Enter. Remember to replace YOUR-PRINTER-NAME with your printer’s full name. For example, printui.exe /dl /n HP DJ 2600 Series CL3 .
- To uninstall the printer software, open Settings>Apps>Apps & Features and select the printer software you want to remove. Click Uninstall and follow the on-screen instructions to complete the process.
Remove a Printer Using PowerShell
If you prefer PowerShell over Command Prompt, here are the steps to take to remove the printer and related software.
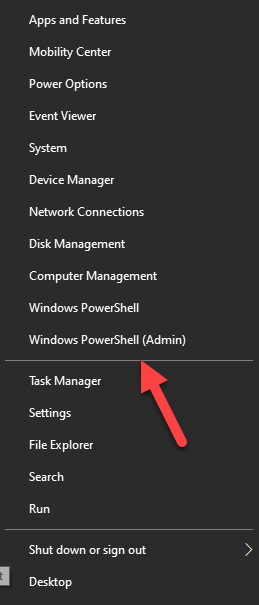
- Right-click Start > Windows PowerShell (Admin) .
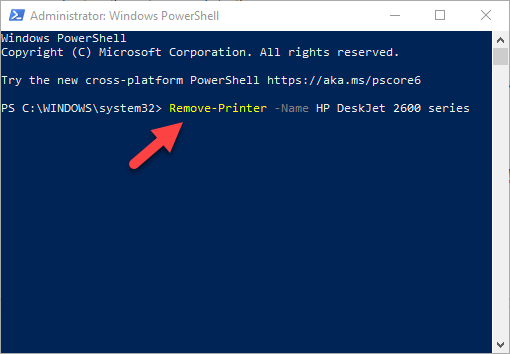
- Type this command: Remove-Printer –Name “YOUR-PRINTER-NAME” .
- Open Settings > Apps > Apps & Features , and click the software you want removed.
- Click Uninstall and follow the directions to remove it completely.
Delete Remnants From The Windows Driver Store
This solution is meant to remove any remnants of drivers that may still be on your device even after deleting driver packages.
In the driver store, you’ll find inbox and third-party driver packages, which were installed and stored in the folder even before the driver itself got installed.
Each of the subfolders in the store holds a driver package and corresponding .inf file , but it’s a bit difficult to find the specific driver package you’d like to remove.
The good news is you can use a third-party tool to explore the Windows driver store and completely remove the old printer driver once for all. It’ll also save you lots of space that would otherwise have been occupied by junk files.
What Happens When Drivers Are Deleted?
A device driver is a piece of software that tells your computer’s operating system how to communicate with the device it’s connected to.
For example, to connect to your printer and execute the print command, a printer driver is needed to bridge the gap between the two devices, and deliver the print job to you.
Without the printer driver, your printer is just hardware that doesn’t work. Similarly, deleting the printer driver after deleting the printer from your computer renders it inoperative.
However, if you delete the driver, you can undo the deletion using System Restore , from the previous restore point created when you deleted the driver from your computer.
Alternatively, Windows will automatically install the driver on your operating system by searching for it from its extensive library of drivers. If it doesn’t find a suitable driver, it’ll search for a driver online through Windows Update. Otherwise, you can visit the device manufacturer’s website to find the specific driver for your printer.
- Preparing for Windows 10 End of Support: Upgrading to Windows 11
- How to Fix a “This file does not have an app associated with it” Error on Windows
- How to Fix an Update Error 0x800705b4 on Windows
- How to Resolve “A JavaScript error occured in the main process” Error on Windows
- How to Fix the Network Discovery Is Turned Off Error on Windows
Elsie is a technology writer and editor with a special focus on Windows, Android and iOS. She writes about software, electronics and other tech subjects, her ultimate goal being to help people out with useful solutions to their daily tech issues in a simple, straightforward and unbiased style. She has a BCom degree in Marketing and currently pursuing her Masters in Communications and New Media. Read Elsie’s Full Bio
