You can check what version of Ubuntu you have using several methods, and each has its benefits. Some give you the major version; others give you all the little details.
Why Should You Find Your Version of Ubuntu?
You know you’ve got Ubuntu. Why does the version matter?
- Like the different versions of Windows, some things will work in some versions of Ubuntu, and some will work only in others. You need to know what version you have to install the proper drivers for your hardware and apps that will work best on your version.
- It also helps you identify what updates your Ubuntu operating system needs.
- Some versions of Ubuntu are best used as servers, and some are best for desktop environments.
- When asking someone for help with Ubuntu, they’ll want to know what version you have.

What Are the Versions of Ubuntu?
Windows and macOS are straightforward when it comes to versions. Many PCs are either Windows 11 or Windows 10. MacOS’ most recent versions are Monterey, Big Sur , and Catalina.
Ubuntu version numbers are based on the year and month of release. Ubuntu releases also come with code names made of two alliterative words. It’s an adjective and an animal name, so the result is a name like Bionic Beaver. For example, the latest standard Ubuntu release is 21.10 Impish Indri. (An indri is a large species of lemur.)
If that wasn’t confusing enough, there are two current versions at any time. There are the interim release and long-term service ( LTS ) versions. Support for the interim Ubuntu release is 9-months from release. The LTS version is used where the stability of the instance is critical. It gets five years of standard support and can have another five years under the Extended Security Maintenance ( ESM ). ESM is free for personal use and is a paid subscription for enterprises.
Canonical Ltd. builds Ubuntu on the open-source Linux kernel , so the Linux kernel version can be important to know. A current Linux kernel version number may look like 5.15 . The first number is the major release version, and the remaining numbers are the minor release.
Put them all together, and you could get an Ubuntu version like 22.04 LTS Jammy Jellyfish, Linux kernel 5.15 .
How to Find The Version of Ubuntu in the Windows Linux Subsystem
Yes, you can run Ubuntu within Windows with Microsoft’s Windows Linux Subsystem (WSL).
- Open Ubuntu for Windows .
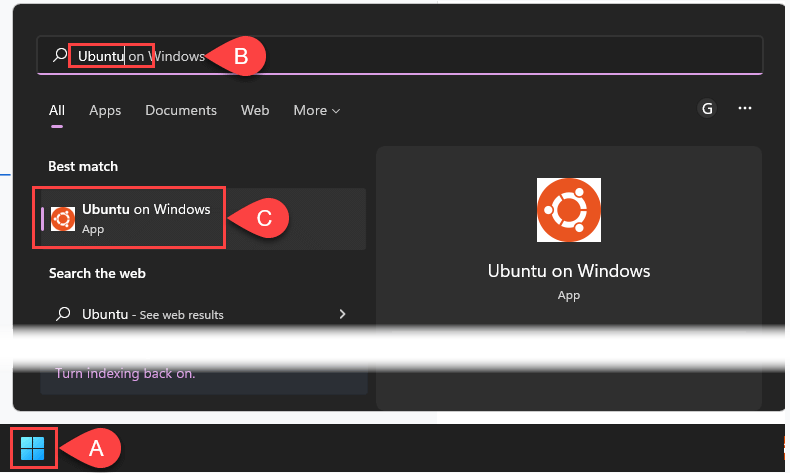
- Upon starting, Ubuntu shares the version and more information in the command line. The version in the example is Ubuntu 20.04 LTS . It also shows the Linux kernel used as 5.10.102.1-microsoft-standard-WSL2 . Note the WSL2 part. There are two versions of Ubuntu Linux for WSL, 1 and 2, and each has its pros and cons.

Already opened Ubuntu WSL, and that line is gone? Check the section below on finding the Ubuntu version through the command line. They also work in WSL.
How to Find theVersion of Ubuntuin the Command Line
If you regularly use terms like “ Linux distro ” or “ bash ,” the command line interface is for you.
- Press Ctrl + Alt + T to open the command line terminal.
- Use any of the following commands to check the Ubuntu version. Each command shows varying amounts of information about the version and the system.
lsb_release -d
For the shortest result, use the command lsb_release -d . The lsb_release command reveals the Linux Standard Base ( lsb ) information for any Linux distribution.

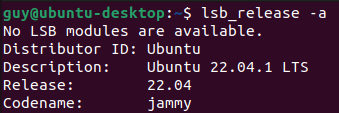
lsb_release -a
Using the -a gives complete information about Ubuntu, including Distributor ID , Description , Release , and Codename . Oddly, Codename doesn’t reveal the full codename, which is Jammy Jellyfish in the version shown below.
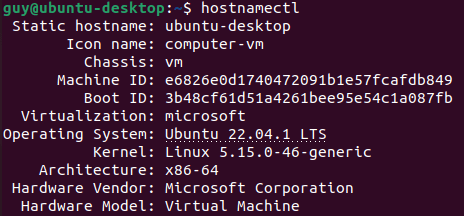
hostnamectl
The hostnamectl utility changes or returns information about the host or hostname . Using it without any options only returns the hostname info. Look for the Operating System line to get the Ubuntu version and the Kernel line for the Linux kernel version.
cat /etc/issue
The concatenate ( cat ) command is usually used to join files together. When used without any options and just the filepath/filename ( etc/issue ), it displays the contents of the issue file. Ignore the \n \l . It’s not important in this context.

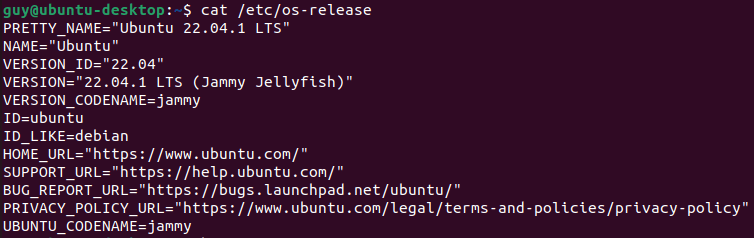
cat /etc/os-release
Just like the command above, this shows the contents of the os-release file. Note the Version line, which shows the entire codename.
uname -r
To see just the Linux core version, use the command uname -r . The uname utility gives information about the system but not about Ubuntu itself.

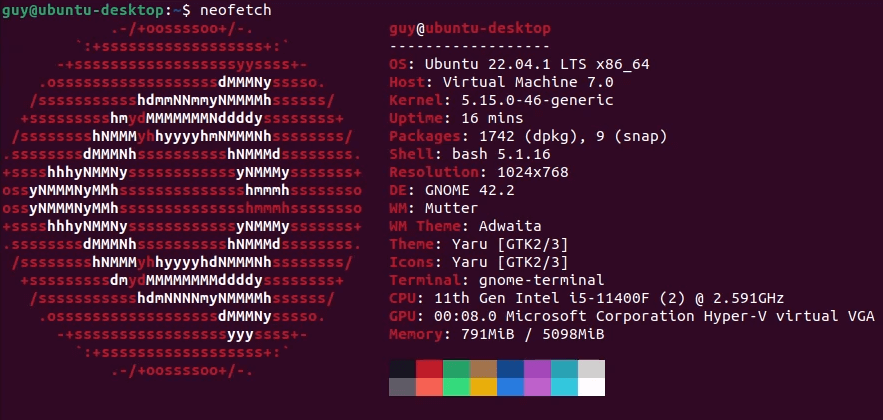
How to Find the Version of Ubuntu Using Neofetch
Neofetch is a bash app that displays system information creatively with ASCII art.
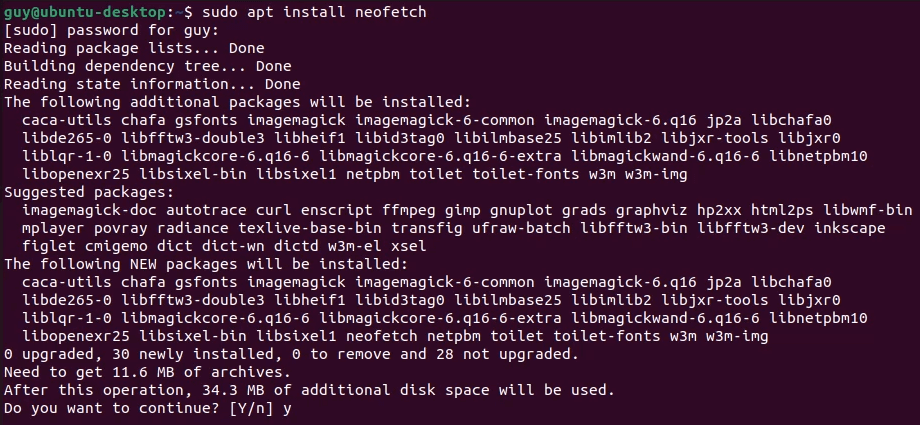
- Open the bash terminal and install with the command sudo apt install neofetch . Then enter your password, and it will find the neofetch.

Once the neofetch package has been found, enter Y to begin the installation.
- When the installation is done, enter the command neofetch .
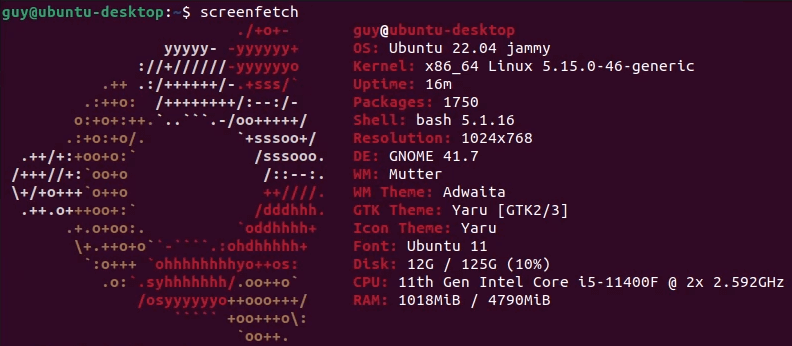
To install a similar utility called Superfetch (not to be confused with Windows Superfetch ), follow the same procedure above, substituting superfetch where you used neofetch. Each returns slightly different information, so pick the one with the information you’ll need most often.
How to Find the Version of Ubuntu Using the GUI
Maybe getting into the terminal and working with bash and the command line is more than you want to do.
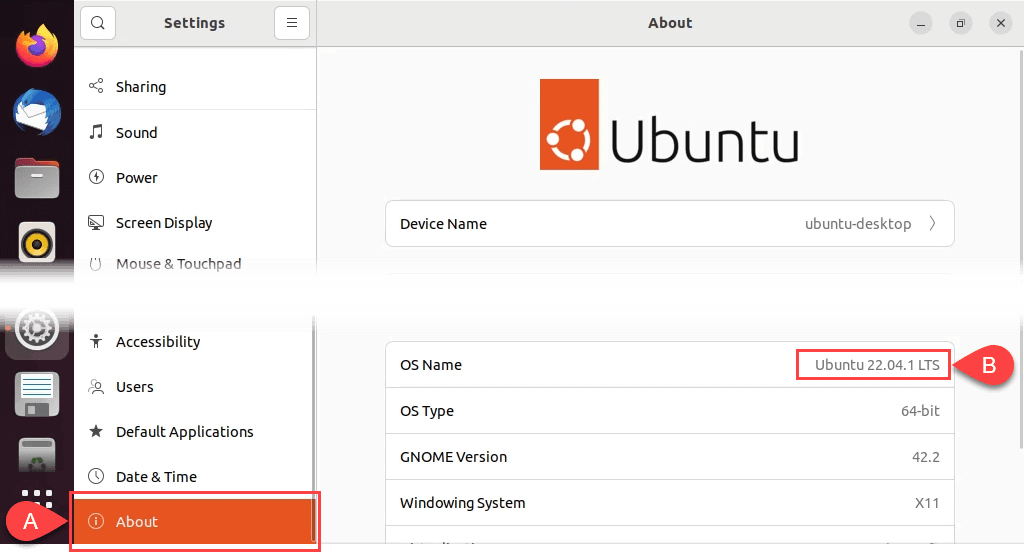
- Select the Show Applications icon and then select Settings .

- It should open to show the About screen where you can find the OS Name . If not, scroll to the bottom of the Settings window and select About .
Now You Know Your Ubuntu
With ten ways to find the Ubuntu version, many of them providing other system information, you’ll know Ubuntu better . You’ll be able to decide what updates you need, find apps that’ll work on it, and know when it’s time to upgrade to the newest version of Ubuntu .
- Linux Mint vs Ubuntu: Which Is Better?
- Fedora vs Ubuntu: Which Linux Distribution Is Better?
- A Beginner’s Ubuntu Linux Guide
- Forcefully Close a Program in Ubuntu
- Top 10 Best Linux Apps For Ubuntu Users
Guy has been published online and in print newspapers, nominated for writing awards, and cited in scholarly papers due to his ability to speak tech to anyone, but still prefers analog watches. Read Guy’s Full Bio
Are you trying to install a printer on your Ubuntu system? Luckily, Ubuntu now recognizes most printer brands and will automatically install the related drivers when connected.
Many printer manufacturers such as Brother and HP support Linux distributions and release their own printer drivers. But before installing a printer from another brand, you should look at their website to see if they support Linux.
Keep in mind that your desktop environment is what dictates the configuration tool you need to use to set up your printer, not the Linux distribution.
Is It Already There?
Many modern printers have powerful network capabilities. What this means is that when you go the add printer area, your printer will already be listed.
How can you find out if it is? Note that you will need administrative privileges on the system to set the default printer.
- Type Printers in the Activities overview. Moving your mouse to the top-left corner of your screen will show Activities .
- Or you can press the Super key on your keyboard. The super key is the one that looks like the Windows logo on most computers.
- Go to system settings . You can find it on your toolbar or Ubuntu dock.
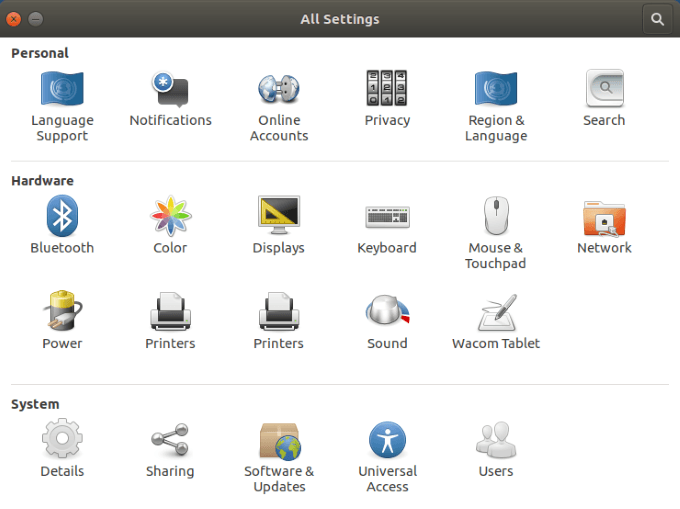
- Click on Printers to see which – if any – printers are listed.
Your Printer Is Listed
If you see your printer listed under devices , the following steps will help you finish the printer installation.
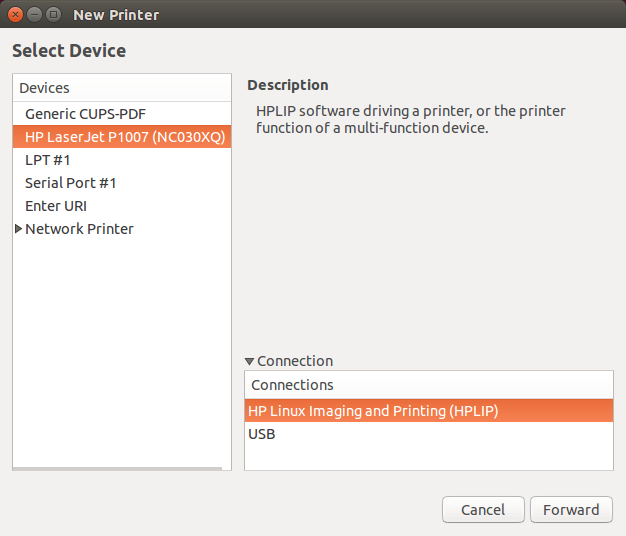
- If your printer is listed, it is because you have a network-savvy printer. Select it and then click on properties.
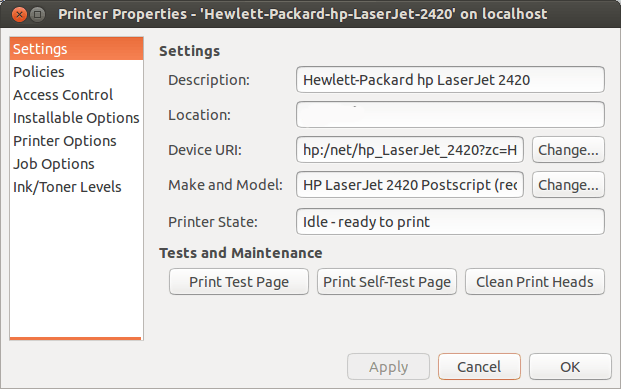
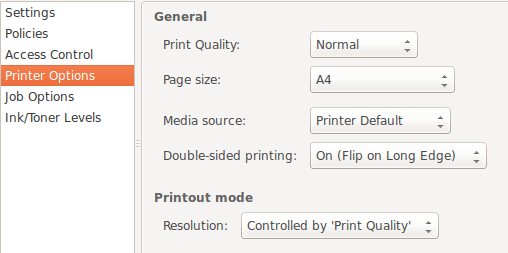
As you can see in the image above, you can:
- Change the name of the printer.
- Print a test page to make sure it is working properly.
- Troubleshoot your issues if you have a problem.
You should also check the Printer Options to make sure the default settings are consistent with the capabilities and features of your printer.
Keep in mind that every printer is going to be slightly different. However, the main principles are the same across all printers.
Pay attention to the Output Mode in the image above. If you are looking to save money because print cartridges can be expensive, you might want to only use Color when necessary.
When you don’t need a color copy, you can change that option to Black and White or Grayscale .
What If Your Printer Is Not Listed?
There will be times when your Ubuntu OS won’t find a connected printer. There are various reasons for this that range from simple to complex.
You can either look at the printer manufacturer documentation or follow the steps below.
Check Your Printer Hardware
One of the simplest things to check is the connection. Did you properly connect the power cables and USB (if the printer is not using wireless)?
If you have an older printer or have moved it from one location to another, you could have a loose connection. Check both ends of the USB cable to make sure the connection is secure.
Ubuntu Drivers
Some older printers were not designed to work with the open-source operating system or the latest version of Ubuntu.
Alternatively, if your printer is very new, it might not have been added yet to Ubuntu’s database. So, what can you do?
Download Your Driver
You can go to the printer manufacturer’s official website to find and download the appropriate driver based on the model number.
Each printer’s brand installation will vary so be sure to follow the directions carefully.
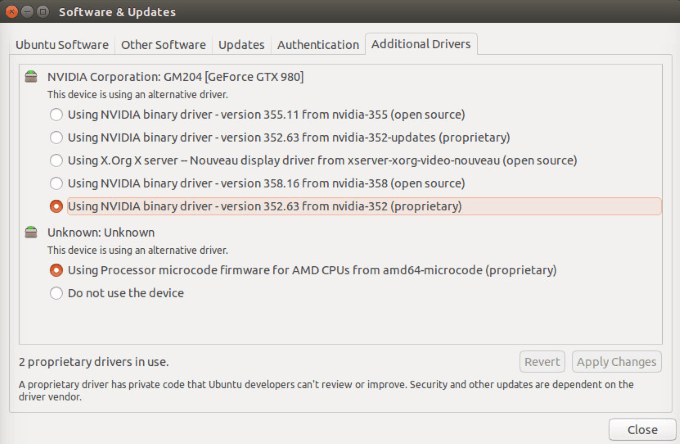
Use The “Additional Drivers” Tool
Some printer manufacturers have their own proprietary and closed-source drivers. This means that that Linux distributions won’t be able to automatically enable them for you.
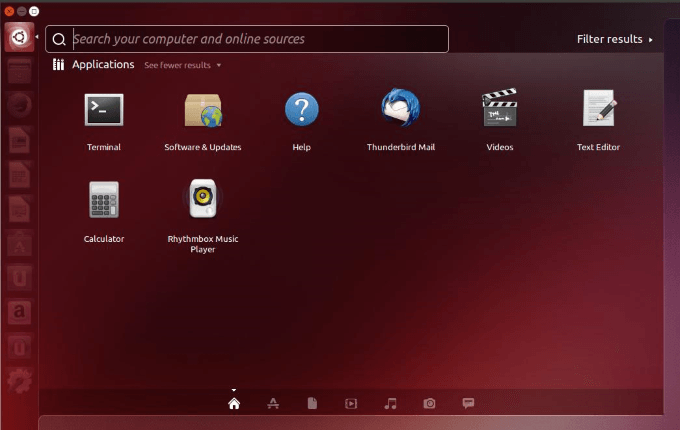
- Ubuntu-based distributions have an Additional Drivers tool to enable you to install proprietary drivers. First, open your dash.
- Then do a search for Additional Drivers and launch it.
- Your system will detect the proprietary drivers you need for your printer and let you install them.
Configure Manually Using CUPS (Common Unix Printing System)
Developed by Apple, CUPS enables your system to detect your printer if it isn’t automatically found. You can use it with a single computer or a group of networked computers.
- If you don’t already have CUPS installed, you can install from Terminal with the following command:
sudo apt install cups
- Now you need to enable CUPS:
sudo systemctl enable cups
- Use the following command to start CUPS:
sudo systemctl start cups
- After you authenticate with your user password, the CUPS server will start automatically .
- Now that you have enabled and started the CUPS service, exit Terminal. Launch into CUPS in local host:
CUPS Setup - localhost:631
- Add your printer from the CUPS for Administrators .
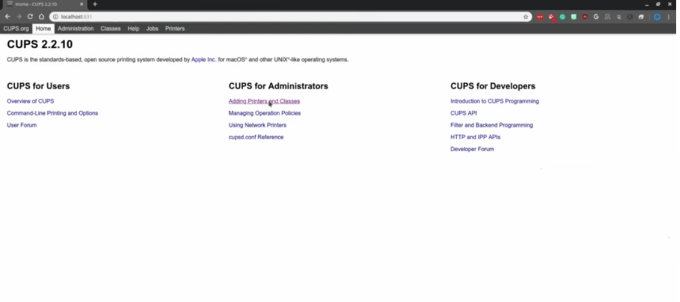
- From the Administration section, under Printers , click Add Printer .
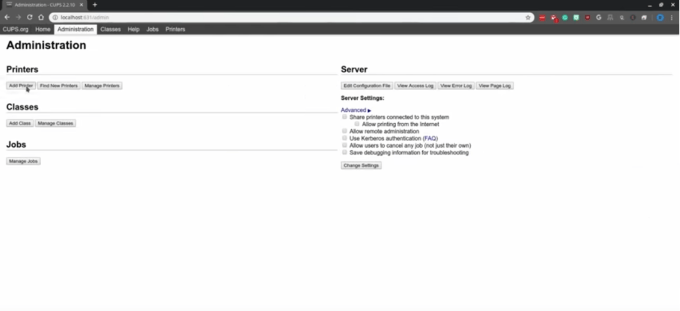
- Find your printer from the locally installed printer.
Keep in mind that CUPS is specifically for printing and not scanning or other functions some printers might perform.
Unless your printer is very new or old, most of the time, setting up a printer on Ubuntu is not that difficult.
- What Version of Ubuntu Do I Have?
- Linux Mint vs Ubuntu: Which Is Better?
- Fedora vs Ubuntu: Which Linux Distribution Is Better?
- A Beginner’s Ubuntu Linux Guide
- Forcefully Close a Program in Ubuntu
David has a background in small business and lives in Australia. He is a WordPress and Ubuntu Developer who enjoys design, CSS and tech tool integration. Read David’s Full Bio
