Keyboards are not just essential for computer activity but also art. They’re becoming collectibles, with people searching for the most unusual units to acquire. Mechanical keyboards are no exception.
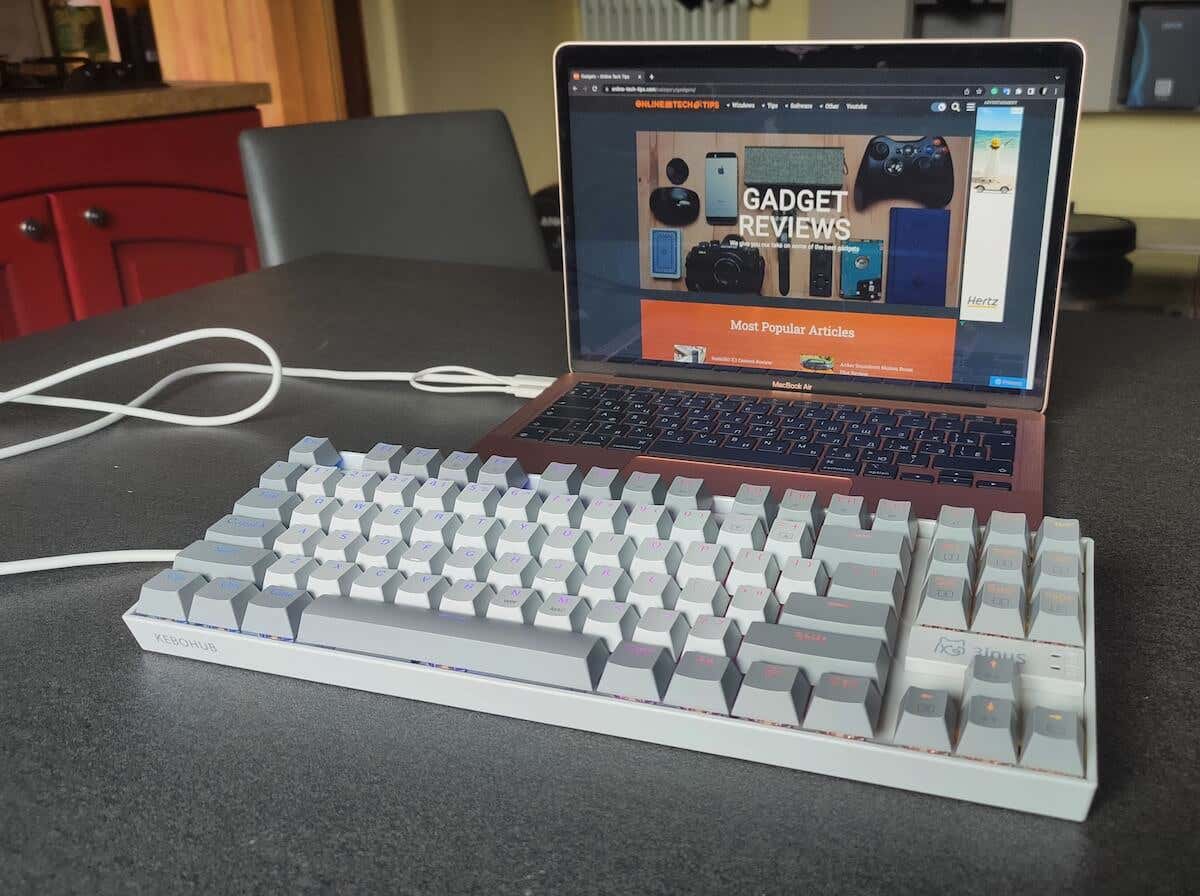
Whether you have a collection of quirky keyboards or are looking for an ergonomic mechanical keyboard that can do it all, you’ll find the new Kebohub 001 an interesting specimen.
Check out our Kebohub EE01 mechanical keyboard review to determine whether you should choose it as your new keyboard.
WhatGeek x 3inuS Kebohub EE01 Mechanical Keyboard: First Impressions & Specs
3inuS is a fairly new manufacturer specializing in Apple peripherals. Their latest product is a Kebohub EE01 mechanical keyboard hub. Kebohub is a mechanical keyboard with hot-swappable switches with four USB hubs: one HDMI port, one USB-C port, and three USB-A ports.
The Kebohub EE01 started as a Kickstarter campaign and is currently seeking funding on Indiegogo . If you want a more efficient addition to your working space, consider backing up this campaign.
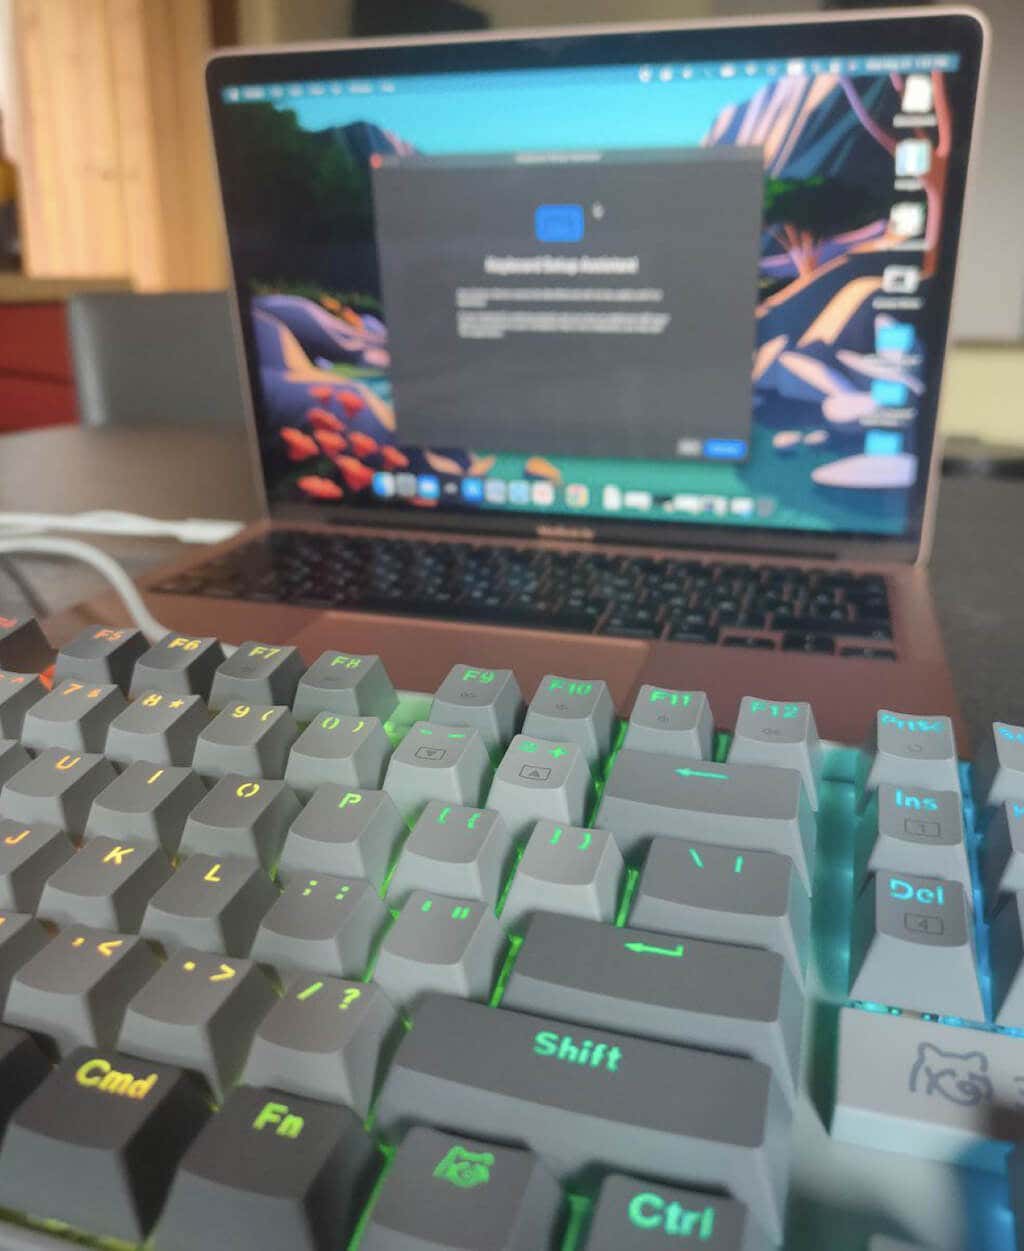
Even though 3inuS specializes in Apple products, the Kebohub is compatible with Windows and Apple computers. For the purposes of this review, I tested the keyboard with a MacBook Air, MacBook Pro, and Lenovo Yoga.
Before we dive into the review, here’s a complete list of specs of the WhatGeek x 3inuS Kebohub EE01 mechanical keyboard:
- Dimensions: 14 x 5 x 1.8in (35.5 x 12.5 x 4.5cm)
- Weight: 2 lbs (920g)
- Type: mechanical keyboard with a built-in 5-in-1 hub
- Number of keys: 87
- Structure: metal plate mounted
- Case material: ABS
- Form factor: TKL
- Keycap: double injection ABS – transparent letter
- Switch: Huano Blue hot-swappable, 3pin/5pin switch support
- Backlight: RGB
- Connectivity: USB-C, cable length 63 in (160cm)
- Compatibility: Mac / Windows / iOS / Android
- Color: light grey with dark and light grey keycaps
- Price: $84 on Indiegogo
Design and Unpacking
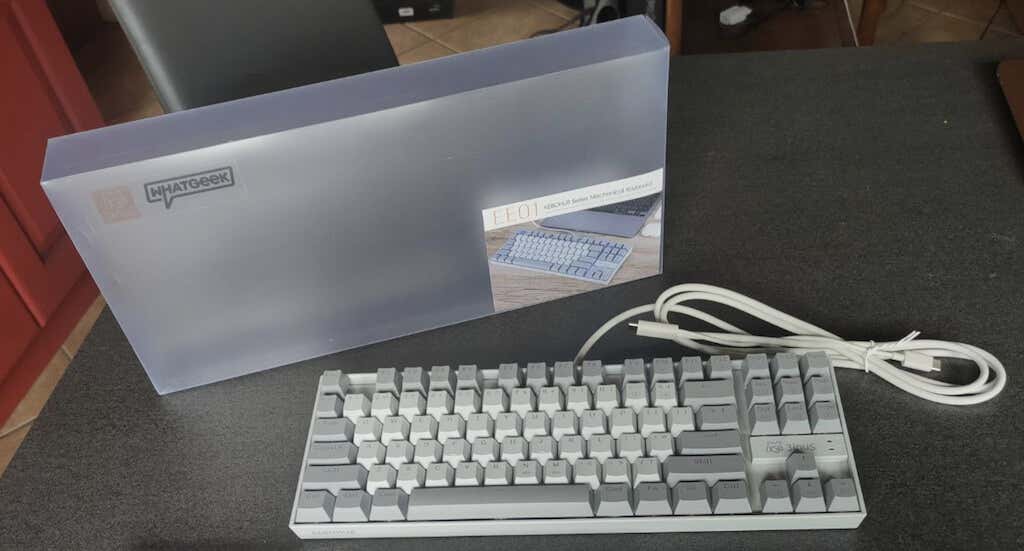
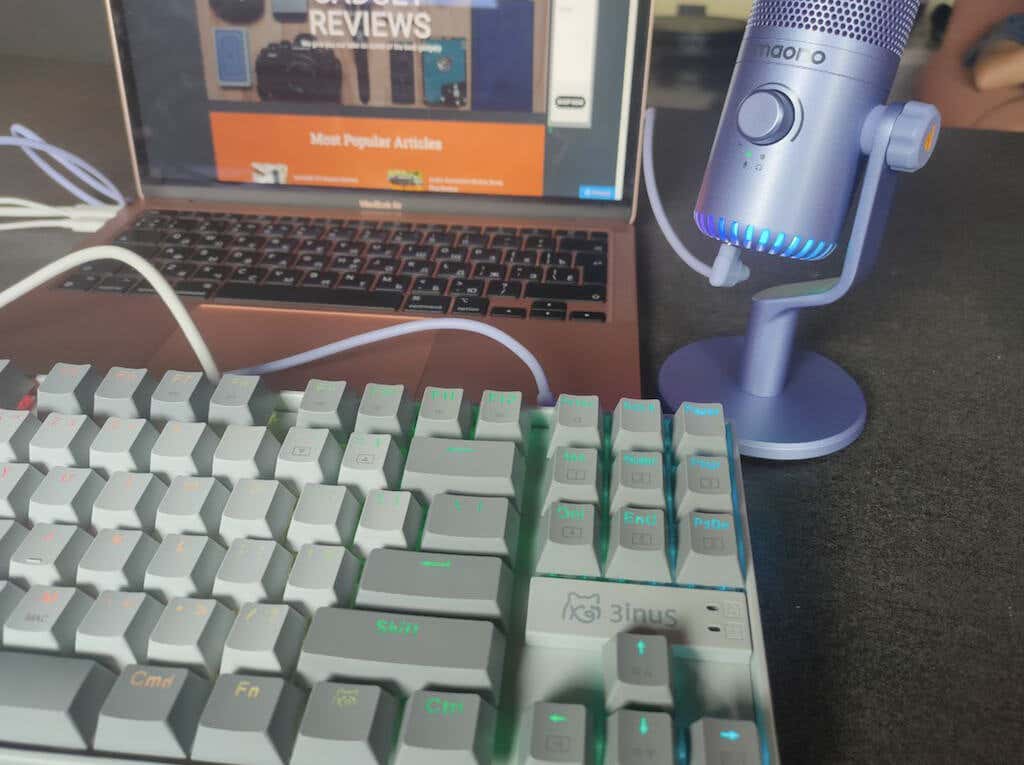
At first glance, the Kebohub doesn’t look much different from any other Windows and macOS-compatible keyboard. In fact, when I received the keyboard, the whole thing seemed kind of boring. It was packed in a see-through box with a little logo in the corner, and the keyboard didn’t look much. But I’m not one to judge gadgets based on their first visual impression.
What’sin the Box
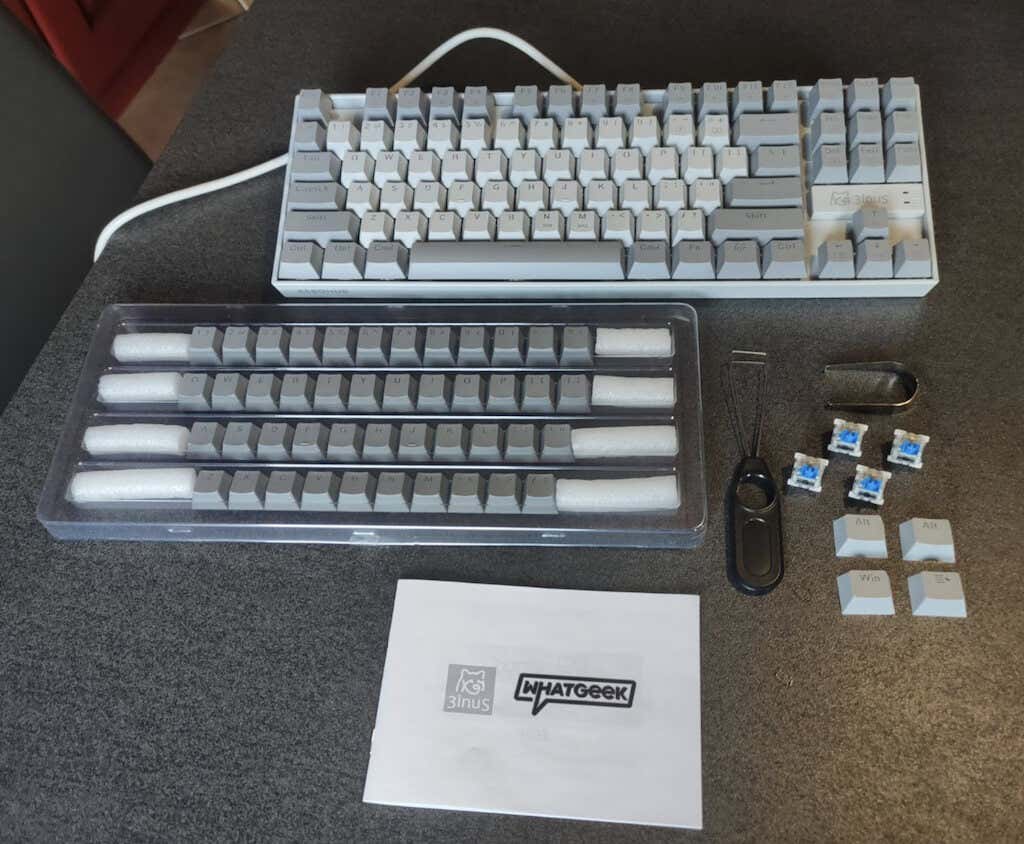
Here’s everything you’ll find inside the package when unboxing your Kebohub EE01:
- WhatGeek x 3inuS kebohub EE01 mechanical keyboard
- Full set of darker grey caps
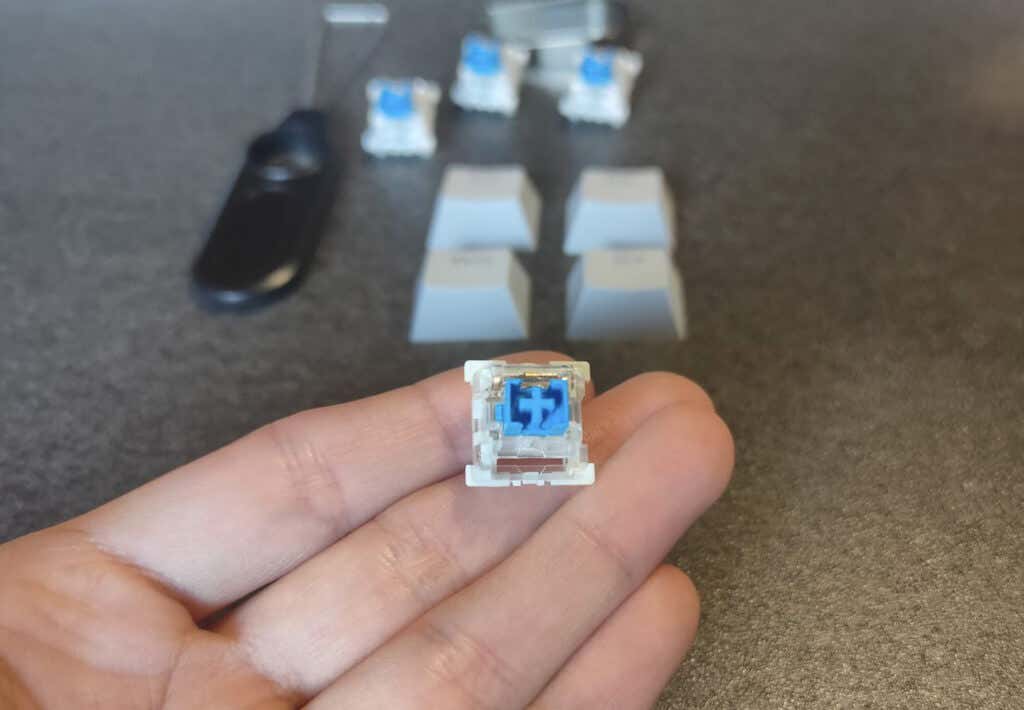
- Four extra switches
- Four extra Windows keycaps
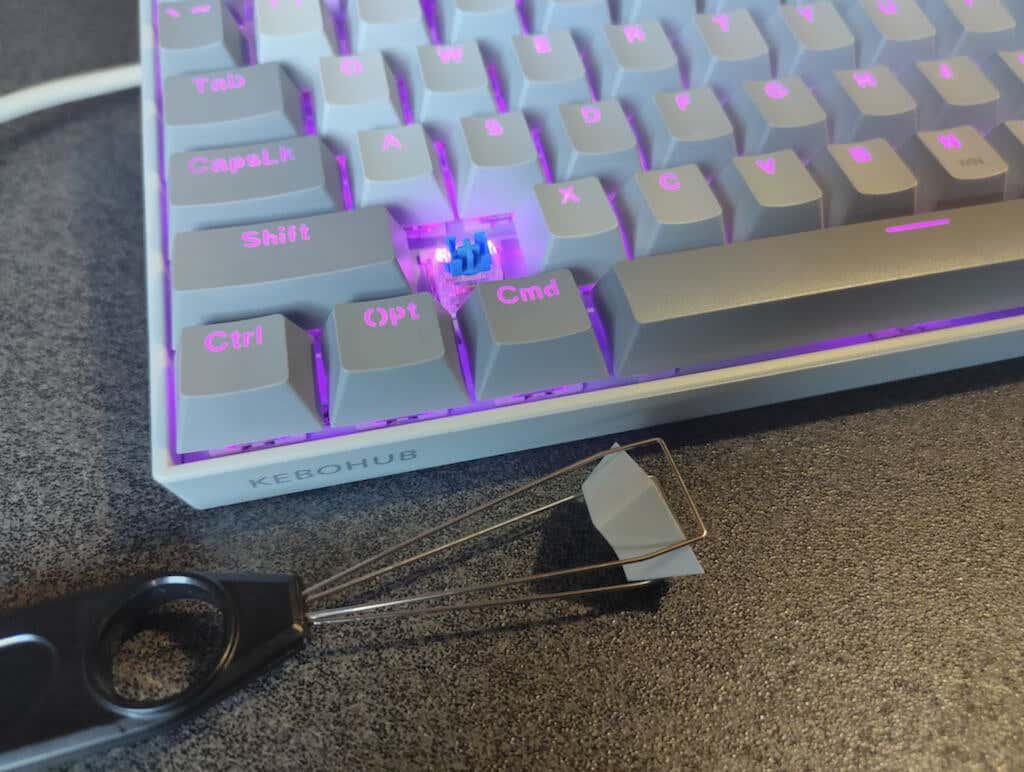
- Switch puller tool
- Keycap puller tool
- User manual
The body of the keyboard and the cable are light grey with 87 keycaps – part of them are darker grey, and the rest are light grey. I had a choice of Red and Blue switches. I’m a big typing enthusiast, and I’ve never tried the Blue clicky keys that are supposed to make clicking noises and feel like an actual typewriter, so the choice was obvious.
Right off the bat, I have to say that if you’ve never tried the Blue Switch before and you don’t live alone – think twice before getting it. On one side, the typing experience is everything I hoped for, and I personally love the sound these keys make. However, it’s a total nightmare for my boyfriend to be around me when I’m using the keyboard.
The clicky sounds are so loud that I was banned from using the keyboard at night, even when I’m in a different room from my boyfriend. If you don’t want to disturb the people around you with your loud typing, go for the red switches, they’re the silent option for mechanical keyboards (and a typical gamer’s choice) that will keep your family and colleagues sane.
Back to the keyboard’s design and build quality. The body of the keyboard feels solid, and it has rubber pads on the feet to make it more stable and avoid sliding around your desk. On the back of the keyboard, you’ll also find two flip-out feet that allow you to raise one side of the keyboard for better ergonomics.
As soon as I got my hands on this keyboard, I was curious about taking out the keycaps and the switches. The best part is that you get all the tools and even some spare parts included in the package. The keycap puller tool makes it super easy to replace a keycap.
The RGB Lighting
The real experience with the Kebohub EE01 starts when you plug it in, and the RGB lighting kicks in. The keyboard doesn’t require extra drivers and is a purely plug-and-play device.
For those of you who are on the hunt for a gaming keyboard, you’ll be happy to know that this keyboard has many lighting effects. Even if you’re someone like me who prefers to disable the lighting effects, you’ll probably find the one you like on this keyboard.
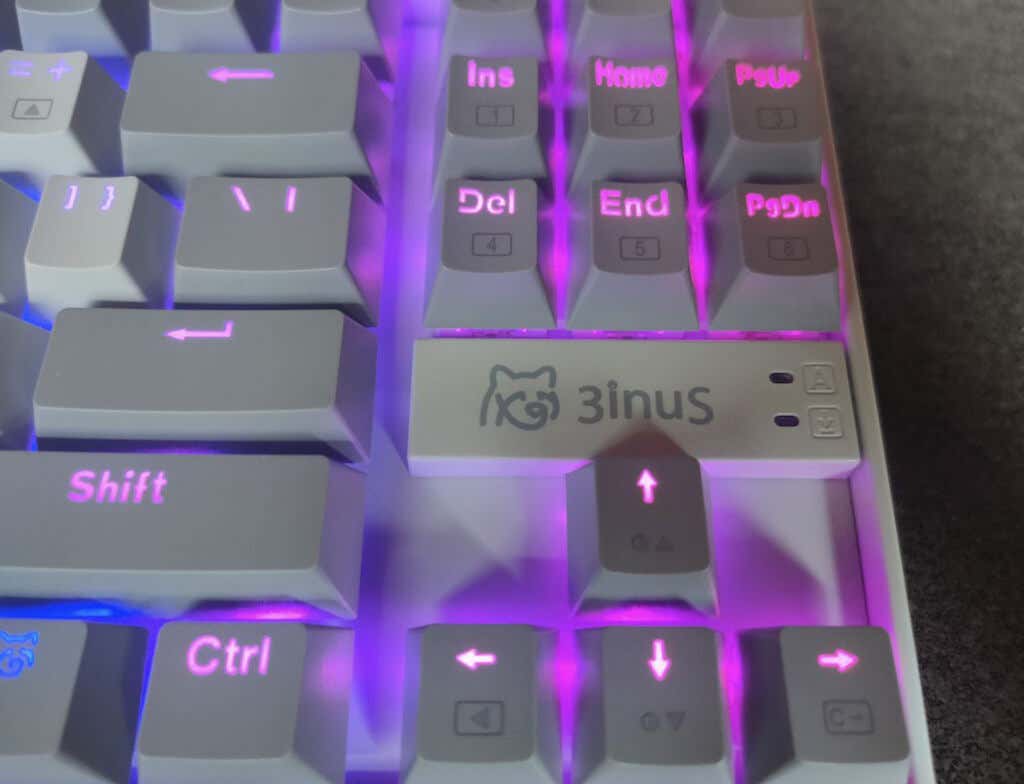
The Kebohub manual has two entire pages that explain different ways you can use to customize the lighting on your keyboard. For example, there are 18 preset RGB backlight effects that you can cycle through by holding the FN key and pressing the ins/home/pgup/del/end/pgdn keys. There are other backlight adjustments that you can perform using the following keyboard shortcuts:
- FN + up arrow/down arrow : increase/decrease brightness in 5 steps
- FN + left arrow : change LED flow direction
- FN + right arrow : change color (8 different colors)
- FN + -/+ : adjust LED flow speed
You can also use a scheme for customizing your own backlight of chosen keys. You can find more information on this one in the user manual included in the package. It’s a shame there’s no software to control these lighting options.
The letters and numbers on the keys are clearly marked, allowing the light to shine through. It makes using this keyboard a wonderful experience.
Performance & Features
As I mentioned before, typing on the Kebohub was overall a great experience for me. The keyboard is built ergonomically, and my wrists don’t tire even after using it for several hours straight. All keycaps are designed to fit the human finger, to reduce hand fatigue after prolonged usage, and to ensure your comfort.
All the while, the rubber feet provide a decent grip on the desk and make sure the keyboard stays in place while you’re typing.
The blue switches provide just enough resistance when typing and produce the old-school clicking noise. Using the Kebohub truly feels like you’re typing on a typewriter. While the sound is satisfying, I wouldn’t recommend this type of switch for live streaming/gaming. Your mic will likely pick up on those keyboard noises, and it might ruin the audio side of your recording. If you’re looking for something in the middle, go for the brown switch, which is also available on Indiegogo.
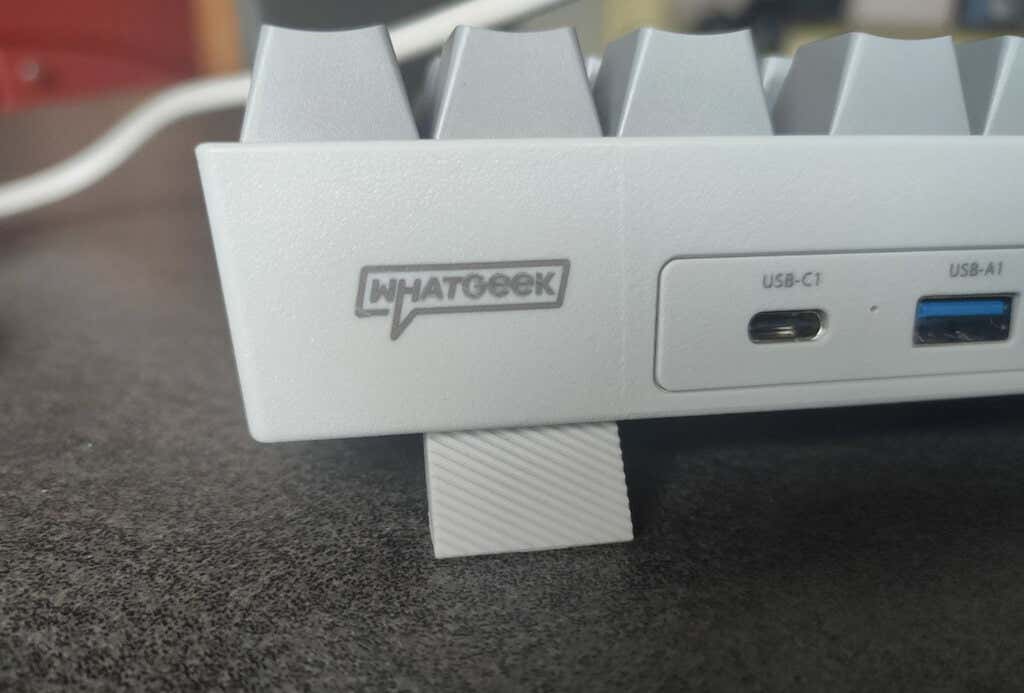
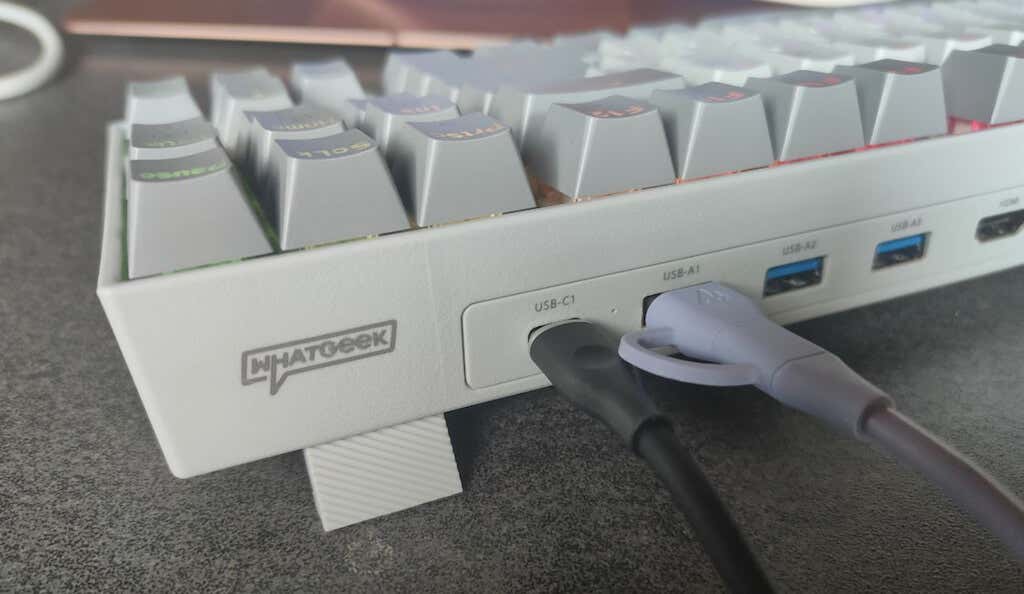
The USB Hub
The Kebohub EE01 is a wired keyboard. Unlike a wireless keyboard that connects to your computer via Bluetooth, it doesn’t require a charger and provides a more stable connection. However, the main reason the Kebohub is wired is because it comes with a built-in hub.
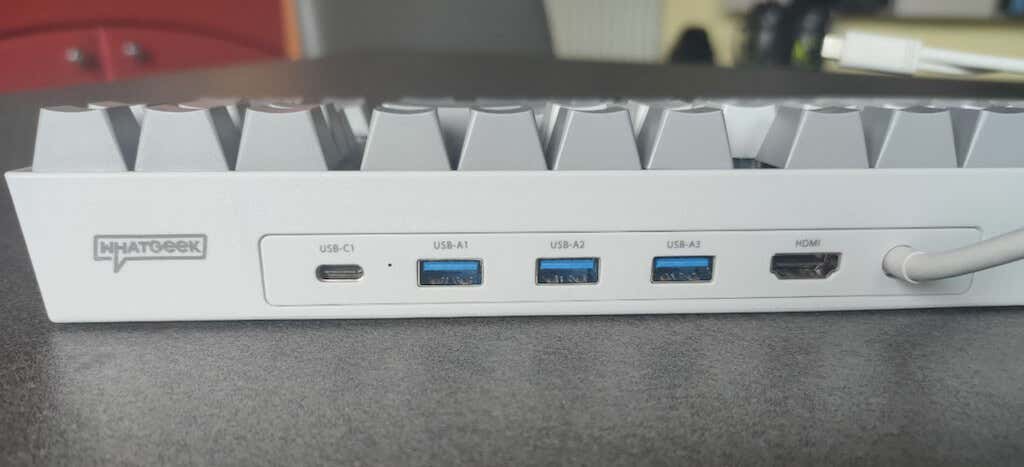
You get a variety of ports available just at the back of your keyboard, which is more convenient than you can imagine. If you own a modern MacBook, it probably comes with just two USB-C ports. One of those ports will often be used to charge your computer, so all you’re left with is just one port. Besides, if you ever need to plug in something with a USB-A cable, like a hard drive, you must use a dongle.
Kebohub can replace the dongle and allow you to use USB sticks, card readers, USB headsets, and hard drives, and even charge your smartphone using its 5-in-one hub.
The keyboard’s cable is Y-shaped and has two USB-C connectors on the end. You can use one of them. If you want more power for the ports, like when you want to use one of them as a power bank, it’s recommended to plug in both of the USB-C connectors. One connector provides a total output of 1.5A for a USB-C1 or USB-A1 port, while two connectors provide 1.5A for both USB-C1 and USB-A1 ports.
The availability of an HDMI port cannot be underestimated either. With the HDMI 2.0 port, your keyboard is compatible with 4K, 2K, 1080p, and 720p monitors.
If you’re dependent on ports, you’ll love the addition of the hub to this keyboard and will quickly forget how you lived without them before.
Should You Buy the Kebohub EE01 Mechanical Keyboard?
When I received the Kebohub EE01, I didn’t even know that I needed this keyboard. During a few months of testing it, it never failed in terms of connectivity and brought me lots of joy in the form of a beautiful typing experience. The 5-in-one hub is a brilliant idea and is bound to improve your productivity and help you declutter your computer desk. I can only recommend this keyboard to anyone looking for an ergonomic mechanical keyboard with added functionality.
- Mobile Pixels Duex Max Portable Monitor Review
- Trifo Lucy: The AI Robot Vacuum and Mop
- Review of Anycubic Kobra Max 3D Printer
- The OBSBOT Tiny 4K: an Impressive Webcam for PC & Mac
- Review of Anycubic’s Kobra 3D Printer
Anya is a freelance technology writer. Originally from Russia, she is currently a full-time Remote Worker and Digital Nomad. With a background in Journalism, Language Studies, and Technical Translation, Anya couldn’t imagine her life and work without using modern technology on a daily basis. Always looking out for new ways to make her life and location-independent lifestyle easier, she hopes to share her experiences as a tech- and internet-addict through her writing. Read Anya’s Full Bio
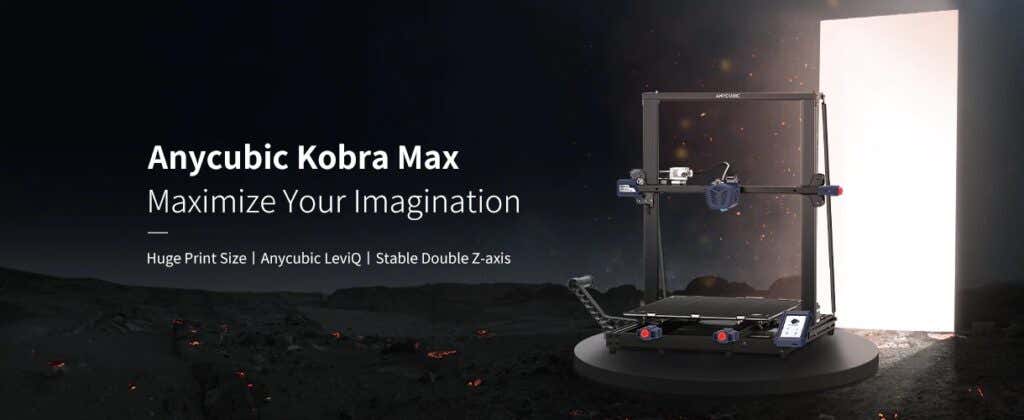
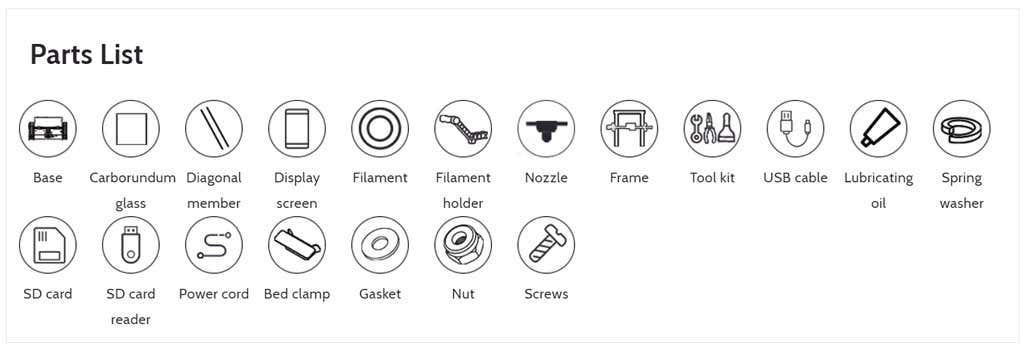
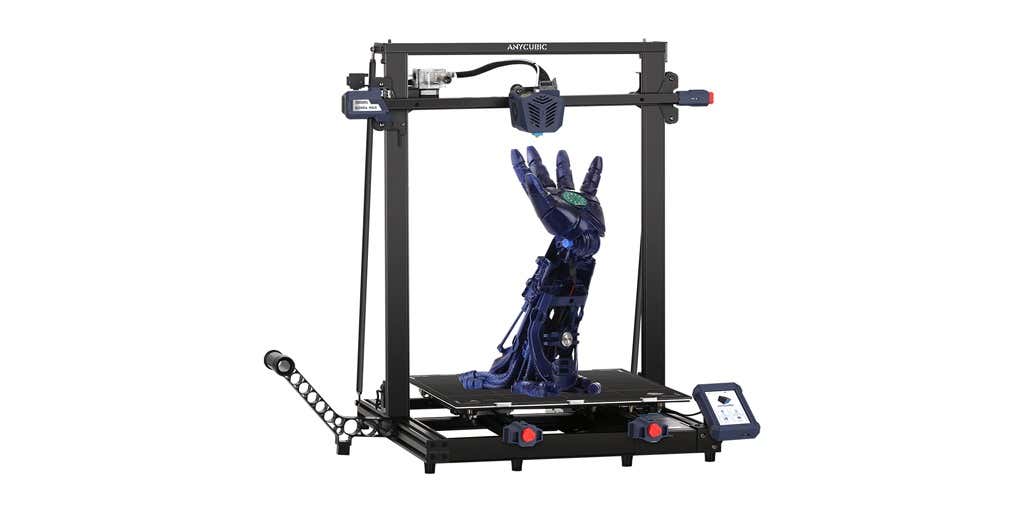
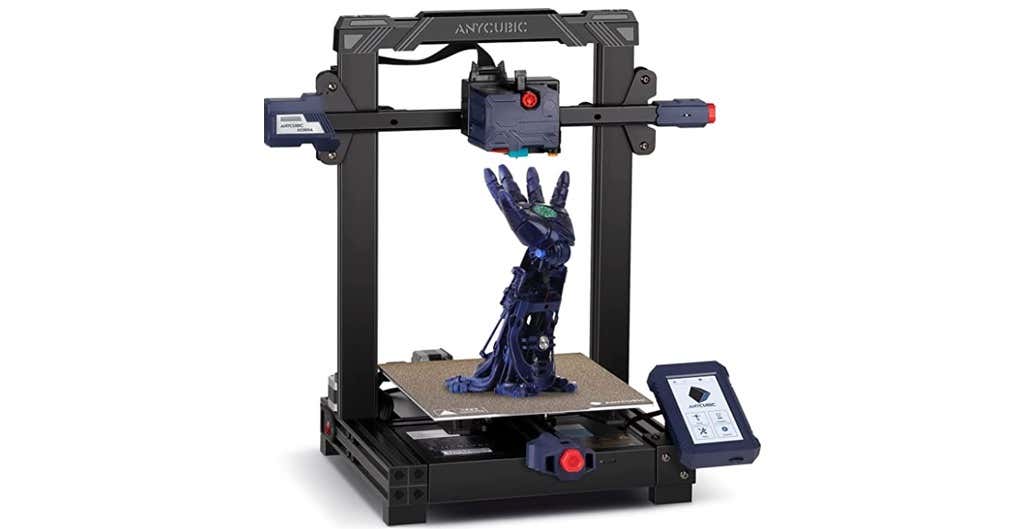
3D printer manufacturer, Anycubic, recently released two new printers—the Anycubic Kobra and its bigger, badder uncle, the Anycubic Kobra Max. We were interested in testing both products in our hunt for the best entry-level 3D printers. We’re looking for ease-of-use and affordability, as well as build and print quality.
We’ve published a number of 3D printer reviews from Anycubic—for both FDM printers like the Anycubic Vyper that print with spools of filament and SLA resin 3D printers like the Anycubic Photon Mono X 6K that use a liquid resin as its raw material—and we can say that the Kobra Max has quickly become one of our favorites.
Features of the Anycubic Kobra Max 3D Printer
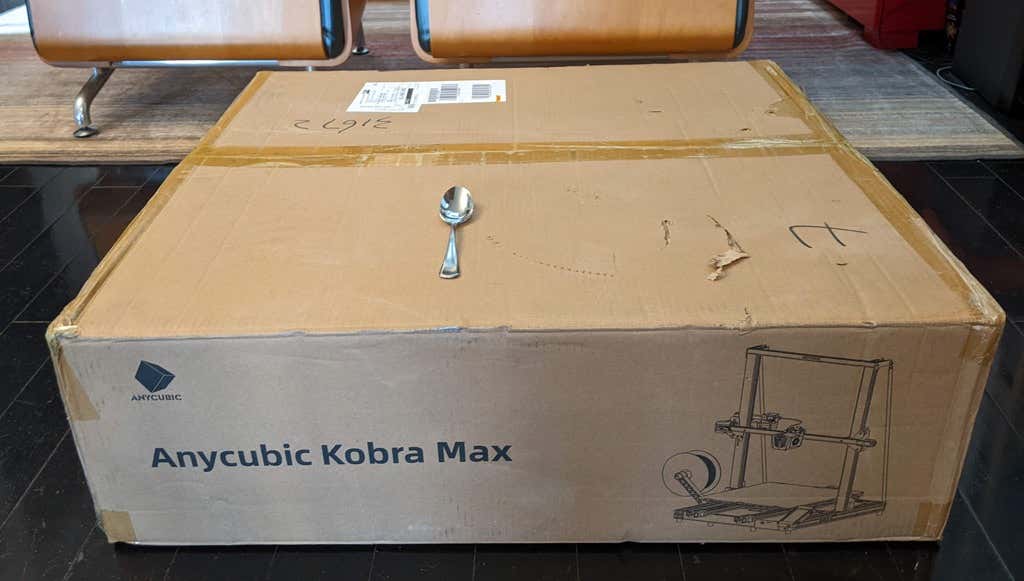
The most obvious feature of this printer is its size. It is absolutely massive. That means you can print huge items in a single piece. Think of a full helmet or an entire ukulele—these are things you couldn’t print in one piece on a normal-sized 3D printer. Truly, the word “Max” doesn’t sufficiently capture just how big this printer is. Good luck fitting the packaging into your trash or recycling bins!
We were skeptical that a Cartesian printer of this size (which relies on a moveable print bed) would perform well since it has a lot of weight to move around. Admittedly, it’s not the speediest printer out there because of those design tradeoffs, but it works great.
The Kobra Max has an impressive list of technical specifications:
- Leveling: Automatic, 25 points leveling using the Anycubic Leviq technology
- Panel area: 7.95 in² / 51.3 cm²
- Filament run-out detection: support
- Printing material: PLA / ABS / PETG & TPU
- Nozzle size: ø 0.4 mm (replaceable)
- Nozzle temperature: ≤ 500 °F / 260 °C
- Hot bed temperature: ≤ 194 °F / 90 °C
- Average speed: 3.1 – 3.9 in./s (80mm/s – 100m/s)
- Control panel: 4.3 inch LCD touch screen
- Z-axis: double threaded rod
- Print size: 17.7 x 15.7 x 15.7 in. / 45 x 40 x 40 cm (HWD)
- Build volume: 19.02 gal. / 72.0 L
- Machine dimensions: 72 x 71.5 x 66.5cm
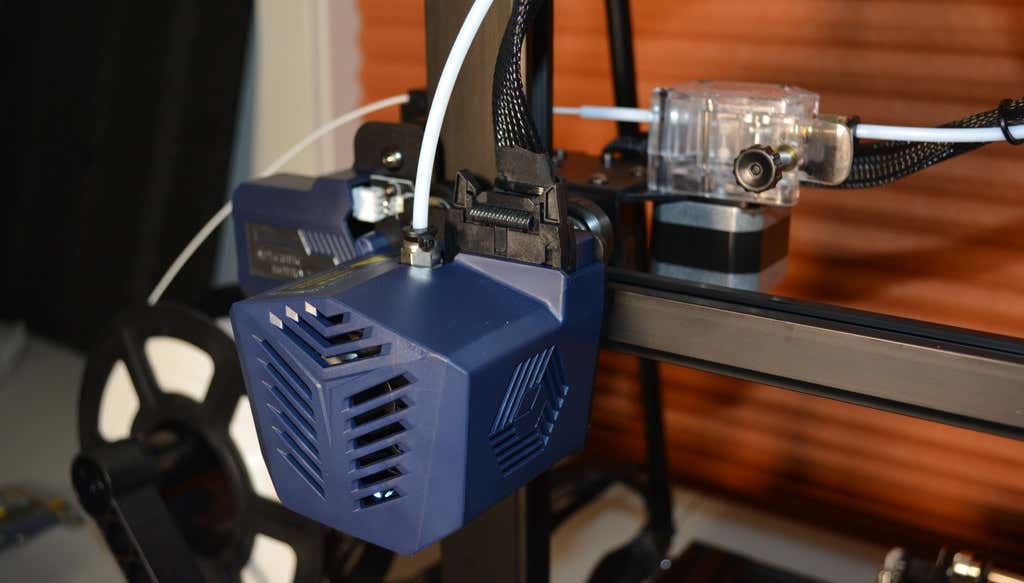
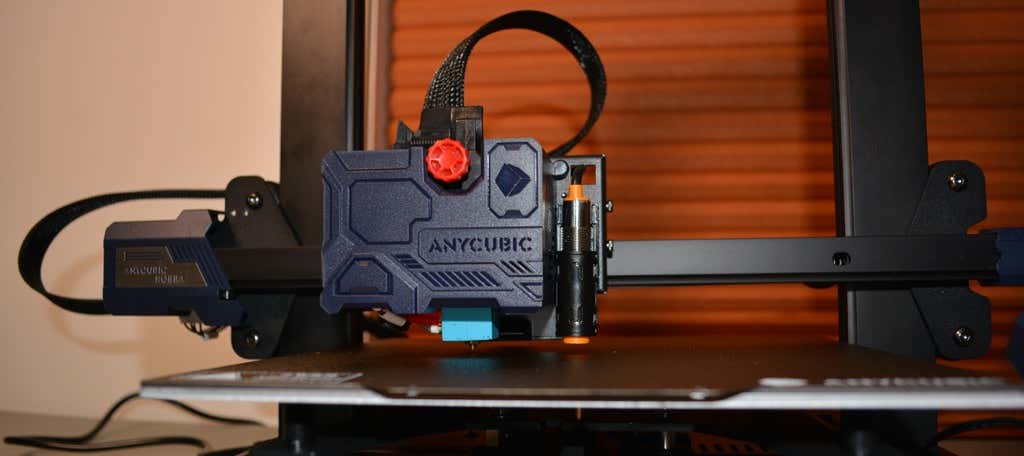
As far as we can tell, the extruder is identical to the extruder and print head on the Anycubic Vyper. Furthermore, the Kobra Max has the same automatic bed-leveling system as the Vyper. The system uses a pressure sensor instead of an inductive sensor.
The bed-leveling sensor is right on the nozzle itself, ensuring that it can probe every printable part of the bed. And since the sensor is pressure-based, you could replace the glass bed with any other material and the bed-leveling system will still work. (Inductive sensors require metal to work, so you won’t find them on printers with glass beds.)
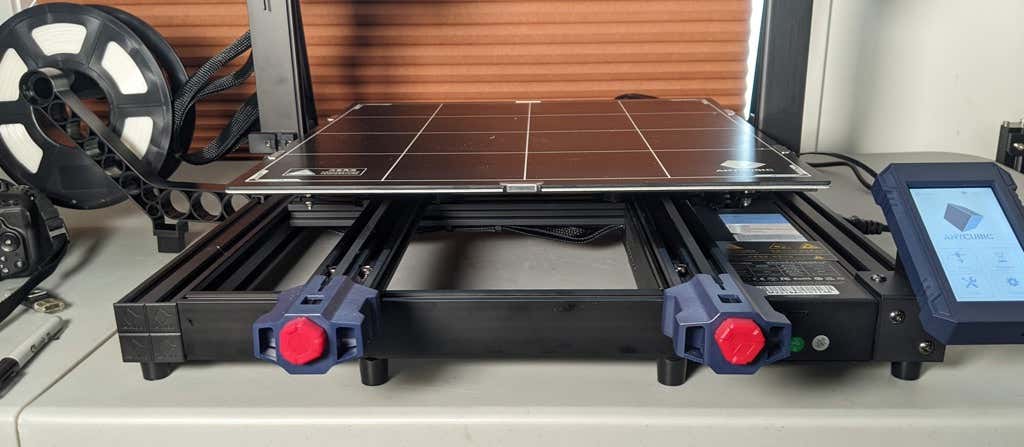
Since the Kobra Max’s printing platform is a rigid glass sheet, you can’t remove and flex it to pop your prints off. We prefer removable spring steel build plates, but glass is still a nice printing surface. If your printer doesn’t have a removable bed, glass is ideal because you can use metal scrapers to remove your prints without worrying about scratching the surface.
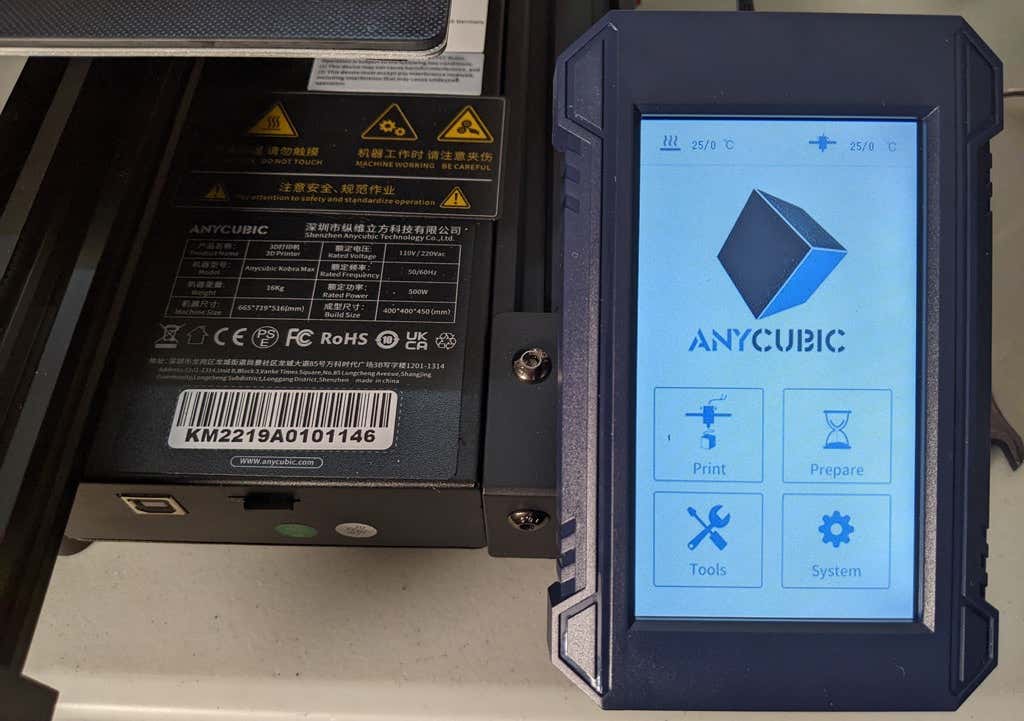
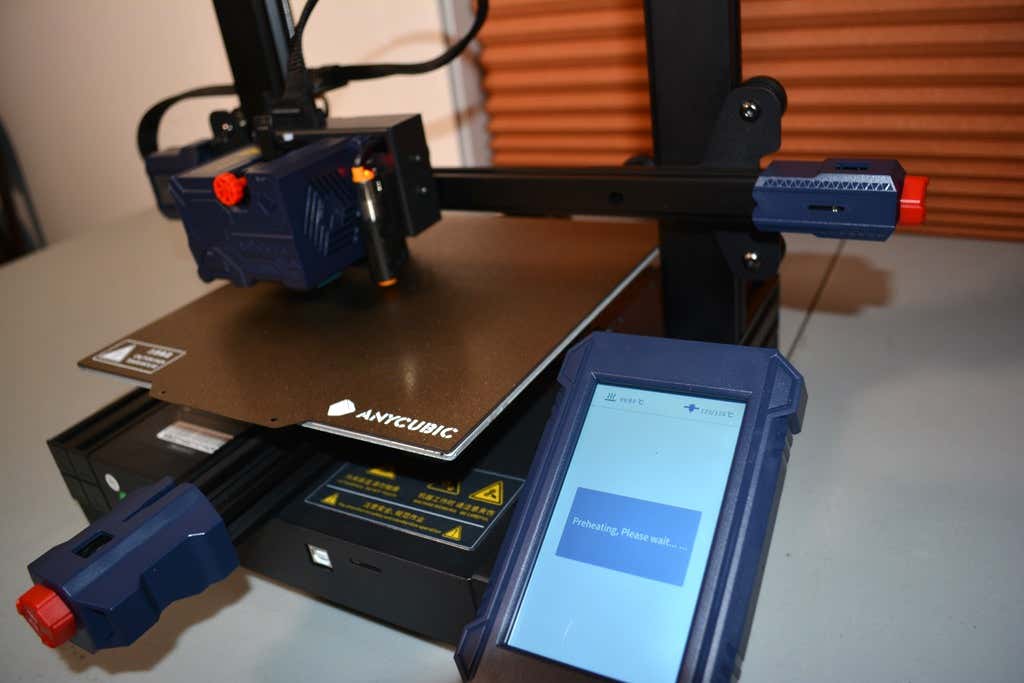
The LCD touchscreen is identical to the screens used on many other Anycubic printers. As usual, it’s responsive and easy to use.
A note about filament types: the Kobra Max will print with PLA, PETG, TPU, and ABS. However, if you really want to print with ABS and get the best possible results, the printer should be inside an enclosure. Given its size, it may be challenging to build a suitable enclosure for the Kobra Max.
Assembling the Kobra Max 3D Printer
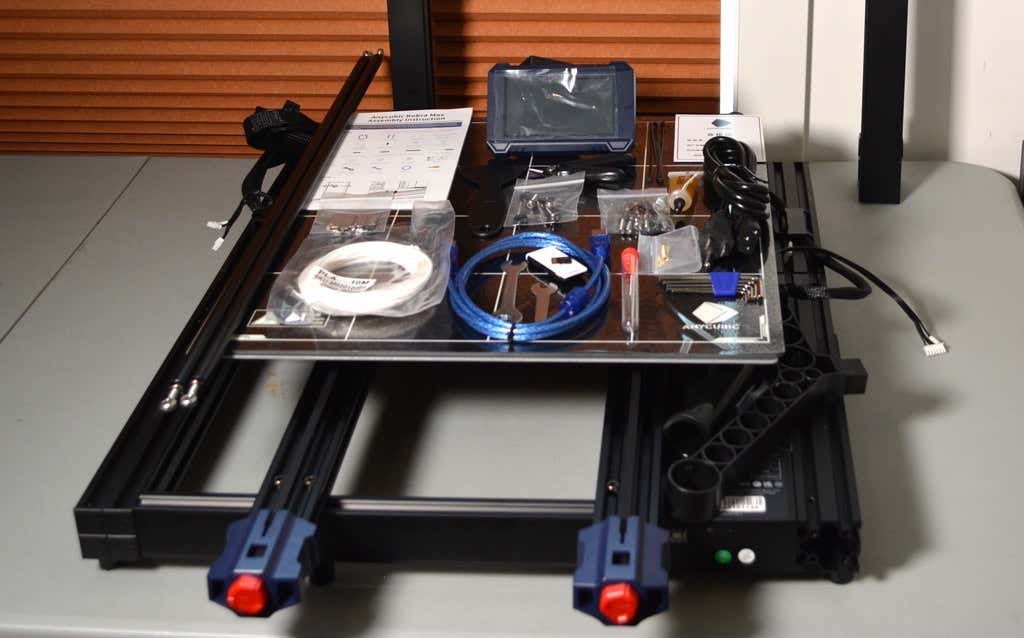
When assembling the new Kobra Max, make sure you have sufficient working space. Since the bed moves forward and backward, you need more space than you’d think. We put it on a 30” folding table, and when it’s printing, it needs about 36 inches, front to back.
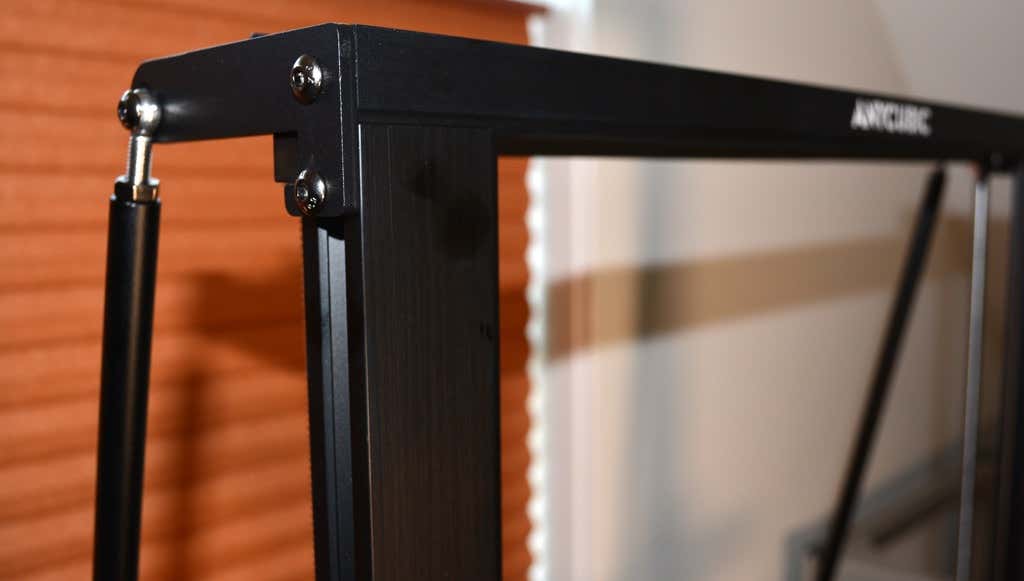
Assembly of the Kobra Max is no more difficult than assembling the Kobra or Vyper. The only additional items are the diagonal braces which add stiffness to the frame, reducing mechanical vibration.
It took two people about 15 minutes to assemble. Double-check that you’ve cut all the zip ties used to stabilize the printer during shipping. There are a lot of them.
Calibration
The auto-bed-leveling system is easy to use. Anycubic recommends that you check the x- and the y-axes to make sure they don’t wobble. If they do, you can adjust the eccentric nuts until the wobbling stops. There was no wobble on our printer, so we didn’t have to do anything.
Additionally, the x- and y-axes have belt tensioners. We needed to slightly tighten the x-axis on ours. The tensioners are easy to use and are features a lot of other printers lack. Who wants to take apart the extruder assembly just to tighten the belts? Not us, and probably not you.
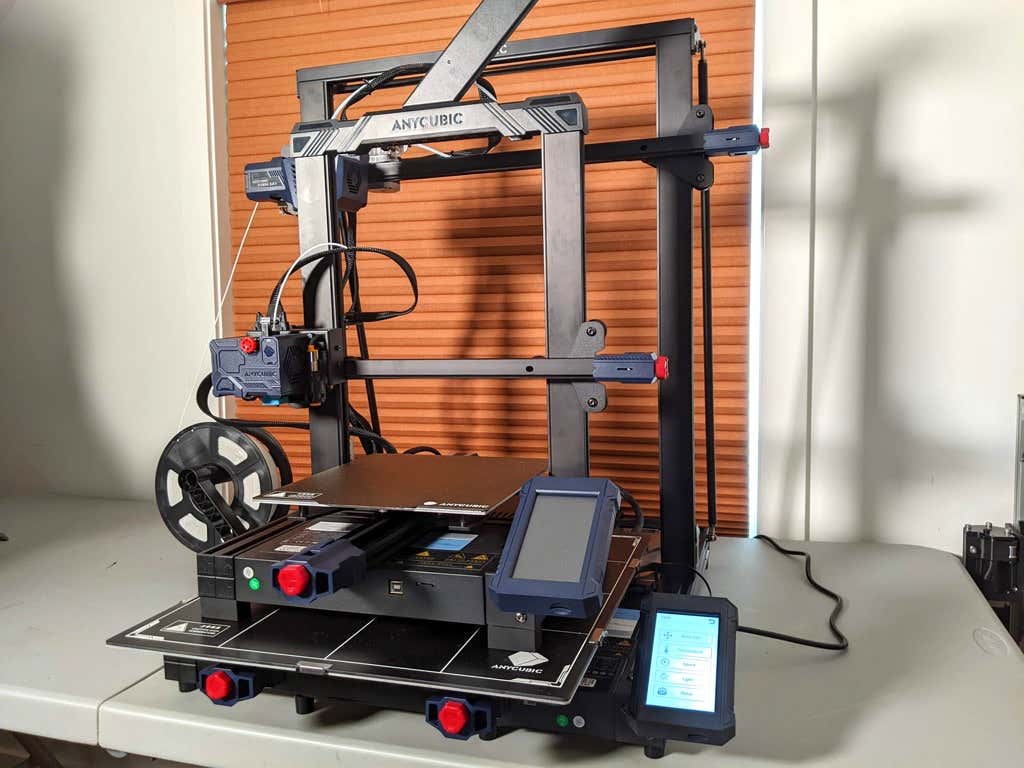
Build Quality of the Kobra Max
Due to the addition of the diagonal braces, the frame is really stiff. The dual z-axis screws are an improvement over the smaller Kobra. They virtually eliminated sagging of the x-axis assembly.
The spool holder sits on the base of the printer, reducing wobbling when printing tall items. It’s better than having the spool on the top like on the Kobra.
This printer is built with aluminum extrusions with aesthetically-pleasing plastic covers for the hotend and the tenionsers. It’s got an optical z endstop. The x and y endstops are mechanical. The whole thing feels solid.
First Print
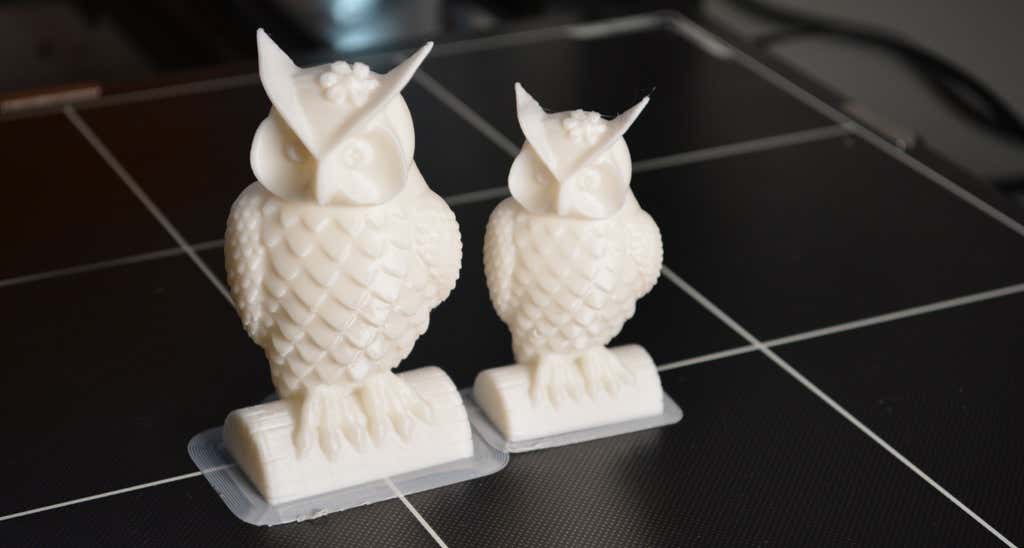
For the first print, we used the test file provided by Anycubic. Appropriately, the owl is about twice the print volume of the owl test print that comes with the smaller Kobra. Given the bowden setup (which makes sense for a printer this size), we were surprised that the ears on the owl turned out so well.
The ears look better than they did on the owl printed on the Kobra which has a direct drive extruder system. We suspect that’s due to the slower print speed. Many times, retractions on bowden extruders will create artifacts, but we didn’t notice any blobs or stringing. It approaches the quality you’d expect from a direct-drive.
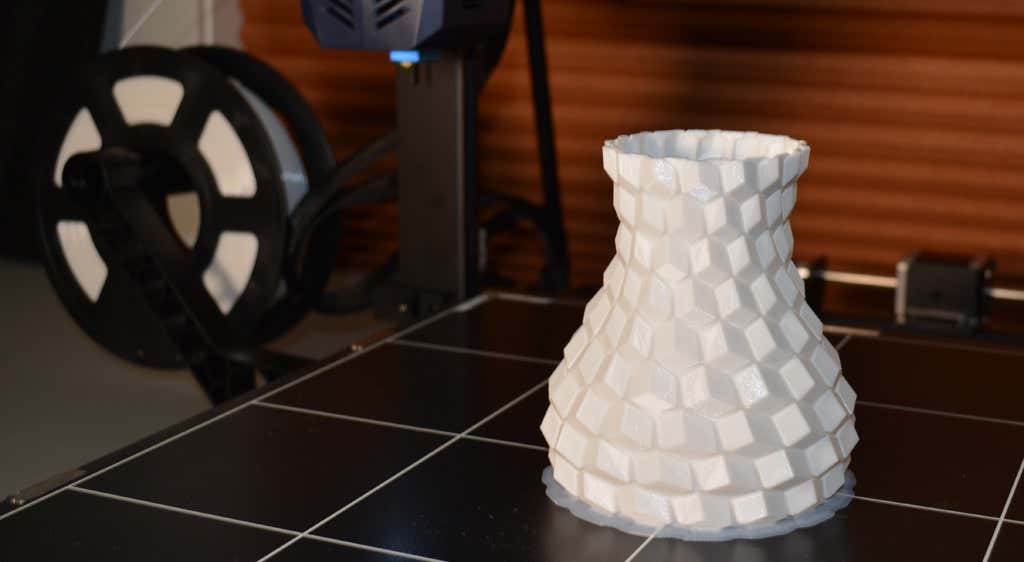
Next, we printed a vase with a large, flat base with a 0.2mm layer height. Removing prints from the glass bed is certainly not as easy as removing prints from smaller, flexible beds, but it’s not a deal-breaker either. We didn’t have any adhesion problems. The prints didn’t release when the glass bed cooled, which is what we expected and hoped for.
Curious what the power requirements would be for a printer this size, we were worried we wouldn’t be able to run multiple printers on the same circuit. We measured the power usage while the Kobra Max was printing, and, as expected, power usage is highest while the printer is warming up. Ours topped out at 473 watts. While printing, it was a more manageable 200-300 watts. We thought it would be more than that. You could probably run three of these printers on a 20 amp circuit.
Cut to the Chase
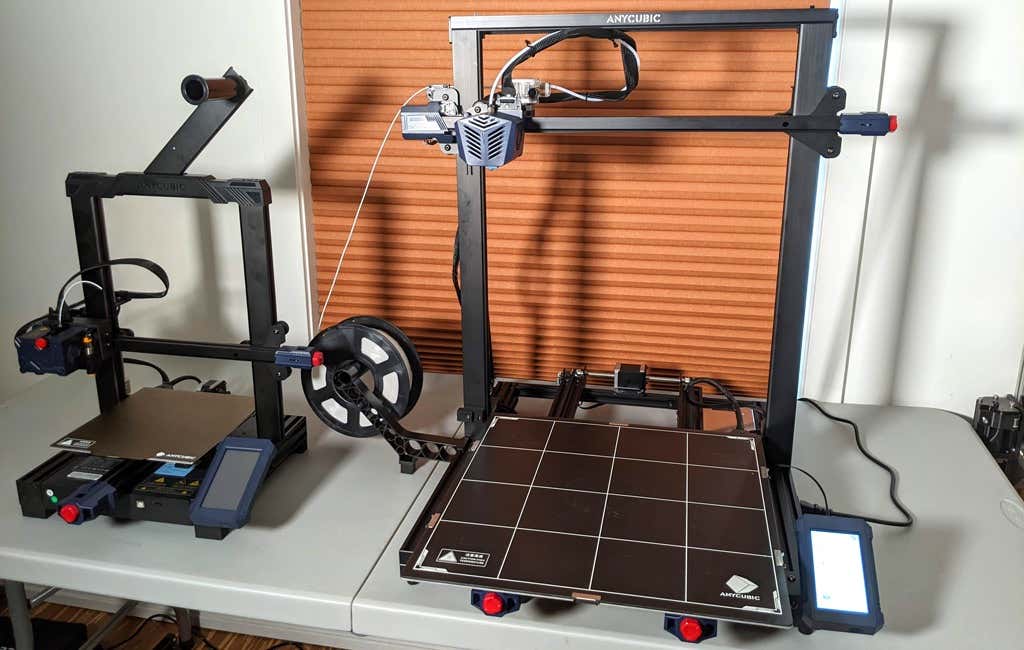
To drive home just how big the Kobra Max is, we put the Kobra on the bed of the Kobra Max. Insane. (We do not recommend you try this.)
A small printer is limiting, so if you find yourself printing large objects in small pieces and assembling them, consider buying a Kobra Max. If you’re new to 3D printing, keep in mind that it takes a long time to print big objects—potentially days and days. Typically, we’d recommend a smaller printer to beginners, but at the price point of $569.00 if you purchase on the Anycubic site, it’s worth considering as an entry-level printer.
One downside is that smaller prints will take a little longer than they would on a smaller, faster printer. That’s just physics. Bigger printers have more inertia to overcome and take longer to move. For example, the print time for our vase was thirteen hours. On our Prusa MK 2.5 with similar settings, it would have taken about twelve hours—not a huge difference.
*Special thanks to FormerLurker for help in reviewing AnyCubic’s Kobra Max 3D printer.
- WhatGeek x 3inuS Kebohub EE01 Mechanical Keyboard Review
- Mobile Pixels Duex Max Portable Monitor Review
- Trifo Lucy: The AI Robot Vacuum and Mop
- The OBSBOT Tiny 4K: an Impressive Webcam for PC & Mac
- Review of Anycubic’s Kobra 3D Printer
Maggie Marystone is a freelance technology writer, human rights worker, and storyteller based in Chicago. Read Maggie’s Full Bio
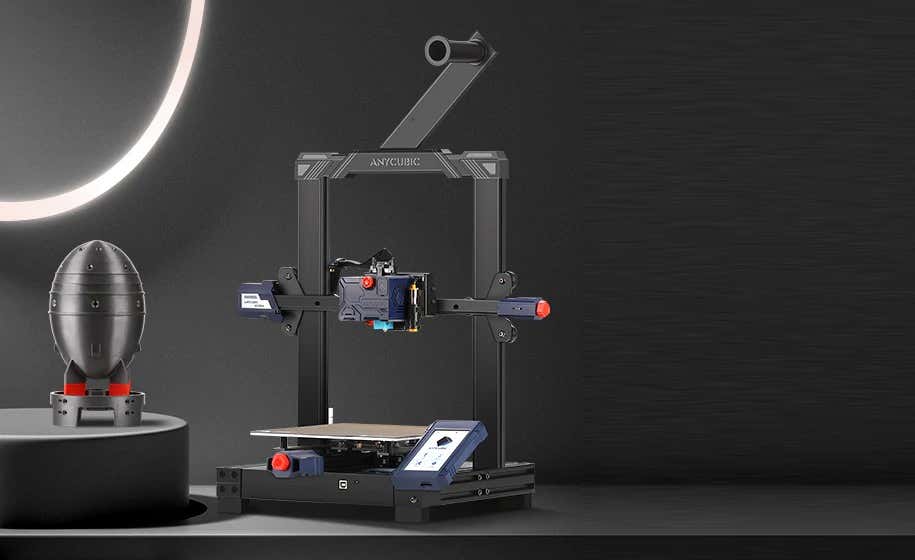
In this 3D printer review, we’ll let you know what you get when you buy an Anycubic Kobra, what it’s like to build it, and our first impressions about its quality and usability.
Features of the Kobra by Anycubic
The Kobra by Anycubic is an FDM 3D printer. FDM stands for fused deposition modeling . The print material for FDM printers is plastic filament. If you’re considering buying your first 3D printer, you could also consider a resin printer like the Anycubic Photon Mono X , the larger Photon Mono X 6K , or the Photon M3.
The Kobra’s features include:
- Build volume of 9.8 x 8.7 x 8.7 in. (250 x 220 x 220 mm)
- Machine dimensions of 19.1 x 19.1 x 16.9 in. (486 x 486 x 430 mm)
- Uses 1.75mm PLA, ABS / PETG & TPU filaments
- Ø 0.4 mm replaceable nozzle
- A heated, textured, removable, and flexible build platform made of PEI spring steel
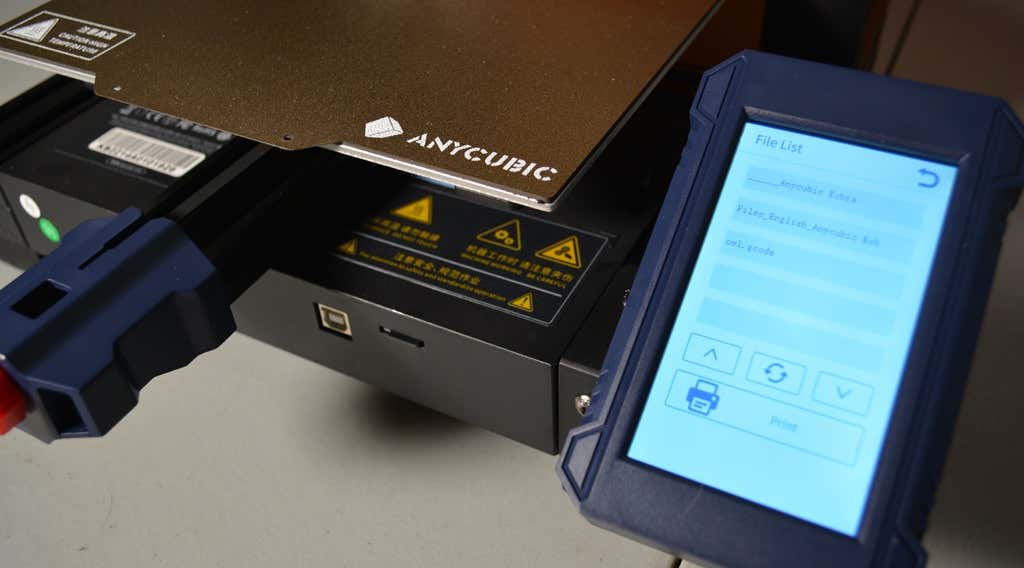
- Ports for USB and microSD card
- 4.3″ color touchscreen LCD
- 25-point auto bed leveling with an inductive sensor using Anycubic’s LeviQ technology
The Kobra has a direct-drive extruder, which is relatively uncommon among printers at this price point. In general, filament printers have either a direct-drive extruder or a bowden extruder. Bowden extruders push the filament into the nozzle from a distance, guided through a teflon tube, whereas direct drive extruders are mounted right above the hot end, greatly reducing the slack inside the tube because it’s so much closer to the nozzle.
The Kobra has an inductive probing sensor for automatic bed leveling. It’s a proximity sensor that can detect nearby metals. It’s not quite as accurate as something like the BL Touch but it’s dramatically cheaper and can give you excellent results. Prusa uses these on printers that are twice as expensive, like the Prusa MK3.
The heated bed has a spring steel sheet that attaches to a magnetic top on the bed, making it incredibly easy to remove your prints. Just remove the spring steel sheet and crack it like an ice tray. In our test print, the print even released itself from the bed as it cooled. Moreover, the bed leaves a nice texture on the underside of the print.
The LCD touchscreen is quite similar to the screens on some of Anycubic’s other printers, like the Anycubic Vyper . It’s intuitive, responsive, and easy to read.
The print volume is quite similar to the Vyper’s, as well, and the print beds are identical. Lastly, the Kobra has optional filament run-out detection. You can turn that feature on or off via the touchscreen panel.
Assembling the Anycubic Kobra 3D Printer
The Kobra comes partially assembled—another reason it’s a good option for beginners to 3D printing. You’ll learn how the printer’s mechanics work as you assemble it, and it won’t take very long since many of the parts are already put together for you.
It took us about fifteen minutes to assemble the Kobra. The instructions were fairly clear, although the photos in the assembly manual could have been larger. There’s not a whole lot to mess up. The cable management is where you want to be the most careful.
The stepper motors are already mounted. They just needed to be plugged in using the provided wiring.
Calibration
Anycubic recommends checking the tension of the belts and ensuring the build plate and x-axis don’t wobble. We didn’t need to make any adjustments to the eccentric nuts which control how tightly the rollers grip on the aluminum extrusions. You don’t want them too tight, and you definitely don’t want them too loose. If you do need to adjust them, it’s fairly simple. You just turn the eccentric nut until the wobbling stops—and no tighter.
If you do need to adjust the belt tension, it’s straightforward. There’s a screw tensioner for each belt. A couple turns of those screws, and you’re done.
After performing the automatic bed-leveling, we calibrated the z offset. To do that, you put a piece of paper under the nozzle and adjust the offset until it ever-so-slightly grips the paper. You’ll need to fine-tune this as the first layer is being printed. We had to raise the z offset 0.1mm. Your results will vary.
Build Quality of the Anycubic Kobra
The only thing we didn’t like about the build quality is that the z-axis only has one lead screw. Despite that, the x-axis seemed pretty stable. We didn’t notice any sagging.
The cooling fan is a bit noisy, but we probably wouldn’t have noticed if the printer weren’t so quiet.
The filament spool is positioned at the top of the printer. We would have preferred it at the bottom since any extra weight at the top of the direct-drive extruder could make the printer shake. On the other hand, there was no evidence of that happening during our prints.
First Print
For our first test print, we used the test file included on the SD card and printed with Anycubic PLA filament. We didn’t try printing with ABS filament because, in our experience, that requires an enclosure to have any hope of getting the quality you expect from PLA.
We had no problems with bed adhesion on our first print. The print partially released when the bed cooled, which was nice.
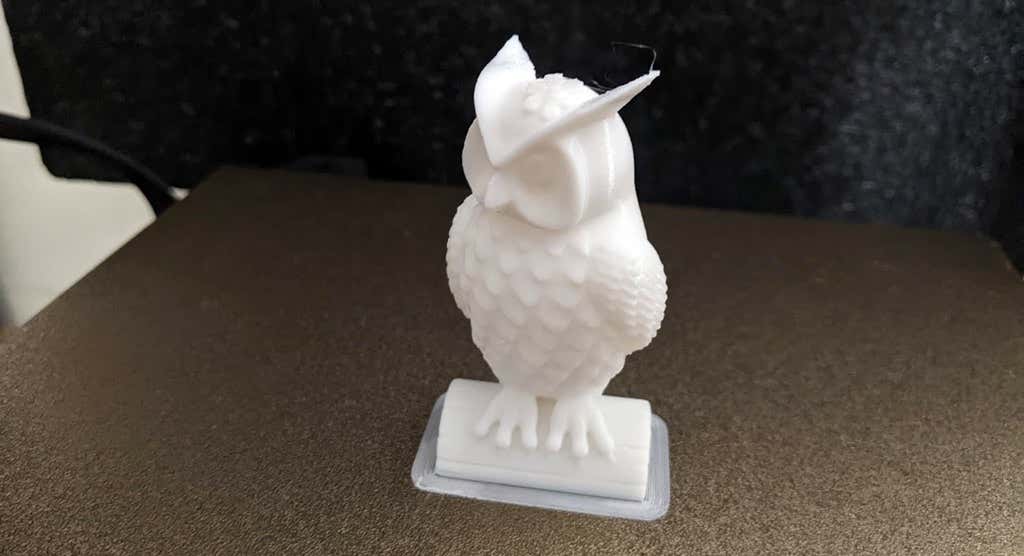
As you can see, we got a good print on our first attempt. There was minimal stringing (really, almost none at all). The only large defect was caused by a piece of plastic we failed to remove from the nozzle. We were particularly impressed by the print quality of the ears at the top of the owl—printers often struggle with thin parts that are at a steep angle and are separated, requiring the nozzle to lift and move.
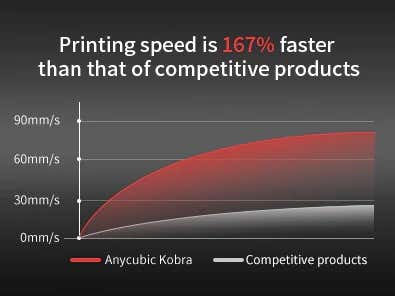
Anycubic says the Kobra’s printing speed is 167% faster than competitors. While the print speed isn’t the fastest we’ve ever seen, we expected that. It’s a trade-off for having a direct-drive extruder instead of a bowden. In our opinion, the responsiveness of a direct-drive extruder is an acceptable tradeoff for the slightly slower print speeds.
Cut to the Chase
Virtually every entry-level 3D printer gets compared to the Ender 3. In this case, the Kobra out-performs the Ender 3 in these areas:
- Less stringing because of the direct-drive extruder
- Comes with a magnetic bed for easy print removal
- No x-axis sagging
- Vastly superior touchscreen
With the Kobra, you’ll get high-quality prints for under $300. If you’re interested in a similar printer with a much larger build volume, keep an eye out for our upcoming review of the Anycubic Kobra Max, a monster FDM 3D printer we simply loved.
*Special thanks to FormerLurker for help in reviewing Anycubic’s Kobra 3D printer.
- WhatGeek x 3inuS Kebohub EE01 Mechanical Keyboard Review
- Mobile Pixels Duex Max Portable Monitor Review
- Trifo Lucy: The AI Robot Vacuum and Mop
- Review of Anycubic Kobra Max 3D Printer
- The OBSBOT Tiny 4K: an Impressive Webcam for PC & Mac
Maggie Marystone is a freelance technology writer, human rights worker, and storyteller based in Chicago. Read Maggie’s Full Bio
